Bluetti EP600 User Manual
Energy storage system
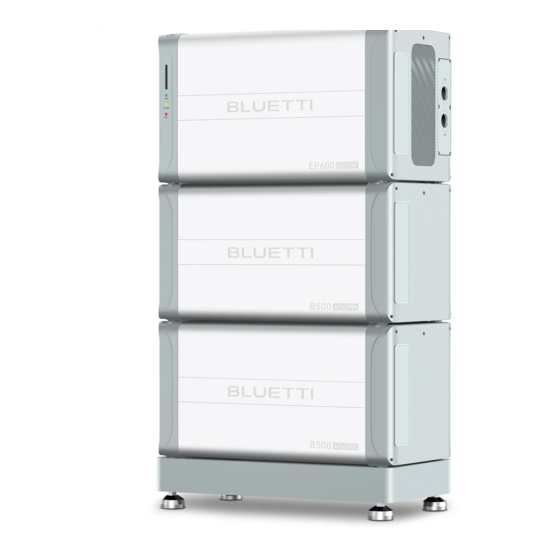
Hide thumbs
Also See for EP600:
- Quick start manual ,
- Installation manual (113 pages) ,
- User manual (88 pages)
Table of Contents
Advertisement
Quick Links
Advertisement
Table of Contents

Related Manuals for Bluetti EP600


Summary of Contents for Bluetti EP600
- Page 1 User Manual EP600 ENERGY STORAGE SYSTEM Shenzhen PowerOak Newener Co.,ltd...
- Page 2 Thank You! Thank you for making BLUETTI a part of your family. From the very beginning, BLUETTI has tried to stay true to a sustainable future through green energy storage solutions for both indoor and outdoor use while delivering an exceptional eco-friendly experience for our homes and our world.
- Page 3 Reader This guidebook is applicable to: Professional technicians who need to install, operate and maintain the EP600 energy storage system. User who learn to use BLUETTI APP for interface operation.
- Page 4 Conventional symbols In order to ensure the personal and property safety of users when using the Energy Storage System and use the Energy Storage System more efficiently and optimally, the manual provides relevant information and highlights it with the following symbols.The symbols that may be used in this manual are listed below.
-
Page 5: Table Of Contents
Precaution of installation Precaution of electrical connection Precaution of transportation Box identification protection Storage instruction EP600 energy storage system instruction Working mode The function and character of EP600 inverter Appearance instruction LED Indicator Buzzer Alarm Routine maintenance B500 Product Information Appearance Description... -
Page 6: Safety Instruction
Please read the guidebook before using the equipment. The technician responsible for installing must hold an electrician certificate, because some components might electric charged or heat up when the EP600 energy storage system running, improper operation,incorrectly install or operate might cause the serious damage of personal safety and property. -
Page 7: Precaution Of Installation
1.2 Precaution of installation Attention Please attention, it's forbidden to power on EP600 energy storage system in the process of installation。 Please measure the voltage of contact point to make sure there's no risk of electric shock before touching any conduct’s surface or metal terminal;... -
Page 8: Precaution Of Electrical Connection
1.3 Precaution of electrical connection The EP600 energy storage system will generate high voltage during operating, which may cause casualties, personal injury or serious damage to property. Please comply with relevant safety regulations during the installation、trial run、... - Page 9 Energy Storage System , such resulting damage will not within the warranty. Attention The EP600 energy storage system can be grid-connected for power generation only with the permission of the electricity power department of the country or region. Precaution of operation...
- Page 10 Precaution of repair and maintenance Danger In the process of operating the Energy Storage System, there exist high voltage which may cause electric shock, result in the casualty or serious damage of personal injury and property. Therefore, the Energy Storage System must be shut down and powered off before operate any maintenance, and the precaution of safety which listed in this guidebook and other relevant documents must be strictly followed when operating the Energy Storage System.
-
Page 11: Precaution Of Transportation
Symbol Symbol name Symbol mean There still exist residual voltage after power off the Energy Storage System, it needs to wait for 30 minutes to Delay discharge label ensure that the discharge is complet- ed, then the maintenance can be operated. -
Page 12: Box Identification Protection
The label shouldn't be covered, please clean up regularly. It should be always visible. 1.6 Storage instruction If the EP600 energy storage system isn’t put into use immediately, the storage shall meet the following requirements: Please power off the Energy Storage System and charge it to 50-70% of capacity before storage;... -
Page 13: Ep600 Energy Storage System Instruction
The system has intelligent power generation and UPS function, and it can be operated and monitored by APP. It is simple operation, economical and practical. The block diagram of EP600 energy storage system shown as below: EP600 Inverter IOT controller... -
Page 14: Working Mode
2.2 Working mode The following are the general working modes of the EP600 energy storage system. According to your configuration and layout condition to select the working mode. Mode 1 PV generate power to the load , the overflow power will charge the battery first, then output to the grid;... - Page 15 Mode 3 When the power grid is cut off , PV and battery will provide power to the load together. Public Grid AC loads Solar panels EP600 Green Energy Public Grid Energy Hybrid Energy BLUETTI APP B500 battery Figure 2-3 Mode 4 Battery can be charged by grid, the charging time and power can be set flexible...
-
Page 16: The Function And Character Of Ep600 Inverter
3.EP600 Inverter instruction Ep600 inverter is a three-phase PV energy storage inverter integrate PV input and grid-connection charging and discharging. It is an important part of EP600 energy storage system. 3.1 The function and character of EP600 inverter PV application: Dual MPPT, which can achieve PV charge and storage energy, and also can generate power with grid-connected system . - Page 17 EP600 Inverter port description Figure 3-2 Left Right Port name Port name Waterproof and PV input 1 ventilate valve COM Communicate PV input 2 Port DC ON/OFF CT Input Port Battery Negative DRMs Port LED Indicator USB Port Signal Port 1...
-
Page 18: Led Indicator
EP600 Inverter port description Figure 3-3(Unit:mm/in) Front Right 3.3 LED Indicator Alarm Fault States Green light Orange light Red light No alarm and Always ON No fault Run Indicator Alarm without Alarm Indicator Flash Always ON fault Fault Indicator No alarm with... -
Page 19: Buzzer Alarm
LLC current overcurrent input 3.5 Routine maintenance EP600 inverter requires regular maintenance, details shown as follow: Check whether dust and other blockages are attached to the air outlet and the heat sink. If the fan is blocked or there is too much dust on the heat sink, clean the fan, fan guard or heat sink. -
Page 20: B500 Product Information
4.B500 Battery Pack Introduction 4.1 B500 Product Information The B500 energy storage battery system is designed for residential and small commercial uses. Single pack rated capacity is 4.96KWh. It support 16 battery packs in parallel to meet capacity up to 80KWH. The B500 battery management system adopts a multi-level architecture, which can detect the voltage, current and temperature of the battery pack in real time during the charging and discharging process. - Page 21 B500 Battery Pack Port Description Figure 4-2 Left Right Port name Port name Waterproof and Negative output breathable valve cable port Upper Signal connection Positive output cable port Upper cable port (bottom) Signal cable port ON/OFF Switch (Bottom) Negative output Ground wire cable port (Bottom) port(Upper)
-
Page 22: Indicator Descriptions
B500 Battery Pack Port Description Figure 4-3(Unit:mm/in) Front Right 4.3 Indicator Descriptions Light Status Meaning Remark The circuit breaker B500 not start can be operated now The circuit breaker B500 is operating can’t be operated now The circuit breaker 0.5Hz Flash B500 is shutting down can’t be operated now If all B500 are flashing, it means that the... -
Page 23: Product Maintenance
4.4 Product Maintenance If you find battery packs connected in parallel, and some of the battery pack indicators are off, please contact the authorized dealer or our company immediately. If you find the B500 battery pack is in a faulty state, please contact the autho- rized dealer or our company immediately. -
Page 24: Ep600 Packing List
5.1 EP600 Packing List Picture Description Quantity EP600 inverter Bracket No.1 Bracket No.2 M5 Hex Nut PV decorative cover AC decorative cover(With label) Soft rubber stopper through the cable AC cable protection box 1.PV+ Input terminal plastic case 2.PV+ Input terminal metal core... - Page 25 MC4 assemble and disassemble tool BAT- Input terminal plastic cover(Black) BAT+ Input terminal plastic cover(Red) M4*12 screw (8 fix BAT+/- terminal cover、 6 AC junction Box) M8*12 screw (Connect battery power cable) M6*12 screw(Fix bracket-wall screw) M5*10 screw (4 fixed bracket-machine, 2 PV ground) M4*10 screw (Fix the decorative covers on both sides) M8*60 Expansion bolt(Wall screw)
- Page 26 Battery power cable - IOT Controller Expandable rubber stopper M3 tapping screws(KA3*25) IOT Controller mounting bracket DRMs port connection cable CT port connection cable M20-6PIN adapter DRMs/CT adapter cable(1.5m) PG waterproof connector JUST POWER ON...
-
Page 27: B500 Packing List
5.2 B500 Packing List Picture Description Quantity B500 Battery Module Bracket 1 Bracket 2 M5 Hex Nut Left decorative cover Right decorative cover M4*8 screw M5*10 screw Battery positive expansion cable(Orange) JUST POWER ON... -
Page 28: Base List
Battery negative expansion cable(Black) Communication cable Ground cable M8*60 Expansion bolt(Wall screw) M6*12 Ground cable screw Spare screws 5.3 Base List Picture Description Quantity Base JUST POWER ON... -
Page 29: About Installation
5.4 About installation 5.4.1 Installation Environment Requirements Choose a dry, tidy place for easy installation The protection level of the inverter and battery pack is IP65, and can be installed both indoors and outdoors.(If it is installed outdoors, additional protective measures are necessary to avoid direct sunlight) If the system is installed in direct sunlight, the performance of the system may be degraded as the temperature rises. - Page 30 fixed on the wall through brackets. The system is installed perpendicular to the horizontal floor. Picture 5-1 5.4.4 Space requirements for single system installation The following diagram shows the EP600 system installed in a single group. Wall Base Ground Figure 5-2 Ground,Base, Wall...
- Page 31 5.4.5 Space requirements for multiple systems are installed side by side When multiple systems are installed side by side, keep at least 1000mm distance between them to reduce the impact of heat dissipation. Ground Table 5-3 ground 5.4.6 Size of base bracket installation Figure 5-4 5.4.7 Installation location requirements...
-
Page 32: Installation Tools
Danger Before drilling, please make sure to avoid the pre-buried water and electricity lines in the wall to avoid danger. Project installation location Size of drilling the wall mounting holes (unit: mm): 5 layers 3 layers 4 layers Ground Ground Ground Figure 5-5 Remarks: For system installation, a maximum of 5 layers of Energy Storage System... - Page 33 Tools Picture Description Function Electric drill machine Wall drilling requires 8mm drill Torque socket Remove and install screws wrench Torque wrench Remove and install screws Flat screwdriver Remove, install screws and cable 4mm cross Remove and install screwdriver4mm AC terminal screws Removal tool Remove PV Terminals Cable cutters...
- Page 34 Marker pen Punch mark Measurement tape Measuring distance Make sure the base Level ruler and backplane are level Cutting knife Thermal casing Tighten and insulate the cable shrink tube Heat gun Tighten the heat shrink tube Cable tie Organize cables Wear it when carrying Anti-static gloves and installing the machine...
-
Page 35: Installation Steps
M8 and M5 nuts. Step 5 : Repeat Step3 and 4 , and fix the subsequent battery packs in turn. Step 6 : Repeat Step3 and 4 to install the EP600 inverter on the top of the battery pack. - Page 36 Base Ground Figure 5-7 6.Electrical connection of EP600 energy storage system Before installation and maintenance , make sure neither the AC side nor the DC side is electrified. For a period of time after the inverter is electrified and discon- nected , the capacitor is still electrified , so it is necessary to wait treat 30 minutes...
-
Page 37: The Whole Units Connection
(such as inverters and battery systems ). Instruction The open circuit voltage of the PV modules connected to the EP600 cannot be more than 550V . The connected PV modules must have an IEC61730 class rating. Table 6-1 Current parameters IscPV... - Page 38 JUST POWER ON...
-
Page 39: B500 External Ports Description
communication box Figure 6-1 6.2 B500 External ports description Connect port name Connect port function Remark Inverter signal Used to connect the inverter, only the connect port (PCS Link ) top battery pack needs to connect inverter. When the battery is installed in a stack, it is used to Battery pack connect the battery pack signal of the previous battery signal input port... - Page 40 Figure 6-1 JUST POWER ON...
-
Page 41: Wiring Description Of Ep600 External Port
6.3 Wiring description of EP600 external port Figure 6-3 Cable instruction Port Cable type Cable specification Define Standard BAT+:Wire the accessories battery positive Standard BAT-:Wire the accessories battery negative PV1+:To solar panel positive Outdoor PV1-:To solar panel multi-core copper negative core cable PV1 PE:PV1 to solar... -
Page 42: Connection Ground Protection(Pe
The PV positive pole and negative pole of the inverter cannot be grounded, otherwise the inverter will fail. In EP600 energy storage system, all non-current carrying metal parts (such as bracket, distribution box, inverter shell, battery pack shell, etc.) should connect to the ground. -
Page 43: Connect Pv Cable
6.5 Connect PV cable Attention Before removing the PV input positive and negative connectors, make sure the DC switch on the EP600 inverter has been set to "OFF". Step 1 : Select the appropriate cable type and specification according to figure 6-3;... - Page 44 Step 2 : Insert the wire core with the insulation layer stripped into the conductor crimping area of OT terminal, and press it with crimping pliers(Figure 6-5-2). Step 3 : Connect the cable with crimped terminals according to the electrical polarity of the load symbols marked on the junction box, and fasten with a screwdriver(6-5-3).
- Page 45 Figure 6-4-3 Figure 6-4-4 Figure 6-4-5 Figure 6-4-6 Remove the PV terminal Figure 6-4-7 JUST POWER ON...
-
Page 46: Connect The Grid And Load Cable
6.6 Connect the grid and load cable Step 1 : Select the appropriate cable type and specification according to figure 6-3; Strip the cable, For the stripping length, refer to figure 6-5-1. Step 2 : Insert the wire core with the insulation layer stripped into the conductor crimping area of OT terminal, and press it with crimping pliers(Figure 6-5-2). - Page 47 Figure 6-5-3 Figure 6-5-4 Screws Max 1.2 N.m 1 . Protective cover of AC junction box 1 . AC cable 2. M32 PG waterproof joint 2. Protective cover of AC junction box3、M4×12 screws Figure 6-5-5 Figure 6-5-6 JUST POWER ON...
-
Page 48: Connecting The Positive And Negative Poles Of The Battery
Tighten the two PG waterproof joints, and the torque is recommended to be 3N.M Figure 6-5 Load cable connection 6.7 Connecting the positive and negative poles of the battery Step 1 : Remove the positive and negative protective cover of the inverter battery with a screwdriver(Figure 6-6-1/6-6-2);... - Page 49 1 . Battery negative terminal 1 . Battery positive terminal box protective cover box protective cover 2. M4×12 screws 2. M4×12 screws Figure 6-6-1 Figure 6-6-2 1 . Battery negative terminal box(black BAT-) 2. Battery negative terminal box(black BAT-) 3. M8×12 screws 4.
-
Page 50: Other Interfaces
1 . Battery positive terminal box(red BAT+) 2. Battery positive terminal box(red BAT+) 3. M8×12 screws 4. Battery positive terminal box protective cover(red BAT+) 5. M4×12 screws Figure 6-6-4 Figure 6-6 Battery positive and negative connection 6.8 Other interfaces 6.8.1 USB communication interface Figure 6-7 USB JUST POWER ON... - Page 51 U disk access (USB flash For EP600 inverter U disk interface disk must be in FAT32 format, firmware upgrade and the maximum memory is 32G) Table 6-4 Interface Description Warning Must be performed by an electrician with a professional technician certificate.
- Page 52 Operation steps. Step 1 : Remove the unconnected end of the DRMs connector adapter counter- clockwise. Step 2 : Thread the extension cable into the connector shell and install the corresponding signal cable into the connector pins. Step 3 : Tighten the screws of the connector with a screwdriver. Step 4 : Gently pull the connection cable of 6 pins to determine whether the connection is tight;...
- Page 53 6.8.3 Link Port 1 & 2 Interface Link Port 1、2 Table 6-6 Interface Interface function Remark Link Port 1 Connect the IOT controller For details, please refer to 6.1 complete machine connection Link Port 2 Connect the battery pack 6.8.4 COM-Electricity Meter Communication Interface For electricity meter communication: Table 6-7 Interface Description 485 electricity meter...
- Page 54 Signal extension cable Lock the screws Waterproof joint shell Figure 6-9 COM interface 6.8.5 CT-current transformer interface Table 6-8 Define Function Remark Negative pole of current CT-R-(Black) transformer Output For Connecting to current transformer of grid R phase Positive pole of current CT-R+(Red) transformer Output JUST POWER ON...
- Page 55 Negative pole of current CT-S-(Black) transformer Output For Connecting to current transformer of grid S phase Positive pole of current CT-S+(Red) transformer Output Negative pole of current CT-T-(Black) transformer Output For Connecting to current transformer of grid T phase Positive pole of current CT-T+(Red) transformer Output Operation steps.
- Page 56 Pay attention to the direction, the direction of the arrow towards the grid. GRID-L1 GRID-L2 GRID-L3 Figure 6-10 CT Interface There are two methods to obtain grid-connected current information and prevent backflow when needed: Method A Figure 6-11 Method B Electricity Meter + CT Figure 6-12 JUST POWER ON...
- Page 57 Description The system with each phase current less than 100A can directly connect to CT or electricity meter; if the current exceeds 100A, only the meter can be used. Instruction The power, statistical power and other inforiiation displayed by Al’? is only a regular reflection of the syste, operation status, and this part of inforiation should not be used as the basis for billing or judging the perfor.ance of this product.
-
Page 58: B500 Power On And Power Off
6.9 B500 power on and power off After installation: Check whether the power and communication cable are connected reliably; Check whether the battery pack and inverter are secure and stable; Move tools and parts away from the Energy Storage System; Push the circuit breaker handle of all battery packs up to the ON position Then press and hold the power button of any battery pack for 3 seconds until the green indicator on the button lights up (or turn on the PV switch of the... -
Page 59: Communication Methods
WiFi network.Users can use the APP to view and control the device according to their needs, which requires registering an account and binding the device by scanning the QR code of EP600. The IOT controller contain the following communication methods:... - Page 60 6.10.2 IoT Controller Installation Danger Avoid cables and pipes before drilling into the wall a. Drill 2 pilot holes in the wall. Please refer to the drill position and hole size shown in fig. 6-14-1 and fig. 6-14-2. The depth of hole is 26mm. b.
- Page 61 Fig. 6-14-6 Fig. 6-14 6.10.3 Safety Instructions The IoT controller is ONLY applicable to BLUETTI products only. Do not keep the controller near heat sources or in high temperatures. Do not store the controller with flammable liquids, gases, or explosive materials.
- Page 62 6.10.4 Connection and Operations Fig. 6.15 a. Plug the communication cable into EP600 Signal Port 1. b. Turn on EP600, and the IoT controller starts up automatically. c. Configure the controller in BLUETTI app. Please refer to BLUETTI App Instructions for details.
-
Page 63: Firmware Upgrade
USB drive, or EP600 will report a USB Format Error. g. Pair EP600 with BLUETTI app, then you can check the firmware version on the phone. If any of the following occurs, please try the solutions provided. If the symptom persists(for 5 times), contact the BLUETTI support team, and we’ll get... -
Page 64: Preliminary Check
Switch on the AC circuit breakers on EP600 grid port. d. Switch on the AC circuit breakers on EP600 load port. e. When EP600 detects that the grid meets the requirements for grid connection under good light conditions, it starts to operate automatically. -
Page 65: Introduction
Turn off the AC power on BLUETTI App. b. Switch off the AC circuit breakers on EP600 grid port and load port. c. Switch off EP600 PV switch. d. Press the power button on any B500 till the indicator on the button flashes green. -
Page 66: Connection
8.3 Connection EP600 inverter system connects to BLUETTI app via Bluetooth or WiFi. Bluetooth Connection Bluetooth BLUETTI APP loT Controller EP600 System Fig. 8.1 Bluetooth Connection WiFi Connection WiFi BLUETTI APP BLUETTI Server Router loT Controller EP600 System Fig. 8.2 WiFi Connection Note: Supported operating systems: Android 6.0 or above, iOS 11.0 or above. -
Page 67: Remove The Inverter
Error Code Error Description Solution Turn off the inverter and wait 30 minutes PV input 1 to restart up it. If the symptom persists, please contact the BLUETTI support team. BUS Undervoltage Hardware BUS Overvoltage Hardware Battery Overvoltage Hardware Inverter... - Page 68 Input Overcurrent Turn off the inverter and wait 30 minutes Auxiliary Power to restart up it. If the symptom persists, Undervoltage please contact the BLUETTI support team. DC Component Exception Relay Failure PV Connection Error PV1 Overcurrent Turn off the inverter and wait 30 minutes PV2 Overcurrent to restart up it.
- Page 69 DC Input Overcurrent Turn off the inverter and wait 30 minutes LLC Output Overvoltage to restart up it. If the symptom persists, please contact the BLUETTI support team. Inverter Overload Check if the inverter is overloaded. Inverter Output Failure Over Temperature Protection...
- Page 70 Temperature 2 Anomaly BLUETTI support team. Temperature 3 Anomaly Temperature 4 Anomaly BMS Charge Protection BMS Discharge Protection Check the details on BLUETTI app. BMS System Failure 63-64 PV Voltage Too High LLC Output Voltage Low 67-96 Grid Voltage High If it occurs occasionally, the grid may go through abnormal working conditions.
- Page 71 DSP_Debug RS485 Communication Failure 109-128 Please reconfigure the settings on EEPROM Read and BLUETTI app. If the symptom persists, Write Anomaly please contact the BLUETTI support team. Grid Voltage High-ARM If it occurs many times, check if the grid voltage and frequency support the inverter Grid Voltage Low-ARM input specifications.
-
Page 72: Ep600
11.Specifications EP600 AC Grid-tied Item Rating Note Rated Output Power 6000W Output Apparent Power 6000VA Wiring connection L1/L2/L3/N/PE Rated Voltage 230V/400V Voltage Range 185V-285VAC×3 Rated Output Current 8.7A×3 Maximum Output Current 9.1A×3 Input Frequency 50Hz Frequency Range 47.5Hz-51.5Hz Maximum Input...
Need help?
Do you have a question about the EP600 and is the answer not in the manual?
Questions and answers