Cisco 7800 Series User Manual
Hide thumbs
Also See for 7800 Series:
- Quick start manual ,
- Administration manual (198 pages) ,
- Accessories manual (98 pages)
Table of Contents
Advertisement
Quick Links
Advertisement
Table of Contents

Related Manuals for Cisco 7800 Series


Summary of Contents for Cisco 7800 Series
- Page 1 Cisco IP Phone 7800 Series Multiplatform Phones User Guide First Published: 2016-01-29 Last Modified: 2023-01-18 Americas Headquarters Cisco Systems, Inc. 170 West Tasman Drive San Jose, CA 95134-1706 http://www.cisco.com Tel: 408 526-4000 800 553-NETS (6387) Fax: 408 527-0883...
- Page 2 Cisco and the Cisco logo are trademarks or registered trademarks of Cisco and/or its affiliates in the U.S. and other countries. To view a list of Cisco trademarks, go to this URL: https://www.cisco.com/c/en/us/about/legal/trademarks.html.
-
Page 3: Table Of Contents
Onboard Your Phone with Activation Code Auto Provision Your Phone with Short Activation Code Set a Password on Initial Phone Boot Up User Authentication Control Sign into Your Extension from Another Phone (Extension Mobility) Cisco IP Phone 7800 Series Multiplatform Phones User Guide... - Page 4 View the Network Status View the Phone Status View the Status Messages on the Phone View the Line Status View Call Records in Call Statistics View 802.1X Transaction Status View the Reboot History Cisco IP Phone 7800 Series Multiplatform Phones User Guide...
- Page 5 Silence an Incoming Call Turn On Do Not Disturb Turn On or Turn Off DND Using a Star Code Answer a Coworker's Phone (Call Pickup) Answer a Call Within Your Group (Pickup) Cisco IP Phone 7800 Series Multiplatform Phones User Guide...
- Page 6 Shared Lines on Your Multiplatform Desk Phone Add yourself to a call on a shared line Call Center Features Sign In as a Call Center Agent Sign Out as a Call Center Agent Cisco IP Phone 7800 Series Multiplatform Phones User Guide...
- Page 7 Edit Credentials of Your LDAP Directory Search for a Contact in Your LDAP Directory Call a Contact in Your LDAP Directory Edit a Contact Number in Your LDAP Directory XML Directory Cisco IP Phone 7800 Series Multiplatform Phones User Guide...
- Page 8 Phone Settings Overview Change the Ringtone Assign a Ring Tone with the Phone Web Page Control Ringer Volume Forward Calls from Your Phone Turn on Do Not Disturb for a Specific Line Cisco IP Phone 7800 Series Multiplatform Phones User Guide viii...
- Page 9 Set Password from Phone Web Page Set up the Profile Account Add Multiple Locations for a BroadWorks XSI User Enable Anonymous Call Blocking from the Phone Web Page Enable Call Waiting from the Phone Web Page Cisco IP Phone 7800 Series Multiplatform Phones User Guide...
- Page 10 Compliance Information for Japan FCC Compliance Statements FCC Part 15.19 Statement FCC Part 15.21 Statement FCC RF Radiation Exposure Statement FCC Receivers and Class B Digital Statement Cisco Product Security Overview Important Online Information Cisco IP Phone 7800 Series Multiplatform Phones User Guide...
-
Page 11: Your Phone
Energy Savings, on page 26 • Additional Help and Information, on page 26 The Cisco IP Phone 7800 Series The Cisco IP Phones 7811, 7821, 7841, and 7861 deliver easy-to-use, highly-secure voice communications. Table 1: Cisco IP Phone 7800 Series Major Features Features 7811... -
Page 12: Feature Support
Spam Indication for Webex Calls, on page 82 calls Updated the topic for Webex calls View your Recent Calls, on page 79 Updated the topic to add Phone Web Page, on page 19 VPN connection Cisco IP Phone 7800 Series Multiplatform Phones User Guide... - Page 13 Edit the Webex Directory Name , on page 64 Updated topic for Webex call log support View your Recent Calls, on page 79 View Calls Logs from Server , on page 82 Cisco IP Phone 7800 Series Multiplatform Phones User Guide...
-
Page 14: New And Changed For Firmware Release 11.3(6)
Code, on page 12 Onboard Your Phone with Activation Code, on page Updated the task topic on non-availability of Save Create a Contact from a Recents Record, on page 84 softkey Cisco IP Phone 7800 Series Multiplatform Phones User Guide... -
Page 15: New And Changed For Firmware Release 11.3(5)
Added the topic to enable call waiting on the phone Enable Call Waiting, on page 99 Added the topic to enable call waiting from the phone Enable Call Waiting from the Phone Web Page, on web page page 114 Cisco IP Phone 7800 Series Multiplatform Phones User Guide... -
Page 16: New And Changed For Firmware Release 11.3(2)
Call a Contact in Your Personal Address Book, on page 61 Edit a Contact in Your Personal Address Book, on page 61 Remove a Contact from Your Personal Address Book, on page 62 Cisco IP Phone 7800 Series Multiplatform Phones User Guide... - Page 17 Updated the topic title Your Personal Voicemail Account, on page 87 Check Your Personal New Voice Messages, on page Access Your Personal Voicemail, on page 88 Access Your Personal Audio Voicemail, on page 88 Cisco IP Phone 7800 Series Multiplatform Phones User Guide...
-
Page 18: New And Changed Features For Firmware Release
New or Changed Sections Added new task to support Activation Code Onboard Your Phone with Activation Code, on page Onboarding. Added new topic to support Phone Keypad Characters. Phone Keypad Characters, on page 23 Cisco IP Phone 7800 Series Multiplatform Phones User Guide... -
Page 19: New And Changed For Firmware Release 11.2(3)
Updated the topic to support XSI caller ID blocking Block Caller ID , on page 98 Added a new topic to support username and password Set up the Profile Account, on page 112 collection on HTTP authentication challenge Cisco IP Phone 7800 Series Multiplatform Phones User Guide... -
Page 20: New And Changed For Firmware Release 11.1(2)
View your Recent Calls, on page 79 Phone Setup Your administrator sets up your phone and connects it to the network. If your phone is not set up and connected, contact your administrator for instructions. Cisco IP Phone 7800 Series Multiplatform Phones User Guide... -
Page 21: Adjust The Handset Rest
Step 5 Return the handset to the handset rest. Change the Viewing Angle of Your Phone You can change the angle of the phone, except the Cisco IP Phone 7811, to eliminate glare on the screen. Procedure Step 1 Unplug the phone from the network. -
Page 22: Connect To The Network
Before you begin Your administrator provides your activation code: Procedure Step 1 Press pound (#), and enter your activation code in the field that is provided on the Welcome screen. Cisco IP Phone 7800 Series Multiplatform Phones User Guide... -
Page 23: Set A Password On Initial Phone Boot Up
After you sign in, the phone adopts your personal directory number. Before you begin Your administrator configures provisioning authority. Procedure Step 1 Press Sign in. Step 2 Enter your username and password, then press Sign in. Cisco IP Phone 7800 Series Multiplatform Phones User Guide... -
Page 24: Sign Out Of Your Extension From Another Phone
The location is sent to the emergency services when you make an emergency call. Sign Out of a Phone as a Guest Procedure Step 1 Press Guest Out. Cisco IP Phone 7800 Series Multiplatform Phones User Guide... -
Page 25: Set The Profile Rule On The Phone
The phone assigns available line keys for monitoring, automatically. With the appropriate configuration, you can use the BLF keys to call the monitored line (speed dial), and to answer incoming calls to the monitored line (call pickup). Cisco IP Phone 7800 Series Multiplatform Phones User Guide... -
Page 26: Activate Or Deactivate Monitoring Of The Blf List
See Remove the Feature Configured on a Line Key, on page 18 for details. Before you begin Your administrator configures the BLF list. Procedure Step 1 Press Applications Cisco IP Phone 7800 Series Multiplatform Phones User Guide... -
Page 27: Configure Monitoring Of An Individual Line
• If you want to use the key for all the three functions, select BLF + Speed dial + Call pickup. Step 3 Enter the user ID of the person whose line you want to monitor, in the User ID field. Cisco IP Phone 7800 Series Multiplatform Phones User Guide... -
Page 28: Remove The Feature Configured On A Line Key
After you configure a line key with a menu shortcut, you can open the menu with a simple press on the line key. Before you begin Your administrator must enable this feature on your phone. Cisco IP Phone 7800 Series Multiplatform Phones User Guide... -
Page 29: Remove The Menu Shortcut From A Line Key
You specify the number that will receive calls when call forward is enabled on the phone. Use the phone web page to set up more complicated call forward functions, for example, when your line is busy. Cisco IP Phone 7800 Series Multiplatform Phones User Guide... -
Page 30: Speed-Dial Numbers
Your phone does not save the authorization code, billing code, or extra digits from the speed dial in the call history. If you press Redial after you connect to a speed-dial destination, the phone prompts you to enter any required authorization code, billing code, or additional digits manually. Cisco IP Phone 7800 Series Multiplatform Phones User Guide... -
Page 31: Buttons And Hardware
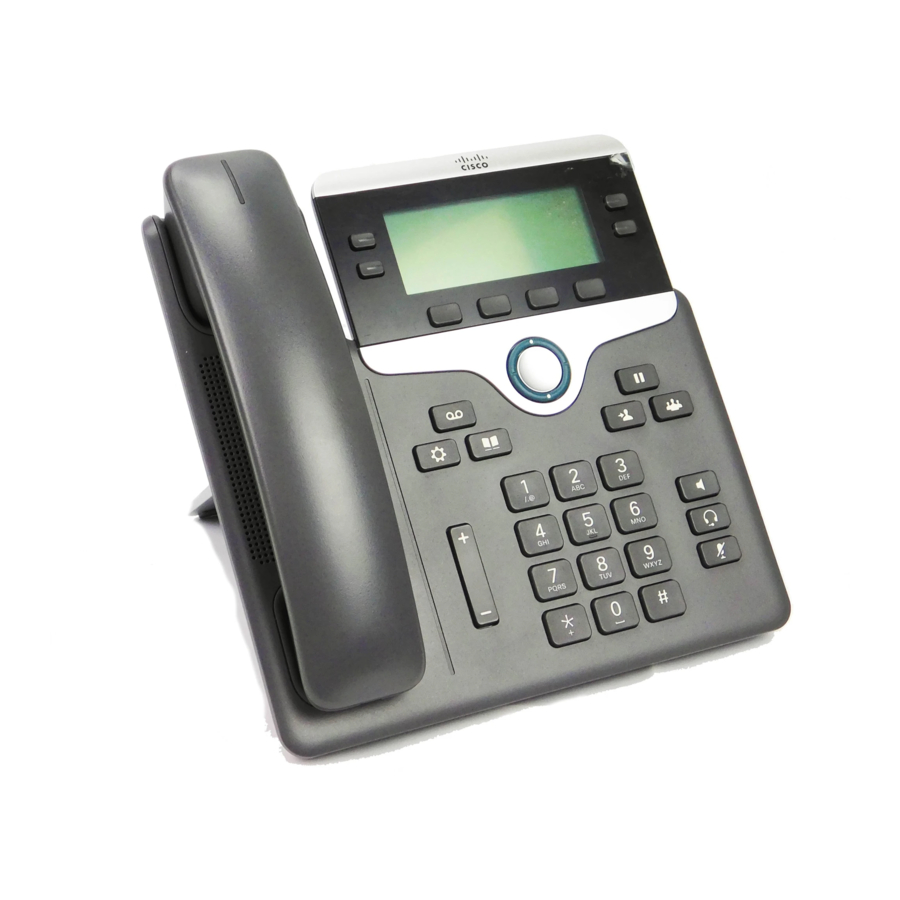
• Cisco IP Phone 7811 No buttons on either side of the screen • Cisco IP Phone 7821 Two buttons on the left side of the screen • Cisco IP Phone 7841 Two buttons on either side of the screen •... - Page 32 Your Phone Buttons and Hardware Figure 2: Cisco IP Phone 7800 Series Buttons and Features Handset and Handset light strip Indicates whether you have an incoming call (flashing red) or a new voice message (steady red). Programmable feature buttons and line Access your phone lines, features, and call sessions.
-
Page 33: Phone Keypad Characters
\ ( ) { } [ ] Navigation Use the outer ring of the Navigation cluster to scroll through menus and between lines. Use the inner Select button of the Navigation cluster to select items. Cisco IP Phone 7800 Series Multiplatform Phones User Guide... -
Page 34: Softkey, Line, And Feature Buttons
The phone screen shows information about your phone such as directory number, active call and line status, softkeys, speed dials, placed calls, and phone menu listings. The screen is made up of three sections: the header row, the middle section, and the footer row. Cisco IP Phone 7800 Series Multiplatform Phones User Guide... -
Page 35: Clean The Phone Screen
There will be no highlight for an active call. Active and incoming call screen supports more than 21 characters. The Cisco IP Phone can display 15 digits on the phone screen when line is inactive. -
Page 36: Power Requirements
• For licensing information, follow this link: https://www.cisco.com/c/en/us/support/collaboration-endpoints/ ip-phone-7800-series-multiplatform-firmware/products-licensing-information-listing.html Accessibility Features Cisco IP Phones provide accessibility features for the vision impaired, the blind, and the hearing and mobility impaired. For detailed information about the accessibility features on these phones, see http://www.cisco.com/c/en/us/ support/collaboration-endpoints/unified-ip-phone-7800-series/products-technical-reference-list.html. -
Page 37: Troubleshooting
Hardware version—Version number of the Cisco IP Phone hardware. VID—Version ID of the Cisco IP Phone. Certificate—Status of the client certificate, which authenticates the Cisco IP Phone for use in the ITSP network. This field indicates if the client certificate is properly installed in the phone. -
Page 38: View The Customization State On The Phone
• IPv4 status—IP address of the phone. You can see information on IP address, Addressing type, IP status, Subnet mask, Default router, Domain Name Server (DNS) 1, DNS 2 of the phone. Cisco IP Phone 7800 Series Multiplatform Phones User Guide... -
Page 39: View The Phone Status
• MAC address—Unique Media Access Control (MAC) address of the phone. • Host name—Displays the current host name assigned to the phone. • Domain—Displays the network domain name of the phone. Default: cisco.com • Switch port link—Status of the switch port. -
Page 40: View The Line Status
• Call time—The time a call was made or answered. • Call ID—An identifier of the caller. The call statistics may contain additional information such as counter, statistics, and voice-quality metrics. Use this information for troubleshooting. Cisco IP Phone 7800 Series Multiplatform Phones User Guide... -
Page 41: View 802.1X Transaction Status
You can use the Problem Reporting Tool (PRT) to collect and send phone logs, and to report problems to your administrator. Before you begin Your administrator enables web server for the phone. Procedure Step 1 Press Applications Cisco IP Phone 7800 Series Multiplatform Phones User Guide... -
Page 42: Factory Reset The Phone From Phone Web Page
In a supported web browser, enter a URL that consists of your phone IP address and the destination IP that you want to ping. Enter the URL using the format: , where: http:/<Phone IP>/admin/ping?<ping destination> Cisco IP Phone 7800 Series Multiplatform Phones User Guide... -
Page 43: Lost Phone Connectivity
• Clear—delete the complete message list. Step 3 Contact your administrator to help you resolve the issue. If your administrator has given you access, you can also view the messages on the phone web page. Cisco IP Phone 7800 Series Multiplatform Phones User Guide... -
Page 44: Find The Transition License Type
Cisco One-Year Limited Hardware Warranty Terms Special terms apply to your hardware warranty and services that you can use during the warranty period. Your formal Warranty Statement, including the warranties and license agreements applicable to Cisco software, is available at: Product Warranties. -
Page 45: Calls
Enter a number and pick up the handset. Make a Call with the Speakerphone Use your speakerphone for hands-free calling. Keep in mind that your coworkers might be able to hear your call too. Cisco IP Phone 7800 Series Multiplatform Phones User Guide... -
Page 46: Make A Call With A Headset
Your phone must be set up to obtain your physical location. Emergency services personnel need your location to find you when you make an emergency call. Procedure Enter the emergency number and lift the handset. Redial a Number You can call the most recently dialed phone number. Cisco IP Phone 7800 Series Multiplatform Phones User Guide... -
Page 47: Speed Dial
• Select Option > Select from contact to select a contact from the address book. Step 5 Press Save. Make a call with a speed-dial code Before you begin Set up speed-dial codes on the phone web page or from your phone screen. Cisco IP Phone 7800 Series Multiplatform Phones User Guide... -
Page 48: Configure A Speed Dial On A Line Key
Step 1 Press a line key that has a speed dial configured for at least two seconds. Step 2 Press Option > Delete in the Speed-Dial window on the phone screen. Cisco IP Phone 7800 Series Multiplatform Phones User Guide... -
Page 49: Use The Line In Focus For Speed-Dial Calls
Step 1 Press and hold star (*) for at least 1 second. The plus (+) sign is displayed as the first digit in the phone number. Step 2 Enter the phone number. Cisco IP Phone 7800 Series Multiplatform Phones User Guide... -
Page 50: Secure Calls
Answer Calls Your Cisco IP Phone works just like a regular phone. But we make it easier for you to answer calls. Answer a Call Procedure Press the flashing red line button. -
Page 51: Silence An Incoming Call
When a line key has both feature key sync and DND enabled, the DND icon is displayed next to the line key label. Procedure Step 1 Press DND to turn on DND. If the DND softkey is grayed on the phone screen, contact your administrator. Cisco IP Phone 7800 Series Multiplatform Phones User Guide... -
Page 52: Turn On Or Turn Off Dnd Using A Star Code
Mute Your Call While you are on a call, you can mute the audio so that you can hear the other person, but they cannot hear you. Procedure Step 1 Press Mute Cisco IP Phone 7800 Series Multiplatform Phones User Guide... -
Page 53: Hold Calls
You can easily switch between active and held calls. Procedure Press the line button for the held call, then press Resume to resume that call and place the other call on hold automatically. Cisco IP Phone 7800 Series Multiplatform Phones User Guide... -
Page 54: Call Park
(Optional) Press the line key that has busy lamp field with call pickup configured to retrieve a call on hold. Step 3 Enter the number where the call is parked followed by Pound (#). Cisco IP Phone 7800 Series Multiplatform Phones User Guide... -
Page 55: Park And Unpark A Call With One Line Key
See Coworker Line Status, on page 15 for the idle and Parked call icons. This feature doesn't apply to phone Cisco IP Phone 7811. Before you begin Activate or Deactivate Monitoring of the BLF List, on page 16 Procedure Step 1 Press the line key that monitors the user to park an active call. -
Page 56: Forward Calls
Call forward settings screen. In this scenario, see Activate Call Forward All with Feature Activation Code Synchronization, on page Step 2 Select one of the following call forward services: • Forward all • Forward busy Cisco IP Phone 7800 Series Multiplatform Phones User Guide... -
Page 57: Activate Call Forward All With Feature Activation Code Synchronization
• Press Redial and select an entry from the Placed calls list. Step 3 Press Call to forward all calls to the specified number. You can clear the call forward settings by pressing Clr fwd or Clf fwd all. Cisco IP Phone 7800 Series Multiplatform Phones User Guide... -
Page 58: Forward Calls With The Phone Web Page
The call forward settings on the phone web page take effect only when FKS and XSI are disabled. For more information, consult your administrator. Step 3 Click Submit All Changes. Related Topics Settings, on page 93 Transfer Calls You can transfer an active call to another person. Cisco IP Phone 7800 Series Multiplatform Phones User Guide... -
Page 59: Transfer A Call To Another Person
You can talk with several people in a single call. You can dial another person and add them to the call. If you have multiple phone lines, you can join two calls across two lines. The conference ends when all participants hang up. Cisco IP Phone 7800 Series Multiplatform Phones User Guide... -
Page 60: Add Another Person To A Call
During a recording, you see different icons in different recording state. You see the icons on the Calls screen and also on the line key on which you are recording a call. Table 6: Recording Icons Icon Meaning Recording in progress Recording paused Cisco IP Phone 7800 Series Multiplatform Phones User Guide... -
Page 61: Instant Message And Presence Contacts
Make a Call to an IM and Presence Contact When you call someone on your IM&P contacts, their presence state is displayed in your call history. Before you begin You administrator enables the IM&P directory in the phone. Cisco IP Phone 7800 Series Multiplatform Phones User Guide... -
Page 62: Change Your Presence State
Multiplatform phones in the phone system. Each paging group has a unique number associated with it. Your administrator gives you the configured paging group numbers. When Cisco IP Phone 7800 Series Multiplatform Phones User Guide... -
Page 63: Multiple Lines
• The shared phone number can be configured to appear on a maximum of 35 devices. • The shared phone number appears on all phones that share the number. Cisco IP Phone 7800 Series Multiplatform Phones User Guide... -
Page 64: Add Yourself To A Call On A Shared Line
If set up this way, you'll hear a tone letting you know that the system recognizes the access code. Step 3 Enter the phone number of the person whose call you want to barge in to. Cisco IP Phone 7800 Series Multiplatform Phones User Guide... -
Page 65: Call Center Features
If the status is Available, the icon displays beside your phone number. Otherwise, proceed with the next steps to manually set the status. Step 3 Press Agt status. Step 4 Highlight the Available status. Cisco IP Phone 7800 Series Multiplatform Phones User Guide... -
Page 66: Sign Out As A Call Center Agent
When you sign into the phone as a call center agent and your phone status is set to available, your phone are ready to accept call center calls. Before you answer a call, you see information about the call. Cisco IP Phone 7800 Series Multiplatform Phones User Guide... -
Page 67: Hold An Agent Call
Press Ok. Trace a Call You can trace an active call and the last incoming call in any agent status. Before you begin Your administrator enables your phone to trace a call. Cisco IP Phone 7800 Series Multiplatform Phones User Guide... -
Page 68: Escalate A Call To A Supervisor
In the Emergency Escalation window, click OK. You can enter preferred emergency escalation number, or you can leave it empty if you do not have any supervisor preference. You will not see any emergency escalation number. Cisco IP Phone 7800 Series Multiplatform Phones User Guide... -
Page 69: Contacts
Select the All directories, the BroadSoft directory, or the LDAP directory. b) Search for a contact that you want to add. c) Highlight the contact. d) Press Option, and then select Add contact. Cisco IP Phone 7800 Series Multiplatform Phones User Guide... -
Page 70: Add A New Contact To Your Personal Address Book With Phone Web Page
Step 5 Enter the address entry to search for. The matched contacts will display on the phone. You can only search by name (case insensitive). Search by number is not supported. Cisco IP Phone 7800 Series Multiplatform Phones User Guide... -
Page 71: Call A Contact In Your Personal Address Book
Step 5 Press Option, and then select Edit. Step 6 Modify the entry information. Step 7 Press Save. Related Topics Search for a Contact in Your Personal Address Book, on page 60 Cisco IP Phone 7800 Series Multiplatform Phones User Guide... -
Page 72: Remove A Contact From Your Personal Address Book
• Group Common • LDAP directory The manual search operation tries to retrieve the contacts from the directories in the following order: • Personal address book • BroadSoft directory • LDAP directory Cisco IP Phone 7800 Series Multiplatform Phones User Guide... - Page 73 If you don't see the Add contact option, contact your administrator. c) Enter the contact details and press Save. Step 7 To call a contact, follow these steps: a) Highlight a contact in the search results. Cisco IP Phone 7800 Series Multiplatform Phones User Guide...
-
Page 74: Corporate Directory
You can modify the display name of the Webex directory. Before you begin Your administrator configures support for Webex contacts. Procedure Step 1 Highlight the Webex directory. Step 2 Click Option. Step 3 Select Edit settings. Cisco IP Phone 7800 Series Multiplatform Phones User Guide... -
Page 75: Search For A Contact In Your Webex Directory
But, if you select the mobile number and make a call, the phone dials the mobile phone number. • If a contact has only mobile number, the directory displays the mobile phone number as the call number. Cisco IP Phone 7800 Series Multiplatform Phones User Guide... -
Page 76: Search For A Webex Contact In All Directory
Too many matches found.Refine your search Before you begin • Your administrator enables the Webex directory. • Your administrator enables All directory search. Procedure Step 1 In the Directory screen, select All directories. Cisco IP Phone 7800 Series Multiplatform Phones User Guide... -
Page 77: Broadsoft Directory
• Your administrator enables the BroadSoft directories and sets up the directories properly. • Your administrator enables the Browse Mode for the directories. When this mode is enabled, a preload operation will start automatically to retrieve all the contacts from the directory. Cisco IP Phone 7800 Series Multiplatform Phones User Guide... -
Page 78: Edit Your Contact Type In Your Broadsoft Directory
Your administrator disables the directory individual mode for the BroadSoft XSI service. Procedure Step 1 Press Contacts Step 2 Press Category, if it displays on the phone. Otherwise, skip the step. Step 3 Highlight the BroadSoft directory. Step 4 Press Option. Cisco IP Phone 7800 Series Multiplatform Phones User Guide... -
Page 79: Manage Your Contacts In The Broadsoft Personal Directory
Search for a contact that you want to add. c) Highlight the contact. d) Press Option, and then select Add contact. e) Enter details of the contact. f) Press Save . Cisco IP Phone 7800 Series Multiplatform Phones User Guide... -
Page 80: Edit Your Broadsoft Directory Name
The default names are: • Enterprise • Group • Personal • Enterprise Common • Group Common Note Only the directory that is enabled by your administrator can display in the Directories screen. Cisco IP Phone 7800 Series Multiplatform Phones User Guide... -
Page 81: Edit The Server Name Of Your Broadsoft Directory
Press Category, if it displays on the phone. Otherwise, skip the step. Step 3 Do one of the following actions: • Highlight the BroadSoft directory. • Highlight one of the configured directories. Step 4 Press Option. Step 5 Select Edit Settings. Cisco IP Phone 7800 Series Multiplatform Phones User Guide... -
Page 82: Edit Credentials Of Your Broadsoft Directory
Enter the user credentials based on the authentication type. • Login credentials: edit the User ID and Password fields. • SIP credentials: edit the SIP auth ID and SIP password fields. Step 8 Press Save to apply the change. Cisco IP Phone 7800 Series Multiplatform Phones User Guide... -
Page 83: Ldap Directory
LDAP Directory LDAP Directory The Cisco IP Phone supports Lightweight Directory Access Protocol (LDAP) v3. You can search for a specified LDAP directory for a name, phone number, or both. LDAP-based directories, such as Microsoft Active Directory 2003 and OpenLDAP-based databases, are supported. -
Page 84: Search For A Contact In Your Ldap Directory
Before you begin Your administrator enables the LDAP directory. Procedure Step 1 Search for a contact in the LDAP directory, see Search for a Contact in Your LDAP Directory, on page Cisco IP Phone 7800 Series Multiplatform Phones User Guide... -
Page 85: Edit A Contact Number In Your Ldap Directory
If an entry contains multiple contact numbers (separated by comma) and you want to edit one of Note the contact numbers, perform Step 4 Step 6. Otherwise, skip the steps. Step 4 Press Details to view more information of the highlighted entry. Cisco IP Phone 7800 Series Multiplatform Phones User Guide... -
Page 86: Xml Directory
Step 7 In the Corporate directory (XML) address entry screen, use the outer ring of the navigation cluster to scroll through the details. An entry can contain up to 5 contact numbers. Cisco IP Phone 7800 Series Multiplatform Phones User Guide... -
Page 87: Edit A Contact Number In Your Xml Directory
In the Corporate directory (XML) address entry screen, use the outer ring of the navigation cluster to highlight a contact number. An entry can contain up to 5 contact numbers. c. Press Edit call. d. Edit the number as necessary. e. Press Call. Cisco IP Phone 7800 Series Multiplatform Phones User Guide... -
Page 88: Reverse Name Lookup For Incoming And Outgoing Calls
Reverse name lookup is enabled by default. Reverse name lookup searches the directories in the following order: 1. Phone contacts 2. Call History 3. LDAP Directory 4. XML Directory Cisco IP Phone 7800 Series Multiplatform Phones User Guide... -
Page 89: Recent Calls
180 calls for the Recents list. This limit consists of outgoing calls, missed calls, and incoming calls. Also, there can be some old missed calls that get added to the count for the missed call badge. This can get overwritten in the Recents list. Cisco IP Phone 7800 Series Multiplatform Phones User Guide... - Page 90 • Delete list-Deletes all the entries in the selected menu, when pressed. • Sort by name-Sort according to caller names when selected. • Add contact-Adds a new contact to the directory. Cisco IP Phone 7800 Series Multiplatform Phones User Guide...
-
Page 91: View Webex Call Logs Duration
When you select a placed call or a received call, you can see the call duration in the Duration field. For a missed call, the call duration information is not available. Cisco IP Phone 7800 Series Multiplatform Phones User Guide... -
Page 92: Spam Indication For Webex Calls
• Phone: Displays call logs stored on the phone. • Webex: Displays call logs stored in the Webex cloud server. Step 5 Click Set. You can view all calls, missed calls, received calls, and placed calls list. Cisco IP Phone 7800 Series Multiplatform Phones User Guide... -
Page 93: Return A Recent Call
Select a list that you want to delete. • All Calls • Missed Calls • Received Calls • Placed Calls • Display recents from Step 6 Press Option and select Delete all. Step 7 Press OK. Cisco IP Phone 7800 Series Multiplatform Phones User Guide... -
Page 94: Create A Contact From A Recents Record
In the Add BroadSoft personal contact screen, when contact details fields are empty or you enter invalid values to the fields, you don't see the Save softkey. Delete a call record Procedure Step 1 Press Applications Step 2 Do one of the following actions: Cisco IP Phone 7800 Series Multiplatform Phones User Guide... -
Page 95: Delete All Call Records
You can delete all call history records on your phone. Procedure Step 1 Press Applications Step 2 Select Recents. Step 3 Select All calls. Step 4 Press Option and select Delete all. Step 5 Press OK. Cisco IP Phone 7800 Series Multiplatform Phones User Guide... - Page 96 Recent Calls Delete All Call Records Cisco IP Phone 7800 Series Multiplatform Phones User Guide...
-
Page 97: Voicemail
If your administrator has not set up your personal voicemail phone number on your phone, you can set it up yourself. Procedure Step 1 Press Applications Step 2 Select User preferences > Call preferences. Step 3 Enter your personal voicemail phone number in Voice mail. Step 4 Press Set. Cisco IP Phone 7800 Series Multiplatform Phones User Guide... -
Page 98: Check Your Personal New Voice Messages
• An exclamation mark (!) indicates urgent voicemail messages. Cisco IP Phone 6800 Series, 7800 Series, and 8800 Series: You will also hear a stutter tone played from your handset, headset, or speakerphone when you use a phone line. This stutter tone is line-specific. You only hear it when you use a line that has voice messages. -
Page 99: Phone Behavior With Voicemail Setting
No Voicemail, No There is no active LED On User interacts with the phone. Missed Call call and a call is missed or a call is on hold and the call is missed. Cisco IP Phone 7800 Series Multiplatform Phones User Guide... -
Page 100: Voice Messages States Of Monitored Voicemail Accounts
The line button LED also changes color to indicate the state of the monitored line. The default LED color and pattern for the states are: • No message: solid green • New messages: solid red • Urgent messages: solid red • Registration Failed: solid amber Cisco IP Phone 7800 Series Multiplatform Phones User Guide... -
Page 101: Access Monitored Voicemail Account Messages
• There are new messages for the monitored voicemail account. Procedure Step 1 Press the line key on the phone. You may be prompted to enter the monitored voicemail account ID and PIN. Step 2 Follow the voice prompts. Cisco IP Phone 7800 Series Multiplatform Phones User Guide... - Page 102 Voicemail Access Monitored Voicemail Account Messages Cisco IP Phone 7800 Series Multiplatform Phones User Guide...
-
Page 103: Settings
Enable Anonymous Call Blocking from the Phone Web Page, on page 114 • Enable Call Waiting from the Phone Web Page, on page 114 • Reboot Your Phone, on page 114 Cisco IP Phone 7800 Series Multiplatform Phones User Guide... -
Page 104: Phone Settings Overview
If your administrator restricts your ability to control the ringer volume, you can't perform this task from either the phone volume key or from the phone administration web page. Before you begin Your administrator must allow you to control the ringer volume. Cisco IP Phone 7800 Series Multiplatform Phones User Guide... -
Page 105: Forward Calls From Your Phone
• Forward all—Determines whether to forward all incoming calls to a target phone number. • Forward busy—Determines whether to forward an incoming call to a target phone number when the line is busy. Cisco IP Phone 7800 Series Multiplatform Phones User Guide... - Page 106 Clf fwd all disables only the Call Forward All service, Clf fwd disables all call forward services. If the call forward settings on the phone don't take effect, consult your administrator. Cisco IP Phone 7800 Series Multiplatform Phones User Guide...
-
Page 107: Turn On Do Not Disturb For A Specific Line
Procedure Step 1 Press the Navigation cluster up or down to select a phone line. Step 2 Press Applications Step 3 Select User preferences > Call preferences > Block anonymous call. Cisco IP Phone 7800 Series Multiplatform Phones User Guide... -
Page 108: Block Caller Id
Select User preferences > Call preferences > Secure call. Step 3 Select On to enable secure call feature or select Off to disable the secure call feature. Step 4 Press Set to save the setting. Cisco IP Phone 7800 Series Multiplatform Phones User Guide... -
Page 109: Set Up An Auto Answer Page
Select User preferences > Call preferences > Voice mail. Step 3 Enter a phone number to check voicemail. If you press the Messages button, it dials the voicemail number and displays the voice message list. Cisco IP Phone 7800 Series Multiplatform Phones User Guide... -
Page 110: Http Proxy Settings
You can choose the manual proxy mode to set up an HTTP proxy server on the phone. Before you begin Your administrator provides you the server address and port of the proxy server. Cisco IP Phone 7800 Series Multiplatform Phones User Guide... -
Page 111: Set Up A Proxy Server From The Phone Web Page
Under the section HTTP Proxy Settings, set the parameters described in the following table: Table 7: HTTP Proxy Settings Parameter Description Proxy Mode Choose the proxy mode for the HTTP proxy setting. Options are: • Auto • Manual • Off Default: Off Cisco IP Phone 7800 Series Multiplatform Phones User Guide... - Page 112 Enter a password of the specified username for the proxy authentication purpose. This parameter is available when you set Proxy Mode to Manual and Proxy Server Requires Authentication to Yes. Step 3 Click Submit All Changes. Cisco IP Phone 7800 Series Multiplatform Phones User Guide...
-
Page 113: Vpn Connection Settings
Highlight Connect to VPN on bootup, press the Select button of the navigation cluster to select On. Step 7 Press Set to save the settings. The VPN settings are finished. For information about how to enable the VPN connection, see Enable a VPN Connection, on page 104. Cisco IP Phone 7800 Series Multiplatform Phones User Guide... -
Page 114: Enable A Vpn Connection
Highlight Connect to VPN on bootup, press the Select button of the navigation cluster to select Off. Step 4 Press Set to save the setting. Step 5 Do one of the following actions: Cisco IP Phone 7800 Series Multiplatform Phones User Guide... -
Page 115: Set Up A Vpn Connection From The Phone Web Page
VPN server. Default: Empty VPN Tunnel Group Enter a tunnel group assigned to the VPN user. Tunnel group is used to identify the group policy for the VPN connection. Default: Empty Cisco IP Phone 7800 Series Multiplatform Phones User Guide... -
Page 116: View The Vpn Status
• Sent bytes—Total bytes the phone sent out to the network through the VPN server. • Received bytes—Total bytes the phone received from the network through the VPN server. Change the Display Mode This feature is supported on Cisco IP Phone 7821, 7841, and 7861. Procedure Step 1... -
Page 117: Change The Time Format
Change the Screen Saver You can enable your phone screen saver, and specify its appearance and the amount of time for the phone to be idle before the screen saver appears. Cisco IP Phone 7800 Series Multiplatform Phones User Guide... -
Page 118: Configure The Screen Saver With The Phone Web Interface
Parameter Description Screen Saver Enable Select Yes to enable a screen saver on the phone. When the phone is idle for a specified time, it enters screen saver mode. Default: No Cisco IP Phone 7800 Series Multiplatform Phones User Guide... -
Page 119: Add A Logo As A Phone Background
In the Screen section, select Logo from the Phone Background field and in the Logo URL field enter a URL or path for the location where the logo image is saved. Cisco IP Phone 7800 Series Multiplatform Phones User Guide... -
Page 120: Adjust The Phone Screen Contrast
Adjust the Backlight Timer from Phone Web Page You can save energy by disabling the backlight on the phone at a preset time. The phone's desktop remains visible, even with the backlight off. Cisco IP Phone 7800 Series Multiplatform Phones User Guide... -
Page 121: Specify An Audio Device For A Call
Select Device administration > Language. Step 3 Select a language from the list of available languages. Step 4 Select Save. Set Password Reset your phone password regularly and keep your network secure. Cisco IP Phone 7800 Series Multiplatform Phones User Guide... -
Page 122: Set Password From Phone Web Page
Password has been changed successfully. Set up the Profile Account You need to enter the authentication credentials to resynchronize your phone with the provisioning profile when prompted with the Profile account setup screen. Cisco IP Phone 7800 Series Multiplatform Phones User Guide... -
Page 123: Add Multiple Locations For A Broadworks Xsi User
Add contact number and name in the Locations screen. Maximum length of a name that you can enter is 25. You can also keep the Name field empty. Maximum length of a number that you can enter is 20. Cisco IP Phone 7800 Series Multiplatform Phones User Guide... -
Page 124: Enable Anonymous Call Blocking From The Phone Web Page
You may have to reboot your phone for a software upgrade or other changes to take effect. Your settings or other customizations do not change. Procedure Step 1 Press Applications Step 2 Select Device administration > Restart. Cisco IP Phone 7800 Series Multiplatform Phones User Guide... - Page 125 Settings Reboot Your Phone Step 3 Select OK to confirm that you want to reboot your phone. Cisco IP Phone 7800 Series Multiplatform Phones User Guide...
- Page 126 Settings Reboot Your Phone Cisco IP Phone 7800 Series Multiplatform Phones User Guide...
-
Page 127: Accessories
External Headsets Check with the headset manufacturer to confirm whether you can use it with your Cisco phone. If you plug a headset into the phone during an active call, the audio path automatically changes to the headset. Cisco IP Phone 7800 Series Multiplatform Phones User Guide... -
Page 128: Standard Headsets
Headset key on the phone. Though the phone is connected to multiple devices, you see a specific headset is selected as the preferred audio device in the following priority order: Cisco IP Phone 7800 Series Multiplatform Phones User Guide... - Page 129 • When you connect only an analog headset to the phone, you can make your analog headset the preferred audio device. Procedure Step 1 Before you make or answer a call, press Headset. Step 2 (Optional) If you place a call, dial the number. Cisco IP Phone 7800 Series Multiplatform Phones User Guide...
- Page 130 Accessories Swap Headsets While on a Call Cisco IP Phone 7800 Series Multiplatform Phones User Guide...
-
Page 131: Product Safety And Security
• Shorten the length of the external device cable. • Apply ferrites or other such devices on the cables for the external device. Cisco cannot guarantee the performance of external devices, cables, and connectors. Cisco IP Phone 7800 Series Multiplatform Phones User Guide... -
Page 132: Ways To Provide Power To Your Phone
The LAN/Ethernet cable or other cables attached to the device should not be extended outside of the building. EnergyStar The following phones have EnergyStar certification: • Cisco IP Phone 7811 • Cisco IP Phone 7841 Cisco IP Phone 7800 Series Multiplatform Phones User Guide... -
Page 133: Product Label
The grant of a Telepermit for any item of terminal equipment indicates only that Spark NZ has accepted that the item complies with minimum conditions for connection to its network. It indicates no endorsement of the Cisco IP Phone 7800 Series Multiplatform Phones User Guide... -
Page 134: Compliance Information For Brazil
RF exposure compliance. This transmitter must be at least 20 cm from the user and must not be collocated or operating in conjunction with any other antenna or transmitter. Cisco IP Phone 7800 Series Multiplatform Phones User Guide... -
Page 135: Fcc Receivers And Class B Digital Statement
This product contains cryptographic features and is subject to U.S. and local country laws that govern import, export, transfer, and use. Delivery of Cisco cryptographic products does not imply third-party authority to import, export, distribute, or use encryption. Importers, exporters, distributors, and users are responsible for compliance with U.S. - Page 136 Product Safety and Security Important Online Information Cisco IP Phone 7800 Series Multiplatform Phones User Guide...
Need help?
Do you have a question about the 7800 Series and is the answer not in the manual?
Questions and answers