Table of Contents
Advertisement
Quick Links
®
STEINDORFF
Digital LCD Stereo Zoom
Microscope
NYMCS-356
Operation Manual
To ensure safety and obtain optimum performance and familiarize yourself with the use of this microscope, we
recommend you read this manual before operating the microscope. Retain this instruction in an easily accessible
place near the microscope for further reference.
Advertisement
Table of Contents

Related Manuals for STEINDORFF NYMCS-356


Summary of Contents for STEINDORFF NYMCS-356
- Page 1 STEINDORFF Digital LCD Stereo Zoom Microscope NYMCS-356 Operation Manual To ensure safety and obtain optimum performance and familiarize yourself with the use of this microscope, we recommend you read this manual before operating the microscope. Retain this instruction in an easily accessible...
-
Page 2: Table Of Contents
® STEINDORFF CONTENTS Optical Microscope Part ……………………………………………………………………….. 1. Structure and Characteristic ………………………………………………………… 2. Main Technical Parameters ………………………………………………………….. 3. Configuration …………………………………………………………………………. 4. Assembly ………………………………………………………………………………. 5. Operation ……………………………………………………………………………… 6. Assembly and Usage of the Attachments ……………………………………………. 7. Troubleshooting ………………………………………………………………………. 8. Maintenance …………………………………………………………………………... - Page 3 ® STEINDORFF This instruction manual is for NYMC-356 LCD digital Zoom Stereo Microscope, Please read the instruction manual carefully before using, proper modification can be made without notice. Please contact manufacturer if something unclear or incorrect is found. ...
-
Page 4: Optical Microscope Part
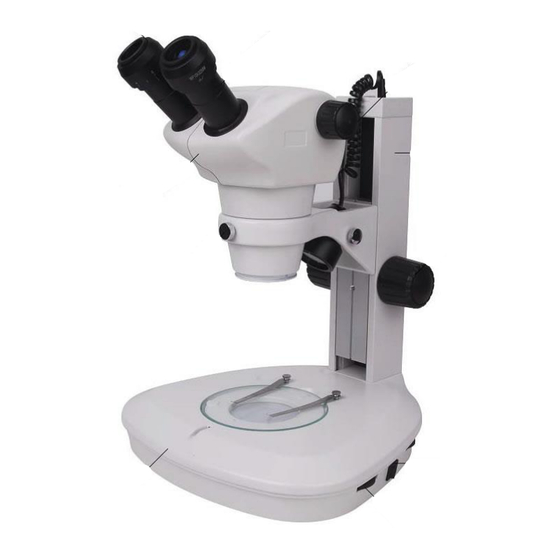
® STEINDORFF OPTICAL MICROSCOPE PART 1. Structure and Characteristic 1.1. Structure Chart Eyepiece Eyepiec Tube Zoom Knob Microscope Body Zoom Tube Focusing Knob Zoom Tube Stapled Switch Base Brightness Adjusting Knob... - Page 5 ® STEINDORFF Binocular 45° Inclined Tube 45° Hex Wrench Fix Working Stage Hex Wrench Adjust Height Socket (Anti-static)
-
Page 6: Main Technical Parameters
® STEINDORFF 1.2. Characteristic 1.2.1. Destaticization: stand, zoom tube, 10×eyepiece and auxiliary objective are all equipped with destaticization. It is very helpful for users to observe the specimen with static (such as semiconductor chip). When use this function, please connect the microscope to the ground through the joggle on the back of the stand. -
Page 7: Configuration
® STEINDORFF 3. Configuration Includes: Contents Quantity Tablet PC with digital camera NYMCS-356 Zoom head 10x Eyepiece Instruction Manual & Dust Cover Microscope Stand (with or without illumination) Optional Accessories Contents 15x Eyepiece 20x Eyepiece 30x Eyepiece 0.5x Auxiliary Objective 0.7x Auxiliary Objective... -
Page 8: Assembly
® STEINDORFF 4. Assembly 4.1. Assembly of the stage Place the stand on a stable table, insert the stage into the base, and tighten the fixing screw with wrench (small) attached at the back of the stand. 4.2. Lifting of the Focus Arm The focus arm can be adjusted according to your special demands. - Page 9 ® STEINDORFF 4.3. Mount the Zoom head Tighten the fixing screw of the zoom tube slightly to fix the zoom head on the stand. Warning: Do not tighten the screw too tight as this will cause damage to the instrument.
- Page 10 ® STEINDORFF 4.6. Image recording digital camera. To satisfy your special requirements, different interfaces are supplied for your choosing, and this will make your operation and observation more convenient. 4.6.1. Assembly of 0.4x reduce lens and the digital camera Take away the dust-cover of the trinocular, insert one end of the 0.4x reduce lens into the digital camera and tighten it.
-
Page 11: Operation
® STEINDORFF 5. Operation 5.1. Preparation 5.1.1. Illumination Insert the power supply source into the socket of the transmitted base, connect the power supply source and turn on the switch. Adjust the brightness. It is not necessary to adjust the brightness to the strongest as this will reduce the life of the bulb. - Page 12 Working Distance is the distance between focus plane and zoom head. The W.D for the NYMCS-356 series zoom stereo microscope is 115mm. Set the distance between the bottom of the zoom tube and specimen at 115mm, and this will be helpful to focus.
-
Page 13: Assembly And Usage Of The Attachments
® STEINDORFF 5.2.3. Magnification Turn the zoom knob on both sides of the zoom tube to change the magnification of the specimen. Total Magnification Zoom knob on right has the indication of the zooming magnification. Total magnification can be calculated by multiplying the eyepiece magnification by the zoom body magnification. - Page 14 ® STEINDORFF 6.2. Illumination Three kinds of illumination are available for your special needs: Transmitted light, incident light and LED Circuit light. Power Supply Input Voltage 200V - 240V, 50/60Hz, 0.4A Output Voltage 6V 3W (LED) Power Cord Protective Earth 250V 7A Temperature: 0 - 40°C...
-
Page 15: Troubleshooting
® STEINDORFF 6.3.2. Install LED circuit illumination Insert the fixing screw into the groove of the zoom body and tighten it. Locking Screw Knob 7. Troubleshooting The function of microscope will not work efficiently for the unfamiliar using. Check the table below if meet some troubles, then take proper action. -
Page 16: Maintenance
® STEINDORFF 8. Maintenance 8.1. Working Environment Temperature range is 0°C-40°C and the max. Humidity is 85%. Avoid high temperature and humidification. Do not expose the microscope in the sun directly. Place microscope on a stable table and keep it in balance. Avoid violent vibration. -
Page 17: Tablet Camera Part
® STEINDORFF TABLET DIGITAL CAMERA PART The tablet digital camera is equipped with 5MP color COMS sensor and 9.7inches tablet, it is developed specifically for microscopy applications. Along with Android 4.2 operating system, it runs smoothly and the user experience is fantastic. It comes with C-mount, can be attached to the trinocular head of the microscope. -
Page 18: Build-In Camera Specification
® STEINDORFF 2. Build-in Camera Specification Optical Format 1/2.5-inch (4:3) 5.70mm (H) x 4.28mm (V) Active Image Size 7.13mm (Diagonal) Active Pixels 2592 H x 1944 V Pixel Size 2.2um x 2.2um Dynamic Range 66.5dB 40.5dB A/D Converter 12-bit, On-chip Sensitivity 0.53V/lux-sec (550nm) - Page 19 ® STEINDORFF 3.1.1. Preview Image – show live video of the camera. 3.1.2. Tool Panel – Control panels, capture, adjust parameter, measurement, etc. 3.1.3. Thumbnail Panel – Show captured images and videos, touch it to browse the files. 3.1.4. System Tool – Switch Camera, full screen, configure.
- Page 20 ® STEINDORFF 3.4. Measurement 3.4.1. Calibration We need calibrate the ruler before measurement, Specific combination of magnification of microscope and the preview size of camera need specific calibration. Swap the tool pane to measurement, Click “Add” to add a new calibration, Click “Edit” to recalibrate the exist calibration.
- Page 21 ® STEINDORFF Follow these Tips: Drag the yellow ruler, let endpoints of the ruler close to physical ruler’s scale. 3.4.1.1. We use the 0.01mm physical ruler, each big grid is 10μm, and we pick three grids, that’s 30μm. 3.4.1.2. Input the name of the calibration and the physical length of the ruler. We input 10x_640x480 for the name, that means the magnification of objective is 10x, and the preview size of camera is 640 x 480.
- Page 22 ® STEINDORFF Click “Calculate” to calculate the calibration value for current objective and 3.4.1.3. preview size, and save to list.
- Page 23 ® STEINDORFF 3.4.2. Measure tool ICON Function Description Point Counting Add a point counting marker on the image Line Measure distance of two points Rectangle Measure width, length and area of rectangle Circle Measure area of circle Cross Cross hair...
- Page 24 ® STEINDORFF Choose line ruler from right side bar. There will be a line ruler show on the image. Use the line ruler to measure the physical ruler. We measured 4 big grid, the line ruler show 39.95μm, that represent the result is right.
Need help?
Do you have a question about the NYMCS-356 and is the answer not in the manual?
Questions and answers