Table of Contents
Advertisement
Quick Links
®
STEINDORFF
Biological Microscope
NYMCS-237
Instruction Manual
This manual is written for biological microscope NYMCS-237 series. To ensure the safety, obtain
optimum performance and to familiarize you fully with the use of this microscope, it is recommended
strongly that you study this manual thoroughly before using the microscope and retain this manual in an
easily accessible place near the work desk for future reference.
Advertisement
Table of Contents

Related Manuals for STEINDORFF NYMCS-237


Summary of Contents for STEINDORFF NYMCS-237
- Page 1 NYMCS-237 Instruction Manual This manual is written for biological microscope NYMCS-237 series. To ensure the safety, obtain optimum performance and to familiarize you fully with the use of this microscope, it is recommended strongly that you study this manual thoroughly before using the microscope and retain this manual in an...
-
Page 2: User Notice
® STEINDORFF USER NOTICE Safety Notes 1. Carefully open the box, avoid the accessories, like lens, dropping to ground and being damaged. 2. Do keep the instrument out of direct sunlight, high temperature or humidity, dusty and easy shaking environment. Make sure the stage is smooth, horizontal and firm enough. - Page 3 ® STEINDORFF 5. Do not attempt to use organic solvents to clean the microscope components other than the glass components. To clean them, use a lint-free, soft cloth slightly moistened with a diluted neutral detergent. 6. When using, if the microscope is splashed by liquid, cut off the power at once, and wipe up the moisture.
-
Page 4: Specifications
® STEINDORFF 1. SPECIFICATIONS 1.1. Mechanical tube: 160mm 1.2. CF high-contrast objectives: Numerical Thickness of Focal length Working Type Magnification Aperture coverslip (mm) distance (mm) (N.A.) (mm) 0.10 0.17 28.902 17.912 0.25 0.17 16.6 0.65 0.17 4.28 1.25 0.17 1.82 0.14... -
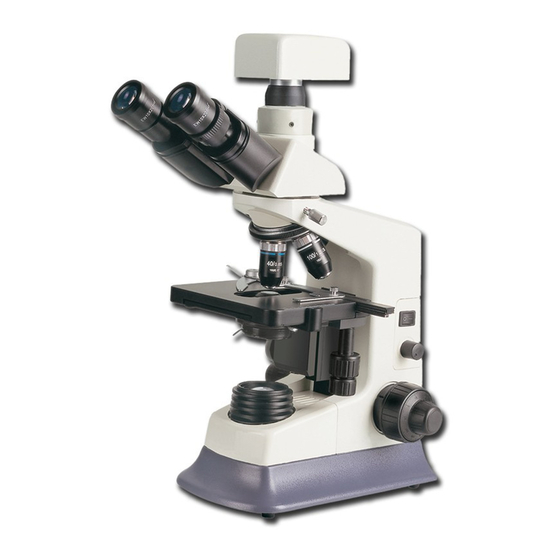
Page 5: Microscope Frame
® STEINDORFF 2. MICROSCOPE FRAME NYMCS-237 Digital Biological Microscope Viewing head: Compensation free binocular viewing head, inclined at 30°, interpupillary distance: 48-75mm. Camera system: External digital camera system with C-mount, 1.3M pixel CMOS image sensor. - Page 6 ® STEINDORFF 3. ASSEMBLY 3.1. Assembly Diagram The following figure shows the installation sequence of the components. The number in the figure shows the assembly steps. Before installing, be sure every components is clean, do not scratch any parts or glass surface.
- Page 7 ® STEINDORFF 3.2. Assembly steps 3.2.1. Preparation (Fig. 1) For protecting the microscope in shipping, we took some protect measures, so you need to finish the things listed below before installation: ① move away the plastic cap on the binocular viewing head; ② move away the plastic cap on the microscope body;...
- Page 8 ® STEINDORFF 3.2.3. Installing the eyepieces (Fig. 4, Fig. 5) Insert the eyepieces into the eyepiece tube until they are against each other as shown in Fig. 5. 3.2.4. Installing objectives (Fig. 6, Fig. 7) 1. Adjusting the coarse focus knob until the support device of the mechanical stage reaches its low limit position.
- Page 9 ® STEINDORFF 3.2.5. Installing the color filters (Fig. 8) 1. Pressing the salient point under the condenser bracket, turn the condenser bracket ① out at the direction of arrow in Fig. 8 2. Put the required filters into the holder on the...
- Page 10 ® STEINDORFF 3.2.8. Replacing the Lamp (Fig. 11, Fig. 12) 1. Please set the main switch to “O” state (off) before ① replacing, and make sure the bulb, the lamp room and periphery are all cool enough to carry no burn.
-
Page 11: Adjustment And Operation
® STEINDORFF 4. ADJUSTMENT & OPERATION 4.1. Assembly Diagram Diopter ring Longitudinal Adjustment Knob Specimen holder Transversal Adjustment Knob Brightness Adjustment Knob Right Coarse Focus Knob Right Fine Focus Knob Tension Adjustment Collar Fig. 15 Aperture diaphragm adjust lever Condenser Focusing Knob... - Page 12 ® STEINDORFF 4.2. Operation 4.2.1. Adjusting the brightness (Fig. 18) 1. Connect the power, turn on the main switch ① ① (shown on the figure) which on the bottom side of the base to “-” (on). 2. Turning the brightness adjustment knob ②...
- Page 13 ® STEINDORFF 4.2.3. Oil spacing observation The objective labeled “Oil” is oil immersion objective (100x objective). When use the oil-spaced lens, you need to add special oil only used for microscope between the objective and the cover slip. You should be aware of the cleaning procedures to be used after the use of oil. Wipe oil from the oil immersion objective, and from any other parts in need of cleaning.
- Page 14 ® STEINDORFF The tight tension of the coarse focus knob has already been adjusted before leaving factory. If loosen (e.g. the stage slip down by its weight), please screw the intention adjustment collar ③ to the right position by the supplied spanner.
- Page 15 ® STEINDORFF The numerical aperture is marked on the objective. For example, the mark “10/0.25” means the magnification is 10x,and the numerical aperture is 0.25. If you want to observe the image of the aperture Specimen iris diaphragm, remove one eyepiece and look Image of Aperture Iris Diaphragm through the tube.
- Page 16 ® STEINDORFF 5. OUTFIT Components Specifications S-237 ● Main body ● Main Body Double layers mechanical stage ● Condenser bracket ● Compensation Free Binocular Head, Inclined at 30° ● Viewing Head 1.3M Pixel CCD Camera System ● USB Cable ●...
-
Page 17: Troubleshooting
® STEINDORFF 6. TROUBLESHOOTING PROBLEMS REASON FOR PROBLEMS SOLUTION Optical Parts The nosepiece is not in the located position Adjust it into the located position The edge of the field of view has shadow or the The filament Imaging not in center... - Page 18 ® STEINDORFF The specimen is floating on the stage. Reinforce it reliably. The image moved when focusing. The nosepiece is not in the located position Turn it into the required position The image takes the Not using the color filter.
Need help?
Do you have a question about the NYMCS-237 and is the answer not in the manual?
Questions and answers