Table of Contents
Advertisement
Quick Links
®
STEINDORFF
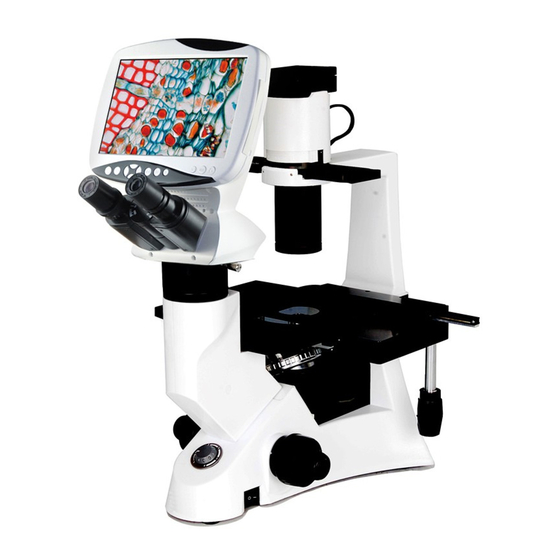
Digital LCD Inverted Phase
Contrast Microscope
NYMCS-1290
Operation Manual
This manual is written for Inverted Biological Microscope NYMC1290. For safety and for exerting the best
performance, making you familiar with the instrument entirely, it is strongly recommended that you read this
manual carefully before using the microscope.
Advertisement
Table of Contents

Subscribe to Our Youtube Channel
Related Manuals for STEINDORFF NYMCS-1290


Summary of Contents for STEINDORFF NYMCS-1290
- Page 1 STEINDORFF Digital LCD Inverted Phase Contrast Microscope NYMCS-1290 Operation Manual This manual is written for Inverted Biological Microscope NYMC1290. For safety and for exerting the best performance, making you familiar with the instrument entirely, it is strongly recommended that you read this...
-
Page 2: Table Of Contents
® STEINDORFF CONTENTS USER NOTICE …………………………………………………………………………………………… Components ………………………………………………………………………………………….. Installation …………………………………………………………………………………………..2.1. Installing Diagram ……………………………………………………………………………... 2.2. Installing Steps …………………………………………………………………………………. Operating the Adjustment …………………………………………………………………………... 3.1. Base ……………………………………………………………………………………………... 3.2. Stage …………………………………………………………………………………………….. 3.3. Viewing Tube …………………………………………………………………………………... 3.4. Illumination Unit ………………………………………………………………………………. Phase Contrast Viewing ……………………………………………………………………………... -
Page 3: User Notice
® STEINDORFF USER NOTICE Safety Note Do not keep the instrument in a direct sunlight, high temperature or humidity, dusty and easy shaking environment. Make sure the stage is plane, horizontal and stable enough. When moving the microscope, please hold up the instrument with one hand on the lower side of the eyepiece tube ①, and the other hand on the... - Page 4 ® STEINDORFF Maintenance 1. Use the gauze to wipe the glass parts gently .If removing the fingerprints and oil stains , slightly dampen gauze with the xylene or the admixture liquid which comparison is 3:7 of the ethanol and the ether to wipe.
-
Page 5: Components
® STEINDORFF 1. COMPONENTS LCD Head Phase Contrast slider Lamp House Illumination bracket Binocular (Eyepiece) Condenser Stage inserted plate Objective 10X(PH) 20X(PH) Nosepiece (Quintuple) Stage (fixed) Microscope base Figure 1... -
Page 6: Installation
® STEINDORFF 2. INSTALLATION 2.1. Installing diagram The following figure shows the installation sequence of the components. The number in the figure shows the installation steps. Before installing, be sure every components is clean, do not score any parts or glass surface. -
Page 7: Installing Steps
® STEINDORFF 2.2. Installing steps 2.2.1. Installing and replacing the lamp (Figure3) Please use the specified halogen Lamp 6V 30W. 1. Hold to the bulb ① after you wrap it with gauze or other protection materials, then depress the plugs ② into the jack ③... - Page 8 ® STEINDORFF 2.2.4. Installing the objective (Figure 6 and Figure 7) Turning the coarse fusing knob ① like the figure shows till the nosepiece get to its lowest position. For ensuring the safety of the instruction on transportation, the nosepiece is located in the lowest position and the tension adjustment collar ②...
- Page 9 ® STEINDORFF 2.2.6. Installing the stage inserted plate (Figure 9) When using the glass stage ①, there is no special requirement, you just need to place it in a plane. Install the stage inserted plate on to the stage opening.
- Page 10 ® STEINDORFF 2.2.9. Connecting the power cord (Figure 12, 13 and 14) Do not bring the power cord to bear a powerful stress. When being bent or wrapping, the cable and wires will be broken easily. Turn the main switch ① on “O” (off) state before connecting the power cord.
-
Page 11: Operating The Adjustment
® STEINDORFF 3. OPERATING THE ADJUSTMENT Color filter holder Aperture diaphragm adjust lever Phase contrast slider Diopter Ring Light Switch Main Switch Coarse focus knob Fine focus knob Tension Adjustment Collar Figure 15... -
Page 12: Base
® STEINDORFF 3.1. Microscope base 3.1.1. Turning on the lamp (Figure 16) Connect the power, turn on the main switch ① (shown on figure 16) which on the bottom side of the base to “-” (on). 3.1.2. Adjusting the brightness (Figure 17) Turning the brightness adjustment knob clockwise, the voltage raise, and the brightness strengthen;... -
Page 13: Stage
® STEINDORFF 3.2. Stage 3.2.1. Setting the specimen (Figure 19 and Figure 20) Set the specimen in the center of the stage. To obtain the best observe effect, please select the containers, such as culture dish and culture bottle, with the bottom thickness is 1.2mm, and the same thickness... -
Page 14: Viewing Tube
® STEINDORFF 3.3. The viewing tube 3.3.1. Adjusting the diopter (Figure 21) Look into the right binocular by your right eye, then revolving the coarse focus knob to focus on the specimen. Then use your left eye to look into the left ocular. If the image is not sharp, just use the diopter adjustment ring ①... -
Page 15: Illumination Unit
® STEINDORFF 3.4. Illumination Unit 3.4.1. Using color filters (Figure 22) Selecting the appropriate color filters according your need, it became more effective to observe or photography the specimen. Especially, we suggest using the LBD color filter, which can compensate more neutral colors. -
Page 16: Phase Contrast Viewing
® STEINDORFF 4. PHASE CONTRAST VIEWING 4.1. The name of the components 4.1.1. Phase contrast objective (Figure 25) The optional magnification of the phase contrast is: 10X, 20X. If you want to know how to mount the phase contrast objective, please see 2.2.4. You should mount it on the turret. - Page 17 ® STEINDORFF 4.2.2. The centering ring (Figure 28 and Figure 29) Usually you needn’t the operation of centering. If necessary, please accord to the following steps: 1. Place the specimen on the stage and focus it. 2. Take out the eyepiece, replace it with the CT (the centering telescope), and inserted it into the viewing tube without diopter adjustment.
-
Page 18: Adjustment & Operation For Digital Head
® STEINDORFF 5. ADJUSTMENT & OPERATION FOR DIGITAL HEAD 5.1. Operation for digital parts 1. Operation buttons and functions Crosshair & Coordinate Confirm Button Color: White, Black, Red, Purple, Green Snapshot & Video Playback View Direction key Start Videos Snapshot Pictures Menu: Setting &... - Page 19 ® STEINDORFF 2. Power on A. Before power on, please take out the SD card from the card reader firstly. Insert SD card into SD slot in the right of the microscope head completely until it is locked. Push softly the inserted SD card, it will eject out, then take it out.
- Page 20 ® STEINDORFF 4. Function menu control With the help of the button, it is able to carry out the setting of the whole system. The direction key allows you to choose the following functions: A. Resolution B. Camera function setting C.
- Page 21 ® STEINDORFF Select photo resolution button as shown the “Resolution:12M”(12M means the pixels has selected On snap model, press MENU now), then press the OK key to select the pixels for photo taken base on 2M/3M/5M/12M use by up & down keys (Fig.33).
- Page 22 ® STEINDORFF C. Camera function setting EXIT Figure 37 Figure 38 Figure 36 Camera function setting: Setting up each item. MENU button as show the “Resolution”, then press the left & right key to enter the On snap model, press “Camera Function Setting”...
- Page 23 ® STEINDORFF D. Display setting EXIT Figure 41 Figure 39 Figure 40 Display Setting: Setting up each item. MENU button as show the “Resolution”, then press the left & right key to enter the On snap model, press “Display Setting”...
- Page 24 ® STEINDORFF B. WB (White Balance) EXIT WB will help you to obtain superb color when observing. C. DE (Color effects) EXIT D. Sharpness EXIT...
- Page 25 ® STEINDORFF E. AE Meter EXIT F. AE ISO EXIT G. AE Bias EXIT...
- Page 26 ® STEINDORFF 6. Display setting details A. Date/Time EXIT You can use left and right keys of direction button to change the time. After fixed, you can save the time. B. Display EXIT Date and time information can be stored together with photo taken in SD card. File names also contain date and time information.
- Page 27 ® STEINDORFF C. Format Select “Yes” can format all the SD card inserted; (Attention: Even the protected content will be deleted when formatting, cannot be resumed again.) Select “No” and press menu button, the model comes back to the snap mode.
- Page 28 ® STEINDORFF F. Language EXIT We developed 9 languages according to your demand. G. Beep EXIT H. USB Selection EXIT...
- Page 29 ® STEINDORFF 7. Snapshot & Record A. Snapshot: When you turn on the microscope, press button to snapshot pictures and meantime icon in upper left of LCD screen will show. The pictures automatically stored in SD card. When the card is full, the LCD screen will show “Card full”.
-
Page 30: Technical Specifications
® STEINDORFF 6. TECHNICAL SPECIFICATIONS 6.1. Main specifications Optical System Infinite Optical System Viewing Tube Compensation Free Binocular Tube Inclined at 30° Eyepiece Wide Field Eyepiece 10X, Linear Visual Field: 22 mm Nosepiece Backward Quintuple Nosepiece Infinite Long Working Distance Plan Achromatic: 4X, 40X... -
Page 31: Troubleshooting
® STEINDORFF 7. TROUBLESHOOTING Under certain condition, some no-fault factors will bring a reversible influence to the instrument’s performance. If the problem is happened, please take proper measures according to the follow table. If you can’t solve the trouble by the supplied methods, please contact with the sales department of our company. - Page 32 ® STEINDORFF The light ring and the phase contrast kits Adjust the bolts to center them is not centered The objective used is not fit to the phase Please use the compatible objective contrast observation Moving the culture dish until you When looking at the edge of the culture obtain the phase contrast effect.
- Page 33 ® STEINDORFF PROBLEM REASON SOLUTION Viewing tube: The interpupillar distance is not Adjust the interpupillar distance correct The diopter is not right Adjust the diopter The two eyes’ field of view is When look into the objective, do different not stare at the specimen but at the...
Need help?
Do you have a question about the NYMCS-1290 and is the answer not in the manual?
Questions and answers