Advertisement
Quick Links
STEINDORFF
LCD Digital Stereo Measuring Microscope
NYMCS-343
Instruction Manual
This manual is written for Industrial LCD Microscope NYMCS-343. For safety and for exerting the best
performance, making you familiar with the instrument entirely, it is strongly recommended that you read this
manual carefully before using the microscope.
1
Advertisement

Related Manuals for STEINDORFF NYMCS-343


Summary of Contents for STEINDORFF NYMCS-343
- Page 1 NYMCS-343 Instruction Manual This manual is written for Industrial LCD Microscope NYMCS-343. For safety and for exerting the best performance, making you familiar with the instrument entirely, it is strongly recommended that you read this manual carefully before using the microscope.
-
Page 2: Table Of Contents
Contents Use Notices ………………………………………………………………4 1. Name of Components ………………………………………………………………5 2. Adjust&Operation ………………………………………………………………5 2.1 Installation …………………………………17 3. Installation and Operation of Image Tester ………………………………………………………………22 4. Maintenance Maintenance of LCD microscope …………………………………………………22... - Page 3 Use Notices NYMCS-343 LCD microscope has renovated the traditional way of microscopic observation and adopted a modern way of electronic imaging. Options for accurate 10x-75x magnification range. This patented microscope makes the observation more comfortable and thoroughly resolves the fatigue caused by using a traditional microscope at work for a long time. It features high resolution of LCD display to preview genuine imagings .This unit integrates magnification,...
-
Page 4: Name Of Components
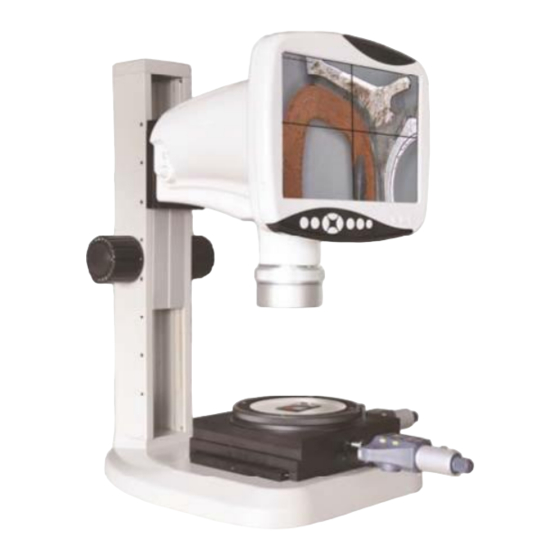
1. Name of Components 1.Components 1. Base Focus adjusting hand wheel Continual zooming LED Ring lamp 5. Operation button layout 6. LCD Screen 7. Measuring stage Based on the model you have purchased, some of the features shown above may change. -
Page 5: Adjust&Operation
2. Adjustment& Operation Operation buttons and function 2.1.1 Operation buttons and functions Crosshair & Coordinate Confirm Button Color: White、Black、Red、Purple、Green Snapshot & Video Playback View Direction key Snapshot & Video Switch Menu: Setting & Exit Snapshot & Video Display button: Only display image and remove kinds of characters, symbols... - Page 6 2.1.2 Power on Before power on, please take out the SD card from the card reader firstly. Insert SD card into SD slot in the right of the microscope head completely until it is locked. Push softly the inserted SD card, it will eject out, then take it out (When the card is under reading or writing, do not pull it out.
- Page 7 2.1.4 Function menu control With the help of the button, it is able to carry out the setting of the whole system. The direction key allows you to choose the following functions: Fig.3 On the snap model,press menu button to enter menu interface. Use direction key to select a setting from the above 3 items.
- Page 8 Select photo resolution button as shown the “Resolution:12M”(12M means the pixels has On snap model, press MENU selected now), then press the OK key to select the pixels for photo taken base on 2M/3M/5M/ 12M use by up & down keys (Fig.11).
- Page 9 B.Camera function setting Exit Camera function setting : Setting up each item. button as show the “Resolution”, then press the left & right key to enter MENU On snap model, press the “Camera Function Setting” (Fig7).Then press up&down key to select as Scene/ WB/ DE/ Contrast/ Sharpness/ AE Meter/ AE ISO/ AE Bias.
- Page 10 Exit Fig.11 Fig.10 Fig.12 Display Setting : Setting up each item. button as show the “Resolution”, then press the left & right key to enter MENU On snap model, press the “Display Setting” (Fig10).Then press up&down key to select as Date/Time、 Display、 Format、 Default settings、Auto power off、Langue、Beep、USB、Version.
- Page 11 You can choose different Scene by MENU button according to the objects observed so that help you to get perfect performance. B. WB (White Balance) Exit WB will help you to obtain superb color when observing. C. DE (Color effects) Exit D.
- Page 12 E. AE Meter Exit F. AE ISO Exit G. AE Bias Exit...
- Page 13 2.1.6 Display setting details A. Date/Time Exit You can use left and right keys of direction button to change the time. After fixed,you can save the time. B. Display Exit Date and time information can be stored together with photo taken in SD card. File names also contain date and time information.
- Page 14 Select “Yes” can format all the SD card inserted;(Attention:Even the protected content will be deleted when formatting, cannot be resumed again.) Select “No” and press menu button, the model comes back to the snap model. D. Reset system settings to default values? E.
- Page 15 We developed 9 languages according to your demand. G. Beep Exit H. USB Selection Exit 2.1.7 Snapshot & Record A. Snapshot On the snap model, press button to snapshot pictures and meantime icon of upper left of LCD screen will show. The pictures automatically stored in SD card. When the card is full, the LCD screen will show “Card full”...
- Page 16 C. Playback Press button to select playback model. Press up & down keys to browse every photo and video which is taken and stored in the SD card. Press left key, the screen will display multi photos and videos. Index display helps to find target photo or video quickly in many pictures and videos.
-
Page 17: Installation
3. Installation and Operation of Image Tester A. Installation of image tester: 1. Installation method and steps of the micrometer: ★ Plug ② support rod of micrometer into ① movable platform clamp spring first, with the LCD screen facing upward, and noting that the support rod of micrometer should be plugged to location. - Page 18 ★ Adjust the black knob at the right side of column for the brightness of bed light source, attaining the sharp image outline. The arrowhead direction is the rotating direction for increasing brightness. The reverse direction is for brightness attenuating and turning off the bed light source power.
- Page 19 Operation Manual of Electronic Micrometer 1. Sketch diagram of structure: 2. LCD screen: IN: The prompt sign for indication of English system measurement mode Set: The prompt sign for indication of initial value setting INC: The prompt sign for indication of relative measurement mode : The prompt sign for under voltage alarm indication of battery...
- Page 20 The function and operation of the key: There are two kinds of key operation: (1) Short press (time < 2 seconds) (2) Long press (time ≥ 2 seconds) 3. 1. ON/OFF … SET: The switch key, delay setting key The key operation < 2 seconds: Power supply ON/OFF of digital display meter The key operation≥2 seconds: Setting initial value of digital display meter of absolute measurement: Display "Set".
- Page 21 ● Digital display meter adopts one SR44 battery. Please replace the battery when the digit displayed on LCD screen is unclear or when displaying " ". ● The digital display meter will cut off the power automatically if the digital display meter is not used for 5 minutes and it will resume to the original value prior to the auto cutting off if rotating the screw rod or pressing "ON/OFF …...
-
Page 22: Maintenance
measuring range: 0-25 (the present product supplied) resolutions: 1 μ m Measurement of force: 5-10 N Power consumption: ≤ 35 μ A operation temperature: 0-40ºC storage temperature: -20 - 60ºC 4.Maintenance 4.1 Maintenance of LCD microscope For the sake of good microscope protection, it is required to avoid dust, water and humidity intruding into the instrument, otherwise, the photo route and the electronic circuit of microscope might be damaged. - Page 23 In case the LCD screen surface is dirty, it is only available to use clean and soft cloth to wipe lightly, and it is forbidden to use organic solution agent to wash and clean. It is forbidden for the consumers to disassemble the microscope by themselves, least there is danger of damage or electric shock.
Need help?
Do you have a question about the NYMCS-343 and is the answer not in the manual?
Questions and answers