
Subscribe to Our Youtube Channel
Related Manuals for STEINDORFF NYMCS-615


Summary of Contents for STEINDORFF NYMCS-615
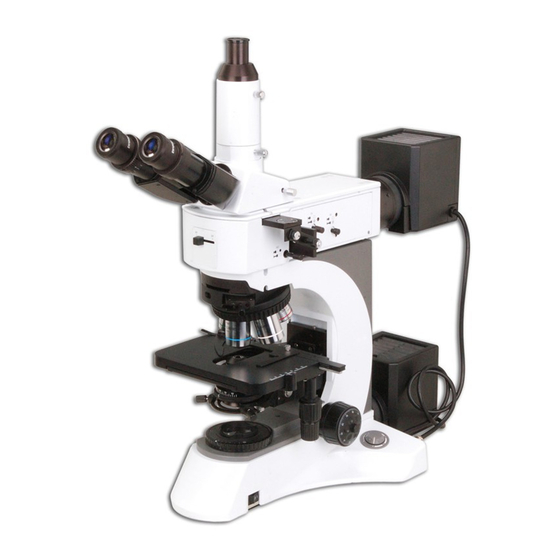
- Page 1 ® STEINDORFF Metallurgical Microscope NYMCS-615 & 616 It is recommended strongly that you study this manual thoroughly before using the microscope. Retain this manual in an easily accessible place near the work desk for future reference...
-
Page 2: Table Of Contents
® STEINDORFF CONTENTS USER NOTICE …………………………………………………………………………………………… Component Names …………………………………………………………………………………… Assembly ……………………………………………………………………………………………... Operation …………………………………………………………………………………………….. Observation Methods ………………………………………………………………………………... Specification ………………………………………………………………………………………….. Troubleshooting ………………………………………………………………………………………... -
Page 3: User Notice
® STEINDORFF USER NOTICE Safety note: Carefully open the box, avoid the accessories, like lens, dropping to ground and being damaged. Do keep the instrument out of direct sunlight, high temperature or humidity, dusty and easy shaking environment. Make sure the stage is smooth, horizontal and firm enough. -
Page 4: Component Names
® STEINDORFF 1. COMPONENT NAMES Light Path Selector Lever Trinocular Viewing Unit Analyzer Insertion Slot Lamp housing Mirror Selector Lever ND Filter Lever Filter Insertion Slot (The filter should be inserted from the left) DIC attachment (optional) Aperture Diaphragm Lever... -
Page 5: Assembly
2. INSTALLATION 2.2. Installation Diagram The following figure shows the installation sequence of the components take NYMCS-615/616 for example. The number in the figure show the installation steps. Before installing, be sure every components is clean, do not score any parts or glass surface. - Page 6 ④ ⑤ Fig. 1, Fig. 2 show the installation sequence of the components which take NYMCS-615/616 for example. For BS-6022RF, there are two limit bolt holes with different height on the guide board ② to meet with sample which have different thickness: the upside hole is for sample with 0 ~...
- Page 7 ® STEINDORFF 2.2.2. Installing the reflected light brightfield/darkfield ⑧ illuminator ⑦ Installing the reflected light illuminator (Fig. 4) on the head of microscope body (Fig. 5), and turn to a proper position, then screw down the bolt ⑥ to fix it.
- Page 8 ® STEINDORFF 2.2.5. Installing the Video Port (optional) Insert the video port (Fig. 8) into the trinocular unit (Fig. 6), then screw down the bolt ⑨ to fix it. 2.2.6. Installing the Eyepiece Insert the eyepiece (Fig. 9) into the eyepiece tube until they are against each other.
- Page 9 ® STEINDORFF 2.2.8. Attaching the Halogen Bulb ① ② The applicable lamp bulb is the 24v 100w Halogen. Fully loosen the clamping screw ① at the top of the lamp housing using the provided hexagon wrench. Remove the lamp housing ② by lifting it up.
-
Page 10: Operation
® STEINDORFF 3. OPERATION 3.1. Turning on the Lamp Connect the power, press the main switch ① to the “I” (on) position. 3.2. Adjust Brightness Turning the brightness adjustment knob ② clockwise, the ① ② voltage raise, and the brightness strengthen; turning with the anti-direction, the voltage decline, and the brightness Fig. - Page 11 ® STEINDORFF ② 3.4. Placing Specimen ① ③ Fix the specimen ② on the sample board ① by plasticine ③, be sure that the specimen surface is parallel to the sample board . It is conveniently to use smoothing presses to flatten the specimen (Fig.
- Page 12 ® STEINDORFF 3.7. Focus When not using the video set ① Push in the light path selector lever ① completely, then observe with both eyes. Use the 10x objective focus, to avoid the objective touch with the specimen, you should raise the mechanical stage at first, let the specimen close to the objective, then slowly separating them to focus.
- Page 13 ® STEINDORFF 3.8. Using the ND Filter Knob The ND Filter is interlocked with brightfield (BF) light path switching so it can be engaged or disengaged according to the mirror selector lever ① .The ND filter makes it possible to reduce the glare when darkfield (DF)is switch to brightfield (BF).
- Page 14 ® STEINDORFF 3.10. Selecting the Light Path of the trinocular Tube Slide the mirror selector lever ① toward the indication of the mirror for the desired observation method. BF: Reflected light brightfield observation ③ ② DF: Reflected light darkfield observation Be sure to slide the mirror selector lever until it contacts the stopper.
- Page 15 ® STEINDORFF 3.12. Centering the Aperture Iris Diaphragm (AS) Slide the mirror selector lever to “BF”. Engage the 10X objective by rotating the revolving nosepiece, place the specimen on the stage and adjust approximate focusing. Remove the eyepiece, look into the eyepiece sleeve and pull the AS knob ⑤, so that the aperture is about 70%.
- Page 16 ® STEINDORFF 3.14. Adjusting the Swing out Condenser (Fig. 32) The center of the condenser and the light axes of the objective are coaxial. It has been adjusted before leaving factory, so the user needn’t to adjust them by self.
-
Page 17: Observation Methods
® STEINDORFF 4. OBSERVATION METHODS 4.1. Reflected Light Brightfield/Darkfield Observation The following flow shows the basic operating procedure for reflected light brightfield or darkfield observation. Controls Used Page Select the brightfield (BF) or darkfield (DF) observation Mirror selector lever (P. 13) Main switch (P. - Page 18 ® STEINDORFF 4.2. Reflected Light Simplified Polarized Light Observation Setting the Analyzer and Polarizer (Fig. 15). Place the specimen on the stage and adjust the focus by moving the stage up or down. Now simplified polarized light Observation can be started.
-
Page 19: Specification
® STEINDORFF 5. SPECIFICATIONS S-615 S-616 ● ● Optical system Infinite Optical System Exceed wide field ocular EW10x/22, tube Φ30mm ● ● Eyepiece (Ocular) ● ● 10x/0.25/∞/- (BF/DF), WD 10.0 mm ● ● 20x/0.4/∞/0 (BF/DF), WD 4.30mm ● 40x/0.65/∞/0.17, WD 0.54 mm Infinite plan achromatic 100x/1.25/∞/0.17, WD 0.13 mm... -
Page 20: Troubleshooting
® STEINDORFF 6. TROUBLESHOOTING 6.1. Optical Part PROBLEM REASON FOR PROBLEM SOLUTION The aperture or field iris diaphragm is closed. Open the aperture and field iris diaphragms. Analyzer and polarizer are engaged in light Disengage them from light path. path. - Page 21 ® STEINDORFF 6.2. Mechanical Part PROBLEM REASON FOR PROBLEM SOLUTION The tension adjustment collar is too tight Loose properly The coarse focus knob is hard to run Pre-focusing lever is locked. Release pre-focusing lever. Stage drifts down by itself or Tension adjustment ring is too loose.
Need help?
Do you have a question about the NYMCS-615 and is the answer not in the manual?
Questions and answers