Table of Contents
Advertisement
Quick Links
Advertisement
Chapters
Table of Contents

Related Manuals for Jetter JetControl 365MC


Summary of Contents for Jetter JetControl 365MC
- Page 1 User Manual JetControl 365MC Controller 60880627_01 We automate your success.
- Page 2 This document has been compiled by Jetter AG with due diligence based on the state of the art as known to them. Any revisions and technical advancements of our products are not automatically made available in a revised document. Jetter AG shall not be liable for any errors either in form or content, or for any missing updates, as well as for any damage or detriment resulting from such failure.
-
Page 3: Table Of Contents
DC power supply inputs and outputs................ 23 5 Mechanical installation ........................ 24 Installing the device on the DIN rail ................... 24 Removing the device from the DIN rail.................. 25 Dismounting the enclosure from the backplane module............ 26 User Manual – JetControl 365MC... - Page 4 Application Program Memory .................. 79 8.2.4 Memory for volatile application program variables ............ 80 8.2.5 Memory for non-volatile application program registers.......... 81 8.2.6 Memory for non-volatile application program variables .......... 82 8.2.7 Registers on I/O modules .................... 83 User Manual – JetControl 365MC...
- Page 5 Startup delay time........................ 95 System runtime registers...................... 96 Monitoring interface activities .................... 96 8.10 Jetter Ethernet system bus...................... 97 8.11 Control of alphanumeric displays and HMIs ................ 98 8.12 Controlling printer and serial interfaces .................. 98 8.13 Project Engineering of a JX2 Station.................. 99 8.14 Project Engineering of a JX3 Station..................
- Page 6 Table of Contents 12 Spare parts and accessories ...................... 142 12.1 Spare parts .......................... 142 12.2 Accessories .......................... 142 12.2.1 CAN bus cable...................... 142 12.2.2 Ethernet Cable...................... 143 12.2.3 Cable for the serial interface.................. 143 User Manual – JetControl 365MC...
-
Page 7: Introduction
For information on new revisions of this document, visit the download area on our website. This document is not subject to any updating service. Start | Jetter - We automate your success. For further information refer to the following information products: ■... -
Page 8: Safety
Machinery Directive This device is no safety-related part as per Machinery Directive 2006/42/EC, and must, therefore, not be used for safety-relevant applications. This device is NOT intended for the purpose of personal safety, and must, therefore, not be used to protect persons. User Manual – JetControl 365MC 8 / 148... -
Page 9: Warnings Used In This Document
Indicates a hazardous situation which, if not avoided, could result in minor or moderate injury. NOTICE Material damage Indicates a situation which, if not avoided, could result in mal- functions or material damage. User Manual – JetControl 365MC 9 / 148... -
Page 10: Product Description
Besides traditional control functions, this controller also offers the possibility to program servo drives as point-to-point axes, axis groups and complex path con- trols thanks to its motion control functionalities. 3.1 System overview Fig. 1: System overview User Manual – JetControl 365MC 10 / 148... -
Page 11: Design
Programming in high-level language STX according to IEC 61131-3 ■ Non-volatile variable memory: 240,000 bytes (with option -R: 480,000) 60,000 registers (with -R option: 120,000) ■ STX program/data memory: 24 MB ■ 1 serial port (RS-232/422/485) User Manual – JetControl 365MC 11 / 148... -
Page 12: Status Indication
Application program is being executed. No error occurred. Blinking at 1 There is no valid OS. Blinking at Reset, fatal error, or checking the network con- 4 Hz sistency. Error; refer to error register. User Manual – JetControl 365MC 12 / 148... -
Page 13: Led States During The Boot Process
The controller only executes phases 5a and 5b only if a time value is entered in R 202971 Start delay. Color Green The first half of the start de- lay is in progress. Blinking 1 Hz 1 Hz pattern User Manual – JetControl 365MC 13 / 148... -
Page 14: Led States After Detection Of An Ip Address Conflict
Color The controller has detected an IP address conflict. Blinking 1 Hz 1 Hz pattern To exit this state, the following two steps must be taken: Resolve the IP address conflict. Reboot the controller. User Manual – JetControl 365MC 14 / 148... -
Page 15: Nameplate
Path control: 4, 8 or 12 servo axes Additional option: Memory expansion to 120,000 non-volatile regis- ters INFO Ordering additional options Specify your desired options in the order. The controller cannot be equipped with additional features afterwards. User Manual – JetControl 365MC 15 / 148... - Page 16 SSI (Server side includes). ■ SMTP client: The SMTP client lets you send e-mails. Modbus/TCP The controller supports the Modbus/TCP protocol. The controller can act as both server and client. User Manual – JetControl 365MC 16 / 148...
-
Page 17: Technical Specifications
This chapter contains information on electrical and mechanical data as well as operating data of the JC-365MC. 4.1 Dimensions 100.7 Fig. 5: Dimensions in mm INFO CAD data CAD data of the device can be found in the download area of our homepage. User Manual – JetControl 365MC 17 / 148... -
Page 18: Mechanical Specifications
DIN EN 61131-2 DIN EN 60068-2-27 Intensity and duration 15 g for 11 ms Number and direction 3 shocks in the directions of all 3 spatial axes Degree of protection Degree of protection IP20 DIN EN 60529 Tab. 2: Mechanical specifications User Manual – JetControl 365MC 18 / 148... -
Page 19: Electrical Properties
10 Mbit/s, 100 Mbit/s (Cat 5e) Auto-crossover Tab. 5: Ethernet interface (ports X14, X15) CAN bus interface Parameter Description (port X19) Terminal type Female Sub-D connector Number of pins Electrical isolation None Tab. 6: CAN bus interface (port X19) User Manual – JetControl 365MC 19 / 148... -
Page 20: System Power Supply
JX3 system bus Logic voltage Supply voltage DC +5 V Permissible voltage range -15 % ... +10 % Additional voltage Supply voltage DC +24 V Permissible voltage range -15 % ... +20 % Tab. 10: System bus User Manual – JetControl 365MC 20 / 148... -
Page 21: Real-Time Clock
Degree of pollution - Elec- Degree of pollution 2 DIN EN 61131-2 tronics Usually, the pollution is non-conductive. However, temporary conductivity due to condensation may occur. Tab. 13: Environmental conditions User Manual – JetControl 365MC 21 / 148... -
Page 22: Emi Values
DIN EN 61000-6-2 DIN EN 61000-6-2 tr/tn 5/50 ns DIN EN 61000-4-4 Repetition frequency 5 kHz Criterion A Surge voltages, asymmetric, line to earth Common-mode tr/th 1.2/50 µs DIN EN 61131-2 interference DIN EN 61000-6-2 1 kV DIN EN 61000-4-5 Tab. 16: Immunity of shielded data and I/O lines User Manual – JetControl 365MC 22 / 148... -
Page 23: Dc Power Supply Inputs And Outputs
0.5 kV DIN EN 61000-4-5 Surge voltages, asymmetric, line to earth Common-mode interfer- tr/th 1.2/50 µs DIN EN 61131-2 ence DIN EN 61000-6-2 1 kV DIN EN 61000-4-5 Tab. 17: DC power supply inputs and outputs User Manual – JetControl 365MC 23 / 148... -
Page 24: Mechanical Installation
Place the upper latch (2) in angled position on the DIN rail (1). Snap the lower latch of the device onto the lower edge of the DIN rail. Slide the device to its intended position. User Manual – JetControl 365MC 24 / 148... -
Page 25: Removing The Device From The Din Rail
DIN rail release latch Detail view Disconnect the system from the power supply. Remove the device from the mains. Pry the release latch (2) downwards and pull the device off the DIN rail (1). User Manual – JetControl 365MC 25 / 148... -
Page 26: Dismounting The Enclosure From The Backplane Module
DIN rail latch Detail view Disconnect the system from the power supply. Press the upper and lower latches (1) on the device simultaneously. Keep the latches pressed and pull off the enclosure straight forward. User Manual – JetControl 365MC 26 / 148... -
Page 27: Electrical Connection
Electric Cabinet. The following instructions are excerpts from Application Note 016: ■ Separate signal and power lines physically. Jetter AG recommends a dis- tance greater than 20 cm. Cables and lines should cross each other at an an- gle of 90°. -
Page 28: Fig. 9 Strain Relief On The Sub-D Housing
■ Only use metallized connectors, e.g. Sub-D with metallized housing. Make sure that the strain relief is directly connected with the housing here as well. Fig. 9: Strain relief on the Sub-D housing User Manual – JetControl 365MC 28 / 148... -
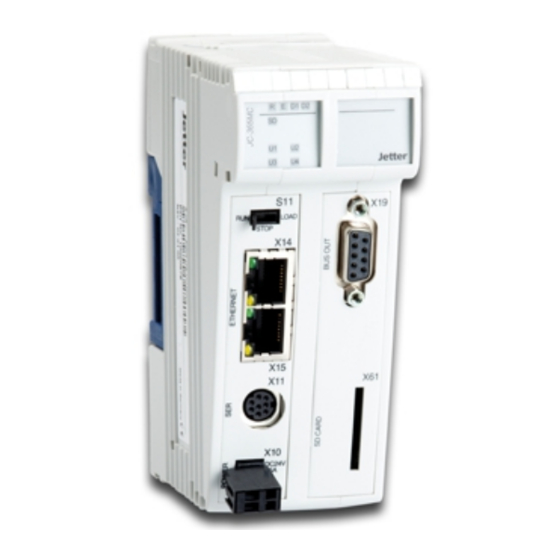
Page 29: Ports And Interfaces
The controller checks the position of selector S11. If ..then ..mode selector S11 = RUN, ... the application program is launched..mode selector S11 = STOP, ... the application program does not start. User Manual – JetControl 365MC 29 / 148... -
Page 30: Terminal X10 - Power Supply
■ Voltage supply of the connected JX3 IO modules provided they are not sup- plied by a separate power supply module. ■ Voltage supply of an HMI (LCD xxx) of the Jetter AG connected to X11 Pin assignment Description DC24V... -
Page 31: Port X11 - Serial Interface
To connect devices to port X11, you can order cables separately as accessories [} 143]. Schematic diagram of port X11 +3V3 33 k X11.3 [RDB] X11.1 [RDA] 33 k +3V3 33 k X11.5 [SDB] X11.7 [SDA] 33 k Fig. 10: Schematic diagram of port X11 User Manual – JetControl 365MC 31 / 148... -
Page 32: Ports X14, X15 - Ethernet
Select a terminating resistor which corresponds to the impedance of the line used. Connecting alphanumeric displays and HMIs The serial interface (port X11) of the JC-365MC lets you connect HMIs by Jetter. INFO Further information For more information on this topic refer to the application-oriented manual Controlling alphanumeric HMI devices (LCD) and printers available in the down- load area of our homepage. -
Page 33: Port X19 - Can Bus
Data signal for CAN bus 1 CAN-H_2 Data signal for CAN bus 2 Unused CAN bus cable To connect devices to the CAN bus, you can order cables separately as accessories [} 142]. User Manual – JetControl 365MC 33 / 148... -
Page 34: Fig. 11 Y-Cable (Splitter Cable) For The Can Bus Interface
The 9-pin Sub-D connector of the Y-cable has the following pin assignment: Connector (A) Signal Description CMODE0 Commissioning CAN-L Data signal CAN 1 Reference potential CMODE1 Commissioning CAN-L_2 Data signal CAN 2 CAN-H Data signal CAN 1 CAN-H_2 Data signal CAN 2 User Manual – JetControl 365MC 34 / 148... -
Page 35: Tab. 20 Jx2 System Bus Cable - Specification
250 kBaud: Max. 60 Ω/km 125 kBaud: Max. 60 Ω/km Number of cores Shield Complete shielding, no paired shielding Twisting CAN_L and CAN_H cables are twisted pairwise Tab. 20: JX2 system bus cable - Specification User Manual – JetControl 365MC 35 / 148... -
Page 36: Fig. 12 Connection Diagram Of The System Bus Cable
Data signal Female Sub-D Pinout of the 9-pin female Sub-D connector to the JX2 system bus cable: connector Signal name Description CMODE0 Commissioning CAN-L Data signal Reference potential CMODE1 Commissioning CAN-H Data signal User Manual – JetControl 365MC 36 / 148... - Page 37 Baud rates The baud rate setting depends on the number of modules connected to the JX2 system bus: JX2-I/O modules JX-SIO JX2 slave 1000 CANopen modules kBaud kBaud kBaud kBaud modules JetMove JX3-BN-CAN User Manual – JetControl 365MC 37 / 148...
-
Page 38: Slot X61 - Sd Memory Card
The SD card is released from the card slot. Pull the SD card straight out. ð If you have removed the SD card, the SD status LED lights up twice for 100 User Manual – JetControl 365MC 38 / 148... -
Page 39: Commissioning
No error Normal operating condition Boot loader is not running The controller does not access the SD card U1 … LEDs which are programmed depending on the application User Manual – JetControl 365MC 39 / 148... - Page 40 Commissioning/Initial Commissioning/Controllers/JetControl controllers. JetSym STX The following program increments the content of a variable by one every 2 sec- program onds: Count: Int; End_Var; Task Increment Autorun Loop Inc(Count); Delay(T#2s); End_Loop; End_Task; User Manual – JetControl 365MC 40 / 148...
- Page 41 Setup pane The JetSym setup pane shows the content of the variable: Number Description Function Present content of the The content of the variable is incremented variable by one every 2 seconds User Manual – JetControl 365MC 41 / 148...
-
Page 42: Configuring Error States
To find out about the exact amount of connectible expansion modules use the JX3-sysbus_configurator_xxx_e which is available for download from our homepage. INFO Further information For more information on this subject, refer to the JetSym Online Help. User Manual – JetControl 365MC 42 / 148... -
Page 43: Configuration In Jetsym
Now, you can activate the digital outputs X32.9...16. Launch the programming tool JetSym. Create a new project. Interconnect the Jetter AG controller and expansion modules and the PC via the Ethernet system bus. Switch on the power supply. Start the Hardware Manager in JetSym by clicking on the Hardware tab or by pressing [Alt] + [5] on your keyboard. - Page 44 LED 9 of the JX3-DIO16 flashes. The status indication is updated every 5 seconds. JetSym STX Output 9 of the module JX3-DIO16 is set and then reset again. program Task Flashing_light Autorun Loop OUTPUTS[100000309] := True; Delay(T#5s); OUTPUTS[100000309] := False; Delay(T#5s); End_Loop; End_Task; User Manual – JetControl 365MC 44 / 148...
-
Page 45: Identification And Configuration
If you format the flash disk or SD card, the EDS file will not be affected. File structure The EDS file is a text file the entries of which are grouped into several sections. User Manual – JetControl 365MC 45 / 148... -
Page 46: Tab. 21 Section [Identification]
PcbRev PCB revision PcbOpt PCB option OSVersionMin 0.0.0.0 The product is available as of this OS ver- sion BLVersionMin 0.0.0.0 The <Produktname> is available as of this bootloader version Tab. 21: Section [IDENTIFICATION] User Manual – JetControl 365MC 46 / 148... -
Page 47: Tab. 22 Section [Production]
A realtime clock is available MotionControl Motion Control feature is available Axes Number of supported JX2 axis modules Web server and e-mail client are available ModbusTCP Modbus/TCP client and server are avail- able Tab. 23: Section [FEATURES] User Manual – JetControl 365MC 47 / 148... -
Page 48: Tab. 24 Register Numbers Of The Eds
Serial number … MR 707 MR 708 Production date: Day MR 709 Month Production date: Month MR 710 Year Production date: Year MR 711 TestNum Internal usage MR 712 TestRev Internal usage User Manual – JetControl 365MC 48 / 148... -
Page 49: Version Registers
The operating system provides several registers which can be used to read out the hardware revision or OS version of the device and its components. You will need this information when contacting the Jetter AG support hotline in case of a problem. -
Page 50: Tab. 27 Format Of Software Version Numbers
Operating system version 210001 Version of the execution unit for the STX application program 100002000 Version of the JX3 system bus driver 200002000 Version of the JX2 system bus driver Tab. 28: Registers - Overview User Manual – JetControl 365MC 50 / 148... -
Page 51: Ip Configuration
JC-365MC. INFO Downloading JetIPScan Jetter AG provides the JetIPScan program on its homepage http://www.jetter.de. You will find the file jetipscan_1-11-00.zip for download under Downloads - Software - Other Software Tools - JetIpScan. Contents of the ZIP The zip file jetipscan_1-11-00.zip contains the following files:... - Page 52 JetIPScan is launched and shows all IP addresses, which are presently active on your PC. Select the interface (IP address) of the device whose IP address you want to determine. ð Among others, JetIPScan shows the IP address of the JC-365MC. User Manual – JetControl 365MC 52 / 148...
-
Page 53: Configuration Memory
Tab. 30: Configuration memory - Default values Storage location/ The configuration memory is located on the backplane module. Owing to this ap- controller proach, configuration data will be preserved when the function module is re- replacement placed. User Manual – JetControl 365MC 53 / 148... -
Page 54: Configuration File "Config.ini
Example This is an example of a configuration file config.ini: ;JC-365MC System Configuration ;Copyright (c) 2008 by Jetter AG [IP] Address = 192.168. 50. 1 SubnetMask = 255.255.255. 0 DefGateway = 192.168. 50. 11 DNSServer = 192.168. - Page 55 192.168.1.44 Function IP address of the server for the Domain Name Sys- Allowed values ≥ 0.0.0.0 < 223.255.255.255 In the event of an illegal Value is set to 0.0.0.0. value Tab. 33: DNSServer User Manual – JetControl 365MC 55 / 148...
- Page 56 Property Description In the given example 50000 Function IP port for OS update and communication between devices Allowed values 1024 ... 65535 In the event of an illegal 50000 value Tab. 36: JetIPBase User Manual – JetControl 365MC 56 / 148...
- Page 57 Copy the config.ini configuration file you created into the system folder. Clear the FTP connection. Reboot. ð The new configuration is active. Configuration registers let you also make changes to the IP configuration. User Manual – JetControl 365MC 57 / 148...
-
Page 58: Configuration Registers
Domain Name System MR 32 HOSTNAME SuffixType The type of the automatically generated suffix that is at- tached to the controller name MR 33 Name Specifies the controller name … MR 51 User Manual – JetControl 365MC 58 / 148... -
Page 59: Setting The Ip Address
Remove the controller enclosure from the backplane module. Make the corresponding DIP switch settings. Reattach the controller enclosure to the backplane module. ð After the restart, the device can be reached at the new IP address. User Manual – JetControl 365MC 59 / 148... - Page 60 JC-365MC. INFO Downloading JetIPScan Jetter AG provides the JetIPScan program on its homepage http://www.jetter.de. You will find the file jetipscan_1-11-00.zip for download under Downloads - Software - Other Software Tools - JetIpScan. Contents of the ZIP The zip file jetipscan_1-11-00.zip contains the following files:...
-
Page 61: Fig. 15 Jetipscan - Command Options
JetIPScan_V_1-11-00.exe -W -M 250.255.248.0. Execute the batch file. JetIPScan is launched and shows all interfaces, which are presently active on your PC. For all further steps, please refer to the instruction Changing the IP address. User Manual – JetControl 365MC 61 / 148... - Page 62 Choose a user login with administrator or system rights. Default login information: User: admin; Password: admin User: system; Password: system Open the System folder of the JC-365MC. Copy the config.ini file to the System folder. Clear the FTP connection. Reboot. User Manual – JetControl 365MC 62 / 148...
-
Page 63: Fig. 14 Dip Switch Sliders 1
OFF OFF OFF OFF OFF OFF OFF aaa.bbb.ccc.1 OFF OFF OFF OFF OFF OFF aaa.bbb.ccc.2 OFF OFF OFF OFF OFF OFF aaa.bbb.ccc.3 … … … … … … … … … aaa.bbb.ccc.254 from config.ini User Manual – JetControl 365MC 63 / 148... - Page 64 The EEPROM data on the backplane module allow for 100,000 write cycles. ► Read a value first. ► Compare the value. ► Write only if you actually want to change the value. User Manual – JetControl 365MC 64 / 148...
- Page 65 IP address of the default gateway INFO Important note The settings made during runtime do not overwrite the parameters in the configu- ration memory. When de-energizing the controller, your settings will be lost. User Manual – JetControl 365MC 65 / 148...
- Page 66 This makes the JC-365MC import the IP address from the config.ini file and the GNN from the lower eight positions of the DIP switches sliders. The DIP switch sliders are binary-coded. ■ Valid values for the GNN: 1 ... 199. User Manual – JetControl 365MC 66 / 148...
-
Page 67: Using Names For Ip Addresses
If … … then … ... the controller could resolve the ... proceed with step 6. name, ..the controller could not resolve ... proceed with step 5. the name, ... User Manual – JetControl 365MC 67 / 148... - Page 68 If a name cannot be found in the /etc/hosts file, the JC-365MC tries to resolve System (DNS) the IP address by DNS server request. During the boot process the JC-365MC reads the IP address of the DNS server from the configuration memory. User Manual – JetControl 365MC 68 / 148...
-
Page 69: Operating System
JC-365MC: ■ This controller ■ Bus node JX3-BN-ETH on the Jetter Ethernet system bus ■ JX3 IO modules on the JX3 system bus ■ Slave modules on a JX2 system bus 7.3.1 Operating system update of the controller This chapter describes how to carry out an OS update of the JC-365MC control system. - Page 70 An automatic OS update of the controller from an SD card can be carried out us- ing the AutoCopy function. INFO Further information For more information on this subject refer to the application-oriented manual File System available for download from our homepage. User Manual – JetControl 365MC 70 / 148...
-
Page 71: Operating System Update Of A Jx2 Or Jx3 Module
You have got several options to transfer the OS file to the module: ■ From within the JetSym programming tool ■ Via FTP connection ■ From SD card ■ From within the application program User Manual – JetControl 365MC 71 / 148... - Page 72 Wait until the update process is completed. If you want to update further mod- ules, repeat steps 1 ... 6. Set the mode selector to STOP or RUN. To activate the transferred OS, re-boot the controller. User Manual – JetControl 365MC 72 / 148...
- Page 73 An automatic OS update of a JX2 or JX3 module from an SD card can be exe- cuted via the AutoCopy function. INFO Further information For more information on this subject refer to the application-oriented manual File System available for download from our homepage. User Manual – JetControl 365MC 73 / 148...
- Page 74 // 4. Sett the flag 'UpdateIt' //***************************************************** Task OSupdate Autorun Var ResCopy: Int; End_Var; Loop UpdateIt := False; When UpdateIt Continue; ResCopy := FileCopy(SourceName, DestinationName); Trace('Result : ' + IntToStr(ResCopy) + '$n'); End_Loop; End_Task; User Manual – JetControl 365MC 74 / 148...
-
Page 75: File System
Separate directory names by a slash "/", not by a backslash "\". ■ When the controller creates a file, the file contains date and time assigned by the controller. ■ Date, time, and file size are not available for all system files. User Manual – JetControl 365MC 75 / 148... - Page 76 The number of directory levels depends on the formatting. ■ There is no user/access administration. Jetter AG cannot guarantee the proper functioning of all SD memory cards avail- able on the market. User Manual – JetControl 365MC 76 / 148...
-
Page 77: Programming
Format of numerical values Keyword Var, When, Task Commands BitClear(); Constant numerical values 100 0x100 0b100 Comment // This is a com- ment Further program processing // ... Tab. 50: JetSym sample programs User Manual – JetControl 365MC 77 / 148... -
Page 78: Storage Options - Overview
By JetSym ■ Via FTP connection ■ By the email client ■ Via a browser (via the HTTP server) ■ Via file commands from the application program and through the AutoCopy function User Manual – JetControl 365MC 78 / 148... -
Page 79: Application Program Memory
To view the memory utilization, go to the Hardware tab and click on CPU. On the right side you can see the STX memory usage. Click the Refresh button and the current STX memory usage will be displayed. User Manual – JetControl 365MC 79 / 148... -
Page 80: Memory For Volatile Application Program Variables
Setup pane The JetSym setup pane shows the content of the variable: Number Description Function Present content of the The content of the variable is incremented variable by 1 every 2 seconds User Manual – JetControl 365MC 80 / 148... -
Page 81: Memory For Non-Volatile Application Program Registers
The JetSym setup pane displays the content of the register variable. Number Element Description Present content of The content of the register variable is incre- the register variable mented by 1 every time the program is launched. User Manual – JetControl 365MC 81 / 148... -
Page 82: Memory For Non-Volatile Application Program Variables
Current content of The content of the variable is incremented by 5 the variable Cnt3 every second. Current content of The content of the variable is incremented by the variable Cnt4 10 every second. User Manual – JetControl 365MC 82 / 148... -
Page 83: Registers On I/O Modules
100030002; End_Var; Task SetSpeed Autorun Loop If SpeedIn > Then AxSpeed := SpeedIn * 0.35; End_If; Delay(T#100ms); End_Loop; End_Task; Setup pane The JetSym setup pane displays the content of the register variable. User Manual – JetControl 365MC 83 / 148... -
Page 84: Memory For Non-Volatile Registers On The Backplane Module
JX3 backplane module, is displayed on the HMI when the program is launched: StationNo: Int %VL 108100; End_Var; Task DisplayStation Autorun DisplayText(0, 1, '_Station : DisplayValue(0, 0, StationNo); Loop // ... End_Loop; End_Task; User Manual – JetControl 365MC 84 / 148... -
Page 85: Special Registers
I/O numbers on the JX2 system bus: 200000201 … 200002416 ■ I/O numbers on the JX3 system bus: 100000201 ... 100001716 ■ I/O numbers of remote devices connected to a JX3-BN-ETH: 1nnn010201 ... 1nnn011716 (nnn = GNN) User Manual – JetControl 365MC 85 / 148... - Page 86 Present state of out- The outputs are set and reset one after an- puts other. Present content of When the input is set, the corresponding out- the input put is activated for 100 ms. User Manual – JetControl 365MC 86 / 148...
-
Page 87: Flag
Flag numbers: 2048 ... 2303 Types of access ■ By JetSym ■ By the email client ■ Via a browser (via the HTTP server) ■ From HMIs ■ From within the application program User Manual – JetControl 365MC 87 / 148... - Page 88 LED in key F1 is enabled, LED in key F2 is flags disabled. Present state of the The counter is incremented when F1 is Counter variable pressed, and decremented when F2 is pressed. User Manual – JetControl 365MC 88 / 148...
-
Page 89: Saving And Loading An Application Program
System available for download from our homepage. 8.4 Addressing expansion modules Addressing Controllers and expansion modules produced by Jetter AG offer a host of func- expansion modules tions which can be accessed by the user via registers. Physically, sensors and actuators are connected to the expansion modules which then establish the con- nection to the automated system. -
Page 90: Numbering Registers And I/Os
I/O number of the module. The I/O numbers always start with the constant prefix 10000. Digits Description Value range 10000XXZZ 10000 Prefix Fig. 20: Example: I/O numbers Position of the module in the system 02 … 17 Module-specific I/O number 01 … 16 User Manual – JetControl 365MC 90 / 148... -
Page 91: Fig. 21 System Overview
Ethernet bus node and controller communicate via Ethernet system bus. When addressing expansion modules via Ethernet bus node, the Global Node Number (GNN) becomes part of the register number. System overview Ethernet TCP/IP Fig. 21: System overview User Manual – JetControl 365MC 91 / 148... -
Page 92: Fig. 22 Example: Register Numbers
Up to 64 Ethernet bus nodes per controller Up to 16 JX3 I/O modules per Ethernet bus node Definition - Global The Global Node Number (GNN) is an ID number used to identify Jetter devices Node Number (e.g. controllers, bus nodes) within an Ethernet network: ■... - Page 93 R E D1 D2 BUS-IN BUS-IN LOAD DC24V DC24V STOP BUS-OUT BUS-OUT DC24V DC24V ENCODER ENCODER DC24V 1,2A Number Module Slave module number Registers JC-3xx Refer to documentation on JC‑3xx JM-206 200012zzz JM-206 200013zzz User Manual – JetControl 365MC 93 / 148...
- Page 94 Module-specific I/O number 1 ... 16 Example Several JX2-I/O modules are connected to a JC-3xx controller. R E D1 D2 0V 24V POWER INPUT LOAD DC24V DC24V STOP DC24V DC24V INPUT DC24V 1,2A User Manual – JetControl 365MC 94 / 148...
-
Page 95: System Commands
The controller supports a time delay of the boot process. You can enter the delay time in a register. INFO Further information For more information on this subject refer to the application-oriented manual System Registers available for download from our homepage. User Manual – JetControl 365MC 95 / 148... -
Page 96: System Runtime Registers
When the service technician connects an HMI, the application program auto- matically displays additional status information. INFO Further information For more information on this subject refer to the application-oriented manual System Registers available for download from our homepage. User Manual – JetControl 365MC 96 / 148... -
Page 97: Jetter Ethernet System Bus
Jetter AG Programming | 8 8.10 Jetter Ethernet system bus The controller uses the Jetter Ethernet system bus as interface. The bus is based on TCP, UDP/IP and can therefore be used in parallel with other TCP, UDP/IP protocols. Application... -
Page 98: Control Of Alphanumeric Displays And Hmis
The display functions are part of the language scope of STX. INFO Further information For more information on this topic refer to the application-oriented manual Controlling alphanumeric HMI devices (LCD) and printers available in the down- load area of our homepage. User Manual – JetControl 365MC 98 / 148... -
Page 99: Project Engineering Of A Jx2 Station
Modules to connect You can connect all JX3-IO modules except JX3-COM-xxxx modules to a JX3 station. INFO Further information For more information on this subject refer to the application-oriented manual JX3 System available for download from our homepage. User Manual – JetControl 365MC 99 / 148... -
Page 100: Jcf-Sv1 "Simple Servo Function
Commands, such as POS, and AXARR, or a Motion API are not available. INFO Further information For more information on this subject refer to the application-oriented manual JCF-SV1 OS Function available for download from our homepage. User Manual – JetControl 365MC 100 / 148... -
Page 101: E-Mail Feature
Modbus/TCP available Bit 7 FTP client available Tab. 51: Web status INFO Further information For more information on this subject refer to the application-oriented manual File System available for download from our homepage. User Manual – JetControl 365MC 101 / 148... -
Page 102: Modbus/Tcp
This class uses commands for reading and writing multiple registers. One frame transmits up to 125 registers of 16 bits width. As protocol ID "0" is used. Assignment of transmitted and received frames is car- ried out using the transaction ID. User Manual – JetControl 365MC 102 / 148... -
Page 103: Modbus/Tcp Server
Value after reset 100000000 Tab. 54: Input offset R 272705 Output offset The basic address for accessing outputs via Modbus/TCP is entered into R 272705. Property Description Value after reset 100000000 Tab. 55: Output offset User Manual – JetControl 365MC 103 / 148... - Page 104 Reading inputs blockwise in 16-bit words The starting register number within the controller is cal- culated as follows: Add the register number specified in the command to the content of R 272702 Register Off- set. User Manual – JetControl 365MC 104 / 148...
-
Page 105: Modbus/Tcp Client With Stx Functions
These functions copy data between registers of a Modbus/TCP server and STX variables. They establish a connection to the specified Modbus/TCP server, transmit the desired data and clear down the connection again. User Manual – JetControl 365MC 105 / 148... - Page 106 Configuration: RSCAN_DSCR): Int; Function RemoteScanStart(Protocol: int): Int; Function RemoteScanStop(Protocol: int): Int; Tab. 59: System functions vs. JetSym STX functions INFO Further information For more information on this subject, refer to the JetSym Online Help. User Manual – JetControl 365MC 106 / 148...
-
Page 107: User-Programmable Serial Interface
The following applications are possible: ■ Server ■ Client ■ TCP/IP ■ UDP/IP INFO Further information For more information on this subject refer to the application-oriented manual User-Programmable Interfaces available for download from our homepage. User Manual – JetControl 365MC 107 / 148... -
Page 108: User-Programmable Can Interface
CiA DR 303 - Information on cables and connectors ■ CiA DS 4xx - These documents describe the behavior of a number of device classes in, what are known as, device profiles. User Manual – JetControl 365MC 108 / 148... - Page 109 CANopen devices via CANopen STX API your- self, only WAGO I/O System 750, JX-SIO, LioN-S modules, etc. can be connected to the JX2 system bus. Bit 6 makes sense only if bit 3 has not been set. User Manual – JetControl 365MC 109 / 148...
- Page 110 ■ To apply the changes, restart the controller once. INFO Further information For more information on this subject refer to the application-oriented manual CANopen STX API available for download from our homepage. User Manual – JetControl 365MC 110 / 148...
-
Page 111: Motion Control
STX. The seamless integration of axis functions into the controller is an essential fea- ture of the Jetter AG control technology. This makes point-to-point positioning (PtP), technology functions (MC), as well as path control and certain robot func- tions easy to realize. - Page 112 As of operating system 1.28 of the JC-365MC, the OS version installed in the amplifiers JM-100 and JM-200 servo amplifiers must be at least 2.16. INFO Further information For more information on Motion Control programming, refer to the JetSym Online Help. User Manual – JetControl 365MC 112 / 148...
-
Page 113: Ftp Server
Modbus/TCP available Bit 7 FTP client available Tab. 60: Web status INFO Further information For more information on this subject refer to the application-oriented manual File System available for download from our homepage. User Manual – JetControl 365MC 113 / 148... -
Page 114: Http Server
Modbus/TCP available Bit 7 FTP client available Tab. 61: Web status INFO Further information For more information on this subject refer to the application-oriented manual File System available for download from our homepage. User Manual – JetControl 365MC 114 / 148... -
Page 115: Ftp Client
Modbus/TCP available Bit 7 FTP client available Tab. 62: Web status INFO Further information For more information on this subject refer to the application-oriented manual File System available for download from our homepage. User Manual – JetControl 365MC 115 / 148... -
Page 116: Automatic Copying Of Controller Data (Autocopy)
The SD card contains a valid command file with the corresponding copy com- mands. INFO Further information For more information on this subject refer to the application-oriented manual File System available for download from our homepage. User Manual – JetControl 365MC 116 / 148... -
Page 117: Registers - Overview
100xx9999 104000 ... Ethernet 200002000 ... JX2 system bus 104999 200029999 107000 … SD memory card Networking via Jetter Ethernet system bus 107499 GNN: nnn = 000 ... 199 107500 ... Flash disk 1nnn020000 JX3 module register 107599 108000 ... - Page 118 100813 Modbus/TCP 2 ... 17: The EDS of the selected 100815 LED for the SD card JX3 module is displayed. 100816 User-defined LEDs 100600 ... [Identification] 100817 100614 100600 Internal version number User Manual – JetControl 365MC 118 / 148...
-
Page 119: Fig. 13 Configuration
Day of the week (0 = Sunday) 103019 Error counter 102915 102916 Month 102917 Year 102920 … Buffer access 102928 102920 Milliseconds 102921 Seconds 102922 Minutes 102923 hours 102924 Day of the week (0 = Sunday) 102925 User Manual – JetControl 365MC 119 / 148... - Page 120 Discarded received packets 104806 Checksum error 104807 Connections 104808 Disconnections 104809 Discarded connections 104810 Repeated transmit packets 104900 Sent packets 104901 Sent bytes 104902 Received packets 104903 Received bytes 104904 Invalid packets User Manual – JetControl 365MC 120 / 148...
- Page 121 System logger is active (R 209700 = 213) Bit 24 IP address conflict detected 200010 Enhanced error register 2 (bit- coded) Bit 1 Error in the MC object Bit 7 File system error User Manual – JetControl 365MC 121 / 148...
- Page 122 203124 ... 32-bit overlaying - Flag 2048 ... Bit 2 = 1 E-mail available 203131 2303 Bit 3 = 1 Data file function available Bit 4 = 1 Modbus/TCP has been licensed User Manual – JetControl 365MC 122 / 148...
- Page 123 210058 Maximum time slice per task in µs 212001 Mode 210060 Task ID (for R210061) 212002 Time 210061 Priority for task [R210060] 210063 Length of scheduler table 210064 Index in scheduler table User Manual – JetControl 365MC 123 / 148...
- Page 124 1nnn990000 Indirect access with variable desti- 222838 Module number of SER (display nation window redirection) 1nnn999999 222839 Character code for Delete display 222840 Character code for Delete to end of line User Manual – JetControl 365MC 124 / 148...
- Page 125 Port number of SMTP server tion 292935 Port number of POP3 server Bit 7 = 1 Subscriber is running 292937 Status of e-mail processing 255001 Command 292938 Task ID - E-mail Restart Stop User Manual – JetControl 365MC 125 / 148...
- Page 126 * 10 390005 + Subscription ID of the last error node * 10 Address of a bus node (not of a controller) having reported an error 394001 394002 IP address 394003 Port number User Manual – JetControl 365MC 126 / 148...
- Page 127 Text of the error message 470157 First instance 471010 Status Bit 0 = 1 Error Bit 1 = 1 Alarms Bit 2 = 1 An instance has been initialized Bit 3 = 1 Execution in process User Manual – JetControl 365MC 127 / 148...
- Page 128 (non-volatile), with option -R 600069 600070 … Axis 4 → see axis 1 600089 600090 … Axis 5 → see axis 1 600109 600110 … Axis 6 → see axis 1 600129 User Manual – JetControl 365MC 128 / 148...
- Page 129 200002763 Timeout for I/O update of I/O mod- 200002011 I/O module number at timeout ules [ms] 200002012 JX2 slave module number at time- 200002764 Timeout for register access to I/O modules [ms] User Manual – JetControl 365MC 129 / 148...
- Page 130 200010543 + Box command register box number * Indirect access Enabling the message box 200010544 + Received CAN-ID Disabling the message box box number * Sending CAN messages Clearing the NEW DAT bit User Manual – JetControl 365MC 130 / 148...
- Page 131 2409 ... 4019 1009 ... 1101 ... 1109 ... 1201 ... 2308 2316 2408 2416 1016 1108 1116 1208 4020 1101 ... 1109 ... 1201 ... 1209 ... 1108 1116 1208 1216 User Manual – JetControl 365MC 131 / 148...
- Page 132 1901 … 1908 1909 … 1916 4145 1309 ... 1316 4097 1909 … 1916 2001 … 2008 4146 1401 ... 1408 4098 2001 … 2008 2009 … 2016 4147 1409 ... 1416 User Manual – JetControl 365MC 132 / 148...
- Page 133 409 ... 501 ... 509 ... 1616 1708 1716 1808 4232 1701 ... 1709 ... 1801 ... 1809 ... 4207 409 ... 501 ... 509 ... 601 ... 1708 1716 1808 1816 User Manual – JetControl 365MC 133 / 148...
- Page 134 509 ... 516 601 ... 608 4270 601 ... 608 609 ... 616 4263 209 ... 216 301 ... 308 4271 609 ... 616 701 ... 708 4272 701 ... 708 709 ... 716 User Manual – JetControl 365MC 134 / 148...
- Page 135 1701 ... 1708 2168 4353 1709 … 1716 2169 4354 1801 … 1808 2170 [SHIFT]+[0] 4355 1809 … 1816 2171 [SHIFT]+[1] 4356 1901 … 1908 2172 [SHIFT]+[2] 4357 1909 … 1916 2173 [SHIFT]+[3] User Manual – JetControl 365MC 135 / 148...
- Page 136 203102 64 ... 95 2217 203103 96 ... 127 2218 203104 128 ... 159 2219 [ENTER] 203105 160 ... 191 2220 203106 192 ... 223 2221 [SHIFT]+[-] 203107 224 ... 255 2222 User Manual – JetControl 365MC 136 / 148...
- Page 137 203141 2192 ... 2207 1000036 1408 ... 1439 203142 2208 ... 2223 1000037 1440 ... 1471 203143 2224 ... 2239 1000038 1472 ... 1503 203144 2240 ... 2255 1000039 1504 ... 1535 User Manual – JetControl 365MC 137 / 148...
- Page 138 Function EmailSend(Const Ref FileName: String): Int; 65/67 Reading register block via Modbus/ Function NetCopyListCon- fig(IPAddr: Int, IPPort: Int, Const 66/68 Writing register block via Modbus/ Ref List: TNetCopyLinstL): Int; 80/85 Initializing RemoteScan Starting RemoteScan User Manual – JetControl 365MC 138 / 148...
- Page 139 Jetter AG Registers - Overview | 9 System Corresponding JetSym STX function function Function NetCopyListSend (Handle: int): Int; Function NetCopyListDelete (Handle: int): Int; User Manual – JetControl 365MC 139 / 148...
-
Page 140: Maintenance And Repairs
In case of damaged packaging inspect the device for any visible damage, and in- form your freight forwarder and the Jetter AG of the damage caused during ship- ment. If the device is damaged or has been dropped, it is strictly forbidden to use User Manual –... -
Page 141: Service
To contact them, please call our technical hotline or use the contact form on our homepage: Technical hotline | Jetter - We automate your success. You are also welcome to send an e-mail to our technical hotline: hotline@jetter.de... - Page 142 Male connector in spring-cage technology, 2-pin 60870409 Tab. 63: Spare parts 12.2 Accessories INFO Ordering accessories The accessories are not part of the scope of delivery. Suitable accessories can be obtained from Jetter AG. Component Item number Screwdriver 60871712 End clamp for DIN rail 60863970 Tab. 64: Accessories...
- Page 143 KAY_0386-0500 From controller to LCD 60 60864360 15-pin Sub-D, length 5 m From controller to LCD 52/54(Z) Component Description Item number KAY_0533-0025 From controller to LCD 60864897 52/54(Z) 15-pin Sub-D, length 0.25 m User Manual – JetControl 365MC 143 / 148...
- Page 144 Item number Cable assy # 197 5M From controller to JetView 60864257 200/300 9-pin Sub-D, length 5 m Cable assy # 197 12M From controller to JetView 60871930 200/300 9-pin Sub-D, length 12 m User Manual – JetControl 365MC 144 / 148...
- Page 145 Fig. 18 GNN DIP switch sliders ......................Fig. 19 Example: Register numbers ....................Fig. 20 Example: I/O numbers......................Fig. 21 System overview ........................Fig. 22 Example: Register numbers ....................Fig. 23 Example: I/O numbers......................User Manual – JetControl 365MC 145 / 148...
- Page 146 Tab. 32 DefGateWay ..........................Tab. 33 DNSServer ..........................Tab. 34 SuffixType..........................Tab. 35 Name ............................Tab. 36 JetIPBase ..........................Tab. 37 JVMDebug..........................Tab. 38 AutoCopyIni ..........................Tab. 39 Register numbers of the configuration registers..............User Manual – JetControl 365MC 146 / 148...
- Page 147 Tab. 59 System functions vs. JetSym STX functions ................106 Tab. 60 Web status..........................113 Tab. 61 Web status..........................114 Tab. 62 Web status..........................115 Tab. 63 Spare parts ..........................142 Tab. 64 Accessories ..........................142 User Manual – JetControl 365MC 147 / 148...
- Page 148 Jetter AG Graeterstrasse 2 71642 Ludwigsburg www.jetter.de E-mail info@jetter.de Phone +49 7141 2550-0 We automate your success.
Need help?
Do you have a question about the JetControl 365MC and is the answer not in the manual?
Questions and answers