Table of Contents
Advertisement
Quick Links
Advertisement
Table of Contents

Subscribe to Our Youtube Channel
Related Manuals for Vitea Care FORTE PLUS


Summary of Contents for Vitea Care FORTE PLUS
- Page 1 INSTRUCTIONS FOR USE FORTE PLUS STANDARD WHEELCHAIR VCWK42L Edition EJ 12.2021...
-
Page 2: Table Of Contents
Table of Contents Introduction ............................3 Description of product ........................3 Indications............................5 Contraindications ..........................5 Usage ..............................5 Safety of use - WARNING! ......................7 Everyday use and maintenance ......................8 Technical parameters ........................19 Symbols ............................19 10. Contact details ..........................20 PLEASE READ WHOLE INSTRUCTION CAREFULLY BEFORE USE. -
Page 3: Introduction
1. Introduction Thank you for choosing our product. We are deeply convinced that it will meet your expectations. Please read this document before first use. This manual was made in order to provide the necessary information on the safe use of the device. The correct application of the recommendations will contribute significantly to extend the durability and aesthetics of the product. - Page 4 14. Cross-frame 15. Hook 16. Footrest frame 17. Footrest platform Elements that should be inside the packaging: Illustration 2. Seat cushion Illustration 3. Belt stabilizing the calf Hook Illustration 4. Two footrests...
-
Page 5: Indications
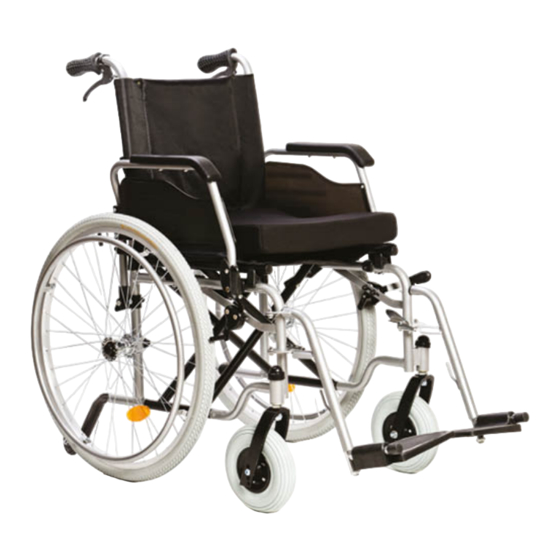
Illustration 5. Wheelchair 3. Indications The wheelchair is used in order to commute by people with disabilities e.g. after the spinal cord damages, cerebral palsy or various lower limb injuries, neuromuscular diseases, post-traumatic cranial cerebral or for geriatric patients. It is also intended for people who want to actively and comfortably participate in everyday life. 4. - Page 6 Illustration 6. Illustration 7. Illustration 8. • The seat must put the seat cushion. Fasten velcro on the back of the seat, so as to stick the velcro under the seat. • To install footrests, hang fixing bracket footrest on the hanger of the wheelchair frame (Illustration 9., 10.) Then rotate it into wheelchair front until if locks (“click”...
-
Page 7: Safety Of Use - Warning
6. Safety of use - WARNING! a) Before using the wheelchair refer to this manual and keep it for future reference. b) While getting o and out of the wheelchair, the brakes always have to be on! c) Before getting on or getting off the wheelchair, do not stand on the footrest, you must fold or completely set aside footrests first. -
Page 8: Everyday Use And Maintenance
z) In order to avoid accidental rolling off the wheelchair, always put on the brakes when the stroller is stopped, when patient get in, get off, while changing the position. aa) Do not leave the patient in the wheelchair (even with turned on both brakes) on the descents, ramps, landings, etc. - Page 9 Armrest clip Illustration 12. Illustration 13. • Place the patient on the wheelchair. • Put on the armrest. • Install and open the footrests and put on it patient's feet. • Place the patient on wheelchair so that the patient is in upright sitting position (knees should be bent at an angle of ~ 90 °).
- Page 10 Backwards without the help of a caretaker • Experienced wheelchair user can cross on his own the threshold or curbs. • Turn the wheelchair in such a way that both rear wheels were turned toward the curb • Lean forward to move the centre of gravity in forward. •...
- Page 11 Quick connect handle Illustration • The wheelchair is equipped with system of quick release rear wheels. • To install or remove the rear wheels, press the system of quick release rear wheels button (Illustration 15) and pull or push a wheel. •...
- Page 12 • To reposition the brake mechanism, loosen two screws (from inside of the wheelchair) by using wrench No. 10. • Move the entire mechanism in the direction of the rear wheel and tighten the screws. • When you turn on the brake, the wheel should not rotate (test the correctness of adjustment carried out in a wheelchair with a patient).
- Page 13 4) Placing the wheelchair in a different position has not been tested; sideways transportation is prohibited in all circumstances (Illustration 19.). 5) Only a homologated 3-point belt should be used to secure the user. The safety devices should not be moved away from the body by wheelchair components such as armrests or wheels. Using only a lap belt is not sufficient! (Illustration 20.).
- Page 14 1. Fasteners should be attached to the main frame of the wheelchair. Attachment to additional elements of the wheelchair or accessories (i.e. spokes, brakes or footrests) is prohibited. 2. Fasteners should be wrapped as tightly as possible at an angle of approximately 45 degrees and locked in accordance with the manufacturer's instructions.
- Page 15 Illustration 21B. Illustration 21C. Attention! The lap belt is not part of the wheelchair or passenger safety system during transportation in a vehicle for disabled people. 2. Put on the chest belt over the shoulder across the chest with hand rests lifted (Illustration 21A, B and C.) The safety belts should be tight and make sure they are not twisted.
- Page 16 Rear securing points Illustration 23. One of the frontals securing points Illustration 24. Illustration 25. Illustration 26. PUMPING TYRE (It applies to wheelchair fitted with wheels pumped) Schrader valve Prest valve Illustration Illustration • Before pumping the tires, identify the type of valve which is located on the tire. This may be one of the two valves shown in Illustration 27.
- Page 17 • Prest valve also has an additional small top, which must be loosened before pumping. • After identifying the valve, prepare the pump designed to valve type. • Most of the new pumps are equipped to service both Prest valve and Schrader. Many of them let to reverse the tip.
- Page 18 You must not use: • solvents, • toilet detergents, • sharp brushes and hard objects, • detergents that contain chlorine, • corrosive detergents, Do not clean the exerciser with pressure or steam aggregates! TECHNICAL REVIEW The review should be carried out regularly, it should be preceded by thorough cleaning the wheelchair (so as to reveal any hidden damage).
-
Page 19: Technical Parameters
8. Technical parameters Permitted user weight 120 kg Usage period: 5 years since production date Wheelchair hight 960 mm Wheelchair width 600 mm 660 mm (depending on the model) Wheelchair length 1120 mm Seat width 410 mm 450 mm (depending on the model) Seat depth 400 mm Back width... -
Page 20: Contact Details
Medical device Serial number Protect from humidity Protect from sunlight Permitted user weight. Use inside and outside buildings Maximum safe slope. The product is intended to transport by car. The wheelchair is marked with stickers indicating the place of fastening the seat belts Unique Device Identifier The possibility of fingers jamming.
Need help?
Do you have a question about the FORTE PLUS and is the answer not in the manual?
Questions and answers