
Subscribe to Our Youtube Channel
Related Manuals for SC&T DP02U-4K6G


Summary of Contents for SC&T DP02U-4K6G
- Page 1 DisplayPort Extender Series User Manual Model DP02U-4K6G 4K 60Hz DisplayPort KVM Extender with USB 2.0 Smart Cabling & Transmission Corp. V1.0 V1.0...
-
Page 2: Installation View
DP02U-4K6G Overview DP02U-4K6G is a DisplayPort over HDBaseT KVM Extender which is able to send uncompressed video, digital & analog audio, RS232, and USB signals, with resolution up to 4096/ 3840 x2160 @60Hz 4:4:4 and transmission distance up to 100M. It uses the Valens Stello VS3000 chipset, which is the only solution for long-range distribution of uncompressed video, with zero latency. -
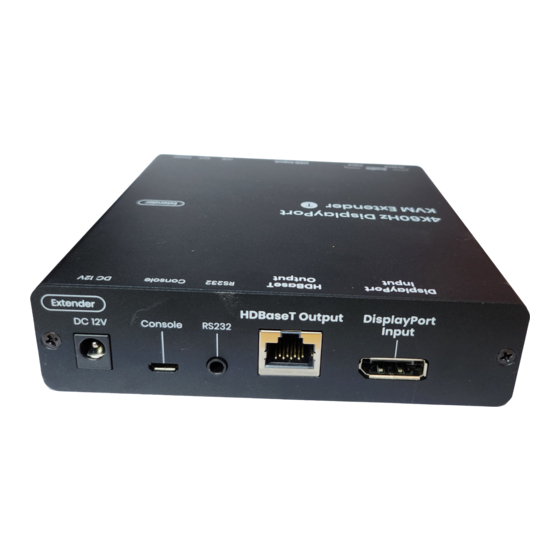
Page 3: Panel View
User Manual DP02U-4K6G Panel View DP02UT-4K6G (Transmitter) Interface Description Power Input To input 12V 1.5A power USB Micro-B Firmware Upgrade 3.5mm Jack RS232 RS232 for control signals extension HDBaseT Output To connect a CAT6A for transmission up to 100M DisplayPort Input Video Input up to 4096*2160@60Hz 3.5mm Jack Audio Output... - Page 4 User Manual DP02U-4K6G DP02UR-4K6G (Receiver) Interface Description Power Input To input 12V 1.5A power USB Micro-B Firmware Upgrade 3.5mm Jack RS232 RS232 for control signals extension HDBaseT Input To connect a CAT6A for transmission up to 100M DisplayPort Output Video Output up to 4096 x 2160@60Hz 3.5mm Jack Audio Output...
-
Page 5: Transmission Distance
Resolution and Distance Resolution DP02U-4K6G transmits Displayport KVM and USB2.0 signals at up to 4096/ 3840 x2160@60Hz resolution and can extend the distance for a maximum of 100m at a lower resolution. For the detailed transmission distances, see the next chapter. -
Page 6: Audio Transmission
DP02U-4K6G transmits DP audio. DP audio input can only be played from DP output. Sound Channel DP02U-4K6G has an independent 3.5mm sound channel at the transmitter and receiver, which can be connected to a microphone or speaker. Tx 3.5mm audio input can only be played at Rx output. Rx 3.5mm audio input can only be played at Tx output. - Page 7 User Manual DP02U-4K6G RS232 Transmission DP02U-4K6G supports RS232 transmission via a 3.5mm connector. If your RS232 device uses a DB9 connector, you will need a DB9 to 3.5mm adapter cable to connect the device to Tx and Rx. RS232 Definition DP02U-4K6G has 3.5mm for RS232 transmission.
-
Page 8: Package Includes
User Manual DP02U-4K6G Caution Using a certified Premium HDMI cable to transfer high-resolution video is recommended. Using a certified HDBaseT3 CAT6A U/FTP cable to transmit up to 100m is needed. The maximum power provided from each USB port is 500mA, and the total maximum power from ... -
Page 9: Specification
User Manual DP02U-4K6G Specification Model DP02UT-4K6G DP02UR-4K6G Compliance DP1.2 Standard HDCP1.3 USB2.0 Video Resolution 4K@60Hz 4:4:4 Transmission Distance 100M (HDBaseT3 certified CAT6a U/FTP cable) RS232 Baud Rate 115200 bps/Full Duplex Ports & Interfaces Video Input 1 x DisplayPort 1 x HDBaseT... - Page 10 User Manual DP02U-4K6G Installation Guide Accessory Machine Screw Self-drilling Screw Screw Plug Angle Bracket 1U Rack Installed on a Platform Step 1 Use machine screws to fix angle brackets on both sides of your product...
- Page 11 User Manual DP02U-4K6G Step 2 Use self-drilling screws to fix the product on a platform Step 3 Move the product to get fixed and then lock the screws...
- Page 12 User Manual DP02U-4K6G Installed on Wall Step 1 Same way as “Installed on a Platform”, but need to put screw plugs into the pilot hole before inserting the screws (leave 2mm space from the platform)
- Page 13 User Manual DP02U-4K6G Installed on a Rack Step 1 Lock machine screws in the rack Step 2 Put your products on the rack...
- Page 14 User Manual DP02U-4K6G Step 3 Push the products to the other side of the rack Step 4 Install the rack in a cabinet...
Need help?
Do you have a question about the DP02U-4K6G and is the answer not in the manual?
Questions and answers