Table of Contents
Advertisement
Available languages
Available languages
Quick Links
Advertisement
Chapters
Table of Contents

Related Manuals for Precor Discovery Plate Loaded Pulldown


Summary of Contents for Precor Discovery Plate Loaded Pulldown
- Page 1 Manuale del proprietario Discovery Plate Loaded™ Line...
-
Page 3: Istruzioni Importanti Sulla Sicurezza Per I Proprietari
Informazioni importanti sulla sicurezza Non posizionare l'attrezzatura all'esterno o su superfici umide. per gli utenti. Precor raccomanda di affiggere una copia delle Informazioni importanti sulla sicurezza per gli utenti in prossimità delle attrezzature, in modo Conformità agli standard di sicurezza chiaramente visibile. -
Page 4: Informazioni Importanti Sulla Sicurezza Per Gli Utenti
Informazioni importanti sulla sicurezza per gli utenti In caso di dolore o sintomi anomali, interrompere immediatamente Prima di iniziare qualsiasi programma di fitness, sottoporsi a visita medica l'allenamento e consultare il proprio medico. completa presso il proprio medico curante. ... -
Page 5: Table Of Contents
Sommario Istruzioni importanti sulla sicurezza per i proprietari ....1 Ispezione settimanale ..............9 Conformità agli standard di sicurezza ..........1 Trattare e pulire a fondo i rivestimenti esterni ......9 Controllare e lubrificare cuscinetti e boccole ........ 9 Informazioni importanti sulla sicurezza per gli utenti ....2 Controllare e lubrificare il meccanismo di regolazione del sedile .................... -
Page 6: Prima Di Iniziare
Richiesta di assistenza. Importante: acquistare sempre parti sostitutive e componenti per il montaggio Precor. Molte parti sono sottoposte a test e prodotte esclusivamente per le attrezzature Strength commerciali Precor. L'uso di componenti non approvati da Precor può... -
Page 7: Richiesta Di Assistenza
N. modello: N. di serie: ulteriori informazioni relative ai numeri di telefono dell’assistenza clienti o all’elenco di centri di assistenza Precor autorizzati, visitare il sito Web Precor Data di acquisto: all’indirizzo www.precor.com. Per ulteriori informazioni sui singoli componenti dell'attrezzatura, individuare il N. -
Page 8: Ispezione Giornaliera
Importante: non rivestire nuovamente i cuscinetti e non utilizzare cuscinetti non pulire e controllare i telai delle attrezzature; approvati da Precor. controllare le etichette di avviso e di istruzioni. Pulire e controllare i telai... -
Page 9: Controllare Le Etichette Di Avviso E Di Istruzioni
La figura che segue mostra un esempio di targhetta dimostrativa, che contiene Controllare le etichette di avviso e di etichette con il nome dell’attrezzatura e istruzioni per l’allenamento. istruzioni Verificare quotidianamente le etichette di avviso e di istruzioni per essere certi che tutte le informazioni siano chiaramente leggibili. - Page 10 I prodotti Precor vengono forniti con diverse etichette di avviso standard. Nelle due figure seguenti sono illustrati esempi di etichette di avviso visibili sulle attrezzature in base al modello e alla linea di prodotti: Figura 2: Etichetta di avviso che indica il pericolo di pizzicamento Figura 3: Etichetta di avviso generale montata sul telaio dell’attrezzatura...
-
Page 11: Ispezione Settimanale
Eseguire le attività boccole descritte per l'unità di cui si sta eseguendo la manutenzione: Precor utilizza cuscinetti di alta qualità progettati per applicazioni intensive e trattare e pulire a fondo i rivestimenti esterni;... -
Page 12: Controllare E Lubrificare Il Meccanismo Di Regolazione Del Sedile
Controllare e lubrificare il meccanismo di regolazione del sedile Il meccanismo di regolazione del sedile necessita di poca manutenzione. Poiché la sicurezza del sedile è fondamentale per la sicurezza dell'allenamento, è opportuno tuttavia controllare regolarmente la leva del sedile per verificare se resta fissa durante l'utilizzo. -
Page 13: Ispezione Mensile
Se necessario, descritte per l'unità di cui si sta eseguendo la manutenzione: rifinire con vernice da ritocco Precor. Per mantenere la vernice lucida, applicare cera per autoveicoli a basso effetto abrasivo. - Page 14 Note: Manuale del proprietario (Discovery Plate Loaded Line): Note...
- Page 16 Stati Uniti e in altri Paesi per la parte meccanica e per gli aspetti visivi del 20031 142nd Ave NE design di prodotto. Eventuali entità esterne che prevedano l’utilizzo del design di prodotto di Precor sono P.O. Box 7202 di conseguenza messe sull’avviso che Precor considera l’appropriazione non autorizzata dei suoi diritti...
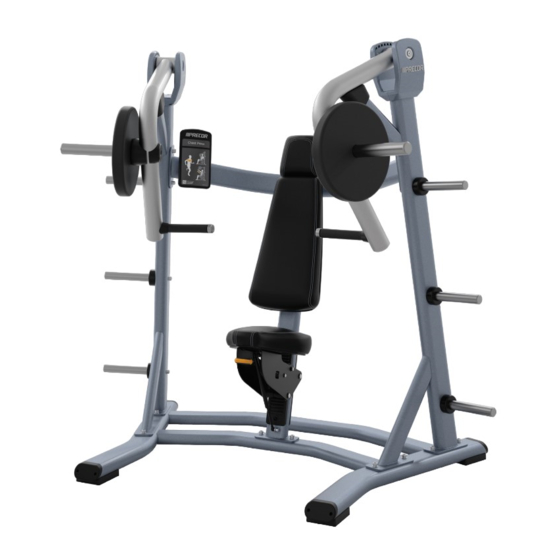
- Page 17 Assembly Guide Discovery Plate Loaded™ Line Pulldown...
- Page 19 Table of Contents Getting Started ................2 Opening the Boxes ................2 Installation Requirements ..............2 Hardware Kit (not to scale) ..............3 Assembling the Equipment ............7 Stabilizing the Equipment ..............8 Attaching the Side Uprights to the Base Frame ......9 Installing the Crossbar .................9 Installing the Center Upright Assembly ........
-
Page 20: Getting Started
Getting Started Opening the Boxes Installation Requirements WARNING You will need assistance to assemble this unit. DO Open the boxes and remove the packing materials. Be careful to open the NOT attempt assembly by yourself. boxes and assemble the components in the sequence presented in this manual. -
Page 21: Hardware Kit (Not To Scale)
Hardware Kit (not to scale) The following pieces of hardware are provided on a shrink-wrapped card. Each part is labeled on the card for easy reference. Table 1. Hardware kit contents Fasteners Quantity Buttonhead cap screw (M8 x 15 mm) Socket head cap screw (M12 x 35 mm) Socket head cap screw (M5 x 20 mm) Socket head cap screw (M5 x 12 mm) - Page 22 Fasteners Quantity Flat washer (13 mm internal diameter) Flat head cap screw (M10 x 25 mm) Hex head cap screw (⁵₁₆-inch x 1¹₂-inch) Flat head cap screw (M6 x 30 mm) Flat washer (11 mm internal diameter) Socket head cap screw (M10 x 30 mm) Axle mount end Pulldown Assembly Guide: Getting Started...
- Page 23 Fasteners Quantity Roller end cap Flat head cap screw (M12 x 30 mm) ⁵₁₆-inch nylon lock nut Table 2. Other Equipment Parts Part Quantity Roller bar Weight horn Weight storage horn Arm pivot axle Weight horn bumper Pulldown Assembly Guide: Getting Started...
- Page 24 Part Quantity Weight horn end cap Weight storage horn bumper Gas spring Instructional placard Pulldown Assembly Guide: Getting Started...
-
Page 25: Assembling The Equipment
Precor highly recommends that the equipment be bolted to the floor to reduce the risk of toppling due to improper use. Because floor construction varies, consult a professional building engineer for proper fastening. -
Page 26: Stabilizing The Equipment
Stabilizing the Equipment 4. Using the same open-end wrench, turn the positioning bolt to the left or the right to move the adjustable foot to the appropriate level, as shown in Once you have positioned the base frame where you want the equipment to be the following figure. -
Page 27: Attaching The Side Uprights To The Base Frame
Attaching the Side Uprights to the Installing the Crossbar Base Frame Note: Have your assistant hold the crossbar in place while you perform this procedure. Perform the following procedure to attach both side uprights to the base frame. To attach the crossbar to the side uprights: To attach the side uprights to the base frame: 1. -
Page 28: Installing The Center Upright Assembly
2. Place two M12 x 35 mm socket head cap screws and two 13 mm flat Installing the Center Upright Assembly washers into the screw holes in the base frame. Partially tighten the fasteners. Attaching the center upright assembly and the accompanying seat mechanism completes the frame of the equipment. -
Page 29: Installing The Movement Arms
Installing the Movement Arms 4. Check that the axle is properly positioned and centered, then tighten the screws completely. You will need an assistant to hold the movement arms in place while you Important: The screws should be tight enough to prevent the movement arm complete this procedure. -
Page 30: Attaching The Knee Roller Pads
Attaching the Knee Roller Pads 3. Slide a knee roller pad and one end cap onto the roller bar and secure it with one M6 x 30 flat head cap screw. The knee roller pads on this equipment are attached to a roller bar fitted to the Note: There is a small pin on each end of the roller bar and a small hole center upright assembly. -
Page 31: Attaching The Seat Pad
2. Insert four ⁵₁₆-inch x 1¹₂-inch hex head screws with 9mm flat washers into Attaching the Seat Pad the screw holes in the pad, as shown in the following figure. The seat mechanism is preassembled, except for the seat pad and the gas spring. -
Page 32: Connecting The Gas Spring
3. Insert the threaded end of the lower stem through the hole in the small Connecting the Gas Spring bracket on the base frame, as shown in the following figure. The gas spring, which lifts the seat assembly when an exerciser adjusts the seat height, is attached to the seat assembly and the frame through two ball-shaped stems. -
Page 33: Adjusting The Seat Rollers
Adjusting the Seat Rollers 2. Have your assistant press the seat pad down until the back roller contacts the black plastic plate on the back of the frame. After you have installed the gas spring, test the seat. It should not rock from 3. -
Page 34: Attaching Weight Horns To The Movement Arms
Attaching Weight Horns to the Attaching Weight Storage Horns Movement Arms Repeat this procedure as needed to attach all of the weight storage horns to the equipment. The weight horns that attach to the movement arms are slightly larger than the weight storage horns. -
Page 35: Attaching The Instructional Placard And Safety Labels
2. Place the large hole near the bottom of the placard over the button, then Attaching the Instructional Placard and slide the placard downward to lock it into place as shown in the following Safety Labels figure. The equipment includes a metal bracket for the instructional placard. The placard slides over a metal button near the bottom of the bracket. - Page 36 3. Insert an M8 x 15 mm buttonhead screw with 9mm flat washer into the Note: If you are installing labels in a language other than English, remove screw hole near the top of the bracket, as shown in the following figure. the general warning label attached to the equipment.
- Page 37 Notes: Pulldown Assembly Guide: Notes...
- Page 38 Notes: Pulldown Assembly Guide: Notes...
- Page 40 U.S. and foreign patents for both the mechanical construction and the visual aspects of its P.O. Box 7202 product design. Any party contemplating the use of Precor product designs is hereby forewarned that Precor Discovery Plate Loaded™ Pulldown Assembly Guide Woodinville, WA USA 98072-4002 considers the unauthorized appropriation of its proprietary rights to be a very serious matter.
Need help?
Do you have a question about the Discovery Plate Loaded Pulldown and is the answer not in the manual?
Questions and answers