Chapters
Table of Contents

Related Manuals for Falcon Classic 110


Summary of Contents for Falcon Classic 110
- Page 1 �������������� ������� ���� 110 Induction User Guide & Installation & Service Instructions Mode d'emploi & Instructions d'installation et d'entretien ArtNo.000-0008 Falcon logo shaded U109973 - 02...
-
Page 2: Table Of Contents
English Contents Before You Start... Cooker Overview Cooking Tips Cleaning Your Cooker Troubleshooting Installation Servicing Circuit Diagrams Technical Data... -
Page 3: Before You Start
1. Before You Start... DocNo.015-0301GB - Introduction - Induction cooker Personal Safety Thank you for buying a Falcon cooker. It should give you many years of trouble-free cooking if installed and operated Important information for pacemaker and implanted correctly. It is important that you read this section before you... - Page 4 English DO NOT use unstable saucepans. Always ensure that Should a crack appear in the surface, disconnect the you position the handles away from the edge of the appliance immediately from the supply and arrange hotplate. for its repair. Make sure to use adequately sized pans with flat Always LIFT pans off...
-
Page 5: Cooker Overview
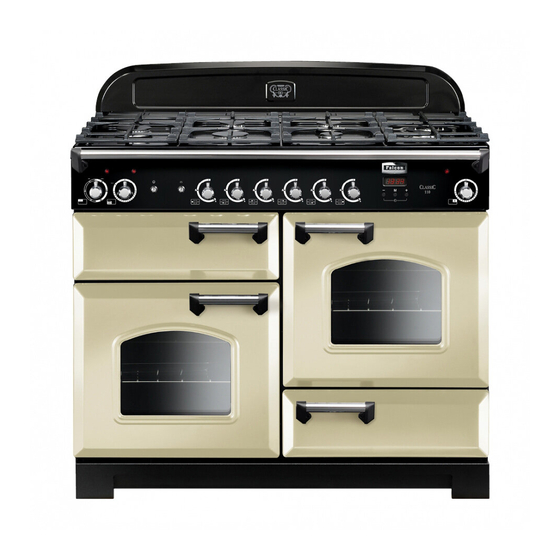
English 2. Cooker Overview DocNo.025-0008GB - Overview - 110 induction - Classic � Fig.2-1 � � � � � ArtNo.210-0012 - 110 Classic induction front view The 110 induction cooker (Fig.2-1) has the following features: Fig.2-2 5 induction cooking zones A control panel A grill A conventional oven... - Page 6 English Make sure that the base of the pan is clean and dry to prevent Fig.2-4 any residue burning onto the hob panel. This also helps prevent scratches and deposits. ����� ����� ����� Always use pans that are the same size as (or slightly larger than) the areas marked on the hob.
- Page 7 English heat up at 100% power for a specified time before the power ���������������������� is reduced to the level selected. ����������� ����������������� When the Automatic Heat-up function is activated, the hob � ���� control display will alternately flash between the [A ] setting �...
- Page 8 English For best results, you should leave the grill pan in the grill Fig.2-10 chamber and preheat the appropriate part(s) of the grill for two minutes. The grill trivet can be removed and the food placed on it while you are waiting for the grill to preheat. Once the grill has preheated, slide the grill pan out again.
- Page 9 English The Clock Fig.2-14 Setting the time of day The LCD clock is shown in (Fig 2-14). When the clock is first connected the display flashes ( 0.00) and () alternately. Press and hold both the [] and [] buttons as shown in ArtNo.302-0002 - 6BC annotated Fig.2-15.
- Page 10 English AUTO is showing, you want to reset to manual Fig.2-21 cooking When cancelling an automatic setting, any cooking time already set must be returned to ( 0.00) before you can return ArtNo.302-0008 - to manual, by pressing the () button. Activating the key lock 1 Key Lock When the key lock is activated, the left-hand oven can be...
- Page 11 English Accessories Fig.2-27 Oven Shelves � In addition to the flat shelves (Fig.2-26), some models are supplied with a drop shelf (Fig.2-27). The drop shelf increases ArtNo.320-0010 Flat & drop shelves the possibilities for oven shelf spacing. The oven shelves can be easily removed and refitted. �...
- Page 12 English Main Oven Light Fig.2-34 Press the button to turn the light on (Fig.2-34). If the oven light fails, turn off the power supply before ArtNo.320-0026 changing the bulb. See the ‘Troubleshooting’ section for - Oven light details on how to change the bulb. The Browning Element The Browning Element is positioned in the top of the left- Fig.2-35...
-
Page 13: Cooking Tips
English 3. Cooking Tips ArtNo.030-0002GB - Cooking tips - electric Tips on Cooking with the Timer General Oven Tips If you want to cook more than one dish, choose dishes that The wire shelves should always be pushed firmly to the back require approximately the same cooking time. -
Page 14: Cleaning Your Cooker
English 4. Cleaning Your Cooker Isolate the electricity supply before carrying out any major Fig.4-1 cleaning. Allow the cooker to cool. Never use paint solvents, washing soda, caustic cleaners, biological powders, bleach, chlorine based bleach cleaners, coarse abrasives or salt. Do not mix different cleaning products –... - Page 15 English Once you have removed as much as possible with the scraper, Fig.4-2 follow the ‘Daily Care’ procedure outlined above. Grill The grill pan and grid should be washed in hot soapy water. After grilling meats or any foods that soil, leave to soak for a few minutes immediately after use.
- Page 16 English Removing the Panels to clean the Enamel Fig.4-3 Interior If you wish to clean the enamel interior of the oven, you will first need to remove the shelves and oven panels. The fanned oven has a removable oven roof. Slide the roof liner forwards and remove (Fig.4-3.
-
Page 17: Troubleshooting
English 5. Troubleshooting DocNo.055-0002GB - Troubleshooting - induction The cooling fan Interference with and repairs to the hob MUST NOT The induction hob incorporates a cooling fan. This be carried out by unqualified persons. Do not try cooling fan is active when either the grill or ovens to repair the hob as this may result in injury and are on. - Page 18 English Food is cooking too slowly, too quickly, or burning Now unscrew the existing bulb anticlockwise, taking care to protect your fingers with a glove in case the bulb Cooking times may differ from your previous oven. should shatter. Adjust the settings according to your own individual tastes.
-
Page 19: Installation
INSTALLATION Check the appliance is electrically safe when you have finished. 6. Installation Dear Installer You will also need the following tools: Electric drill Before you start your installation, please complete the details below, so that, if your customer has a problem relating to Masonry drill bit (only required if fitting the cooker on a your installation, they will be able to contact you easily. - Page 20 INSTALLATION Check the appliance is electrically safe when you have finished. Positioning the Cooker Fig.6-1 Fig.6-1 shows the minimum recommended distance from the cooker to nearby surfaces. ���� ���� ����� ��� ��� The cooker should not be placed on a base. ���...
- Page 21 INSTALLATION Check the appliance is electrically safe when you have finished. LOWER THE FRONT ROLLER by doing 14 complete (360°) turns Fig.6-6 clockwise (Fig.6-6). (This means turning and removing the � �� levelling tool 56 times). Now LOWER THE TWO REAR ROLLERS. First fit the levelling tool on the hexagonal adjusting nut (Fig.6-7).
- Page 22 INSTALLATION Check the appliance is electrically safe when you have finished. Adjust the height of the front roller to level the cooker. Turn Fig.6-11 clockwise to raise the cooker and anticlockwise to lower. When you are satisfied with the height and level, raise the front of the cooker by one turn of the front roller adjuster.
- Page 23 INSTALLATION Check the appliance is electrically safe when you have finished. Grill Check Fig.6-14 Turn on the grill control and check that the grill heats up. Oven Check Set the clock as described earlier, and then turn on the ovens. Check the oven fans start to turn and that the ovens heat up.
-
Page 24: Servicing
WARNING – SERVICING TO BE CARRIED OUT ONLY BY AN AUTHORISED PERSON Disconnect from electricity before servicing. Check appliance is safe when you have finished. 7. Servicing Disconnect the cooker from the electricity supply Fig.7-1 Fig.7-2 before servicing, particularly before removing any of the following: control panel, side panels, ceramic hob, or any of the electrical components or cover ArtNo.210-0009 - Classic... - Page 25 WARNING – SERVICING TO BE CARRIED OUT ONLY BY AN AUTHORISED PERSON Disconnect from electricity before servicing. Check appliance is safe when you have finished. Note: The IHE will require commissioning when the hob has Note: The arms are spring tensioned. Carefully remove the grill been refitted.
- Page 26 WARNING – SERVICING TO BE CARRIED OUT ONLY BY AN AUTHORISED PERSON Disconnect from electricity before servicing. Check appliance is safe when you have finished. 14. To Change the Oven Door Latch Fig.7-8 Fig.7-9 Remove the outer door panel (see 13). Remove screws ‘B’ that ArtNo.320-0004 Oven door keep hold the latch assembly to the inner door panel (Fig.7-8).
- Page 27 WARNING – SERVICING TO BE CARRIED OUT ONLY BY AN AUTHORISED PERSON Disconnect from electricity before servicing. Check appliance is safe when you have finished. 20. To Replace an Oven Fan Fig.7-13 Disconnect from electricity supply. Pull the cooker forward to gain access to the rear. Remove ArtNo.322-0002 Oven bottom element access the screws securing the electric cover to the back sheet and remove the cover.
- Page 28 English 8. Circuit Diagram: Oven � � � � ArtNo.080-0029 110 induction (oven) circuit diagram �� � � � �� � �� � � �� � �� � �� � �� �� � � �� � � �� � � �...
- Page 29 English Circuit Diagram: Hob To T1 To T2 To T4 To T5 To Earth 2.3kW 2.3kW 2.3kW 1.4kW 1.4kW ���������������������������������������������������� ����������� Code Description �� ���� Touchlite panel ��� ����� Distribution board ��� ����� Left-hand front control ��� ������ Left-hand rear control ��...
-
Page 30: Technical Data
English 9. Technical Data INSTALLER: Please leave these instructions with the User. DATA BADGE LOCATION : Cooker back, serial number repeater badge below oven door opening. Connections Electric 220 - 240V 50Hz Dimensions Overall height minimum 902mm maximum 927mm Overall width 1100mm Overall depth 650mm... - Page 31 Français Contents Avant de commencer… Vue d’ensemble de la Cuisinière Conseils pour la Cuisson Cleaning Your Cooker Dépannage Installation Entretien Schémas de câblage Fiche technique...
-
Page 32: Avant De Commencer
Français 1. Avant de commencer… DocFR.015-0301 - Introduction - Induction Nous vous remercions d’avoir acheté une cuisinière Falcon. d’utilisation simultanée de plusieurs brûleurs ou d’utilisation Installée et utilisée correctement, cette cuisinière vous prolongée de la cuisinière, ouvrez une fenêtre ou mettez en donnera de nombreuses années de service fiable. - Page 33 Français Conseils relatifs à la table de cuisson N’utilisez PAS d’aérosols à proximité de la cuisinière lorsque celle-ci est en marche. Ne découpez PAS d’aliments sur la table de cuisson. Au besoin, utilisez des gants isolants secs – l’emploi ...
-
Page 34: Vue D'ensemble De La Cuisinière
Français 2. Vue d’ensemble de la Cuisinière DocNo.025-0008GB - Overview - 110 induction - Classic Fig.2-1 � � � � � � ArtNo.210-0012 - 110 Classic induction front view La cuisinière à induction 110 (Fig. 2-1) comprend : Fig.2-2 Cinq foyers de cuisson à induction Un panneau de commande Un gril coulissant «... - Page 35 Français Les récipients de cuisson les mieux adaptés sont ceux qui, à Fig.2-4 l’état froid, sont très légèrement bombés vers l’intérieur (Fig. 2-3). En plaçant une règle sur le fond de ces récipients, ����� ����� ����� on peut constater que la surface est légèrement incurvée vers le milieu.
- Page 36 Français Chauffage automatique, A Automatique réchauffez le Niveau de puissance temps à 100% (min:secs) Cette fonction est disponible pour tous les foyers de la table de cuisson. Elle permet un chauffage rapide de l’élément du 0:48 foyer jusqu’à la température de cuisson requise. Lorsque le 2:24 foyer a atteint la température requise, la puissance diminue 3:48...
- Page 37 Français Gril Fig.2-10 Retirez la lèchefrite de la partie inférieure de l’enceinte du gril (Fig. 2-7). Le gril a deux éléments qui permettent de chauffer la totalité de la lèchefrite ou seulement la partie droite de celle-ci. Tournez le bouton de commande pour régler la chaleur du gril.
- Page 38 Français Le voyant du four sera allumé jusqu’à ce que le four atteigne Fig.2-14 la température requise. Il s’allumera et s’éteindra pendant la cuisson (Fig. 2-13). Pendant la cuisson d’aliments à haute teneur en eau, un peu de vapeur peut être visible à la grille à l’arrière du chauffe- plats.
- Page 39 Français DE COMMANDE DU FOUR SUR LA POSITION 0 (Arrêt), puis Fig.2-21 appuyez une fois sur () pour arrêter le signal sonore, appuyez de nouveau sur () pour revenir au fonctionnement manuel. ArtNo.302-0008 - Si vous êtes absent pendant la cuisson, ne vous inquiétez pas Activating the key lock 1 au sujet de l’arrêt du signal sonore, celui-ci s’arrêtera après un certain temps.
- Page 40 Français Accessories Fig.2-27 Grilles de Four � Outre la grille plate (Fig. 2-26), la cuisinière est fournie avec une grille surbaissée (Fig. 2-27), qui augmente les possibilités ArtNo.320-0010 Flat & drop shelves d’espacement entre les grilles de four. Les grilles de four s’insèrent et s’extraient facilement. �...
- Page 41 Français Eclairage du Four Fig.2-34 Appuyez sur le bouton approprié pour allumer l’éclairage du four (Fig. 2-34). ArtNo.320-0026 Si l’éclairage est défectueux, mettez la cuisinière hors tension - Oven light avant de changer l’ampoule. Pour des informations détaillées sur la façon de changer une ampoule de four, reportez-vous à la section «...
-
Page 42: Conseils Pour La Cuisson
Français 3. Conseils pour la Cuisson DocFR.030-0002 - Cooking tips - 110 Electric Conseils pour la cuisson avec minuterie Conseils généraux pour la cuisson au four Si vous désirez cuire plusieurs plats simultanément, choisissez des plats nécessitant approximativement le même temps Veillez à... - Page 43 Français 4. Nettoyage de la Cuisinière DocFR.045-0007 - Cleaning - 110 induction - classic Informations Importantes Fig.4-1 Avant un nettoyage complet, mettez la cuisinière hors tension. Laissez-la ensuite refroidir. N’utilisez jamais de solvants pour peinture, de cristaux de soude, de nettoyants caustiques, de poudres biologiques, d’eau de Javel, de nettoyants chlorés, ni de produits abrasifs à...
- Page 44 Français Lorsque la surface de cuisson a refroidie et que les indicateurs Fig.4-2 de chaleur résiduelle sont éteints, suivez la procédure de nettoyage quotidien décrite plus haut. Nettoyage des Déversements Brûlés Vérifiez que les indicateurs de chaleur résiduelle sont éteints et que la table de cuisson a refroidi.
- Page 45 Français Panneaux Autonettoyants Fig.4-3 Le four principal est doté de panneaux à revêtement émaillé partiellement autonettoyants. Ceci n’empêche pas complètement la formation de taches sur le revêtement, mais réduit le nettoyage manuel nécessaire. Le nettoyage automatique des panneaux est plus efficace à...
-
Page 46: Dépannage
Français 5. Dépannage DocFR.055-0002 - Troubleshooting - Induction La table de cuisson à induction est bruyante NE PAS faire effectuer de modifications ou Lors de l’utilisation de la table de cuisson à induction, de réparations de la table de cuisson par des un «... - Page 47 Français Panne de courant Avec le temps, la température du four de la cuisinière En cas de panne de courant, n’oubliez pas de régler de devient plus chaude nouveau l’horloge pour permettre le fonctionnement Si le fait de mettre le bouton de réglage sur une automatique du four.
-
Page 48: Installation
INSTALLATION Une fois le travail terminé, vérifiez que les alimentation d’électricité sont correctement rebranchées. 6. Installation DocFR.065-0005 - Installation - 110 induction inc splashback A L’intention de L’installateur Vous aurez aussi besoin des outils suivants: Perceuse électrique Avant de commencer l’installation, veuillez remplir la fiche ci-dessous. - Page 49 INSTALLATION Une fois le travail terminé, vérifiez que les alimentation d’électricité sont correctement rebranchées. Positionnement de la Cuisinière Fig.6-1 La Fig. 6-1 indique les cotes minimales recommandées entre la cuisinière et les surfaces adjacentes. ���� ���� ����� ��� ��� Ne placez pas la cuisinière sur un support. ���...
- Page 50 INSTALLATION Une fois le travail terminé, vérifiez que les alimentation d’électricité sont correctement rebranchées. Déplacement de la Cuisinière Fig.6-6 � �� N’essayez jamais de déplacer la cuisinière lorsque celle-ci est sous tension. La cuisinière est très lourde, faites très attention. ...
- Page 51 INSTALLATION Une fois le travail terminé, vérifiez que les alimentation d’électricité sont correctement rebranchées. pour pouvoir manœuvrer la cuisinière. N’oubliez pas de la Fig.6-11 remettre en place lorsque vous replacez la cuisinière. Lors de la remise en place de la cuisinière, vérifiez de nouveau que le câble n’est pas entravé...
- Page 52 INSTALLATION Une fois le travail terminé, vérifiez que les alimentation d’électricité sont correctement rebranchées. Raccordement Électrique Fig.6-12 La cuisinière doit être installée par un électricien qualifié, � conformément aux normes/codes britanniques en vigueur (notamment BS 7671), ou à la réglementation nationale et �...
-
Page 53: Entretien
AVERTISSEMENT – INTERVENTION D’ENTRETIEN NE DEVANT ÊTRE EFFECTUÉE QUE PAR UNE PERSONNE QUALIFIÉE Avant toute intervention d’entretien, débranchez les alimentation d’électricité. Une fois le travail terminé, effectuez les contrôles de sécurité nécessaires. 7. Entretien DocFR.081-0006 - Service - 110 induction - Classic Débranchez l’alimentation électrique avant toute ... - Page 54 AVERTISSEMENT – INTERVENTION D’ENTRETIEN NE DEVANT ÊTRE EFFECTUÉE QUE PAR UNE PERSONNE QUALIFIÉE Avant toute intervention d’entretien, débranchez les alimentation et d’électricité. Une fois le travail terminé, effectuez les contrôles de sécurité nécessaires. Remplacement de l’interrupteur d’éclairage Remarque: Les bras sont sur ressorts. Procédez avec soin pour retirer la porte du gril.
- Page 55 AVERTISSEMENT – INTERVENTION D’ENTRETIEN NE DEVANT ÊTRE EFFECTUÉE QUE PAR UNE PERSONNE QUALIFIÉE Avant toute intervention d’entretien, débranchez les alimentation d’électricité. Une fois le travail terminé, effectuez les contrôles de sécurité nécessaires. Posez le panneau sur la porte. Remontez en procédant dans Fig.7-8 Fig.7-9 l’ordre inverse.
- Page 56 AVERTISSEMENT – INTERVENTION D’ENTRETIEN NE DEVANT ÊTRE EFFECTUÉE QUE PAR UNE PERSONNE QUALIFIÉE Avant toute intervention d’entretien, débranchez les alimentation et d’électricité. Une fois le travail terminé, effectuez les contrôles de sécurité nécessaires. n’est pas possible de débrancher les fils de cette façon, tirez la Fig.7-13 cuisinière vers l’avant pour pouvoir accéder à...
- Page 57 Français 8. Schéma de câblage: Fours � � � � ArtNo.080-0029 110 induction (oven) circuit diagram �� � � � �� � �� � � �� � �� � �� � �� �� � � �� � � �� � �...
- Page 58 Français Schéma de câblage: Table de cuisson To T1 Au T1 To T2 Au T2 To T4 Au T4 To T5 Au T5 To Earth À la terre 2.3kW 2.3kW 2.3kW 1.4kW 1.4kW ���������������������������������������������������� Code Elément Code Couleur Panneau de commande tactile Touchlite Bleu Tableau de distribution Brun...
-
Page 59: Fiche Technique
Français 9. Fiche technique A L’INTENTION DE L’INSTALLATEUR: Veuillez remettre les présente instructions à l’utilsateur. EMPLACEMENT DE BADGE TECHNIQUE: Arrière de la cuisinière, badge auxiliaire de numéro de série sous l’ouverture de la porte du four. Raccordments Electricité 220 - 240V 50Hz Dimensions Hauteur hor tout minimum 902mm... - Page 60 ArtNo.000-0001 Aga address block ArtNo.000-0003 CE logo...
Need help?
Do you have a question about the Classic 110 and is the answer not in the manual?
Questions and answers