Falcon Elan 110 Dual Fuel User Manual
Hide thumbs
Also See for Elan 110 Dual Fuel:
- User manual & installation & service instructions (44 pages) ,
- User's manual & installation instructions (44 pages)

Related Manuals for Falcon Elan 110 Dual Fuel


Summary of Contents for Falcon Elan 110 Dual Fuel
-
Page 1: User Guide
Elite �������������� ���� ���� 110 Dual Fuel User Guide & Installation & Service Instructions ArtNo.000-0008 Falcon logo shaded U109740-04 Australia... -
Page 2: Table Of Contents
Contents Before You Start... Cooker Overview Cooking Tips Cooking Table Troubleshooting Cleaning Your Cooker Installation Conversion to Propane Gas Servicing 10. Circuit Diagram 11. Technical Data... -
Page 3: Before You Start
Australia 1. Before You Start... Ventilation Thank you for buying this cooker. It should give you many years of trouble-free cooking if installed and operated The use of a gas cooking appliance results in the production correctly. It is important that you read this section before of heat and moisture in the room in which it is installed. - Page 4 Australia Cleaning DO NOT spray aerosols in the area of the cooker while it is on. In the interests of hygiene and safety, the cooker should be kept clean at all times as a build up in fats and other food Use dry oven gloves when applicable –...
-
Page 5: Cooker Overview
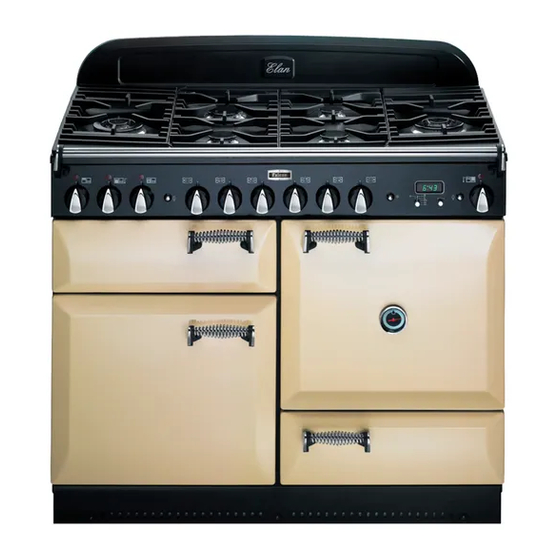
Australia 2. Cooker Overview DocAUS.020-0004 - Overview - 110DF - Elan Fig.2-1 � � �� �� � � � � ArtNo.215-0009 - 110 Elan DF The 110 dual fuel cooker (Fig.2-1) has the following features: Fig.2-2 6 hotplate burners including 2 wok burners A control panel A glide-out grill Main multi-function oven... - Page 6 Australia The igniter should spark and light the gas. Keep holding the Fig.2-3 knob pressed in to let the gas through to the burner for about ten seconds. If, when you let go of the control knob, the burner goes out, ArtNo215-0033 knob LH hotplate low then the FSD has not been bypassed.
-
Page 7: The Griddle
Australia The Wok Cradle ArtNo.311-0006 Correct wok sizes Fig.2-9 The wok cradle is designed to fit a Professional 35cm Wok (available from our cookware collection – Part Code RM095). If you use a different Wok, make sure that it fits the cradle. Woks vary very widely in size and shape. -
Page 8: The Ovens
Australia The Glide-out Grill Fig.2-15 Open the door and pull the grill pan carriage forward using the handle (Fig.2-15). The grill has two elements that allow either the whole area of the pan to be heated or just the right-hand half. Adjust the heat to suit by turning the knob. - Page 9 Australia The multi-function ovens have many varied uses. We suggest Fan assisted oven you keep a careful eye on your cooking until you are familiar This function operates the fan, circulating air heated with each function. Remember – not all functions will be ArtNo.030-0028 - Elan MF symbols by the elements at the top and the base of the oven.
- Page 10 Australia Operating the Ovens Fig.2-18 Operating the left-hand multi-function oven The multi-function oven has two controls: a function selector and a temperature setting knob (Fig.2-18). Turn the function selector control to a cooking function. Fig.2-19 shows the control set for convectional oven cooking. Turn the oven temperature knob to the temperature required (Fig.2-20).
-
Page 11: Setting The Time Of Day
Australia The Clock Fig.2-22 ArtNo.300-0004 2-button clock annotated You can use the timer (Fig.2-22) to turn the ovens on and off. The clock must be set to the time of day before the ovens will work. Setting the time of day When the clock is first connected, the display flashes ( 0.00) and () alternately. -
Page 12: Manual Cooking
Australia Use the Adjusting knob to set the ‘cook time’ you need Fig.2-28 Fig.2-29 (Fig.2-28). ArtNo.301-0010 2BC Turn the Timer knob to the () position. The display will show ArtNo.301-0008 2BC Setting the cooking time Stopping the oven 2 the current time of day plus the ‘cook time’ you just set. Use the Adjusting knob to set the ‘stop time’... -
Page 13: Oven Shelves
Australia Accessories Fig.2-36 Oven Shelves � In addition to the flat shelves (Fig.2-35), some models are supplied with a drop shelf (Fig.2-36). The drop shelf increases ArtNo.320-0010 Flat & drop shelves the possibilities for oven shelf spacing. The oven shelves can be easily removed and refitted. �... - Page 14 Australia Main Oven Light Fig.2-43 Press the appropriate button to turn the light on (Fig.2-43). If the oven light fails, turn off the power supply before ArtNo.320-0017 Main oven light changing the bulb. See the ‘Troubleshooting’ section for details on how to change the bulb. ArtNo.342-0001 - Elan - Storage drawer Storage The bottom drawer is for storing oven trays and other...
-
Page 15: Cooking Tips
Australia 3. Cooking Tips ArtNo.030-0002GB - Cooking tips - electric Tips on Cooking with the Timer General Oven Tips If you want to cook more than one dish, choose dishes that The wire shelves should always be pushed firmly to the back require approximately the same cooking time. -
Page 16: Cooking Table
DocNo.031-0002 - Cooking table Australia 4. Cooking Table The oven control settings and cooking times given in the table below are intended to be used AS A GUIDE ONLY. Individual tastes may require the temperature to be altered to provide a preferred result. -
Page 17: Troubleshooting
Australia 5. Troubleshooting Steam is coming from the oven The oven is not cooking evenly When cooking foods with a high water content (e.g. If you are cooking a large item, be prepared to turn it oven fries) there may be some steam visible at the rear round during cooking. - Page 18 Australia Hotplate ignition or cooktop burners faulty Fig.5-1 Is the power on? Are the sparker (ignition electrode) or burner holes blocked by debris? ArtNo.324-0005 Oven light bulb Are the burner heads correctly located? See the section entitled ‘Cleaning’ . Remember that each cooktop burner has a special safety device that stops the flow of gas if the flame goes out.
-
Page 19: Cleaning Your Cooker
Australia 6. Cleaning Your Cooker Doc AUS.040-0004 - Cleaning - 110DF - GO grill Isolate the electricity supply before carrying out any major Fig.6-1 cleaning. Allow the cooker to cool. � Never use paint solvents, washing soda, caustic cleaners, biological powders, bleach, chlorine based bleach �... -
Page 20: The Wok Cradle
Australia Now fit the two burner caps, ensuring that they are seated Fig.6-5 properly. Check the burner ports are not blocked. If a blockage occurs, remove stubborn particles using a piece of fuse wire. The Wok Cradle Recommended cleaning materials are hot soapy water, a moistened soap pad, cream cleaner or nylon scourer. - Page 21 Australia Control Panel and Doors Fig.6-10 Avoid using any abrasive cleaners, including cream cleaners, on brushed stainless steel surfaces. For best results, use a liquid detergent or our Multi-purpose Cleaner. The same cleaner can also be used on the doors. Alternatively, use a soft cloth wrung out in clean hot soapy water.
-
Page 22: Cleaning Table
Australia Cleaning Table Cleaners listed are available from supermarkets or electrical retailers as stated. For enamelled surfaces use a cleaner that is approved for use on vitreous enamel. Regular cleaning is recommended. For easier cleaning, wipe up any spillages immediately. To help keep your oven clean, cover meat when roasting, with foil or use a roasting bag. -
Page 23: Installation
INSTALLATION Check the appliance is electrically safe and gas sound when you have finished. 7. Installation Service and Spares Firstly, please complete the appliance details below and keep them safe for future reference – this information will enable us to accurately identify the particular appliance and help us to help you. Filling this in now will save time and inconvenience if you later have a problem with the appliance. -
Page 24: Dear Installer
INSTALLATION Check the appliance is electrically safe and gas sound when you have finished. Dear Installer Provision of Ventilation Before you start your installation, please complete the details This appliance is not connected to a combustion products below, so that, if your customer has a problem relating to evacuation device. - Page 25 INSTALLATION Check the appliance is electrically safe and gas sound when you have finished. You will need the following equipment to complete the Checking the Parts: cooker installation satisfactorily: Levelling tool 4 pan supports • Restraining chain: If the cooker is to be supplied with gas through a flexible hose, a restraining chain must be fitted.
-
Page 26: Moving The Cooker
INSTALLATION Check the appliance is electrically safe and gas sound when you have finished. Positioning the Cooker Fig.7-1 The diagram (Fig.7-1) shows the minimum recommended distance from the cooker to nearby surfaces as given in AS 5601 / AG 601. Overhead –... -
Page 27: Completing The Move
INSTALLATION Check the appliance is electrically safe and gas sound when you have finished. Lift up the ends of the plastic clips (one each side) to release Fig.7-5 the catches holding the drawer to the side runners and at the same time pull the drawer forward and away from the side runners (Fig.7-5). -
Page 28: Stability Bracket And Chain
INSTALLATION Check the appliance is electrically safe and gas sound when you have finished. Fitting the Splashback Fig.7-10 The splashback fits the back of the cooker. It is secured using 4 screws (2 at each end) in the rear edge of the flue grille. Remove the outer 2 screws and then loosen the inner pair. -
Page 29: Pressure Testing
INSTALLATION Check the appliance is electrically safe and gas sound when you have finished. Gas Connection ��� � Fig.7-14 ��� Must be in accordance with the relevant standards. The gas supply needs to terminate with a down facing bayonet. ��� Because the height of the cooker can be adjusted and ���... - Page 30 INSTALLATION Check the appliance is electrically safe and gas sound when you have finished. The total electrical load of the appliance is approximately Fig.7-15 8kW. The cable size used should be suitable for this load and comply with all local requirements (i.e. PVC Insulated cable IEC 60227 –...
-
Page 31: Refit The Drawer
INSTALLATION Check the appliance is electrically safe and gas sound when you have finished. Fitting the Plinth Fig.7-19 Remove the 3 screws for the plinth mounts along the front bottom edge of the range (Fig.7-19). Fasten the plinth using these screws (alternative colour screws can be found in the loose parts pack). -
Page 32: Conversion To Propane Gas
WARNING – SERVICING TO BE CARRIED OUT ONLY BY AN AUTHORISED PERSON Disconnect from electricity and gas before servicing. Check appliance is safe when you have finished. 8. Conversion to Propane Gas DocNo.080-0002 - LP gas conversion - 90 elan Check in the ‘Technical Data’... -
Page 33: Affix Label
WARNING – SERVICING TO BE CARRIED OUT ONLY BY AN AUTHORISED PERSON Disconnect from electricity and gas before servicing. Check appliance is safe when you have finished. Set the Governor Fig.8-4 Unscrew the governor’s brass top. In the base of the brass top is a plastic snap-in converter device (Fig.8-4). -
Page 34: Servicing
WARNING – SERVICING TO BE CARRIED OUT ONLY BY AN AUTHORISED PERSON Disconnect from electricity before servicing. Check appliance is safe when you have finished. 9. Servicing Disconnect the cooker from the electricity supply Fig.9-1 before servicing, particularly before removing any of the following: control panel, side panels, ceramic hob, or any of the electrical components or cover ArtNo.210-0009 - Classic... - Page 35 WARNING – SERVICING TO BE CARRIED OUT ONLY BY AN AUTHORISED PERSON Disconnect from electricity before servicing. Check appliance is safe when you have finished. To Change a Hotplate Tap Fit the new generator to the cooker and replace the leads, referring to the wiring diagram.
- Page 36 WARNING – SERVICING TO BE CARRIED OUT ONLY BY AN AUTHORISED PERSON Disconnect from electricity before servicing. Check appliance is safe when you have finished. 13. To Remove the Grill Outer Door Panel Fig.9-5 Open the left-hand oven door and remove the two screws from the bottom edge of the grill door.
- Page 37 WARNING – SERVICING TO BE CARRIED OUT ONLY BY AN AUTHORISED PERSON Disconnect from electricity before servicing. Check appliance is safe when you have finished. Remove the door handle from the panel by unscrewing the Fig.9-10 two retaining nuts. Fit the door handle to the new panel and refit the two blanking plugs to the fixing holes.
- Page 38 WARNING – SERVICING TO BE CARRIED OUT ONLY BY AN AUTHORISED PERSON Disconnect from electricity before servicing. Check appliance is safe when you have finished. 25. To Remove the Fan Oven Element Fig.9-15 Disconnect from electricity supply. Remove the oven inner back (see 25). Remove the two screws from the top of the element and the one from the bottom of the element inside the oven (Fig.9-16).
- Page 39 WARNING – SERVICING TO BE CARRIED OUT ONLY BY AN AUTHORISED PERSON Disconnect from electricity before servicing. Check appliance is safe when you have finished. 28. To Change Oven Light Bulb Fig.9-19 Fig.9-20 Disconnect from electricity supply. Make sure the oven is cool. Open the oven door and remove the oven shelves.
-
Page 40: Circuit Diagram
Australia 10. Circuit Diagram � � � � � � � � � � � � � � �� � � � � � �� � � � � � � �� �� � �� � � �� �� �� ��... -
Page 41: Technical Data
Australia 11. Technical Data DocAUS.102-0004 - Technical data - 110DF This cooker is designed for use on Natural Gas, although a conversion for LP (LPG X Propane (2.54kPa)) gas is available. INSTALLER: Please leave these instructions with the user. DATA BADGE LOCATION: Cooker back. The serial number is repeated on the badge below the left-hand oven door opening. Country of Destination: Australia Test Pressures (quoted on the data badge) Electric...
Need help?
Do you have a question about the Elan 110 Dual Fuel and is the answer not in the manual?
Questions and answers
Brännare slocknar när jag släpper tillbaka vredet efter tändning ca: 10 sek
The burner goes out after releasing the knob because the Flame Supervision Device (FSD) has not been bypassed. To fix this, turn the control knob to the OFF position, wait for one minute, and try again while holding the knob in slightly longer before releasing it.
This answer is automatically generated