ATEN CE920 - USB DisplayPort HDBaseT Quick Start Guide
- User manual (33 pages) ,
- User manual (42 pages) ,
- User manual (34 pages)
Advertisement
Hardware Review

CE920L Front
- RS-232 Serial Port
- Link LED
- Power LED
CE920L Rear
- Power Jack
- HDBaseT Out Port
- Ethernet Port
- DisplayPort In Port
- USB Type-B Port
- Audio Out Port
- Audio In Port
- Long Reach Mode Switch
- Firmware Upgrade Switch
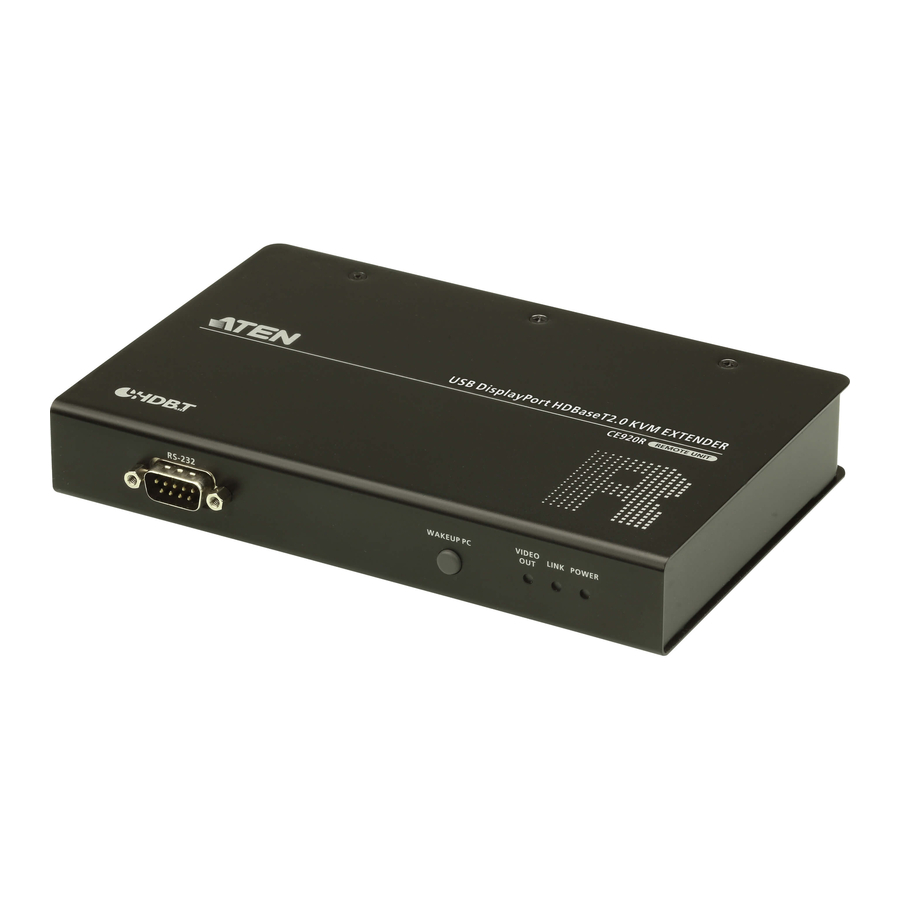
CE920R Front
- RS-232 Serial Port
- Wake Up PC Pushbutton
- Video Out LED
- Link LED
- Power LED
CE920R Rear
- Power Jack
- HDBaseT In Port
- Ethernet Port
- DisplayPort Out Port
- USB Type-A Ports
- Audio Out Port
- Audio In Port
- Long Reach Mode Switch
- Firmware Upgrade Switch
CE920 Package Contents
1 CE920L USB DisplayPort HDBaseT 2.0 KVM Extender (Local Unit)
1 CE920R USB DisplayPort HDBaseT 2.0 KVM Extender (Remote Unit)
1 Microphone Cable
1 Speaker Cable
1 USB Type-A to Type-B Cable
1 DisplayPort Cable
1 Mounting Kits
8 Foot Pads
2 Power Adapters
1 User Instructions
CE920L Package Contents
1 CE920L USB DisplayPort HDBaseT 2.0 KVM Extender (Local Unit)
1 Microphone Cable
1 Speaker Cable
1 USB Type-A to Type-B Cable
1 DisplayPort Cable
1 Mounting Kit
4 Foot Pads
1 Power Adapter
1 User Instructions
CE920R Package Contents
1 CE920R USB DisplayPort HDBaseT 2.0 KVM Extender (Remote Unit)
1 Mounting Kit
4 Foot Pads
1 Power Adapter
1 User Instructions
Hardware Installation

Before you proceed with the setup, make sure that all the equipment to be connected is powered off. To install the CE920, refer to the installation diagram above and do the following:
- Connect one end of the supplied microphone cable to the rear of the CE920L, and the other end to a local computer. Do the same using the supplied speaker cable.
- Connect the supplied USB cable to the USB Type-B Port on the CE920L, and the other end to a USB Type-A Port on the local computer.
- Connect the supplied DisplayPort cable to the DisplayPort In Port on the CE920L, and the other end to the local computer.
- Plug one end of an Ethernet cable into the HDBaseT Out Port on the CE920L, and the other end into the HDBaseT In Port on the CE920R.
- Plug one of the supplied power adapters into a power source, and then plug the adapter's power cable into the Power Jack on the CE920L.
- Use a DisplayPort Cable to connect the DisplayPort Out Port on the CE920R to your monitor.
- Plug USB devices (mouse, keyboard, etc.) into their respective USB ports on the CE920R.
- Plug the microphone and speakers into their respective audio ports on the CE920R.
- To gain access via LAN/WAN, use an Ethernet cable to connect the Ethernet Port of the CE920L to the computer, and then use another Ethernet cable to connect the Ethernet Port of the CE920R to a network switch.
- Plug the second adapter into a power source, and then plug the adapter's power cable into the Power Jack on the CE920R.
- To use the Wake Up PC Pushbutton, use an RS-232 serial cable to connect the RS-232 Serial Port on the CE920L to the local computer.
- To control the local computer with a serial device, connect the RS-232 Port on the CE920L to the local computer, as illustrated in step 11, and then connect a hardware/software controller to the RS-232 Port on the CE920R.
- To extend video of 1080p up to 150 m, put either the CE920L or CE920R's Long Reach Mode Switch to ON.
Operation
Rack Mounting
- Using the screws from the supplied Mounting Kit, secure the mounting bracket to the top or bottom of the CE920.
- Using self-prepared screws, secure the mounting bracket to a preferred location on the rack.
Note: Rack screws are not provided. ATEN recommends using M5 Phillips recessed screws.
LED Display and System Status
| LED | LED Display | System Status |
| Power | Lights green | The system is receiving power. |
| Link | Lights orange | The connection between the CE920L and CE920R is stable. |
| Flashes orange | The HDBaseT transmission is unstable. | |
| Off | The connection between the CE920L and CE920R is off. | |
| Video Out | Lights orange | The video display is normal and secured with HDCP. |
| Flashes orange | The video display is normal but not secured with HDCP. | |
| Off | The video is not displayed. |
Note: The Video Out LED is only available on the CE920R.
Support and Documentation Notice
All information, documentation, firmware, software utilities, and specifications contained in this package are subject to change without prior notification by the manufacturer.
To reduce the environmental impact of our products, ATEN documentation and software can be found online at http://www.aten.com/download/
Technical Support
www.aten.com/support
Scan for more information

EMC Information
FEDERAL COMMUNICATIONS COMMISSION INTERFERENCE STATEMENT:
This equipment has been tested and found to comply with the limits for a Class A digital device, pursuant to Part 15 of the FCC Rules. These limits are designed to provide reasonable protection against harmful interference when the equipment is operated in a commercial environment. This equipment generates, uses, and can radiate radio frequency energy and, if not installed and used in accordance with the instruction manual, may cause harmful interference to radio communications. Operation of this equipment in a residential area is likely to cause harmful interference in which case the user will be required to correct the interference at his own expense.
FCC Caution: Any changes or modifi cations not expressly approved by the party responsible for compliance could void the user's authority to operate this equipment.

Operation of this equipment in a residential environment could cause radio interference.
 Suggestion: Shielded twisted pair (STP) cables must be used with the unit to ensure compliance with FCC & CE standards. This device complies with Part 15 of the FCC Rules. Operation is subject to the following two conditions:
- this device may not cause harmful interference, and
- this device must accept any interference received, including interference that may cause undesired operation.
© Copyright 2018 ATEN ® International Co., Ltd.
ATEN and the ATEN logo are trademarks of ATEN International Co., Ltd. All rights reserved. All other trademarks are the property of their respective owners.


Documents / Resources
References
Download manual
Here you can download full pdf version of manual, it may contain additional safety instructions, warranty information, FCC rules, etc.
Download ATEN CE920 - USB DisplayPort HDBaseT Quick Start Guide
Advertisement


Need help?
Do you have a question about the VanCryst CE920 and is the answer not in the manual?
Questions and answers