Table of Contents
Advertisement
Quick Links
Advertisement
Table of Contents

Related Manuals for Nortel IP Phone 2210


Summary of Contents for Nortel IP Phone 2210
- Page 1 Carrier VoIP Nortel IP Phone 2210, 2211, 2212 User Guide NN10042-116...
- Page 2 Type: User Guide Language type: EN Copyright © 2006 Nortel Networks. All Rights Reserved. Nortel, the Nortel logo, and the Globemark are trademarks of Nortel Networks. The information in this document is sourced in Canada, the United States, and the United Kingdom.
-
Page 3: Table Of Contents
CICM main menu Logout 20 Audio Profile 20 Feature 20 Language 20 User 21 History 21 Diagnostics 21 Carrier VoIP Nortel IP Phone 2210, 2211, 2212 User Guide NN10042-116 01.03 Standard (I)SN09U October 2006 Copyright © 2006, Nortel Networks Nortel Networks Confidential... - Page 4 Making a call using a headset 58 Answering a call using a headset 59 Making a call using a line 60 Carrier VoIP Nortel IP Phone 2210, 2211, 2212 User Guide NN10042-116 01.03 Standard (I)SN09U October 2006 Copyright © 2006, Nortel Networks...
- Page 5 Making a call using the Directory Use the handset battery pack Removing the battery pack 99 Carrier VoIP Nortel IP Phone 2210, 2211, 2212 User Guide NN10042-116 01.03 Standard (I)SN09U October 2006 Copyright © 2006, Nortel Networks Nortel Networks Confidential...
- Page 6 Desktop Charger 105 Cleaning the Desktop Charger 106 Cleaning the Desktop Charger connectors 106 Terms you should know Carrier VoIP Nortel IP Phone 2210, 2211, 2212 User Guide NN10042-116 01.03 Standard (I)SN09U October 2006 Copyright © 2006, Nortel Networks Nortel Networks Confidential...
-
Page 7: New In This Release
New in this release There have been no updates to the document in this release. Carrier VoIP Nortel IP Phone 2210, 2211, 2212 User Guide NN10042-116 01.03 Standard (I)SN09U October 2006 Copyright © 2006, Nortel Networks Nortel Networks Confidential... -
Page 8: Overview
Overview Nortel IP Phone 2210, 2211, 2212 (221x) wireless handsets bring Voice over Internet Protocol (VoIP) to the work environment through the 2245 server. 221x handsets access Centrex IP Client Manager (CICM), which uses Internet Protocol (IP) telephony to integrate voice and data capabilities. CICM... -
Page 9: Ip Phone 221X Handset Description
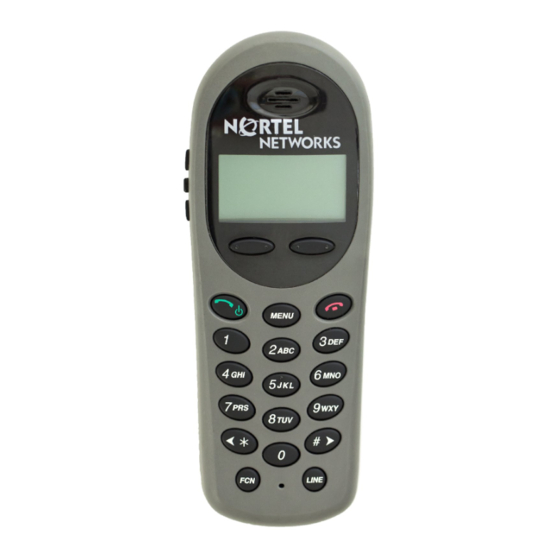
- 9 - Overview IP Phone 221x handset description Nortel IP Phone 2210, 2211, 2212 wireless handsets have these features: • navigation keys: — on the dialpad, the keys function as left and right keys — the volume keys on the handset function as up and down keys •... - Page 10 - 10 - Overview IP Phone 2210 handset Carrier VoIP Nortel IP Phone 2210, 2211, 2212 User Guide NN10042-116 01.03 Standard (I)SN09U October 2006 Copyright © 2006, Nortel Networks Nortel Networks Confidential...
- Page 11 - 11 - Overview IP Phone 2211 handset Carrier VoIP Nortel IP Phone 2210, 2211, 2212 User Guide NN10042-116 01.03 Standard (I)SN09U October 2006 Copyright © 2006, Nortel Networks Nortel Networks Confidential...
-
Page 12: Ip Phone 221X Handset Controls
IP Phone 221x handset controls The table, 221x handset controls (page 13), provides a brief description of Nortel IP Phone 2210, 2211, 2212 (221x) handset controls. Carrier VoIP Nortel IP Phone 2210, 2211, 2212 User Guide NN10042-116 01.03 Standard (I)SN09U October 2006 Copyright ©... -
Page 13: 221X Handset Display
Top—status row displays the status icons of each line appearance, a message waiting indicator (envelope icon), a battery level indicator, and left and right arrows. Carrier VoIP Nortel IP Phone 2210, 2211, 2212 User Guide NN10042-116 01.03 Standard (I)SN09U October 2006 Copyright © 2006, Nortel Networks... -
Page 14: 221X Handset States
4 characters long. Display area 221x handset states This section describes the states of Nortel IP Phone 2210, 2211, 2212 (221x) handsets. Power off The handset is turned off. In this state, the handset is not registered with the call server. -
Page 15: Active/Idle State
221x handset status indicators, icons, and soft keys This table describes the on-screen status indicators, icons, and soft keys that appears on Nortel IP Phone 2210, 2211, 2212 (221x) handsets. A steady (not flashing) indicator beside an extension number or feature indicates that the item is active. -
Page 16: Inbox
Carrier VoIP Nortel IP Phone 2210, 2211, 2212 User Guide NN10042-116 01.03 Standard (I)SN09U October 2006 Copyright © 2006, Nortel Networks... -
Page 17: Outbox
Only one DN key can be assigned to the Outbox. Hardware requirements To operate, Nortel IP Phone 2210, 2211, 2212 (221x) handsets require a 2245 server, 2246 Application Gateway, 2230 Access Point, 2270 WSS and CICM 2245 server The 2245 server acts as a proxy and provides services for 221x wireless handsets. -
Page 18: Call Server
2230 Access Point An 802.11b access point. For best quality of service (QoS) performance the Access Point should be SVP-compliant, for example the Nortel 2230 Access Point. 2270 Wireless Security switches The 2270 Wireless Security switches act as aggregation points for multiple access points or ports, and are the gateways from the Wireless LAN into the wired LAN. -
Page 19: Cicm Menu System
CICM menu system The Centrex IP Client Manager (CICM) menu system provides additional functions and features to Nortel IP Phone 2210, 2211, 2212 (221x) handsets. The figure CICM menu hierarchy (page 19), shows a schematic map of the CICM menu system. This section describes the menus. Procedures on how to access and use the features appear in other sections. -
Page 20: Logout
Use this menu item to select the language used in the display. Selecting a language (page 46). Carrier VoIP Nortel IP Phone 2210, 2211, 2212 User Guide NN10042-116 01.03 Standard (I)SN09U October 2006 Copyright © 2006, Nortel Networks Nortel Networks Confidential... -
Page 21: User
82). Diagnostics Use this item to test the local mode. Testing the local mode (page 47). Carrier VoIP Nortel IP Phone 2210, 2211, 2212 User Guide NN10042-116 01.03 Standard (I)SN09U October 2006 Copyright © 2006, Nortel Networks Nortel Networks Confidential... -
Page 22: 221X Handset Menus
221x handset menus Nortel IP Phone 2210, 2211, 2212 (221x) handsets have feature keys and user options menus, in addition to the Centrex IP Client Manager (CICM) menus. Navigation • Function key menu (page 23) • User Options menu (page 23) -
Page 23: Function Key Menu
Allows you to access your voicemail. Outbox Reserved for future use. User Options menu The User Options menu lets you configure the noise level for the Nortel IP Phone 2210, 2211, 2212 (221x) handset and view system information. handset User Options menu 221x... - Page 24 Use this option to view the PBX type used by the system, see Viewing the terminal type (page 90). (2 of 2) Carrier VoIP Nortel IP Phone 2210, 2211, 2212 User Guide NN10042-116 01.03 Standard (I)SN09U October 2006 Copyright © 2006, Nortel Networks Nortel Networks Confidential...
-
Page 25: Turn The Handset On And Off
Turn the handset on and off Follow these procedures to turn on and off Nortel IP Phone 2210, 2211, 2212 handsets. See the handset figures in Overview (page 8) for the location of the keys. Navigation • Turning on the handset (page 26) •... -
Page 26: Turning On The Handset
The in-service tone sounds and the extension number appears on the display. The handset is now in standby mode. --End-- Carrier VoIP Nortel IP Phone 2210, 2211, 2212 User Guide NN10042-116 01.03 Standard (I)SN09U October 2006 Copyright © 2006, Nortel Networks Nortel Networks Confidential... -
Page 27: Turning Off The Handset
Press and hold for 2 seconds, the Power off/End call key. One chirp sounds and the handset turns off. --End-- Carrier VoIP Nortel IP Phone 2210, 2211, 2212 User Guide NN10042-116 01.03 Standard (I)SN09U October 2006 Copyright © 2006, Nortel Networks... -
Page 28: Logging On
The password screen appears. Use the dialpad to enter your password. For security, the system displays your password as asterisks. Carrier VoIP Nortel IP Phone 2210, 2211, 2212 User Guide NN10042-116 01.03 Standard (I)SN09U October 2006 Copyright © 2006, Nortel Networks... - Page 29 If you make a mistake entering your password, press and start Clear again. Press The display shows the options/idle screen. --End-- Carrier VoIP Nortel IP Phone 2210, 2211, 2212 User Guide NN10042-116 01.03 Standard (I)SN09U October 2006 Copyright © 2006, Nortel Networks Nortel Networks Confidential...
-
Page 30: Logging Off
From the main menu, select and open Logout. Press Ok. The logout confirmation screen appears. Press Yes. --End-- Carrier VoIP Nortel IP Phone 2210, 2211, 2212 User Guide NN10042-116 01.03 Standard (I)SN09U October 2006 Copyright © 2006, Nortel Networks Nortel Networks Confidential... -
Page 31: Viewing And Editing Your Audio Profile
Use the navigation keys to toggle between enabling and disabling the Local Area Network functionality. Press OK to save the setting. Carrier VoIP Nortel IP Phone 2210, 2211, 2212 User Guide NN10042-116 01.03 Standard (I)SN09U October 2006 Copyright © 2006, Nortel Networks... - Page 32 - 32 - Viewing and editing your audio profile --End-- Carrier VoIP Nortel IP Phone 2210, 2211, 2212 User Guide NN10042-116 01.03 Standard (I)SN09U October 2006 Copyright © 2006, Nortel Networks Nortel Networks Confidential...
-
Page 33: Using The Main Menu
Logging on (page 28). Procedure steps Step Action Press Menu . The CICM main menu appears. --End-- Carrier VoIP Nortel IP Phone 2210, 2211, 2212 User Guide NN10042-116 01.03 Standard (I)SN09U October 2006 Copyright © 2006, Nortel Networks Nortel Networks Confidential... -
Page 34: Use The Cicm Feature Menu
Resetting the feature keys to their defaults (page 44) • Navigating the Call menu (page 45) Carrier VoIP Nortel IP Phone 2210, 2211, 2212 User Guide NN10042-116 01.03 Standard (I)SN09U October 2006 Copyright © 2006, Nortel Networks Nortel Networks Confidential... -
Page 35: Navigating The Feature Menu
To run a diagnostic check go to Testing the local mode (page 47). --End-- Carrier VoIP Nortel IP Phone 2210, 2211, 2212 User Guide NN10042-116 01.03 Standard (I)SN09U October 2006 Copyright © 2006, Nortel Networks Nortel Networks Confidential... -
Page 36: Using The Assign Menus
AutoScroll handsets. 2211, 2212 • Inbox: see Enabling or disabling the CICM Inbox (page 38). --End-- Carrier VoIP Nortel IP Phone 2210, 2211, 2212 User Guide NN10042-116 01.03 Standard (I)SN09U October 2006 Copyright © 2006, Nortel Networks Nortel Networks Confidential... -
Page 37: Defining The Key Type
By default, all feature keys are defined as Central. For further information about Centrex features, see CICM Basics (NN10044-111). Attention: AutoScroll is not available on Nortel IP Phone 2210, 2211, 2212 handsets. The item is not enabled. -
Page 38: Enabling Or Disabling The Cicm Inbox
Action To enable the Inbox select Enable. To disable the Inbox select Disable. Press Ok. --End-- Carrier VoIP Nortel IP Phone 2210, 2211, 2212 User Guide NN10042-116 01.03 Standard (I)SN09U October 2006 Copyright © 2006, Nortel Networks Nortel Networks Confidential... -
Page 39: Labeling A Feature Key
Press Ok to save the entry. You return to the Feature menu. --End-- Carrier VoIP Nortel IP Phone 2210, 2211, 2212 User Guide NN10042-116 01.03 Standard (I)SN09U October 2006 Copyright © 2006, Nortel Networks Nortel Networks Confidential... -
Page 40: Using The Options Menus
Assigning a default DN key (page 42). • Outbox: see Enabling or disabling the CICM Outbox (page 43). --End-- Carrier VoIP Nortel IP Phone 2210, 2211, 2212 User Guide NN10042-116 01.03 Standard (I)SN09U October 2006 Copyright © 2006, Nortel Networks Nortel Networks Confidential... -
Page 41: Configuring Auto Hide
Action To enable the Inbox select Enable. To disable the Inbox select Disable. Press Ok. --End-- Carrier VoIP Nortel IP Phone 2210, 2211, 2212 User Guide NN10042-116 01.03 Standard (I)SN09U October 2006 Copyright © 2006, Nortel Networks Nortel Networks Confidential... -
Page 42: Assigning A Default Dn Key
Scroll through the list of DN keys and select the one you want to assign as your default feature key. Press Ok to make this your default key. --End-- Carrier VoIP Nortel IP Phone 2210, 2211, 2212 User Guide NN10042-116 01.03 Standard (I)SN09U October 2006 Copyright © 2006, Nortel Networks Nortel Networks Confidential... -
Page 43: Enabling Or Disabling The Cicm Outbox
Step Action To enable the Inbox select Enable. To disable the Inbox select Disable. Press --End-- Carrier VoIP Nortel IP Phone 2210, 2211, 2212 User Guide NN10042-116 01.03 Standard (I)SN09U October 2006 Copyright © 2006, Nortel Networks Nortel Networks Confidential... -
Page 44: Resetting The Feature Keys To Their Defaults
Reset The Reset screen appears. Press to reset the feature keys to their default settings --End-- Carrier VoIP Nortel IP Phone 2210, 2211, 2212 User Guide NN10042-116 01.03 Standard (I)SN09U October 2006 Copyright © 2006, Nortel Networks Nortel Networks Confidential... -
Page 45: Navigating The Call Menu
Procedure steps Step Action From the Feature menu, select and open Call. The Call screen appears. --End-- Carrier VoIP Nortel IP Phone 2210, 2211, 2212 User Guide NN10042-116 01.03 Standard (I)SN09U October 2006 Copyright © 2006, Nortel Networks Nortel Networks Confidential... -
Page 46: Selecting A Language
Use the navigation keys to scroll through the list to select a language. Press Apply. Press Ok. The display now uses the language you selected. --End-- Carrier VoIP Nortel IP Phone 2210, 2211, 2212 User Guide NN10042-116 01.03 Standard (I)SN09U October 2006 Copyright © 2006, Nortel Networks Nortel Networks Confidential... -
Page 47: Testing The Local Mode
Press Ok to enter local test mode, or No to return to the Diagnostics menu. Press Help for more information. --End-- Carrier VoIP Nortel IP Phone 2210, 2211, 2212 User Guide NN10042-116 01.03 Standard (I)SN09U October 2006 Copyright © 2006, Nortel Networks... -
Page 48: Using The User Menu
Enabling Auto Login (page 51) • Viewing your login type (page 52) • Changing your password (page 53) Carrier VoIP Nortel IP Phone 2210, 2211, 2212 User Guide NN10042-116 01.03 Standard (I)SN09U October 2006 Copyright © 2006, Nortel Networks Nortel Networks Confidential... -
Page 49: Navigating The User Information Menus
51). To change your login password go to Changing your password (page 53). Press Ok. --End-- Carrier VoIP Nortel IP Phone 2210, 2211, 2212 User Guide NN10042-116 01.03 Standard (I)SN09U October 2006 Copyright © 2006, Nortel Networks Nortel Networks Confidential... -
Page 50: Changing Your User Name
Use the dialpad to enter the user name. Press Ok. Enter this user name the next time you log on. --End-- Carrier VoIP Nortel IP Phone 2210, 2211, 2212 User Guide NN10042-116 01.03 Standard (I)SN09U October 2006 Copyright © 2006, Nortel Networks Nortel Networks Confidential... -
Page 51: Enabling Auto Login
From the User menu, select and open Auto Login. The AutoLogin screen appears. Use the navigation key to select Enabled. Press Ok. --End-- Carrier VoIP Nortel IP Phone 2210, 2211, 2212 User Guide NN10042-116 01.03 Standard (I)SN09U October 2006 Copyright © 2006, Nortel Networks Nortel Networks Confidential... -
Page 52: Viewing Your Login Type
Using the User menu Viewing your login type Follow this procedure to view your login type. Nortel IP Phone 2210, 2211, 2212 handsets can operate in one of two login types: • Unique—the ability to join a session with an m6350 Softclient is not enabled. -
Page 53: Changing Your Password
In the same screen, use the dialpad to enter the new password. Press Ok. Use the new password the next time you log on. --End-- Carrier VoIP Nortel IP Phone 2210, 2211, 2212 User Guide NN10042-116 01.03 Standard (I)SN09U October 2006 Copyright © 2006, Nortel Networks Nortel Networks Confidential... -
Page 54: Make A Call
Make a call These procedures show you how to make calls using Nortel IP Phone 2210, 2211, 2212 handsets. See the handset figures in Overview (page 8) for the location of the keys and the headset jack. Navigation • Using off-hook dialing (page 55) •... -
Page 55: Using Off-Hook Dialing
Use the dialpad to enter the number. Press the Power off/End call key when you finish the call. --End-- Carrier VoIP Nortel IP Phone 2210, 2211, 2212 User Guide NN10042-116 01.03 Standard (I)SN09U October 2006 Copyright © 2006, Nortel Networks... -
Page 56: Using Predial
Use the dialpad to enter the number you want to call. The number appears in the display area. Press OK to dial the number. --End-- Carrier VoIP Nortel IP Phone 2210, 2211, 2212 User Guide NN10042-116 01.03 Standard (I)SN09U October 2006 Copyright © 2006, Nortel Networks Nortel Networks Confidential... -
Page 57: Editing The Predial Number
To quit without editing a number press Cancel. Press Ok to dial the number. --End-- Carrier VoIP Nortel IP Phone 2210, 2211, 2212 User Guide NN10042-116 01.03 Standard (I)SN09U October 2006 Copyright © 2006, Nortel Networks Nortel Networks Confidential... -
Page 58: Making A Call Using A Headset
Using off-hook dialing (page 55) • Using Predial (page 56) • Making a call using a line (page 60) --End-- Carrier VoIP Nortel IP Phone 2210, 2211, 2212 User Guide NN10042-116 01.03 Standard (I)SN09U October 2006 Copyright © 2006, Nortel Networks Nortel Networks Confidential... -
Page 59: Answering A Call Using A Headset
Procedure steps Step Action Connect the headset to the handset. Press the Power on/Start call key. --End-- Carrier VoIP Nortel IP Phone 2210, 2211, 2212 User Guide NN10042-116 01.03 Standard (I)SN09U October 2006 Copyright © 2006, Nortel Networks Nortel Networks Confidential... -
Page 60: Making A Call Using A Line
DN from which you want the call to originate. Use the dialpad to enter the number. --End-- Carrier VoIP Nortel IP Phone 2210, 2211, 2212 User Guide NN10042-116 01.03 Standard (I)SN09U October 2006 Copyright © 2006, Nortel Networks Nortel Networks Confidential... -
Page 61: Answer A Call
• Answering a call (page 62) • Answering a call while using a headset (page 63) Carrier VoIP Nortel IP Phone 2210, 2211, 2212 User Guide NN10042-116 01.03 Standard (I)SN09U October 2006 Copyright © 2006, Nortel Networks Nortel Networks Confidential... -
Page 62: Answering A Call
Procedure steps Step Action Press the Power on/Start call key. --End-- Carrier VoIP Nortel IP Phone 2210, 2211, 2212 User Guide NN10042-116 01.03 Standard (I)SN09U October 2006 Copyright © 2006, Nortel Networks Nortel Networks Confidential... -
Page 63: Answering A Call While Using A Headset
Press any key on the handset except Power on/Start call, Power off/ End call, soft keys, or keys on the side of the handset. --End-- Carrier VoIP Nortel IP Phone 2210, 2211, 2212 User Guide NN10042-116 01.03 Standard (I)SN09U October 2006 Copyright © 2006, Nortel Networks... -
Page 64: Ending A Call
See the handset figures in Overview (page 8) for the location of the key. Nortel Networks recommends that you end all calls by pressing the Power off/ End call key, even when the far end disconnects first. Procedure steps Step Action Press the Power off/End call key. -
Page 65: While On An Active Call
Using Call Join (page 70) • Muting a call (page 71) • Unmuting a call (page 72) Carrier VoIP Nortel IP Phone 2210, 2211, 2212 User Guide NN10042-116 01.03 Standard (I)SN09U October 2006 Copyright © 2006, Nortel Networks Nortel Networks Confidential... -
Page 66: Putting A Call On Hold
--End-- Carrier VoIP Nortel IP Phone 2210, 2211, 2212 User Guide NN10042-116 01.03 Standard (I)SN09U October 2006 Copyright © 2006, Nortel Networks Nortel Networks Confidential... -
Page 67: Resuming A Call That Is On Hold
Select the number of the call on hold. Look for a flashing line number in the top row of the display. --End-- Carrier VoIP Nortel IP Phone 2210, 2211, 2212 User Guide NN10042-116 01.03 Standard (I)SN09U October 2006 Copyright © 2006, Nortel Networks... -
Page 68: Transferring A Call
If you put a call on hold to answer and transfer a call, press the LINE key and select the line you put on hold. The original call is active. --End-- Carrier VoIP Nortel IP Phone 2210, 2211, 2212 User Guide NN10042-116 01.03 Standard (I)SN09U October 2006 Copyright © 2006, Nortel Networks Nortel Networks Confidential... -
Page 69: Using The Conference Call Feature
Press and hold the FCN key and select 3wc a second time to merge the parties. --End-- Carrier VoIP Nortel IP Phone 2210, 2211, 2212 User Guide NN10042-116 01.03 Standard (I)SN09U October 2006 Copyright © 2006, Nortel Networks Nortel Networks Confidential... -
Page 70: Using Call Join
To merge the calls, press and hold the FCN key and select 3wc again. --End-- Carrier VoIP Nortel IP Phone 2210, 2211, 2212 User Guide NN10042-116 01.03 Standard (I)SN09U October 2006 Copyright © 2006, Nortel Networks Nortel Networks Confidential... -
Page 71: Muting A Call
On the dialpad, press the number key that corresponds to the Mute option. The mute feature is enabled, and Mute appears on the display. --End-- Carrier VoIP Nortel IP Phone 2210, 2211, 2212 User Guide NN10042-116 01.03 Standard (I)SN09U October 2006 Copyright © 2006, Nortel Networks Nortel Networks Confidential... -
Page 72: Unmuting A Call
On the dialpad, press the number key that corresponds to the Mute option. The mute feature is disabled, and Mute disappears from the display. --End-- Carrier VoIP Nortel IP Phone 2210, 2211, 2212 User Guide NN10042-116 01.03 Standard (I)SN09U October 2006 Copyright © 2006, Nortel Networks Nortel Networks Confidential... -
Page 73: While Away From Your Desk
Navigation • Using Call Forward (page 74) • Turning off call forwarding (page 75) Carrier VoIP Nortel IP Phone 2210, 2211, 2212 User Guide NN10042-116 01.03 Standard (I)SN09U October 2006 Copyright © 2006, Nortel Networks Nortel Networks Confidential... -
Page 74: Using Call Forward
Press Forward again. An icon next to the label on the feature key appears on your display. --End-- Carrier VoIP Nortel IP Phone 2210, 2211, 2212 User Guide NN10042-116 01.03 Standard (I)SN09U October 2006 Copyright © 2006, Nortel Networks Nortel Networks Confidential... -
Page 75: Turning Off Call Forwarding
Press the FCN key and select Forward. The icon no longer appears in the display. --End-- Carrier VoIP Nortel IP Phone 2210, 2211, 2212 User Guide NN10042-116 01.03 Standard (I)SN09U October 2006 Copyright © 2006, Nortel Networks Nortel Networks Confidential... -
Page 76: Work Without Interruption
Navigation • Using the Make Busy feature (page 77) • Disabling Make Busy (page 78) Carrier VoIP Nortel IP Phone 2210, 2211, 2212 User Guide NN10042-116 01.03 Standard (I)SN09U October 2006 Copyright © 2006, Nortel Networks Nortel Networks Confidential... -
Page 77: Using The Make Busy Feature
All incoming calls now receive a busy signal. An icon appears beside the Make Set Busy option, indicating that the feature is enabled. --End-- Carrier VoIP Nortel IP Phone 2210, 2211, 2212 User Guide NN10042-116 01.03 Standard (I)SN09U October 2006 Copyright © 2006, Nortel Networks... -
Page 78: Disabling Make Busy
On the dialpad, press the number key that corresponds to the Make Set Busy. The feature is disabled. --End-- Carrier VoIP Nortel IP Phone 2210, 2211, 2212 User Guide NN10042-116 01.03 Standard (I)SN09U October 2006 Copyright © 2006, Nortel Networks Nortel Networks Confidential... -
Page 79: Use The Inbox And Outbox
Using the Inbox (page 80) • Using the Outbox (page 81) • Resetting the Inbox or the Outbox (page 82) Carrier VoIP Nortel IP Phone 2210, 2211, 2212 User Guide NN10042-116 01.03 Standard (I)SN09U October 2006 Copyright © 2006, Nortel Networks Nortel Networks Confidential... -
Page 80: Using The Inbox
Use the navigation keys to select Store and press Ok. The number is added to your directory. The procedure is complete. --End-- Carrier VoIP Nortel IP Phone 2210, 2211, 2212 User Guide NN10042-116 01.03 Standard (I)SN09U October 2006 Copyright © 2006, Nortel Networks... -
Page 81: Using The Outbox
Use the navigation keys to select Store and press Ok. The number is added to your directory. The procedure is complete. --End-- Carrier VoIP Nortel IP Phone 2210, 2211, 2212 User Guide NN10042-116 01.03 Standard (I)SN09U October 2006 Copyright © 2006, Nortel Networks... -
Page 82: Resetting The Inbox Or The Outbox
From the Call screen, select Reset Inbox or Reset Outbox Press Ok. The calls are deleted. --End-- Carrier VoIP Nortel IP Phone 2210, 2211, 2212 User Guide NN10042-116 01.03 Standard (I)SN09U October 2006 Copyright © 2006, Nortel Networks Nortel Networks Confidential... -
Page 83: Additional 221X Handset Features
Additional 221x handset features Follow these procedures to use other features of Nortel IP Phone 2210, 2211, 2212 (221x) handsets. See the handset figures in Overview (page 8) for the location of the keys. Navigation • Silencing the ringer (page 84) •... -
Page 84: Silencing The Ringer
The ringing stops but the call is not interrupted, which gives the caller the option of leaving a voice mail message. --End-- Carrier VoIP Nortel IP Phone 2210, 2211, 2212 User Guide NN10042-116 01.03 Standard (I)SN09U October 2006 Copyright © 2006, Nortel Networks... -
Page 85: Using Noise Mode
To return the handset to standby press the Power Off/End Call key, or mode press Exit. --End-- Carrier VoIP Nortel IP Phone 2210, 2211, 2212 User Guide NN10042-116 01.03 Standard (I)SN09U October 2006 Copyright © 2006, Nortel Networks Nortel Networks Confidential... -
Page 86: Viewing The Alias Ip Address
To return the handset to standby press the Power Off/End Call key, or mode press Exit. --End-- Carrier VoIP Nortel IP Phone 2210, 2211, 2212 User Guide NN10042-116 01.03 Standard (I)SN09U October 2006 Copyright © 2006, Nortel Networks Nortel Networks Confidential... -
Page 87: Viewing Current Ip Address
To return the handset to standby press the Power Off/End Call key, or mode press Exit. --End-- Carrier VoIP Nortel IP Phone 2210, 2211, 2212 User Guide NN10042-116 01.03 Standard (I)SN09U October 2006 Copyright © 2006, Nortel Networks Nortel Networks Confidential... -
Page 88: Entering The Extension Number For The Handset
To return the handset to standby press the Power Off/End Call key, or mode press Exit. --End-- Carrier VoIP Nortel IP Phone 2210, 2211, 2212 User Guide NN10042-116 01.03 Standard (I)SN09U October 2006 Copyright © 2006, Nortel Networks Nortel Networks Confidential... -
Page 89: Viewing The Current Call Server
To return the handset to standby press the Power Off/end Call key, or mode press Exit. --End-- Carrier VoIP Nortel IP Phone 2210, 2211, 2212 User Guide NN10042-116 01.03 Standard (I)SN09U October 2006 Copyright © 2006, Nortel Networks Nortel Networks Confidential... -
Page 90: Viewing The Terminal Type
To return the handset to standby press the Power Off/End Call key, or mode press Exit. --End-- Carrier VoIP Nortel IP Phone 2210, 2211, 2212 User Guide NN10042-116 01.03 Standard (I)SN09U October 2006 Copyright © 2006, Nortel Networks Nortel Networks Confidential... -
Page 91: Enter Text Using The Dialpad
To enter the third letter press the key three times. The letter appears on the display. --End-- Carrier VoIP Nortel IP Phone 2210, 2211, 2212 User Guide NN10042-116 01.03 Standard (I)SN09U October 2006 Copyright © 2006, Nortel Networks Nortel Networks Confidential... -
Page 92: Use The Cicm Directory
• Deleting a directory entry (page 96) • Making a call using the Directory (page 97) Carrier VoIP Nortel IP Phone 2210, 2211, 2212 User Guide NN10042-116 01.03 Standard (I)SN09U October 2006 Copyright © 2006, Nortel Networks Nortel Networks Confidential... -
Page 93: Navigating The Directory
Deleting a directory entry (page 96). To dial an entry Making a call using the Directory (page 97). --End-- Carrier VoIP Nortel IP Phone 2210, 2211, 2212 User Guide NN10042-116 01.03 Standard (I)SN09U October 2006 Copyright © 2006, Nortel Networks Nortel Networks Confidential... -
Page 94: Adding An Entry To The Directory
Press No to exit from the Directory screens. --End-- Carrier VoIP Nortel IP Phone 2210, 2211, 2212 User Guide NN10042-116 01.03 Standard (I)SN09U October 2006 Copyright © 2006, Nortel Networks Nortel Networks Confidential... -
Page 95: Editing A Directory Entry
On the Edit screen, select Save and press Ok. --End-- Carrier VoIP Nortel IP Phone 2210, 2211, 2212 User Guide NN10042-116 01.03 Standard (I)SN09U October 2006 Copyright © 2006, Nortel Networks Nortel Networks Confidential... -
Page 96: Deleting A Directory Entry
A screen appears, asking you to confirm the deletion. Press Yes. The entry is deleted from the directory. --End-- Carrier VoIP Nortel IP Phone 2210, 2211, 2212 User Guide NN10042-116 01.03 Standard (I)SN09U October 2006 Copyright © 2006, Nortel Networks Nortel Networks Confidential... -
Page 97: Making A Call Using The Directory
Press Ok. You are prompted to confirm the call. Press Yes. The number is dialed. --End-- Carrier VoIP Nortel IP Phone 2210, 2211, 2212 User Guide NN10042-116 01.03 Standard (I)SN09U October 2006 Copyright © 2006, Nortel Networks Nortel Networks Confidential... -
Page 98: Use The Handset Battery Pack
• Changing a battery pack during a call (page 101) • Recharging the battery (page 102) Carrier VoIP Nortel IP Phone 2210, 2211, 2212 User Guide NN10042-116 01.03 Standard (I)SN09U October 2006 Copyright © 2006, Nortel Networks Nortel Networks Confidential... -
Page 99: Removing The Battery Pack
The battery pack releases from the handset. Lift the battery pack out of the handset cavity. --End-- Carrier VoIP Nortel IP Phone 2210, 2211, 2212 User Guide NN10042-116 01.03 Standard (I)SN09U October 2006 Copyright © 2006, Nortel Networks Nortel Networks Confidential... -
Page 100: Inserting A Battery Pack
The battery pack releases from the handset. Slide the battery pack straight into the handset cavity. --End-- Carrier VoIP Nortel IP Phone 2210, 2211, 2212 User Guide NN10042-116 01.03 Standard (I)SN09U October 2006 Copyright © 2006, Nortel Networks Nortel Networks Confidential... -
Page 101: Changing A Battery Pack During A Call
Slide the battery pack straight into the handset cavity. Resume the call. See Resuming a call that is on hold (page 67). --End-- Carrier VoIP Nortel IP Phone 2210, 2211, 2212 User Guide NN10042-116 01.03 Standard (I)SN09U October 2006 Copyright © 2006, Nortel Networks Nortel Networks Confidential... -
Page 102: Recharging The Battery
It is normal for the battery pack to warm up when it is recharging. Prerequisites You must have the Nortel Networks WLAN Handset Desktop Charger appropriate for the model of handset. Attention: — To charge the battery pack, always use the Desktop Charger provided. Other chargers can damage the battery pack. -
Page 103: Handset Maintenance
Battery packs (page 104) • Cleaning the handset (page 104) • Cleaning the handset connector (page 105) Carrier VoIP Nortel IP Phone 2210, 2211, 2212 User Guide NN10042-116 01.03 Standard (I)SN09U October 2006 Copyright © 2006, Nortel Networks Nortel Networks Confidential... -
Page 104: Battery Packs
- 104 - Handset maintenance Battery packs Nortel IP Phone 2210, 2211, 2212 handsets have rechargeable batteries. The battery pack supply is sufficient for a maximum of for four hours of talk time, or 70 hours standby time. See Use the handset battery pack (page 98) for procedures about replacing and recharging the battery pack. -
Page 105: Cleaning The Handset Connector
If available, blow compressed air into the connector to dry it. Desktop Charger Nortel Networks WLAN Handset Desktop Chargers are designed to fully charge the Nickel Metal Hydride (NiMH) battery packs in approximately 1.5 hours. The charger operates in temperatures from 50... -
Page 106: Cleaning The Desktop Charger
Insert the swab into the connector and twist. Repeat step 2 several times. If available, blow compressed air into the connector to dry it. Carrier VoIP Nortel IP Phone 2210, 2211, 2212 User Guide NN10042-116 01.03 Standard (I)SN09U October 2006 Copyright © 2006, Nortel Networks... -
Page 107: Terms You Should Know
CICM The Centrex IP Client Manager (CICM) product delivers Centrex capabilities uses VoIP technology to connect Nortel IP Phone 2210, 2211, 2212 users to an IP network. CICM provides the interface between the Centrex feature set and an IP network. - Page 108 Extension, Current Call Server, and Terminal Type, that you use to configure the handset ring type and noise level and view system information. Carrier VoIP Nortel IP Phone 2210, 2211, 2212 User Guide NN10042-116 01.03 Standard (I)SN09U October 2006 Copyright © 2006, Nortel Networks...
- Page 110 Product release: (I)SN09U Job function: Product Fundamentals Type: User Guide Language type: EN To provide feedback or report a problem in this document, go to www.nortel.com/documentfeedback. NORTEL, the Globemark design, and the NORTEL corporate logo are trademarks of Nortel Networks.
Need help?
Do you have a question about the IP Phone 2210 and is the answer not in the manual?
Questions and answers