
Related Manuals for Hoover HV-C60OV-2


Summary of Contents for Hoover HV-C60OV-2
- Page 1 60 cm Electric Oven Model Number: HV-C60OV-2 INSTRUCTION MANUAL AFTER SALES SUPPORT (AU) 1300 886 649 (NZ) 0800 836 761 E209...
-
Page 2: Table Of Contents
Contents 03 General Safety Instructions 08 Product Overview 10 Installation 13 Getting Started 14 Instructions 23 FAQs and Troubleshooting Guide 25 Other Useful Information After Sales Support (AU) 1300 886 649 (NZ) 0800 836 761 | tempo.org/support... -
Page 3: General Safety Instructions
General Safety Instructions IMPORTANT SAFETY INSTRUCTIONS READ CAREFULLY AND KEEP FOR FUTURE REFERENCE Read this manual thoroughly before first use, even if you are familiar with this type of product. The safety precautions enclosed herein reduce the risk of fire, electric shock and injury when correctly adhered to. - Page 4 General Safety Instructions (Cont.) Ventilation requirements • Heat, steam and moisture will be created during use of the oven. Take care to avoid injury and ensure the room is adequately ventilated. • If the appliance is going to be used for prolonged periods of time, additional ventilation may be required.
- Page 5 General Safety Instructions (Cont.) General usage conditions and restrictions • Domestic use only: This oven is designed for indoor domestic use only. It can be built into a standard kitchen cabinet or housing unit. • Intended purpose: This oven is not intended for commercial, industrial or trade use.
- Page 6 General Safety Instructions (Cont.) • WARNING! Disconnect: Remove the power plug from the electrical socket in the following situations: * Before changing the lamp to avoid the possibility of electric shock. * Before any adjustments, service or maintenance work is done on it. Grip the plug when disconnecting, do not pull on the cord.
- Page 7 General Safety Instructions (Cont.) • Cleaning: Clean the oven on a regular basis so oils and fats do not accumulate and cause a fire risk. Make sure all relevant oven controls are switched off before cleaning. Refer to pages 25–27 for comprehensive cleaning instructions.
-
Page 8: Product Overview
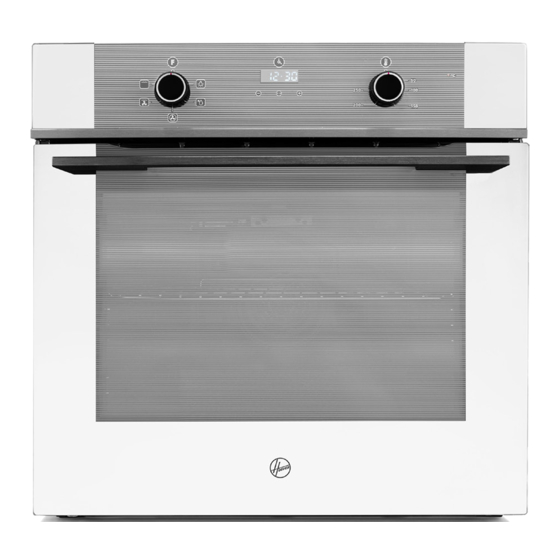
Product Overview Scope of delivery Oven Control panel (see page 9) Oven light (inside oven) Shelf supports (side racks) (inside oven) Removable door Door hinge (inside oven) After Sales Support (AU) 1300 886 649 (NZ) 0800 836 761 | tempo.org/support... - Page 9 Product Overview (Cont.) Control panel Control panel Accessories FUNCTION control DECREASE button TIMER / OK button INCREASE button Digital Display TEMPERATURE control Accessories Oven rack Baking tray Baking tray insert (not shown) Other inclusions (not shown) 2 Screws (for installation) Instruction manual Quick start guide Warranty certificate...
-
Page 10: Installation
Installation Installing the oven into a kitchen cabinet Fig. 1 Product dimensions Only plus deviations are admissible for all dimensions. Product dimensions Aperture dimensions Height: 595 mm Height: 600 mm Width: 595 mm Width: 560 mm Depth: 575 mm Depth: 570 mm (min.) Space requirements •... - Page 11 Installation (Cont.) Ventilation requirements • When mounted under a benchtop, airflow ventilation is important to help keep the cabinets and oven electronics from getting too hot. • The location of the power point cannot be mounted directly behind the oven as this will impede the oven sitting correctly into the cabinet. Positioning the appliance •...
- Page 12 Installation (Cont.) Electrical connection WARNING! All electrical work must be carried out by a licensed electrician. No alterations or wilful changes in the electricity supply should be carried out. • This oven is manufactured to work with single-phase alternating current (220–240 V~ 50–60 Hz).
-
Page 13: Getting Started
Getting Started Unpacking the appliance • This product has been packaged to protect it against transportation damage. Unpack the appliance and remove all packaging materials from around the oven and from inside the oven cavity. • Keep the original packaging carton and materials in a safe place. It will help prevent any damage if the product needs to be transported in the future, and you can use to store the appliance, if required. -
Page 14: Instructions
Instructions Switching the oven on and off • To switch on the oven you need to set the required oven function and cooking temperature and timer (or manual) mode. • To switch off the oven, set both FUNCTION and TEMPERATURE control knobs to the OFF [ o ] position. - Page 15 Instructions (Cont.) Symbol Function / cooking mode Oven light This function provides a separate light control to illuminate the oven cavity without opening the door. It will light up for all cooking functions. Defrost This function circulates room temperature air to thaw frozen food more quickly, without the use of any heat.
- Page 16 Instructions (Cont.) Setting the timer Your new electric oven has a digital timer with an easy to read LED display and three push buttons for easy operation (Fig. 4). Fig. 4 DISPLAY DECREASE INCREASE CONFIRM Setting the clock When your new oven is connected to the mains supply for the first time, the display shows 12.30 while 12 is blinking.* Before you start using the oven, you should set the clock.
- Page 17 Instructions (Cont.) • To cancel a setting and enter Manual cooking mode: press the [ ] button and hold it for more than three seconds. • To cancel the setting and return the timer to standby mode: press the [ ] and [ + ] buttons simultaneously and hold for three seconds.
- Page 18 Instructions (Cont.) Setting the cooking duration [ dur ] This function allows you to set a countdown time (max. 10 hours) after which the oven turns off automatically. • Place the food to be cooked in the oven, close the door and set the cooking function and oven temperature.
- Page 19 Instructions (Cont.) Setting fully automatic delayed cooking The delayed cooking function is a convenient feature you can use when you are at home and want to set the oven to come on at a time in the future and switch off after a set cooking duration. It only works after you have set the cooking duration function.
- Page 20 Instructions (Cont.) Shelf positions • Your electric oven comes supplied with an oven rack and a baking tray, which can be positioned on the side racks (shelf supports) at the sides of the oven cavity (Fig. 5). • When installed correctly, the oven rack and baking tray should be horizontal and not at an angle.
- Page 21 Instructions (Cont.) Cooking and baking tips • Before switching on: Before cooking, check that any accessories that are not required are removed from the oven and that only the baking tray and/or the oven rack are positioned on the appropriate shelf support(s). •...
- Page 22 Instructions (Cont.) Saving energy Using energy in a responsible way not only saves money but also helps the environment. Below are a few hints how you can save energy when using your electric oven. • Do not open the oven door more frequently than required. •...
-
Page 23: Faqs And Troubleshooting Guide
FAQs and Troubleshooting Guide If you experience problems with your oven, or it appears to be operating incorrectly, check on the following pages for solutions to common problems. The oven isn’t coming on. • Ensure that the oven is properly connected to the electricity supply. •... - Page 24 FAQs and Troubleshooting Guide (Cont.) I am getting condensation in my oven. • Steam and condensation is a natural byproduct of cooking any food with a high water content, such as frozen food, chicken etc. It may form in the oven cavity and between the oven door glass layers. This is not necessarily a sign that the oven is not working correctly.
-
Page 25: Other Useful Information
Other Useful Information Cleaning the oven CAUTION! • Before cleaning any part of the oven, make sure all oven controls are switched off and the oven has cooled down sufficiently. • Never use a steam cleaner to clean any part of the oven. •... - Page 26 Other Useful Information (Cont.) Removing the oven door for cleaning Removing the oven door and the glass panel inside the door enables full access to the entire oven cavity for easier cleaning and maintenance. • Before you start, place some soft, padded material on the floor or benchtop. •...
- Page 27 Other Useful Information (Cont.) Removing the door’s inner glass panel for cleaning IMPORTANT: Do not use any abrasive cleaner that could cause damage. Remember that if the surface of the glass panel becomes scratched, this could lead to a dangerous failure. While you have the oven door removed for cleaning, you may wish to remove the inner glass panels for cleaning.
- Page 28 Other Useful Information (Cont.) Replacing the oven light bulb IMPORTANT! To avoid the possibility of electric shock, make sure the oven is switched off and unplugged from the power supply before removing or replacing the oven light bulb. When the lamp in the oven fails and needs replacement, proceed as follows. (Bulb replacement is not covered by warranty.) Fig.
- Page 29 Other Useful Information (Cont.) Service, repairs and spare parts • Besides keeping the oven clean, regularly inspect the control dials and heating element. • If the appliance is damaged, do not attempt to repair it yourself. If it requires repair or service, please contact our after sales support centre to arrange for examination and repair.
- Page 30 Other Useful Information (Cont.) Technical specifications Model HV-C60OV-2 Oven cavity capacity (gross) 80 L Product dimensions (H)595 x (W)595 x (D)575 mm Aperture dimensions (H)600 x (W)560 x (D)570 (min) mm Weight approx. 32 kg Oven light bulb Halogen lamp, 220/230 V, 25-40 W, 300°C...
- Page 31 Other Useful Information (Cont.) Responsible disposal Packaging materials are recyclable. Please dispose of them responsibly for recycling. At the end of its working life, do not throw this appliance out with your household waste. Electrical and electronic products contain substances that can have a detrimental effect on the environment and human health if disposed of inappropriately.
- Page 32 Warranty returns Should you for any reason need to return this product for a warranty claim, make sure to include all accessories with the product. Product does not work? If you encounter problems with this product, or if it fails to perform to your expectations, make sure to contact our After Sales Support Centre on (AU) 1300 886 649 or (NZ) 0800 836 761 for advice.
Need help?
Do you have a question about the HV-C60OV-2 and is the answer not in the manual?
Questions and answers