Table of Contents
Advertisement
Available languages
Available languages
Quick Links
Advertisement
Table of Contents

Related Manuals for Hoover HON602X


Summary of Contents for Hoover HON602X
- Page 1 • HON602X • HON602B • HON602W USER INSTRUCTIONS OVENS KULLANIM KILAVUZU FIRINLAR INSTRUÇÕES DO UTILIZADOR FORNOS CANDY HOOVER GROUP S.R.L. • Via Privata Eden Fumagalli • 20047 Brugherio Milano Italy...
- Page 2 Safety Indications • WARNING: the appliance and accessible parts become hot during use. Be careful not to touch any hot parts. •WARNING: the accessible parts can become hot when the oven is in use. Children must be kept at a safe distance. •WARNING: ensure that the appliance is switched off before replacing the bulb, to avoid the possibility of electric shocks.
- Page 3 having the earth contact connected and in operation. The earth conductor is yellow-green in colour. This operation should be carried out by a suitably qualified professional. In case of incompatibility between the socket and the appliance plug, ask a qualified electrician to substitute the socket with another suitable type.
-
Page 4: Table Of Contents
Summary General Instructions 1.1 Safety indications 1.2 Electrical safety 1.3 Recommendations 1.4 Installation 1.5 Waste management 1.6 Conformity declaration 2.1 Overview Product Description 2.2 Accessories 2.3 First use Use of the Oven 3.1 Display description 3.2 Cooking modes 3.3 Using the minute timer Oven Cleaning and Maintenance 4.1 General notes on cleaning 4.2 Maintenance... -
Page 5: General Instructions
1. General Instructions We thank you for choosing one of our products. For the best results with your oven, you should read this manual carefully and retain it for future reference. Before installing the oven, take note of the serial number so that you can give it to customer service staff if any repairs are required. -
Page 6: Recommendations
NOTE: as the oven could require maintenance work, it is advisable to keep another wall socket available so that the oven can be connected to this if it is removed from the space in which it is installed. The power cable must only be substituted by technical service staff or by technicians with equivalent qualifications. -
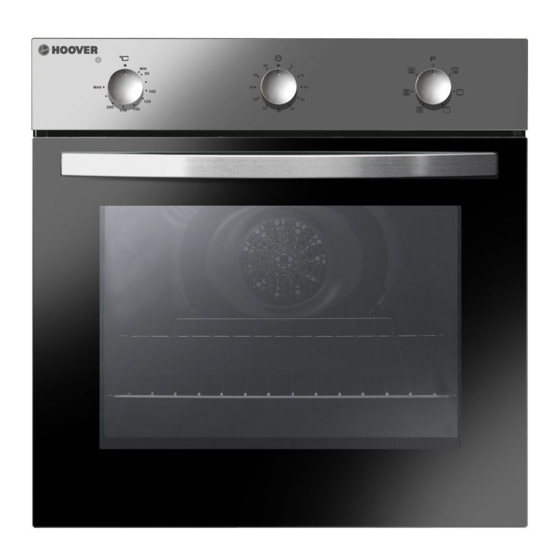
Page 7: Product Description
2. Product Description 2.1 Overview 1. Control panel 2. Shelf positions (lateral wire grid if included) 3. Metal grill 4. Drip pan 5. Fan (behind the steel plate) 6. Oven door 2.2 Accessories Metal grill Drip pan Holds baking trays and plates. Collects the residues that drip during the cooking of foods on the grills. -
Page 8: Use Of The Oven
3. Use of the Oven 3.1 Display description 3.2 Cooking Modes Function T °C Function (Depends on the oven model) Dial range LAMP: Turns on the oven light. CONVENTIONAL COOKING: Both top and bottom heating elements are used. Preheat the oven for about ten minutes. This method is ideal for all traditional roasting and 50 ÷... -
Page 9: Using The Minute Timer
3.3 Using the minute timer To set the cooking time, turn dial one complete revolution and then position the index to the required time. When the time has lapsed, the signal will ring for a few seconds. 4. Oven cleaning and maintenance 4.1 General notes on cleaning The lifecycle of the appliance can be extended through regular cleaning. -
Page 10: Removal And Cleaning Of The Glass Door
REMOVAL AND CLEANING OF THE GLASS DOOR 1. Open the oven door. 2.3.4. Lock the hinges, remove the screws and remove the upper metal cover by pulling it upwards. 5.6. Remove the glass, carefully extracting it from the oven door (NB: in pyrolytic ovens, also remove the second and third glass (if present)). -
Page 11: Changing The Bulb
CHANGING THE BULB 1. Disconnect the oven from the mains supply. 2. Undo the glass cover, unscrew the bulb and replace it with a new bulb of the same type. 3. Once the defective bulb is replaced, replace the glass cover. 5. - Page 12 Güvenlik uyarıları • UYARI: Cihaz ve aparatları kullanım sırasında ısınır. Isınmış parçalara dokunmaktan kaçınınız. •UYARI: Fırın kullanımdayken erişilebilir parçalar çok sıcak olabilir. Çocuklar güvenli bir mesafede tutulmalıdır. • Bu cihaz, 8 yaş ve üzeri çocuklar ve fiziksel, duyusal veya zihinsel yetenekleri veya bilgi ve tecrübe açısından yetersiz kişiler tarafından ancak yetişkin bir bireyin denetiminde ve cihazın nasıl kullanılacağına dair verilen talimatların uygulanması...
- Page 13 erişilebilir durumda olmalıdır. •Bağlantı, fişin erişilebilir durumda tutulması veya kablolama kurallarına uygun şekilde sabit kablo tesisatına bir anahtarın eklenmesi yoluyla kesilebilir. •Güç kablosu hasarlıysa üreticiden temin edilen bir kablo veya özel bir demet ile ya da müşteri hizmetleri departmanıyla iletişim kurularak değiştirilmelidir.
- Page 14 Özet Genel Açıklamalar 1.1 Güvenlik ipuçları 1.2 Elektriksel güvenlik 1.3 Tavsiyeler 1.4 Kurulum 1.5 Atık yönetimi 1.6 Uygunluk beyanı Ürün Açıklaması 2.1 Genel bakış 2.2 Aksesuarlar 2.3 İlk kullanım Fırının Temizlenmesi ve Bakımı 3.1 Gösterge açıklamaları 3.2 Pişirme modları 3.3 Pişirme sonu programı Fırının Temizlenmesi ve Bakımı...
- Page 15 1. Genel Açıklamalar Ürünlerimizden birini tercih ettiğiniz için teşekkür ederiz. Fırınınızdan en iyi sonuçları almak için bu kılavuzu dikkatle okuyun ve daha sonra başvurmak için saklayın. Fırının montajından önce, herhangi bir onarım gerekmesi halinde müşteri hizmetleri personeline vermek üzere seri numarasını not edin. Fırını ambalajından çıkardıktan sonra nakliye sırasında hasar almamış...
- Page 16 çıkabilecek her türlü kaza veya zararda imalatçı herhangi bir sorumluluk kabul etmemektedir. NOT: fırında bazı bakım işlemleri yapılması gerektiğinden, montajın yapılmış olduğu alandan çıkarılması halinde fırının bağlanabileceği başka bir prizin yakınlarda bulunması tavsiye edilir. Elektrik kablosunun sadece teknik servis personeli ya da eşdeğer niteliklere sahip teknisyenler tarafından değiştirilmesi gereklidir.
- Page 17 - WEEE evsel atık olarak işlem görmemelidir; - WEEE belediyeler veya tescilli bir firma tarafından yönetilen belirlenmiş toplama alanlarına götürülmelidir. Birçok ülkede, büyük WEEE'ler için şehir içinde toplama noktaları bulunmaktadır. Yeni bir cihaz satın aldığınızda, eski cihazın satın alınan cihazla aynı tipte olması ve aynı işlevlere sahip olması durumunda eski cihazı...
- Page 18 2.3 İlk Kullanım İLK TEMİZLEME İlk kez kullanmadan önce fırını temizleyin. Dış yüzeyleri yumuşak bir ıslak bezle silin. Tüm aksesuarları yıkayın ve fırının içini sabunlu su ve sıvı bulaşık deterjanı karışımına batırılmış bir bezle silin. Boş fırını maksimum sıcaklık değerine ayarlayın ve yaklaşık 1 saat çalıştırın, bu şekilde fırının yeni olmasından kaynaklı...
- Page 19 3.3 PİŞİRME SONU PROGRAMI Pişirme süresini ayarlamak için, kadran tam bir tur çevrilir ve daha sonra istenen zamanı gösteren pozisyona getirilir. Zaman geçtiğinde sinyal birkaç saniyeliğine çalacaktır. 4. Fırının Temizlenmesi ve Bakımı 4.1 Temizleme hakkında genel notlar Düzenli temizlik ile cihazın kullanım ömrü uzatılabilir. Elle temizlik işlemlerini yapmadan önce fırının soğumasını...
- Page 20 CAMIN SÖKÜLMESİ VE TEMİZLENMESİ 1. Fırının kapağını açın. 2.3.4. Menteşeleri kilitleyin, vidaları çıkarın ve yukarı doğru çekerek üst metal kapağı çıkarın. 5.6. Camı dikkatli bir şekilde fırın kapağından çekerek çıkarın (Not: pirolitik fırınlarda ikinci ve üçüncü camı (eğer varsa) da çıkarın). 7.
- Page 21 AMPULÜN DEĞİŞTİRİLMESİ 1. Fırını elektrik beslemesinden ayırın. 2. Cam kapağı sökün, ampulü sökün ve aynı türde yeni bir ampul ile değiştirin. 3. Arızalı ampul değiştirildikten sonra cam kapağı yerine takın. 5. Sorun Giderme 5.1 Sorun giderme SORUN ÇÖZÜMÜ OLASI NEDENİ Bir pişirme işlevi ya da sıcaklık Gerekli ayarların doğru Fırın ısınmıyor...
- Page 22 Candy Hoover Euroasia tarafından sağlanan garanti şartları aşağıdaki koşullarda geçersiz olacaktır. • Ürüne, yetkili servis dışındaki kişiler tarafından müdahale edilmesi, elektrik-su kesintisi ve üründen kaynaklanmayan kaçaklar garanti kapsamı...
- Page 23 şahıslar tarafından bakımı, onarımı veya başka bir nedenle müdahale edilmemiş olması şartıyla bütün parçaları dahil olmak üzere tamamı malzeme, işçilik ve üretim hatalarına karşı ürünün teslim tarihinden itibaren 3 ( ÜÇ ) YIL SÜRE İLE CANDY HOOVER EUROASIA A.Ş. TARAFINDAN GARANTİ EDİLMİŞTİR. Malın bütün parçaları dahil olmak üzere tamamı garanti kapsamındadır.
- Page 24 Indicações de segurança • AVISO: o aparelho e as partes acessíveis estão quentes durante a utilização. Cuidado para não tocar nas partes quentes. • AVISO: As partes acessíveis podem ficar quentes quando o forno está a ser usado. As crianças devem ser mantidas a uma distância segura.
- Page 25 • Ligue uma ficha com contacto de terra ao cabo de alimentação que suporte a tensão, corrente e carga indicadas na etiqueta. A tomada deve ser adequada para a carga indicada na etiqueta e deve ter um contacto de terra ligado e operacional. O condutor de terra é de cor amarelo-verde.
- Page 26 Índice Instruções gerais 1.1 Indicações de segurança 1.2 Segurança elétrica 1.3 Recomendações 1.4 Instalação 1.5 Gestão de resíduos 1.6 Declaração de conformidade Descrição do produto 2.1 Resumo 2.2 Acessórios 2.3 Primeira utilização Utilização do forno 3.1 Descrição do visor 3.2 Modos de cozedura 3.3 Usar o temporizador de minutos Limpeza e manutenção do forno 4.1 Notas gerais sobre limpeza...
- Page 27 1 Instruções gerais Agradecemos por ter selecionado um dos nossos produtos. Para obter os melhores resultados com o seu forno, deve ler este manual cuidadosamente e conservá-lo para futura referência. Antes de instalar o forno, anote o número de série para o fornecer à equipa do serviço ao cliente, caso seja necessário realizar alguma reparação.
- Page 28 NOTA: Dado que o forno pode requerer trabalho de manutenção, é recomendado manter uma outra tomada de parede disponível onde o forno possa ser ligado caso seja necessário retirá-lo do local de instalação. O cabo elétrico deve ser substituído apenas por um membro da nossa equipa técnica ou por um técnico qualificado e habilitado para o fazer.
- Page 29 Ao colocar a marca neste produto, confirmamos a sua conformidade com todos os requisitos Europeus de segurança, saúde e ambientais que são mencionados na legislação aplicável para este produto. 2. Descrição do produto 2.1 Visão geral 1. Painel de controlo 2.
- Page 30 3. Utilização do forno 3.1 Descrição do visor Modos de cozedura Indicador T °C Função (depende do modelo do forno) de função intervalo LUZ: Acende a luz do forno. COZEDURA CONVENCIONAL: Utilizam-se os elementos de aquecimento superiores e inferiores. Preaqueça o forno durante cerca de dez minutos. Este método é ideal para cozer e assar de forma tradicional.
- Page 31 Usar o temporizador de minutos Para definir o tempo de cozedura, rode o mostrador uma volta completa e, de seguida, posicione o indicador no tempo requerido. Depois do tempo marcado ter passado, o sinal sonoro toca durante alguns segundos. Limpeza e manutenção do forno Notas gerais sobre limpeza O ciclo de vida do equipamento pode ser aumentado com a limpeza regular do mesmo.
- Page 32 REMOÇÃO E LIMPEZA DA JANELA DO FORNO 1. Abrir a porta do forno. 2.3.4. Fechar as dobradiças, retirar os parafusos e a tampa superior metálica, puxando a mesma para cima. 5,6. Retirar o vidro, extraindo-o cuidadosamente da porta do forno (Nota: em fornos pirolíticos, retirar ainda o segundo e o terceiro vidro (se presente)).
- Page 33 SUBSTITUIR A LÂMPADA 1. Desligar o forno da alimentação. 2. Desapertar a tampa de vidro, desenroscar a lâmpada e substituir por uma nova do mesmo tipo. 3. Depois de substituída a lâmpada danificada, substituir a tampa de vidro. 5. Resolução de problemas PROBLEMA POSSÍVEL CAUSA SOLUÇÃO...
- Page 34 INSTALLATION INSTALAÇÃO KURULUM Opening / çıklık 550 mm 460 mm x 15 mm 560 mm 595 mm 580 mm 545 mm 595 mm 22 mm If the furniture is coverage with a bottom at the back part, provide an opening for the power supply cable. Mobilyanın arka tarafında bir kaplama bulunuyorsa güç...
Need help?
Do you have a question about the HON602X and is the answer not in the manual?
Questions and answers