Sign In
Upload
Download
Table of Contents
Contents
Add to my manuals
Delete from my manuals
Share
URL of this page:
HTML Link:
Bookmark this page
Add
Manual will be automatically added to "My Manuals"
Print this page
×
Bookmark added
×
Added to my manuals
Manuals
Brands
SOLTEK Manuals
Motherboard
SL-65KVB
User manual
SOLTEK SL-65KVB User Manual
Hide thumbs
1
2
3
Table Of Contents
4
5
6
7
8
9
10
11
12
13
14
15
16
17
18
19
20
21
22
23
24
25
26
27
28
29
30
31
32
33
34
35
36
37
38
39
40
41
42
43
44
45
46
47
48
49
50
51
52
53
54
55
56
57
58
59
60
61
62
63
64
65
66
67
68
69
70
71
72
73
74
75
76
77
78
79
80
81
82
83
84
85
86
87
88
89
90
91
92
page
of
92
Go
/
92
Contents
Table of Contents
Bookmarks
Table of Contents
Table of Contents
Chapter 1 Introduction
Mainboard Specification
Cpu
Chipset
Advanced High-Performance Dram Controller
Full Featured Accelerated Graphics Port (Agp) Controller
Multi-I/O Function
Expansion Slots
Award Bios V6.0, Supporting
Sound Controller
Power Management
Form Factor
Hardware Monitoring
Others
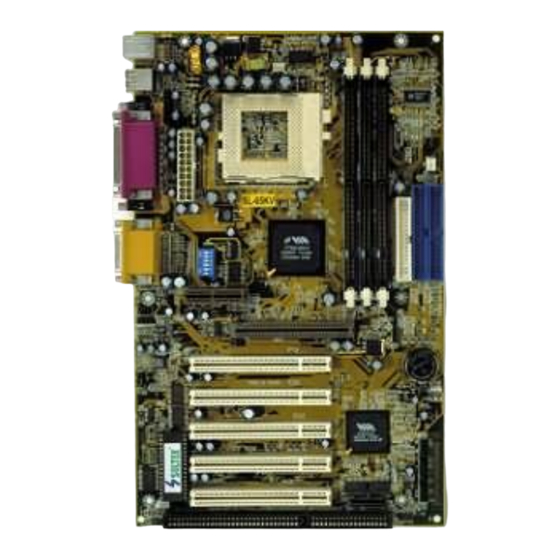
Motherboard Layout
Motherboard Layout
Chipset System Block Diagram
Motherboard Specification Table
Chapter 2 Hardware Setup
Cpu Installation
Memory Installation
Hdd/Fdd Installation
Cpu Bus Ratio Select (by Sw1 Dip1~Dip4)
Fsb Frequency Select (by Sw1 Dip5~Dip6/Jp2)
Jumper Setting for Devices on Board
Jumper Jbat1 for Clearing Cmos Data
Usb2 Header Select-1 (by Jp3/Jp4)
Onboard Ac'97 Codec Select (by Jp5/Jp9)
Usb 1 Select-2 (by Jp6/Jp7)
Power Lost Resume (by Jp8)
Factory Test (by Jp14)
Connectors Configurations
Onboard Fan Connector (Fan1/Fan2)
CD-Rom Audio Connector (Cd_In1/Cd_In2)
Wake on Lan (Jwol1)
Thermal Sensor Connector (Rt2)
Complex Header J2&J3
Chassis Panel Connector
Atx Power Supply Connector
Ps/2 Mouse and Ps/2 Keyboard
Second Usb Header (Usb2)
Irqs Description for Various Devices
Chapter 3 Software Setup
About Support CD
Via Chipset Driver Installation (4-In-1 Driver)
Ac97 Audio Codec Driver Installation
Hardware Monitor Driver Installation
Chapter 4 Bios Setup
The Bios
What Is Bios Setup
How to Run Bios Setup
What Is Cmos
What Is Post
Bios Upgrade
Before Upgrading Bios
Upgrade Process
Bios Setup-- Cmos Setup Utility
Standard Cmos Setup
Advanced Bios Features
Advanced Chipset Features
Integrated Peripherals
Power Management Setup
Pnp / Pci Configuration
Pc Health Status
Frequency/Voltage Control
Load Optimized Defaults
Set Supervisor / User Password
Save & Exit Setup
Exit Without Saving
Appendices
Appendix-1 Technical Terms Introduction
Appendix-2 Identifying Bios Version and Bios Part
Number
Appendix-3 Identifying Mainboard / Model Number
Advertisement
Quick Links
Download this manual
R
SL-65KVB/65KV2
USER MANUAL V1.1
Table of
Contents
Previous
Page
Next
Page
1
2
3
4
5
Advertisement
Table of Contents
Need help?
Do you have a question about the SL-65KVB and is the answer not in the manual?
Ask a question
Questions and answers
Related Manuals for SOLTEK SL-65KVB
Motherboard SOLTEK SL-65KIV User Manual
Soltek mainboard user manual (94 pages)
Motherboard SOLTEK SL-65KV2-T User Manual
(88 pages)
Motherboard SOLTEK SL-65KV2 User Manual
(92 pages)
Motherboard Soltek SL-65ME-T User Manual
(102 pages)
Motherboard Soltek SL-65DVB User Manual
Soltek motherboard user manual (72 pages)
Motherboard Soltek SL-65EP-T User Manual
(102 pages)
Motherboard SOLTEK SL-65LIV User Manual
(88 pages)
Motherboard SOLTEK SL-65DRV User Manual
(93 pages)
Motherboard SOLTEK SL-65MIV User Manual
(80 pages)
Motherboard SOLTEK SL-65MIV-C User Manual
(101 pages)
Motherboard SOLTEK SL-65FVB User Manual
(47 pages)
Motherboard SOLTEK SL-65F+ User Manual And Technical Manual
(39 pages)
Motherboard SOLTEK SL-65MV Users Manual And Technical Reference
(71 pages)
Motherboard SOLTEK SL-65ME User Manual
(88 pages)
Motherboard SOLTEK SL-65ME User Manual
(70 pages)
Motherboard SOLTEK SL-65EP User Manual
(84 pages)
This manual is also suitable for:
Sl-65kv2
Table of Contents
Print
Rename the bookmark
Delete bookmark?
Delete from my manuals?
Login
Sign In
OR
Sign in with Facebook
Sign in with Google
Upload manual
Upload from disk
Upload from URL


Need help?
Do you have a question about the SL-65KVB and is the answer not in the manual?
Questions and answers