Table of Contents
Advertisement
Quick Links
LD-60, LD-61, LD-70, LD-70NR,
LD-71, LD-71A, LD-80, LD-100
Blood Pressure Monitor
Instruction Manual
GENERAL INFORMATION
This Instruction Manual is designed to assist the user with safe and effective
operation of the Device for measurement of blood pressure (hereinafter – the
"Device"). Use this Device according to the rules described in this Manual.
Operate the Device only as intended. Do not use the Device for any other
purposes. Read and understand the whole Instruction Manual, in particular
«RECOMMENDATIONS ON CORRECT MEASUREMENT».
INDICATIONS FOR USE
The device is designed to measure arterial pressure of human according to
Korotkov method. The device is recommended for use under conditions of clin-
ics and hospitals, as well as in household conditions as supplement to medi-
cal observation. Pressure is measured by means of auscultation of Korotkov's
tones by stethoscope and by taking readings on manometer.
RECOMMENDATIONS ON CORRECT MEASUREMENTS
1. Do not use the device without preliminary consultation with Your doctor,
if You undergo treatment by hemodialysis or by anticoagulants, antithrombo-
cytes or steroids. Use of device in these cases may cause internal hemorrhage.
2. For correct measurement you should know that THE BLOOD PRESSURE IS
SUBJECT TO SHARP VARIATIONS EVEN WITHIN THE SHORT TIME INTERVALS.
The blood pressure depends on many factors. It is usually lower in summer and
higher in winter. The blood pressure varies together with the atmospheric pres-
sure, depends on physical loads, emotional excitement, stresses and dietary re-
gime. Drugs, drinking alcohol and smoking produce significant effect. Even the
very procedure of blood pressure measurement in a polyclinic sends the blood
pressure high in many people, thus, the blood pressure measured at home of-
ten differs from the values received in a polyclinic. As the blood pressure tends
to rise at low temperatures, make measurements at an indoor temperature (ap-
proximately 20°C). If this Device stayed under a low temperature, keep it for at
least 1 hour at an indoor temperature before use, otherwise the measurement
result may be incorrect. During a day the difference in readings for healthy
people may be 30-50 mmHg of systolic pressure and to 10 mmHg of diastolic
pressure. The dependence of the blood pressure on various factors is individual
for each person. Accordingly, it is recommended to keep a special book with
blood pressure records. ONLY A CERTIFIED DOCTOR USING YOUR RECORDS IS
CAPABLE TO ANALYZE THE TENDENCY OF YOUR BLOOD PRESSURE VARIATIONS.
3. At cardiovascular and some other diseases requiring blood pressure mon-
itoring make measurements in the hours fixed by your attending doctor.
REMEMBER THAT THE DIAGNOSTIC AND ANY TREATMENT OF HYPERTENSION
MAY BE CONDUCTED ONLY BY A CERTIFIED DOCTOR ON THE BASIS OF BLOOD
PRESSURE VALUES OBTAINED BY THIS DOCTOR. TAKING OF DRUGS AND THEIR
DOSES SHOULD BE PRESCRIBED ONLY BY YOUR ATTENDING DOCTOR.
Fig. 1
4. KEEP QUIET DURING A MEASUREMENT TO OBTAIN THE ACCURATE VALUES
OF YOUR BLOOD PRESSURE WITH THE ELECTRONIC DEVICE. Measure your
blood pressure in the calm and comfortable conditions at the indoor tempera-
ture. No eating an hour before measurement; no smoking, taking tonic agents,
alcohol 1.5-2 hours before measurement.
5. The accuracy of blood pressure measurement depends on whether the cuff
matches the size of your arm. THE CUFF SHOULD NOT BE TOO SMALL OR TOO
LARGE.
6. Wait 3 minutes between measurements for
the blood to restore its circulation. However, the
persons with prominent atherosclerosis due to
considerable loss of vascular elasticity may need
to increase the wait time between measurements
(10-15 minutes). This also refers to the patients suf-
fering for long from diabetes. For more accurate
determination of blood pressure it is recommend-
ed to make a series of 3 consecutive measure-
ments and to use the average value.
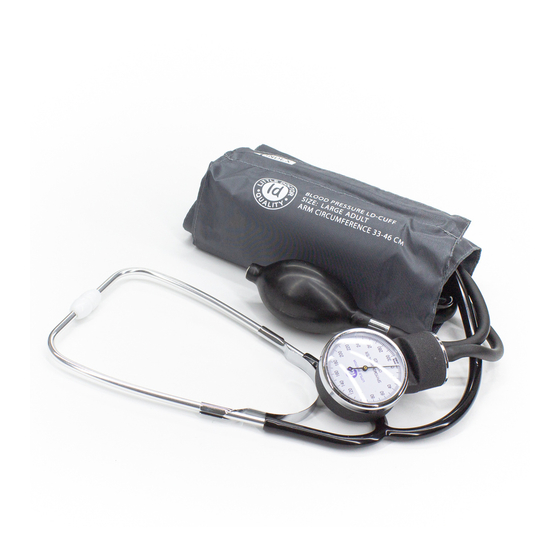
PARTS AND COMPONENTS
Manometer
1
Metal Ring
2
Non-return
Valve
LD CUFF
Air Pump
Air Valve
Cu Tubes
Cu Compartment
Storage
Storage Case
4
Instruction
Manual
Card
Manometer
3
For models LD-60, LD-61, LD-70, LD-70NR, LD-71, LD-71A, LD-80
1
For models LD-60, LD-70, LD-71, LD-71A, LD-100
2
For model LD-100
3
4
For models LD-60, LD-61, LD-70, LD-70NR, LD-71, LD-71A, LD-80
5
For models LD-60, LD-61, LD-71, LD-71A, LD-100
CUFF PREPARATION
1. Insert the cuff end for about 5 cm into a metal ring as
shown in the fig. 3 (if cuff is with ring).
2. Apply the cuff to your left upper arm so that the air tube is
directed to your palm (fig. 4). If the measurement on your
left arm is difficult, you may use your right arm. In this case
remember that the readings may differ by 5-10 mmHg and
even more.
3. Wrap the cuff around your upper arm so that the bottom
of the cuff is approximately 2-3 cm above your elbow. The
sign "ARTERY" should be over the arm artery as shown in
the fig. 5.
4. Fix the cuff so that it fits tightly to the arm, but see that it
is not overtight. Too tight or too free placement of the cuff
may give inaccurate readings.
5. On the fixed cuff the sign «INDEX» should point to the area
«NORMAL» (fig 7). It means that the cuff is chosen correctly
and fits the size of your upper arm. If the sign points to the
area marked «
the readings will be higher. If the sign points to the area
marked «
» or to the right, the cuff is too large and the
readings will be lower.
6. If the arm has a conic form, the cuff should be put on with
a spiral movement as shown in the fig. 8.
7. If the rolled-up sleeve squeezes the arm interfering with
free blood flow the Device may give inaccurate figures not
corresponding to your actual blood pressure (fig. 9).
STETHOSCOPE
5
8. Place stethoscope head so that it was located in depres-
sion, somewhat higher than elbow bend (Fig. 4). If You use
Metal Tubes
the device with built-in stethoscope (for models LD-60 and
LD-71A), to reach better auscultation of pulse on full hand,
the cuff may be turned round the hand approximately
Stethoscope
by quarter of circle (60-90˚) in such way that stethoscope
Head
head would be positioned on inner side of hand (more
close to the body).
9. Pressure shall be measured in sitting or lying position of human. IN SITTING
POSITION WATCH THAT PART OF HAND WITH CUFF WOULD BE LOCATED AT THE
LEVEL OF HEART, AND HAND WOULD BE FREELY LOCATED ON THE TABLE AND
Stethoscope
WOULD NOT MOVE.
Tube
1. Insert metal tubes of stethoscope into ears. Close air valve on air pump, having
turned it clockwise. Squeezing air pump, pump up the cuff, listening to pulse
by stethoscope. After You stopped to listen to pulse, pump up the cuff by 30
mm Hg more.
2. Slowly opening air valve, turning it counterclockwise, bleed down pressure in
the cuff. Watch that pressure in the cuff would fall down at speed 2-4 mm Hg
per second. This is necessary to get accurate result.
3. As soon as You hear weak pulse beats, memorize manometer reading. This is
Your systolic (upper) arterial pressure.
4. Pressure in the cuff is continuing falling down at the same speed (2-4 mm Hg
per second). You are continuing to listen to pulse. Sounds which You hear will
change. Unlike the first beats, they will become softer, resembling rustling. At
the moment when You practically stop seize pulse, memorize manometer read-
ing. This is Your diastolic (lower) arterial pressure.
CARE, STORAGE, REPAIR AND DISPOSAL
Fig. 3
1. Keep this Device from exposure to higher humidity, direct sunlight, shocks.
2. Do not keep and use this Device near heating installations and open fire.
3. Keep the Device clean and protect it from dust.
4. Contact of device with aggressive solutions is not allowed.
5. Protect the arm cuff and air tubes from contacting on sharp things.
6. This Device does not contain special controls to adjust the measurement accu-
Fig. 4
racy. Independent opening of manometer is prohibited. Repair the Device only
in authorized organizations.
7. Service life of device is indicated in section TECHNICAL SPECIFICATIONS.
Service life is determined from the moment of commodity delivery to the cus-
tomer. On expiration of the warranted service life apply from time to time to
authorized repair organizations to check the technical condition of the Device.
Fig. 5
8. Dispose of the Device and its components according to the application local
regulations. No special requirements to disposal of this Device are defined by
the manufacturer.
9. The arm cuff may withstand multiple sanitary treatments. The internal tissue
surface of the arm cuff (contacting on arm) may be cleaned with cotton ball
soaked in 3%-solution of hydrogen peroxide. At long use the partial color fad-
Fig. 6
» or to the left, the cuff is too small and
Fig. 7
Fig. 8
Fig. 9
Fig. 10
MEASUREMENT PROCEDURE
Advertisement
Table of Contents


Need help?
Do you have a question about the LD-60 and is the answer not in the manual?
Questions and answers