
Related Manuals for Little Doctor LD2


Summary of Contents for Little Doctor LD2
- Page 1 Digital Blood Pressure Monitor Instruction Manual Ciśnieniomierz elektroniczny półautomatyczny LD do pomiaru ciśnienia tętniczego krwi i pulsu Instrukcja Obsługi...
-
Page 2: Table Of Contents
TABLE OF CONTENTS PARTS AND COMPONENTS ..........3 GENERAL INFORMATION . -
Page 3: Parts And Components
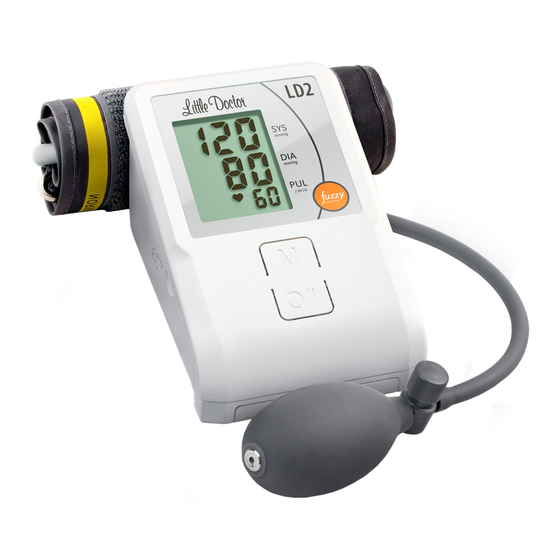
PARTS AND COMPONENTS 1. Electronic Unit. 2. Arm cuff and pump jack. 3. Air tube. 4. T-piece for connecting the bulb and cuff to the electronic Device. 5. Bulb. 6. Check valve. 7. Pressure release valve. 8. LCD. 9. Button M (memory). 10. -
Page 4: General Information
This Instruction Manual is designed to assist the user with safe and eff ective operation of the semiautomatic digital Device for measurement of blood pres- sure and heartbeat rate LD, (modifi cation LD2 (hereinafter – the “Device”). Use this Device according to the rules described in this Manual. Operate the Device only as intended. -
Page 5: Recommendations On Correct Measurements
RECOMMENDATIONS ON CORRECT MEASUREMENTS 1. For correct measurement you should know that THE BLOOD PRESSURE IS SUBJECT TO SHARP VARIATIONS EVEN WITHIN THE SHORT TIME INTERVALS. The blood pressure depends on many factors. It is usually lower in summer and higher in winter. -
Page 6: Power Supply
long from diabetes. For more accurate determination of blood pressure it is recommended to make a series of 3 consecutive measurements and to use the average value. POWER SUPPLY OF THE DEVICE Open the cover of the battery compart- ment and install 4 “AA” size batteries accord- ing to polarit y marked inside the compartment. -
Page 7: Cuff Preparation
CUFF PREPARATION 1. Insert the cuff end for about 5 cm into a metal ring as shown in the fi gure. 2. Apply the cuff to your left upper arm so that the air tube is directed to your palm. If the measurement on your left arm is diffi... -
Page 8: Measurement Procedure
7. If the rolled-up sleeve squeezes the arm interfering with free blood flow the Device may give inaccurate fi gures not corresponding to your actual blood pressure. MEASUREMENT PROCEDURE 1. Connect the air hoses of the cuff and bulb to the T-piece. -
Page 9: Memory Function
7. If symbol “ “, appears during pressure release, it means that the cuff has not been pumped up to the required level. Pump the cuff up by additional 30-40 mmHg for 4 seconds above the previous value, otherwise the display will show the error message “... -
Page 10: Memory Clearing
MEMORY CLEARING To delete all values stored in the memory, press the M Button and hold it down for more than 5 seconds. Symbols “Clr” will appear on the screen and all values will be deleted from the memory. INFORMATION ABOUT ERRORS Indication Likely cause Methods of correction... -
Page 11: Troubleshooting Tips
4. Keep the Device clean and protect it from dust. Use the dry soft cloth to clean the Device. 5. Keep the Device and its components away from water, solvents, spirit and petrol. 6. Protect the arm cuff from contacting on sharp things; do not stretch or fold tightly the arm cuff... -
Page 12: Warranty
Measurements Perhaps you talk or move Keep silence and quiet of the pulse your arm during the during measurement. rate are too measurement? Repeat the measurement at high/low. Perhaps you make least in 5 min. measurement directly after physical load? Spontaneous Actuation of automatic de- This is not a defect. - Page 13 Type of power supply 4 “AA” size batteries (LR6) Max power intake, W Memory 90 recent measurements + average value of the last three measurements Operation conditions: Temperature, °C from 10 to 40 Relative humidity, % Rh 85 and lower Storage and transportation conditions: from -20 to 50...
-
Page 14: Certification And State Registration
57G Zawila Street, 30-390, Krakow, Poland Service phone: +48 12 2684748, 2684749 Manufactured under control: Little Doctor International (S) Pte. Ltd., 35 Selegie Road # 09-02 Parkline Shopping Centre, Singapore 188307 Manufacturer: Little Doctor Electronic (Nantong) Co. Ltd., No.8, Tongxing Road Economic &... - Page 15 Yishun Central P.O. Box 9293 Singapore 917699, Fax: 65-62342197, E-mail: ld@singaporemail.com Shanghai International Trading Corp.GmbH Eiffestrasse 80, 20537 Hamburg, Germany. Tel: 0049-40-2513175 ® Registered trade marks of Little Doctor International (S) Pte. Ltd. © Little Doctor International (S) Pte. Ltd., 2015 E196/1507/2...
Need help?
Do you have a question about the LD2 and is the answer not in the manual?
Questions and answers