
Related Manuals for Little Doctor LD3


Summary of Contents for Little Doctor LD3
- Page 1 LD3, LD3a Digital Blood Pressure Monitor Instruction Manual Ciśnieniomierz elektroniczny automatyczny LD do pomiaru ciśnienia tętniczego krwi i pulsu Instrukcja Obsługi...
-
Page 2: Table Of Contents
TABLE OF CONTENTS PARTS AND COMPONENTS........3 GENERAL INFORMATION. -
Page 3: Parts And Components
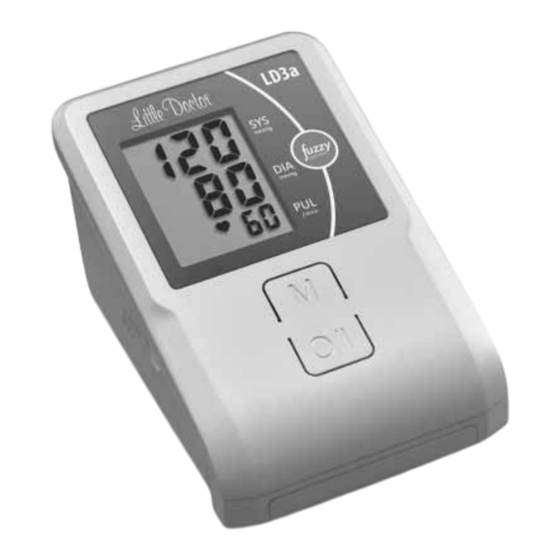
PARTS AND COMPONENTS 1. Electronic unit. 2. LCD. 3. Arm cuff jack. 4. Air plug. 5. Air tube. 6. Arm cuff. 7. Power source Jack . 8. Electrical power supply LD-N057. 9. Button M (memory). 10. Button O/I (Power ON/OFF). 11. -
Page 4: General Information
This Instruction Manual is designed to assist the user with safe and effective operation of the automatic digital Device for measurement of blood pressure and heartbeat rate LD, modifi cation LD3 (LD3a) (hereinafter – the “Device”). Use this Device according to the rules described in this Manual. Operate the Device only as intended. -
Page 5: Recommendations On Correct Measurements
size 25-36 cm (delivered in a set with the Device). RECOMMENDATIONS ON CORRECT MEASUREMENTS 1. For correct measurement you should know that THE BLOOD PRESSURE IS SUBJECT TO SHARP VARIATIONS EVEN WITHIN THE SHORT TIME INTERVALS. The blood pressure depends on many factors. It is usually lower in summer and higher in winter. -
Page 6: Power Supply
3. At such disorders as deep vascular sclerosis, weak pulse wave and also in patients with the prominent distortions of cardiac rhythm it may be diffi cult to measure the blood pressure accurately. IN SUCH CASES CONSULT A CERTIFIED DOCTOR ABOUT APPLICATION OF THE ELECTRONIC DEVICE. 4. -
Page 7: Use Of The Device With The Power Source
• The batteries supplied with the Device are intended for check of the Device performance at sale and their service life may be shorter than of the recommended batteries. • Replace all four batteries at the same time. Do not use the waste batteries. -
Page 8: Cuff Preparation
CUFF PREPARATION 1. Insert the cuff end for about 5 cm into a metal ring as shown in the Figure. 2. Apply the cuff to your left upper arm so that the air tube is directed to your palm. If the measurement on your left arm is diffi... -
Page 9: Measurement Procedure
7. If the rolled-up sleeve squeezes the arm interfering with free blood fl ow the Device may give inaccurate fi gures not corresponding to your actual blood pressure. MEASUREMENT PROCEDURE 1. Insert the Air Tube Plug into the Cuff Jack. Make 3-5 deep inhales and exhales before taking a measurement and relax. -
Page 10: Automatic Re-Inflating
The Device is designed to store automatically the results of each measure- ment (blood pressure and pulse) in the memory every time a measurement is completed. THE DATA WILL BE KEPT IN THE MEMORY EVEN IF THE DEVICE IS STORED WITHOUT BATTERIES. TO DELETE ALL VALUES STORED IN THE MEMORY YOU SHOULD MAKE ACTIONS DESCRIBED IN “MEMORY FUNCTION”. -
Page 11: Memory Clearing
MEMORY CLEARING To delete all values stored in the memory, press the M Button and hold it down for more than 5 seconds. Symbols “Clr” will appear on the screen and all values will be deleted from the memory (Fig. 8). Fig .8 INFORMATION ABOUT ERRORS Indication... -
Page 12: Care, Storage, Repair And Disposal
CARE, STORAGE, REPAIR AND DISPOSAL 1. Keep this Device from exposure to higher humidity, direct sunlight, shocks, vibration. THIS DEVICE IS NOT WATERTIGHT. 2. Do not keep and use this Device near heating installations and open fi re. 3. If the Device was stored at a temperature below the freezing point, keep it at least for 1 hour in some warm place before use. - Page 13 Infl ation is stopped Automatic re-infl ation See MEASUREMENT and resumed. to obtain correct PROCEDURE measurements. Perhaps you talk or move Calm down and repeat the your arm during the measurement measurement? Every time the Check that the arm cuff is Take the correct position for blood pressure is level with your heart?
-
Page 14: Warranty
WARRANTY 1. The following LD product is covered by warranty for the period specifi ed in the warranty card. 2. The warranty liabilities are contained in the warranty card given at the sale of this Device to a purchaser. 3. The addresses of organizations for warranty maintenance are given in the warranty card. -
Page 15: Certification And State Registration
CERTIFICATION AND STATE REGISTRATION This Device manufacturing is certifi ed according to international standard ISO 13485:2003. Devices LD3, LD3a comply with the requirements of European Directive MDD 93/42/ЕЕС, international standards, EN980, EN1041, EN1060-1, EN1060-3, EN10601-1-2, ISO 14971, EMC (IEC 60601-1-2:2001/A1:2004, CISPR 11:2003/A2:2006, GROUP 1, CLASS B, IEC 61000-3-2:2005, IEC 61000- 3-3:1994/A2:2005. - Page 16 Manufacturer: Little Doctor Electronic (Nantong) Co. Ltd., No.8, Tongxing Road Economic & Technical Development Area, Nantong 226010, Jiangsu, PEOPLE'S REPUBLIC OF CHINA Distributor in Europe: Little Doctor Europe Sp. z o.o. 57G Zawila Street, 30-390, Kraków, Poland Sales Offi ce phone: +48 12 2684746, 12 2684747, fax: +48 12 268 47 53 E-mail: biuro@littledoctor.pl...
-
Page 17: Information In Polish
SPIS TREŚCI Podstawowe części i komponenty ......18 Informacje ogólne ......... . . 19 Wskazania do stosowania . -
Page 18: Podstawowe Części I Komponenty
PODSTAWOWE CZĘŚCI I KOMPONENTY 1. Panel przedni. 2. Wyświetlacz LCD. 3. Gniazdo do podłączenia mankietu. 4. Złącze do mankietu. 5. Wąż mankietu. 6. Mankiet. 7. Gniazdo do podłączenia zasilacza. 8. Zasilacz LD-N057 (w zawartości kompletu modelu LD3a). 9. Przycisk M (pamięć). 10. -
Page 19: Informacje Ogólne
Niniejsza instrukcja ma służyć użytkownikom pomocą w bezpiecznym i efektywnym posługiwaniu się automatycznym elektronicznym urządzeniem do pomiaru ciśnienia tętniczego krwi i pulsu LD, model LD3 (LD3a) (dalej w tekście: URZĄDZENIE). Urządzenie powinno być stosowane zgodnie z zasadami przedstawionymi w niniejszej instrukcji i nie należy go wykorzystywać... -
Page 20: Zalecenia Dotyczące Prawidłowego Pomiaru
ZALECENIA DOTYCZĄCE PRAWIDŁOWEGO POMIARU 1. Dla przeprowadzenia prawidłowego pomiaru trzeba wiedzieć, że CIŚNIENIE TĘTNICZE PODLEGA SILNYM WAHANIOM NAWET W KRÓTKIM OKRESIE CZASOWYM. Wartość ciśnienia tętniczego krwi zależy od wielu czynników. Zwykle jest ona niższa w okresie letnim i wyższa w okresie zimowym. Ciśnienie krwi zależy od ciśnienia atmosferycznego, wysiłku fi... -
Page 21: Zasilanie Elektryczne Urządzenia
3. Przy zaburzeniach takich jak: miażdżyca naczyń krwionośnych, słaba fala pulsu, a także u pacjentów z poważnymi zaburzeniami rytmu uderzeń serca pomiar ciśnienia tętniczego może być utrudniony. W TAKICH PRZYPADKACH NALEŻY SKONSULTOWAĆ SIĘ Z LEKARZEM W CELU OKREŚLENIA NAJLEPSZEJ METODY POMIARU. 4. -
Page 22: Stosowanie Urządzenia Zasilanego Zasilaczem
• Baterie dostarczone z urządzeniem służą do testowania poprawności działania ciśnieniomierza, ich żywotność jest zatem o wiele niższa, niż żywotność nowych baterii. • Podczas wymiany baterii należy zmienić je wszystkie, nie należy zakładać baterii używanych. • Jeżeli urządzenie nie jest używane przez dłuższy czas, należy wyjąć z niego baterie. -
Page 23: Zakładanie Mankietu
ZAKŁADANIE MANKIETU 1. Rozsuń mankiet tak, aby metalowy pierścień był około 5 cm od rzepu, jak pokazano na rysunku. 2. Wsuń lewe ramię w mankiet tak, aby rurka była skierowana w kierunku dłoni. Jeżeli pomiar na lewej ręce jest utrudniony, można dokonać... -
Page 24: Procedura Pomiaru
7. Zbyt mocno podwinięty rękaw nad mankietem uciska rękę, tamując przepływ krwi, i może być przyczyną błędnego pomiaru ciśnienia. PROCEDURA POMIARU 1. Połącz złączkę mankietu z właściwym gniazdkiem ciśnieniomierza. Rozluźnij się i weź 3-5 głębokich oddechów. Nie poruszaj się, nie naprężaj ręki i nic nie mów w czasie pomiaru. -
Page 25: Pompowanie Automatyczne
DANE TE ZOSTANĄ ZACHOWANE NAWET PO WYJĘCIU BATERII Z URZĄDZENIA. USUNĄĆ ZACHOWANE W PAMIĘCI URZĄDZENIA WYNIKI MOŻNA PO DOKONANIU CZYNNOŚCI OPISANYCH W ROZDZIALE «FUNKCJA PAMIĘCI». Jeśli zasilanie nie zostało przerwane, ale z urządzenia się nie korzysta przez 3 minuty, wyłączy się ono automatycznie. POMPOWANIE AUTOMATYCZNE Jeżeli początkowe pompowanie mankietu do wartości 190 mmHg nie jest wystarczające lub zostanie wykonany ruch ręką, urządzenie napompuje... -
Page 26: Czyszczenie Pamięci Urządzenia
CZYSZCZENIE PAMIĘCI URZĄDZENIA W celu usunięcia z pamięci urządzenia wszystkich zapisanych w niej wyników pomiarów, należy po zakończeniu pomiaru nacisnąć na przycisk M i przytrzymać go dłużej niż 5 sekund. Na wyświetlaczu pojawi się symbol “Clr” i cała pamięć urządzenia zostanie wyczyszczona (rys . 8). Rys .8 ZAWIADOMIENIA O BŁĘDACH Symbol... -
Page 27: Pielęgnacja, Przechowywanie, Naprawa I Utylizacja
PIELĘGNACJA, PRZECHOWYWANIE, NAPRAWA I UTYLIZACJA 1. Ciśnieniomierz należy chronić przed nadmierną wilgocią, bezpośrednim światłem słonecznym, wstrząsami i wibracjami. URZĄDZENIE NIE JEST WODOSZCZELNE. 2. Nie należy przechowywać lub używać ciśnieniomierza w pobliżu urządzeń grzewczych i otwartego ognia. 3. Jeśli urządzenie nie jest używane przez dłuższy czas, należy wyjąć z niego baterie. -
Page 28: Wykrywanie Usterek
WYKRYWANIE USTEREK PROBLEM PRAWDOPODOBNY SPOSÓB POWÓD WYELIMINOWANIA Po naciśnięciu Baterie są rozładowane. Wymień wszystkie baterie przycisku O/I na na nowe. Nie zachowano wyświetlaczu nic nie biegunowości przy Włóż baterie poprawnie. wyświetla się. wkładaniu baterii. Wytrzyj styki suchą ścierką. Styki baterii są zabrudzone. Pompowanie Urządzenie przeprowadza Zapoznaj się... -
Page 29: Zobowiązania Gwarancyjne
ZOBOWIĄZANIA GWARANCYJNE 1. Na sprzęt LD jest ustalony okres gwarancji, który określono w karcie gwarancyjnej produktu. 2. Zobowiązania gwarancyjne potwierdzone są kartą gwarancyjną, otrzymywaną przez nabywcę przy zakupie urządzenia. 3. Adresy punktów serwisowych realizujących obsługę gwarancyjną, podane są na karcie gwarancyjnej. CHARAKTERYSTYKI TECHNICZNE oscylometryczna z technologią... - Page 30 90 ostatnich pomiarów + średnia wartość Pamięć 3-ch ostatnich pomiarów Zasilacz LD-N057 w zawartości kompletu LD3A) Napięcie wyjściowe 6 V ± 5% Maksymalny prąd obciążenia 1.0 A Napięcie wejściowe ~100-240 V, 50/60 Hz Wymiary gabarytowe 64 x 70 x 43 mm Waga nie więcej niż...
-
Page 31: Certyfi Kacja I Rejestracja Państwowa
& Technical Development Area, 226010 Nantong, Jiangsu, PEOPLE’S REPUBLIC OF CHINA Dystrybutor w Polsce: Little Doctor Europe Sp. z o. o., ul. Zawiła 57G, 30-390 Kraków Polska Biuro handlowe tel.: +48 12 2684746, 12 2684747, fax: +48 12 268 47 53. - Page 32 Yishun Central P.O. Box 9293 Singapore 917699, Fax: 65-62342197, E-mail: ld@singaporemail.com Shanghai International Trading Corp.GmbH Eiffestrasse 80, 20537 Hamburg, Germany. Tel: 0049-40-2513175 ® Registered trade marks of Little Doctor International (S) Pte. Ltd. © Little Doctor International (S) Pte. Ltd., 2006-2014 E197/1408/02...
Need help?
Do you have a question about the LD3 and is the answer not in the manual?
Questions and answers