
Related Manuals for Little Doctor LD5


Summary of Contents for Little Doctor LD5
- Page 1 LD5, LD5a Digital Blood Pressure Monitor Instruction Manual Ciśnieniomierz elektroniczny automatyczny LD do pomiaru ciśnienia tętniczego krwi i pulsu Instrukcja Obsługi...
-
Page 2: Table Of Contents
TABLE OF CONTENTS PARTS AND COMPONENTS........3 GENERAL INFORMATION. -
Page 3: Parts And Components
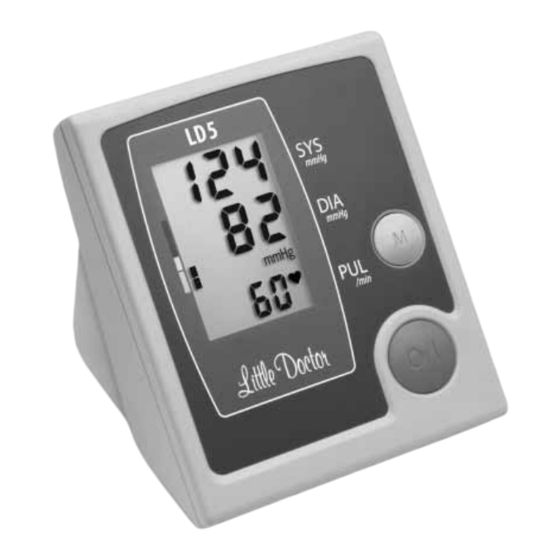
PARTS AND COMPONENTS 1. Electronic device. 2. LCD. 3. Arm cuff jack. 4. Air plug. 5. Air tube. 6. Arm cuff. 7. Power source Jack . 8. Electrical power supply LD-N057. 9. Button M (memory). 10. Button O/I (Power ON/OFF). 11. -
Page 4: General Information
This Instruction Manual is designed to assist the user with safe and effec- tive operation of the automatic digital Device for measurement of blood pressure and heartbeat rate LD, modifi cation LD5 (LD5a) (hereinafter – the “Device”). Use this Device according to the rules described in this Manual. -
Page 5: Recommendations On Correct Measurements
RECOMMENDATIONS ON CORRECT MEASUREMENTS 1. For correct measurement you should know that THE BLOOD PRESSURE IS SUBJECT TO SHARP VARIATIONS EVEN WITHIN THE SHORT TIME INTERVALS. The blood pressure depends on many factors. It is usually lower in summer and higher in winter. The blood pressure varies together with the atmo- spheric pressure, depends on physical loads, emotional excitement, stresses and dietary regime. -
Page 6: Power Supply
3. At such disorders as deep vascular sclerosis, weak pulse wave and also in patients with the prominent distortions of cardiac rhythm it may be diffi cult to measure the blood pressure accurately. IN SUCH CASES CONSULT A CERTIFIED DOCTOR ABOUT APPLICATION OF THE ELECTRONIC DEVICE. 4. -
Page 7: Correct Position During Measurement
USE OF THE DEVICE WITH THE POWER SOURCE The jack for connection of the power source is on the back side of the Device (Fig. 3). Use the power source only with the following technical characteristics: The output voltage, V : 6V ±... - Page 8 2. Apply the cuff to your left upper arm so that the air tube is directed to your palm. If the measurement on your left arm is diffi cult, you may use your right arm. In this case remember that the readings may differ by 5-10 mmHg and even more (Fig.
-
Page 9: Measurement Procedure
MEASUREMENT PROCEDURE 1. Insert the Air Tube Plug into the Cuff Jack. Make 3-5 deep inhales and exhales before taking a measurement and relax. Do not move, do not speak and do not toughen your arm. 2. Press button O/I. 3. -
Page 10: Automatic Re-Inflating
The Device is designed to store automatically the results of each measure- ment (blood pressure and pulse) in the memory every time a measurement is completed. THE DATA WILL BE KEPT IN THE MEMORY EVEN IF THE DEVICE IS STORED WITHOUT BATTERIES. TO DELETE ALL VALUES STORED IN THE MEMORY YOU SHOULD MAKE ACTIONS DESCRIBED IN “MEMORY FUNCTION”. -
Page 11: Memory Clearing
MEMORY CLEARING To delete all values stored in the memory, press the M Button and hold it down for more than 5 seconds. Symbols “Clr” will appear on the screen and all values will be deleted from the memory (Fig. 18). Fig. -
Page 12: Troubleshooting Tips
4. Remove the batteries if the Device will be unused for a long time. Battery leaking may damage the Device. KEEP BATTERIES OUT OF REACH OF CHILDREN. 5. Keep the Device clean and protect it from dust. Use the dry soft cloth to clean the Device. -
Page 13: Warranty
Every time the blood Check that the arm cuff is Take the correct position pressure is different. level with your heart? for measurement. Measurements are Check that the arm cuff is Take the correct position too low/high. applied correctly? for measurement. Perhaps your arm Apply the arm cuff muscles are tough? -
Page 14: Technical Specifications
TECHNICAL SPECIFICATIONS Measurement method oscillometric with Fuzzy Algorithm Display LCD, three-line display Pressure indication range in an arm from 0 to 300 cuff, mmHg Measurement range: pressure in an arm cuff, mmHg from 40 to 260 pulse rate, 1/min from 40 to 160 Range of admissible absolute error at measurement of air pres- sure in an arm cuff, mmHg... -
Page 15: Certification And State Registration
Power source LD-N057 complies with international standard EN 55022 Class A, protection level against electric shock: Class II, Type B. Complaints and requests should be addressed to: Little Doctor Europe Sp. z o.o. 57G Zawila Street, 30-390, Krakow, Poland Service phone: +48 12 2684748, 2684749... - Page 16 Manufactured under control: Little Doctor International (S) Pte. Ltd., 35 Selegie Road # 09-02 Parkline Shopping Centre, Singapore 188307 Manufacturer: Little Doctor Electronic (Nantong) Co. Ltd., No.8, Tongxing Road Economic & Technical Development Area, Nantong 226010, Jiangsu, PEOPLE'S REPUBLIC OF CHINA Distributor in Europe: Little Doctor Europe Sp.
-
Page 17: Information In Polish
Yishun Central P.O. Box 9293 Singapore 917699, Fax: 65-62342197, E-mail: ld@singaporemail.com Shanghai International Holding Corp.GmbH Eiffestrasse 80, 20537 Hamburg, Germany. Tel: 0049-40-2513175 ® Registered trade marks of Little Doctor International (S) Pte. Ltd. © Little Doctor International (S) Pte. Ltd., 2006-2015 E132/1510/03...
Need help?
Do you have a question about the LD5 and is the answer not in the manual?
Questions and answers