
Related Manuals for LINET GRACIELLA


Summary of Contents for LINET GRACIELLA
- Page 1 User Manual and Technical description GRACIELLA Gynaecological examination chair D9U004GKC-0101 Version: 03 Date of publication: 2022-06...
- Page 2 Related links: www.linet.com D9U004GKC-0101 Version: 03 Date of publication: 2022-06 Copyright © LINET, s.r.o., 2022 Translation © LINET, 2022 All rights reserved. All trademarks and brands are the property of the appropriate owners. The manufacturer reserves the right to changes in the contents of this manual that relate to the product´s technical regulations.
-
Page 3: Table Of Contents
14.2 Eurobar holder ............65 6.1 Identification of Applied Parts (Type B) ...... 25 14.3 Headrest (pillow) ............65 6.2 Mechanical Specifications (Graciella) ......25 14.4 Physician's chair —ergonomic ........65 6.3 Environmental conditions(Graciella) ......26 14.5 Physician's chair — ergonomic, adjustable by feet .. 65 6.4 Electrical Specifications (Graciella) ...... -
Page 4: Symbols And Definitions
1 Symbols and Definitions 1.1 Warning Notices 1.1.1 Types of Warning Notices Warning notices are differentiated by the type of danger using the following key words: ► WARNING warns about the risk of physical injury. ► CAUTION warns about the risk of material damage. ►... -
Page 5: Symbols On A Package
1.4 Symbols on a package FRAGILE, HANDLE CAREFULLY THIS WAY UP PROTECT FROM MOISTURE PAPER RECYCLING SYMBOL DO NOT USE A HAND TROLLEY HERE D9U004GKC-0101... -
Page 6: Symbols And Labels On A Chair
1.5 Symbols and labels on a chair READ THE USER MANUAL STOP BUTTON (PRESS TO INTERRUPT THE CHAIR POSITION) SAFE WORKING LOAD 180 kg (396 lb) 180 kg 190 kg MAXIMUM WEIGHT OF PATIENT (396 lb) (418 lb) 190 kg 120 kg (418 lb) WEIGHT OF CHAIR... - Page 7 SERIAL NUMBER MANUFACTURER DATE OF MANUFACTURE DO NOT POLLUTE THE ENVIRONMENT WEEE SYMBOL (RECYCLE AS ELECTRONIC WASTE, DO NOT DISPOSE WITH HOUSEHOLD WASTE) RECYCLING SYMBOL WARNING: DO NOT SIT ON FOOTRESTS SAFE WORKING LOAD OF FOOTRESTS DO NOT PUT ANY OBJECTS ON UNDERCARRIAGE JACK FOR ATTACHMENT OF CONDUCTOR FOR POTENTIAL EQUALISATION D9U004GKC-0101...
- Page 8 Fig. Location of warning labels D9U004GKC-0101...
-
Page 9: Product Label With Udi
Serial number Date of manufacture (Year-Month-Day) DI (Device Identifier) GTIN (Global Trade Item Number) PI (Product Identifier) 2D Bar Code (GS1 DataMatrix) DI+PI=UDI Electrical specifications 1D Bar code GS1-128 (Serial number) Symbols Fig. Location of the product label (Graciella) D9U004GKC-0101... -
Page 10: Audible Alarm
1.7 Audible alarm SOUND MEANING Sound 0,5 s, Interval 2,5 s Error detected in safety circuit of STOP function Continuous signal CB ( Control Box) electronics overheated Continuous signal Motor overloading Short sound when positioning the seat Zero seat position reached Short sound when positioning the seat If the seat reaches 12°... -
Page 11: Definition
1.8 Definition Basic Chair Configuration Model configuration Chair weight The value depends on the product configuration, accessories or customer adjustments. Duty Cycle Cycle of operation of the motor: time of activity/time of rest. Safe working load The highest allowable load on the chair (patient and accessories) D9U004GKC-0101... -
Page 12: Abbreviations
1.9 Abbreviations AC ( ~ ) Alternating Current European Conformity Sound Intensity Unit DC ( = ) Direct Current Electromagnetic Compatibility High Pressure Laminate Hardware INT. Duty Cycle Degree of protection Light Emitting Diodes Medical Electrical (Equipment) Reference number (product type depending on the configura- tion) Serial number Software... -
Page 13: Safety Instructions
WARNING! Improper handling of the mains cable, eg. by twisting, cutting or other mechanical damage, is dangerous! WARNING! When routing the cables of other devices through the Graciella chair through parts of this medical chair, avoid pinching these cables! WARNING! To reduce the risk of electric shock, this appliance must be connected to a mains supply with a protective earth connection. - Page 14 WARNING! The patient may only use the selected controls if the medical staff considers that the patient's physical and mental condition corresponds to this and only if the medical staff has trained the patient in accordance with the instructions for use! WARNING! During specific examinations and specific treatments, significant risks of Interaction due to medical electrical ...
-
Page 15: Unpacking Instructions
3 Unpacking instructions Before connecting the chair to the mains, read the Commissioning chapter carefully. ► Cut the securing tape on the box. ► Remove the top lid and ring of a box. Cut or step on the corners of the lower wall at the back of the chair so that the chair can be conveniently removed from the pallet. - Page 16 ► Gradually remove all accessories, including the power cord, from the tray. Discard empty containers. ► If a step is part of the chair, remove it. D9U004GKC-0101...
- Page 17 ► Lift the base cover, cut 4x cable ties holding the chair to a pallet. Then the chair can be transferred from a pallet to the floor by two people. ► Then remove all fixing and protective material from the chair D9U004GKC-0101...
- Page 18 Before connecting the chair to the mains, read the Commissioning chapter carefully. D9U004GKC-0101...
-
Page 19: Intended Use
4 Intended Use 4.1 Intended use Examination and treatment in gynaecology. The chair is used for gynaecological examination and ultrasound examination, respec- tively for small outpatient operations. Basic functions include lying down, sitting and supporting the patient. 4.2 User population Women and girls of any age for a preventive examination or if they experience irregularities in the breasts, genitals, menstrual cycles or if they become pregnant. -
Page 20: Product Description
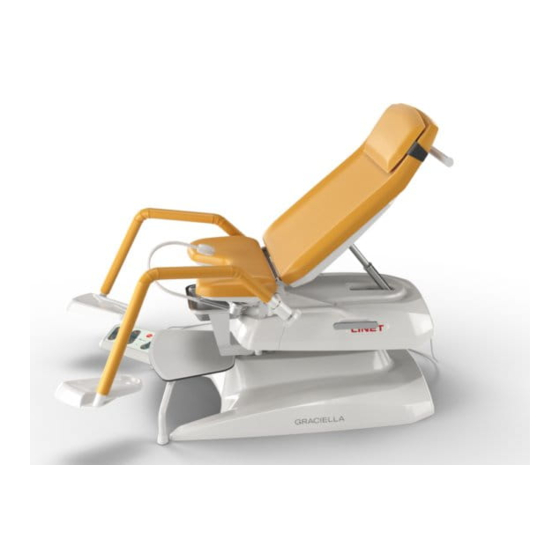
5 Product Description 5.1 Chair with footrests - without vertical adjustment Fig. Chair with footrests - without vertical adjustment Base Lifting columns Seat section Backrest Footrest Foot controller D9U004GKC-0101... -
Page 21: Chair With Footrests - With Vertical Adjustment
5.2 Chair with footrests - with vertical adjustment Fig. Chair with footrests - with vertical adjustment Base Lifting columns Seat section Backrest Goepel footrest Foot controller Controller D9U004GKC-0101... -
Page 22: Chair With Goepel Footrests - Without Vertical Adjustment
5.3 Chair with Goepel footrests - without vertical adjustment Fig. Chair with Goepel footrests - without vertical adjustment Base Lifting columns Seat section Backrest Goepel footrest Foot controller D9U004GKC-0101... -
Page 23: Chair With Goepel Footrests - With Vertical Adjustment
5.4 Chair with Goepel footrests - with vertical adjustment Fig. Chair with footrests - with vertical adjustment Base Lifting columns Seat section Backrest Goepel footrest (2_joint) Foot controller Controller D9U004GKC-0101... -
Page 24: Chair With Goepel Footrests - With Manual Position Adjustment
5.5 Chair with Goepel footrests - with manual position adjustment Fig. Chair with Goepel footrests - with manual position adjustment Base Lifting columns Seat section Backrest Goepel footrest Foot controller D9U004GKC-0101... -
Page 25: Technical Specification
All part of the chair (and accessories) the patient can reach are type B Applied Parts. ■ upholstery/mattresses ■ footrests ■ leg holders 6.2 Mechanical Specifications (Graciella) Parameter Value Maximum chair length (without footrests) 1325±10mm Maximum chair length (with footrests) 1733±10mm Maximum chair length (with Goepel-footrests) 1402±10mm... -
Page 26: Environmental Conditions(Graciella)
WARNING! A portable RF communication device (including terminal equipment such as antenna cables and external antennas) should not be used closer than 30 cm (12 inches) from any part of the Graciella chair, including cables specified by the manufacturer. Otherwise, the operation of this device may deteriorate. WARNING! Do not overload the chair over the permissible safe working load (SWL) and observe the motor loader (INT.) -
Page 27: Instructions And Manufacturer's Declaration - Electromagnetic Radiation
6.5.1 Instructions and manufacturer's declaration - electromagnetic radiation Radiation test Conformity RF emissions Group 1 CISPR 11 RF emissions Class B CISPR 11 Harmonic radiation Class A IEC 61000-3-2 Voltage fluctuations / flickering emission Complying IEC 61000-3-3 6.5.2 Instructions and manufacturer's declaration - electromagnetic immunity Endurance test Satisfactory level Electrostatic discharge (ESD) -
Page 28: Use And Storage Conditions
► Ground the mains. ► Use exclusively Hospital Grade or Hospital Only receptacles for grounding. Graciella Chair is designed for use in rooms for medical purposes. Electrical installations must therefore meet local norms laying down the necessary conditions for electrical installations. -
Page 29: Scope Of Delivery And Product Variants
► Notify the carrier and supplier of any deficiencies or damages immediately as well as in writing or make a note on a delivery note. 8.2 Scope of Delivery ► Graciella gynaecological examination chair ► User Manual 8.3 Graciella Variants... -
Page 30: Entry Into Operation
Risk of damage to property due to incorrect commissioning! ► Ensure that commissioning is performed exclusively by customer service or trained hospital personnel. NOTE: For safe and easy handling, LINET® recommends the chair be assembled by two technicians at a time. Set the chair as follows: ►... - Page 31 LEFT SIDE RIGHT SIDE LEFT SIDE RIGHT SIDE D9U004GKC-0101...
-
Page 32: Potential Equalisation
9.1 Potential Equalisation The chair is equipped with a standard protective connector. This connector is used for potential equalisation between the chair and any intravascular or intracardiac device connected to the patient to protect the patient from static electric hocks. Use equalisation connector if: ... -
Page 33: Before Use
9.2 Before use Prepare the chair for use as follows: ► Make sure that the chair is firmly seated on all four legs. ► Connect the chair to the mains. ► Raise and tilt the chair to the highest position. ►... -
Page 34: Mains Power Cable
10 Mains Power Cable Attachment plug is means of connecting and disconnecting the chair from the mains. The mains cable must be securely stored on the chair during transport and handling. WARNING! Disconnecting the chair from the mains will stop the chair's movements! D9U004GKC-0101... -
Page 35: Manipulation
11 Manipulation WARNING! Risk of injury when adjusting the chair! ► Ensure that there are no body parts between backrest and upper frame when adjusting the chair. ► Make sure there are no body parts or objects under the upper frame before adjusting the chair. ►... -
Page 36: Control Elements
11.1 Control Elements The chair is operated by different control elements. Control elements depending on the model: ■ Hand controller ■ Foot controller POSITIONING Hand Foot controller controller Chair lift - height adjustment Seat tilt Tilt of the backrest Tilt of footrests / Goepel footrests Patient mounting position Position for patient examination... -
Page 37: Hand Controller (Part Of Electrically Operated Foot- Rests / Goepel Footrests)
11.1.1 Hand controller (part of electrically operated footrests / Goepel footrests) ► Ensure that exclusively trained nursing staff operates the hand controller. Fig. Hand controller 1. Chair Height Adjustment Button 2. Adjustment angle of the seat part Button 3. Backrest Adjustment Button 4. -
Page 38: Foot Controller For The Chair Height Adjustment (Optional)
11.1.2 Foot Controller for the chair height adjustment (optional) The foot controller is optional and allows setting the height of the chair during patient examination with one’s feet. Fig. Foot controller 1. Chair Height Adjustment Button 2. Adjustment angle of the seat part Button 3. -
Page 39: Chair Positioning
11.2 Chair Positioning 11.2.1 Chair height Fig. Chair Height Adjustment For Chair Height Adjustment use: ► Hand controller ► Foot controller During the continuous upward positioning of the chair, the chair automatically stops when a seat tilt of 12° is reached. To continue positioning, release the button, then press and hold it until you reach the desired position. -
Page 40: Seat Section
11.2.2 Seat section Fig. Positioning of the sitting section For sitting section positioning use: ► Hand controller ► Foot controller During continuous positioning, the seat automatically stops in 12°. To continue positioning, release the button, then press and hold it until you reach the desired position. When adjusting the height of the chair in the range of seat tilt 12°–20°, the backrest automatically raises to its upper position. -
Page 41: Backrest
11.2.3 Backrest Fig. Backrest Positioning To position Backrest use: ► Foot controller ► Hand controller If the seat section is set in the range of 12°–20°, it is not possible to position with the backrest - there is a risk of tilting patient backwards. -
Page 42: Footrests/Goepel Footrests Adjustment (Only For Electric Vertical Movement Of The Footrests)
11.2.4 Footrests/Goepel footrests adjustment (only for electric vertical movement of the footrests) Fig. Footrests/Goepel footrests adjustment (only for electric vertical movement of the footrests) WARNING! Improper handling can cause injury to the patient or operator! Use to adjust the position of the footrests: ►... -
Page 43: Manually Adjustable Goepel Footrests (Vertically)
11.2.5 Manually adjustable Goepel footrests (vertically) Fig. Manually adjustable Goepel footrests (vertically) WARNING! Improper handling can cause injury to the patient or operator! ► Hold Goepel whenever you manipulate it! ► Carefully lower the Goepel to prevent the Goepel from falling immediately! To adjust the position of the Goepel footrests, use: ► Manual setting Lifting / lowering of Goepel: ►Hold the Goepel arm ►Slide the side rosette slightly ►Set the Goepel arm to the desired position... -
Page 44: Position For Patient Examination
11.2.6 Position for patient examination Fig. Position for patient examination To position patient for examination use: ► Hand controller ► Foot controller Hand controller, foot controller: ► Press button, until intended position is reached. Fig. Position button for patient examina- tion (Hand controller, Foot controller). -
Page 45: Patient Mounting Position
11.2.7 Patient mounting position Fig. Mounting position To position the chair for mounting of a patient use: ► Hand controller ► Foot controller Hand controller, foot controller: ► Press button, until intended position is reached. Fig. Position button for mount- ing of a patient (Hand control- ler, Foot controller). -
Page 46: Straight Position
11.2.8 Straight position Fig. Straight position For straight position use: ► Hand controller Hand controller, foot controller: ► Press button, until intended position is reached. Fig. Straight button (Hand controller). D9U004GKC-0101... -
Page 47: Trendelenburg Emergency Position
11.2.9 Trendelenburg Emergency Position Fig. Trendelenburg Emergency Position/Trendelenburg Tilt To position Emergency Trendelenburg Position use: ► Hand controller Trendelenburg position is suitable if the patient is in shock. During Trendelenburg Position the lying area is straightened in the tilt. Operator´s Manual Control Panel: ►... -
Page 48: Adjusting The Straight Position Using The Buttons For Adjusting The Height Of The Chair And The Back Part
11.2.10 Adjusting the straight position using the buttons for adjusting the height of the chair and the back part Fig. Straight position For straight position use: ► Hand controller, foot controller 1) Use the downward adjustment button to set the chair to the lowest position 2) Use the downward adjustment button to set the backrest to the lower end position Hand controller, foot controller: ►... -
Page 49: Trendelenburg Emergency Position Adjustment Using The Backrest And Seat Section Adjustment Buttons
11.2.11 Trendelenburg emergency position adjustment using the backrest and seat section adjustment buttons Fig. Trendelenburg Emergency Position/Trendelenburg Tilt To position Emergency Trendelenburg Position use: ► Hand controller, foot controller Trendelenburg position is suitable if the patient is in shock. During Trendelenburg Position the lying area is straightened in the tilt. 1) Use the downward adjustment button to set the backrest to the lower end position 2) Use the seat adjustment button upwards to set the seat to a position of approx. -
Page 50: Mandatory Optional Equipment
12 Mandatory optional equipment WARNING! Risk of injury due to incompatible accessories! ► Use exclusively original equipment from the manufacture. The manufacturer is not responsible for the use of unapproved accessories. WARNING! Risk of injury due to damaged equipment! ► Use only equipment in perfect condition. -
Page 51: Footrests - Without Vertical Adjustment
12.1 Footrests - without vertical adjustment WARNING! ► Improper handling can cause injury to the patient, or operator! ► The footrests are not intended for stepping and leaning the body - there is a risk of instability of the chair ►... -
Page 52: Footrests - Electrically Operated
12.2 Footrests - electrically operated WARNING! ► Improper handling can cause injury to the patient, or operator! ► Footrests are not intended for stepping and leaning the body - there is a risk of instability of the chair ► The footrests are intended to support the feet when the patient is sitting / lying down ►... -
Page 53: Goepel Footrests (Hereinafter Only Goepel)- Without Vertical Adjustment
12.3 Goepel footrests (hereinafter only Goepel)- without vertical adjust- ment WARNING! ► Improper handling can cause injury to the patient, or operator! ► Goepel is not intended for stepping and leaning the body - there is a risk of instability of the chair ►... -
Page 54: Goepel Footrests (Hereinafter Only Goepel)- Electrically Operated
12.4 Goepel footrests (hereinafter only Goepel)- electrically operated WARNING! ► Improper handling can cause injury to the patient, or operator! ► Goepel is not intended for stepping and leaning the body - there is a risk of instability of the chair ►... -
Page 55: Goepel Footrests (Hereinafter Only Goepel) - Manual Position Adjustment
12.5 Goepel footrests (hereinafter only Goepel) – manual position adjust- ment WARNING! ► Improper handling can cause injury to the patient, or operator! ► Hold Goepel whenever you manipulate it! ► Carefully lower the Goepel to prevent the Goepel from falling immediately! ►... -
Page 56: Bowl Holder L
12.6 Bowl holder L The bowl is set to the working position on rotating holder. WARNING! Take extra care when getting on and off the chair. The bowl should only be extended during the patient's examination. ► When turning, beware of collisions with accessories (eg. lamp) 12.7 Bowl holder R The bowl is set to the working position on rotating holder. -
Page 57: Hand Controller L
12.8 Hand controller L Serves for control of the chair. It is located on the left side of the chair. WARNING! Take extra care when getting on and off the chair. ► The hand control is connected exclusively to "electrically operated footrests and electrically operated Goepel footrests”... -
Page 58: Optional Equipment
13 Optional equipment WARNING! Risk of injury due to incompatible accessories! ► Use exclusively original equipment from the manufacture. The manufacturer is not responsible for the use of unapproved accessories. WARNING! Risk of injury due to damaged equipment! ► Use only equipment in perfect condition. OPTIONAL EQUIPMENT Head Foot... -
Page 59: Step L
13.1 Step L Serves for patient step on. In the inactive position, it is located on the left side of the chair. WARNING! Take extra care when getting on and off the step. The step is covered with anti-slip foil. ►... -
Page 60: Lamp L
13.5 Lamp L Serves for patient examination. In the inactive position, it is located on the left side of the chair. WARNING! Take extra care when getting on and off the chair. Lamp must be in the inactive position. ► When turning the lamp, beware of collisions with accessories (eg. tool table, footrests, colposcope). -
Page 61: Castors
13.9 Castors The castors serve only for moving the chair within the surgery (eg. when cleaning). WARNING! No one may sit on the chair when activating, using and deacti- vating the castors. ► With the castors in the active position, the thresholds and other irregularities must not be passed. -
Page 62: Patient Surface Extension
13.10 Patient surface extension This accessory is used to create a flat patient surface, suitable for patients in a lying posi- tion for longer procedures. WARNING! ► Improper handling can cause injury to the patient or operator! ► The patient surface is a detachable accessory! ► Only trained personnel can handle and operate the patient surface! ►... - Page 63 Removal: 1) Stand facing the head of the patient surface extension (load capacity plate side) 2) Pull the locking pin with one hand (Fig. 4) while pulling the patient surface extension away from the chair with the other hand (Fig. 5) 3) Then hold the patient surface extension on the long sides of the upholstery with both hands and pull the patient surface exten- sion away from the chair until the guide bars are fully removed from both bracket holes (Fig.
-
Page 64: Accessories
14 Accessories ACCESSORIES Head Foot on the sides Infusion stand Eurobar holder Headrest (cushion) Physician's chair —ergonomic Physician's chair —ergonomic - adjustable by feet Physician's chair, height-adjustable, manual locking Short cover Long cover 14.1 Infusion stand The stand is made of stainless steel. Height adjustable telescopically. WARNING! The maximum load capacity of one hook is 2 kg! The maximum load capacity is 8 kg... -
Page 65: Eurobar Holder
14.2 Eurobar holder WARNING! The maximum load capacity is 9.5 kg! Risk of injury due to use of incorrect accessories or because of incorrect use! ► Eurobar holder must only be used for their intended use. Always read the User Manual! ►... -
Page 66: Short Cover
14.7 Short cover Imitation leather unbuttoned cover for the arm of the footrest and arm of the Goeple footrest for increased patient comfort when gripping the arm. Fig. Chair with footrests - electrical- Fig. Chair with Goepel foot- Fig. Chair with footrests ly-operated/ without vertical adjust- rests - electrically-operated/ - manual position adjust-... -
Page 67: Cleaning/Disinfection
Chassis cover, seat, backrest, upper frame covers, footrests Keyboards Polyester, MP glues Upholstery 15.1 Cleaning (Graciella) The chair prepare for cleaning as follows: ► Put the chair in the highest position. ► Adjust the backrest so that the reverse sides are accessible. - Page 68 For safe and gentle cleaning: ► Do not use any strong acids or bases (optimum pH range 6–8). ► Exclusively use detergents that are suitable for cleaning medical equipment. ► Do not use abrasive powders, steel wool, or other materials and cleaning agents. ►...
-
Page 69: Troubleshooting
16 Troubleshooting DANGER! Danger of fatal electric shock! ► If a fault occurs, have the electric motor, power box or other electrical parts always repaired only a qualified techni- cian from the service department approved by the manufacturer! ► Do not open the protective covers of the electric motor or the power box. Error/Fault Cause Solution... -
Page 70: Maintenance
► Ensure that maintenance is performed exclusively by manufacturer´s customer service or authorized service personnel certified by the manufacturer. ► If the defect cannot be repaired, do not use the chair. LINET® recommends attaching the maintenance plaque to the chair. 17.1 Regular maintenance ► Regularly check all movable parts for wear. -
Page 71: Disposal
Based on Directive No. 2002/96/EC (WEEE Directive - on waste electrical and electronic equipment), LINET, s.r.o. Is registered in the list of manufac- turers of electrical equipment at the Ministry of the Environment of the Czech Republic.. -
Page 72: Warranty
19 Warranty The company BORCAD MEDICAL a.s. will only be responsible for the safety and reliability of products that are regularly maintained and used in accordance with the safety guidelines. If serious damage occurs that cannot be repaired during maintenance: ...
Need help?
Do you have a question about the GRACIELLA and is the answer not in the manual?
Questions and answers