
Subscribe to Our Youtube Channel
Related Manuals for Plebani Sogno 056


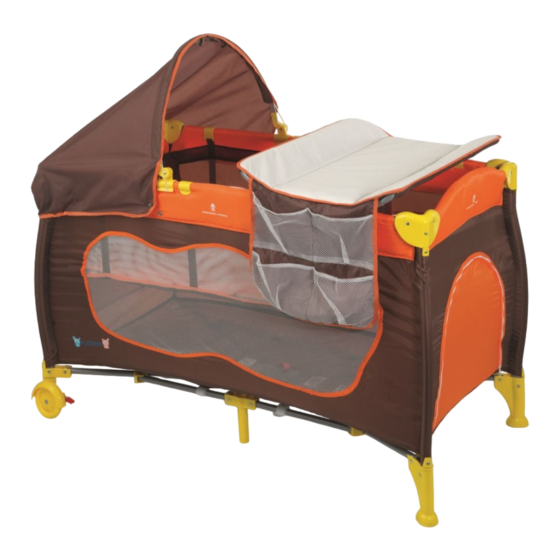
Summary of Contents for Plebani Sogno 056
- Page 1 “Sogno” ART - 056 LEGGERE ATTENTAMENTE E CONSERVARE PER FUTURA CONSULTAZIONE! READ CAREFULLY AND KEEP THESE INSTRUCTIONS FOR FUTURE REFERENCE!
-
Page 2: Garanzia Di Qualità
ISTRUZIONI DI MONTAGGIO ED USO LEGGERE ATTENTAMENTE E CONSERVARE PER FUTURA CONSULTAZIONE IMPORTANTE! PRIMA DI UTILIZZARE QUESTO ARTICOLO, LEGGERE ATTENTAMENTE SEGUENDO RIGOROSAMENTE LE ISTRUZIONI E LA SEQUENZA DI MONTAGGIO PER EVITARE INUTILI PERICOLI AL VOSTRO BAMBINO! RIMUOVERE ED ELIMINARE TUTTI I SACCHETTI DI PLASTICA, POTREBBERO ESSERE FONTE DI SOFFOCAMENTO O STRANGOLAMENTO PER IL VOSTRO BAMBINO! MAI LASCIARE IL BAMBINO INCUSTODITO! - Page 3 AVVERTENZE MAI LASCIARE IL Tenere lontano da fonti Non mettere il lettino BAMBINO di calore e da altri tipi di vicino a finestre dove le INCUSTODITO. pericoli. corde delle tende Tenere sempre in vista il possono strangolare il bambino anche quando bambino.
- Page 4 APERTURA ATTENZIONE ERRORI NEL SEGUIRE QUESTE PRECAUZIONI ED ISTRUZIONI POTREBBERO CAUSARE SERI PERICOLI DI FERIMENTO O MORTE PER SOFFOCAMENTO! IMPORTANTE - Prima di assemblare il lettino “SOGNO" leggere attentamente le istruzioni e le avvertenze. - Un montaggio non corretto potrebbe rendere il lettino non sicuro. - Non usare l’articolo se i particolari sono rotti o mancanti.
- Page 5 MONTAGGIO DEL SECONDO LIVELLO AVVERTENZE! - Assicurarsi che il lettino sia montato correttamente prima di inserire il piano rialzato. - Non utilizzare il secondo livello per bambini di peso superiore ai 10 Kg e di altezza superiore ai 75 cm. - Utilizzare il lettino solo per bambini non ancora in grado di restare seduti e\o gattonare.
- Page 6 MONTAGGIO DEL FASCIATOIO Fig. 1 Fig. 2 1. Per posizionare correttamente i tubi, inserire nelle apposite asole prima quelli corti in modo che i ganci siano rivolti verso l’ interno del fasciatoio (Fig. 1). Controllare che le lettere sui perni corrispondano a quelle dei fori (Fig. 2). 2.
- Page 7 CHIUSURA ATTENZIONE II procedimento deve essere fatto in modo appropriato affinché il lettino chiuso possa essere rimesso nell'apposita borsa. Rimuovere tutti gli accessori precedentemente montati prima di effettuare la chiusura, riportando il lettino alla versione “base”. 1. Togliere il 2. Impugnare la 3.
-
Page 8: Note Importanti
- Usare esclusivamente pezzi di ricambio approvati e forniti dal produttore. Il produttore potrà apportare in qualsiasi momento modifiche all'articolo al fine di migliorarlo. Plebani s.r.l. declina ogni responsabilità per danni a cose o persone derivanti da un utilizzo improprio e/o scorretto del prodotto. - Page 9 ASSEMBLING AND EMPLOY INSTRUCTIONS READ CAREFULLY THESE INSTRUCTIONS AND KEEP THEM FOR FUTURE REFERENCE IMPORTANT! BEFORE USING THIS ARTICLE, READ CAREFULLY AND FOLLOW STRICTLY THE INSTRUCTIONS AND THE SEQUENCE OF ASSEMBLY TO AVOID UNNECESSARY HAZARD TO YOUR CHILD! REMOVE AND DELETE ALL PLASTIC BAGS MAY BE A SOURCE OF SUFFOCATION OR ENTANGLEMENT FOR YOUR CHILD! NEVER LEAVE YOUR CHILD UNATTENDED! QUALITY ASSURANCE:...
- Page 10 WARNINGS NEVER LEAVE THE Keep the cot far from Do not place the cot BABY ALONE IN THIS heating sources or other near windows where the ARTICLE. types of danger. ropes of the curtains Always watch the child could strangle the baby. even when sleeping.
- Page 11 OPENING WARNING ERRORS IN FOLLOWING THESE PRECAUTIONS AND INSTRUCTIONS MIGHT CAUSE SERIOUS DANGERS OF INJURY AND DEATH BY SUFFOCATION! IMPORTANT - Before assembling and using this cot “SOGNO", read carefully these instructions and warnings. - An incorrect assembling could make the playard unsafe. - Do not use the cot if the components are damaged or missing.
- Page 12 ASSEMBLING OF SECOND LEVEL WARNINGS! - Be sure that the item is correctly assembled before placing the second level. - Do not use the playard for children of more than 10 Kg and higher than 75 cm. - Use the cot with the second level only for babies not yet able to stay sitting or walk on hands and knees. - Do not use the playard without mattress.
- Page 13 ASSEMBLING OF CHANGING MAT Fig. 1 Fig. 2 To correctly place frames, insert first short ones into provided holes with hooks turned inside changing mat (See fig.1). Check letters on pins fit together on holes’ letters (See fig. 2). Only after to have correctly positioned frame proceed to their assembling.
- Page 14 CLOSING ATTENTION These instructions must be followed correctly in order that the cot could be put in its nylon bag when closed. Remove all accessories assembled before make closing, bringing back to “basic” version the cot. 1. Take the 2. Grip and pull up 3.
-
Page 15: Important Notes
- Use only approved spare parts and supplied by the manufacturer. The manufacturer may make changes to the article at any time to improve it. Plebani s.r.l. disclaims any liability for damage or injury caused by improper handling and / or misuse of the product. - Page 16 - car seats ...E TANTI, TANTI ALTRI ANCORA !!..AND MANY, MANY OTHERS MORE!!... PLEBANI s.r.l. VIA DELL’ ARTIGIANATO 1 , 24060 TELGATE (BG) ITALY Tel. +39 035 830314 • Fax +39 035 831350 - www.plebani.it • e-mail : info@plebani.it...
Need help?
Do you have a question about the Sogno 056 and is the answer not in the manual?
Questions and answers