Garmin G1000 Pilot's Manual
Integrated flight deck
Hide thumbs
Also See for G1000:
- Manual (724 pages) ,
- Pilot's manual (708 pages) ,
- System maintenance manual (340 pages)
Table of Contents
Advertisement
Quick Links
Advertisement
Table of Contents

Related Manuals for Garmin G1000


Summary of Contents for Garmin G1000
- Page 1 G1000 Integrated Flight Deck Pilot’s Guide Quest Kodiak 100...
- Page 2 Except as expressly provided herein, no part of this manual may be reproduced, copied, transmitted, disseminated, downloaded or stored in any storage medium, for any purpose without the express written permission of Garmin. Garmin hereby grants permission to download a single copy of this manual and of any revision to this manual onto a hard drive or other electronic storage medium to be viewed for personal use, provided that such electronic or printed copy of this manual or revision must contain the complete text of this copyright notice and provided further that any unauthorized commercial distribution of this manual or any revision hereto is strictly prohibited.
- Page 3 Garmin retains the exclusive right to repair or replace the unit or software, or to offer a full refund of the purchase price, at its sole discretion.
- Page 4 Although unlikely, it may be possible for erroneous operation to occur without a fault indication shown by the G1000. It is thus the responsibility of the pilot to detect such an occurrence by means of cross-checking with all redundant or correlated information available in the cockpit.
- Page 5 The GPS system is subject to changes which could affect the accuracy and performance of all GPS equipment. Portions of the Garmin G1000 utilize GPS as a precision electronic NAVigation AID (NAVAID). Therefore, as with all NAVAIDs, information presented by the G1000 can be misused or misinterpreted and, therefore, become unsafe.
- Page 6 Revision Date Page Range Description 190-00590-00 3/13/06 Initial release 190-00590-00 3/21/07 Production Release 190-00590-00 4/3/07 Added Print Specification Reference to Cover Sheet 190-00590-00 6/22/07 Revised AMPS Engine Gauge Garmin G1000 Pilot’s Guide for the Quest Kodiak 100 190-00590-00 Rev. C...
-
Page 7: Table Of Contents
Entertainment Inputs ..........2-21 Traffic Annunciation ........4-36 Simultaneous COM Operation ..........2-21 TAWS Annunciations 4.6 Audio Panels Preflight Procedure.....4-37 ........2-22 Marker Beacon Annunciations ............2-22 Altitude Alerting .......2-23 Barometric Minimum Descent Altitude 190-00590-00 Rev. C Garmin G1000 Pilot’s Guide for the Quest Kodiak 100... - Page 8 SECTION 6 HAZARD AVOIDANCE .............B-2 Garmin Databases Glossary................C-1 6.1 XM Satellite Weather...........6-1 Frequently Asked Questions .........D-1 .............6-1 Activating Services ......6-3 Using XM Satellite Weather Products ............6-5 Weather Softkeys Garmin G1000 Pilot’s Guide for the Quest Kodiak 100 190-00590-00 Rev. C...
- Page 9 TABLE OF CONTENTS General TIS Information ..........E-1 .............. E-1 Introduction ............E-1 TIS vs. TAS/TCAS ............E-1 TIS Limitations Map Symbols ..............F-1 INDEX Index ................I-1 190-00590-00 Rev. C Garmin G1000 Pilot’s Guide for the Quest Kodiak 100...
- Page 10 TABLE OF CONTENTS LANK viii Garmin G1000 Pilot’s Guide for the Quest Kodiak 100 190-00590-00 Rev. C...
-
Page 11: Section 1 System Overview
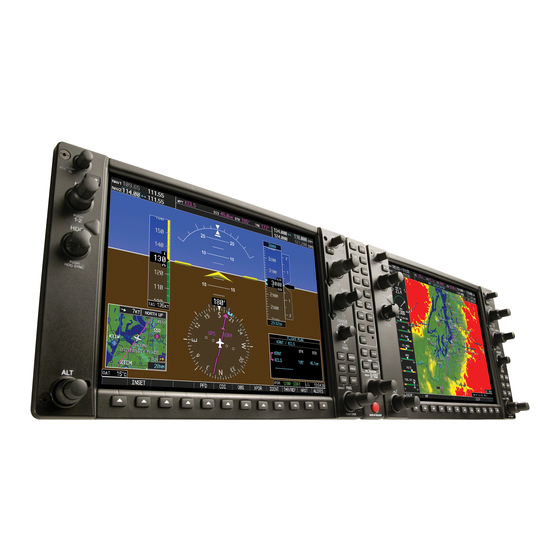
SECTION 1 SYSTEM OVERVIEW 1.1 SYSTEM DESCRIPTION This section is designed to provide an overview of the G1000 Integrated Flight Deck installed in the Quest Kodiak 100. The G1000 is an integrated flight deck system that presents flight instrumentation, position, navigation, communication, and identification information to the pilot using flat-panel color displays. -
Page 12: Line Replaceable Units
PFD. Each IAU contains VHF COM/NAV/GS receivers and system integration microprocessors and is paired with the on-side display via a HSDB connection. The IAUs are not paired together and do not communicate with each other directly. Garmin G1000 Pilot’s Guide for the Quest Kodiak 100 190-00590-00 Rev. C... - Page 13 • GDC 74 – The Air Data Computer (ADC) processes data from the pitot/static system and outside air temperature (OAT) sensor. The ADC provides pressure altitude, airspeed, vertical speed, and OAT information to the G1000 System, and it communicates with the primary IAU, displays, and AHRS using an ARINC 429 digital interface.
- Page 14 RS-485 digital interface. • GDL 69A – The Data Link Satellite Radio Receiver provides real-time weather information to the G1000 MFD and PFD Inset Map, as well as digital audio entertainment. The Data Link Receiver communicates with the MFD via a HSDB connection.
-
Page 15: Secure Digital (Sd) Cards
SYSTEM OVERVIEW 1.3 SECURE DIGITAL (SD) CARDS Ensure the G1000 System is powered off before inserting an SD card. NOTE: Refer to Appendix B for instructions on updating the aviation database. NOTE: The PFD and MFD data card slots use Secure Digital (SD) cards and are located on the upper right side of the display bezels. -
Page 16: System Power-Up
Refer to Appendix A for system-specific annunciations and alerts. NOTE: The G1000 System is integrated with the aircraft electrical system and receives power directly from electrical busses. The G1000 PFD, MFD, and supporting sub-systems include both power-on and continuous built-in test features that exercise the processor, RAM, ROM, external inputs, and outputs to provide safe operation. -
Page 17: System Operation
The displays are connected together via a single Ethernet bus for high-speed communication. Each IAU is connected to the on-side display. This section discusses normal and reversionary G1000 display operation, as well as the various AHRS modes and G1000 System Annunciations. - Page 18 SYSTEM OVERVIEW Primary Flight Display Multi Function Display Figure 1-4 G1000 Normal Display Operation Garmin G1000 Pilot’s Guide for the Quest Kodiak 100 190-00590-00 Rev. C...
-
Page 19: Reversionary Display Operation
SYSTEM OVERVIEW REVERSIONARY DISPLAY OPERATION The G1000 System alerts the pilot when backup paths are utilized by the LRUs. Refer to Appendix A NOTE: for further information regarding system-specific alerts. In the event of a display failure, the G1000 System automatically switches to reversionary (backup) mode. In reversionary mode, all important flight information is presented on the remaining display in the same format... -
Page 20: Ahrs Operation
The Attitude and Heading Reference System (AHRS) performs attitude, heading, and vertical acceleration calculations for the G1000 System, utilizing GPS, magnetometer, and air data in addition to information from its internal sensors. Attitude and heading information are updated on the PFD while the AHRS receives appropriate combinations of information from the external sensor inputs. -
Page 21: G1000 System Annunciations
(Figure 1-10 displays all possible flags and responsible LRUs). Upon G1000 power-up, certain instruments remain invalid as equipment begins to initialize. All instruments should be operational within one minute of power-up. If any instrument remains flagged, the G1000 should be serviced by a Garmin-authorized repair facility. -
Page 22: G1000 Controls
(17) Dual ALT Knob – Sets the reference altitude in the box located above the Altimeter. The large knob selects the thousands, while the small knob selects the hundreds. 1-12 Garmin G1000 Pilot’s Guide for the Quest Kodiak 100 190-00590-00 Rev. C... -
Page 23: Softkey Function
TRAFFIC – Press to display traffic on the inset map. TOPO – Press to display topographical data (i.e., coastlines, terrain, rivers, lakes) and elevation scale on the Inset Map. 190-00590-00 Rev. C Garmin G1000 Pilot’s Guide for the Quest Kodiak 100 1-13... - Page 24 Press the DFLTS softkey to change the PFD to return to the top level softkeys metric values to standard Figure 1-12 PFD Softkey Flow Chart – 2 1-14 Garmin G1000 Pilot’s Guide for the Quest Kodiak 100 190-00590-00 Rev. C...
- Page 25 IDENT – Press to provide special aircraft position identification to Air Traffic Control (ATC). BACK – Press to return to the previous level softkeys. ALERTS – Press to display the Alerts window. 190-00590-00 Rev. C Garmin G1000 Pilot’s Guide for the Quest Kodiak 100 1-15...
- Page 26 XM LTNG (optional) – Pressing this softkey displays/removes XM Radio lightning data on the Navigation Map. BACK – Pressing this softkey displays the ENGINE and MAP top level softkeys. DCLTR (declutter) – Pressing this softkey removes map information in three levels. 1-16 Garmin G1000 Pilot’s Guide for the Quest Kodiak 100 190-00590-00 Rev. C...
- Page 27 (outer) control portion. When a portion of the knob is not specified in the text, either may be used. Large (Outer) Knob Small (Inner) Knob Figure 1-15 Dual Concentric Knob 190-00590-00 Rev. C Garmin G1000 Pilot’s Guide for the Quest Kodiak 100 1-17...
-
Page 28: Accessing G1000 Functionality
1.7 ACCESSING G1000 FUNCTIONALITY MENUS The G1000 has a dedicated MENU Key that when pressed displays a context-sensitive list of options. This options list allows the user to access additional features or make settings changes which specifically relate to the currently displayed window/page. There is no all-encompassing menu. Some menus provide access to additional submenus that are used to view, edit, select, and review options. -
Page 29: Page Groups
2) Turn the small FMS Knob until the desired page is selected. • Map Page Group (MAP) Navigation Map Traffic Map Weather Data Link (optional) Terrain/TAWS (TAWS optional) Figure 1-19 Map Pages 190-00590-00 Rev. C Garmin G1000 Pilot’s Guide for the Quest Kodiak 100 1-19... - Page 30 Trip Planning Utility GPS Status System Setup XM Satellite screens (optional) - XM Information (INFO Softkey) - XM Radio (RADIO Softkey) Pages System Status Figure 1-21 Auxiliary Pages 1-20 Garmin G1000 Pilot’s Guide for the Quest Kodiak 100 190-00590-00 Rev. C...
- Page 31 In addition to the main page groups accessed exclusively using the FMS Knob, there are pages for flight planning (FPL) and loading procedures (PROC) which are accessed by key. In some instances, softkeys may be used to access the Procedure Loading pages. 190-00590-00 Rev. C Garmin G1000 Pilot’s Guide for the Quest Kodiak 100 1-21...
-
Page 32: System Setup And Status
• MFD Data Bar (Navigation Status Box) fields • Map datum • GPS Course Deviation Indicator (CDI) range • Airspace alerts • COM transceiver channel spacing • Arrival alert • Displayed nearest airports 1-22 Garmin G1000 Pilot’s Guide for the Quest Kodiak 100 190-00590-00 Rev. C... - Page 33 SYSTEM OVERVIEW Figure 1-24 System Setup Page 190-00590-00 Rev. C Garmin G1000 Pilot’s Guide for the Quest Kodiak 100 1-23...
- Page 34 Pilot profile names cannot start with a blank as the first letter in the name. NOTE: System settings configured on the System Setup Page may be saved under a pilot profile. The G1000 will store up to 25 profiles; the currently active profile and amount of memory used and available are shown at the top of the System Setup Page in the Pilot Profile Box.
- Page 35 2) Press the FMS Knob momentarily to activate the flashing cursor. 3) Turn the large FMS Knob to highlight the time offset field in the Date/Time Box. 4) Enter the time offset and press the ENT Key. 190-00590-00 Rev. C Garmin G1000 Pilot’s Guide for the Quest Kodiak 100 1-25...
- Page 36 The default datum setting is WSG 84. If charts based on another datum are being used, the G1000 should be set to use the same datum. Using a map datum that does not match the paper charts can result in significant differences in position information. If paper charts are being used for reference only, the G1000 still provides correct navigation guidance to the waypoints contained in the database, regardless of the datum selected.
- Page 37 2) Press the FMS Knob momentarily to activate the flashing cursor. 3) Turn the large FMS Knob to select the ON/OFF field in the Arrival Alert Box. 190-00590-00 Rev. C Garmin G1000 Pilot’s Guide for the Quest Kodiak 100 1-27...
- Page 38 • Enroute Safe Altitude (ESA) • Track (TRK) • Estimated Time of Arrival (ETA) • Vertical Speed Required (VSR) • Estimated Time Enroute (ETE) • Crosstrack Error (XTK) 1-28 Garmin G1000 Pilot’s Guide for the Quest Kodiak 100 190-00590-00 Rev. C...
- Page 39 If a lower CDI range setting is selected (i.e., 1.0 or 0.3 nm), the higher range settings are not selected during any phase of flight. For example, if 1.0 nm is selected, the G1000 uses this for enroute and terminal phases and ramps down to 0.3 nm during an approach.
- Page 40 3) Turn the large FMS Knob to highlight the minimum length field in the Nearest Airport Box. 4) Enter the minimum runway length (zero to 99,999 feet) and press the ENT Key. 1-30 Garmin G1000 Pilot’s Guide for the Quest Kodiak 100 190-00590-00 Rev. C...
- Page 41 The cursor can also be placed in the desired box using the System Status Page Menu. The ANN TEST Softkey, when depressed, causes an annunciation test tone to be played. 190-00590-00 Rev. C Garmin G1000 Pilot’s Guide for the Quest Kodiak 100 1-31...
-
Page 42: Display Backlighting
5) Turn the large FMS Knob to highlight ‘AUTO’ next to ‘MFD DSPL’ and repeat steps 2-4. 6) To remove the menu, press the CLR or MENU Key. 1-32 Garmin G1000 Pilot’s Guide for the Quest Kodiak 100 190-00590-00 Rev. C... - Page 43 9) Turn the small FMS Knob in the direction of the green arrowhead to display ‘MFD KEY’ and repeat steps 4-7. 10) To remove the menu, press the CLR or MENU Key. 190-00590-00 Rev. C Garmin G1000 Pilot’s Guide for the Quest Kodiak 100 1-33...
- Page 44 SYSTEM OVERVIEW LANK 1-34 Garmin G1000 Pilot’s Guide for the Quest Kodiak 100 190-00590-00 Rev. C...
-
Page 45: Section 2 Flight Instruments
The G1000 System controls were designed so that regardless of which seat the pilot is flying from, the aircraft can be flown with one hand and the controls manipulated with the other hand. Increased situational awareness is provided by replacing the traditional instrument “six-pack”... - Page 46 Outside Air Temperature (OAT) Reference Altitude Softkeys COM Frequency Box System Time Navigation Status Box Transponder Data Box Slip/Skid Indicator Selected Heading Bug Attitude Indicator Figure 2-1 Primary Flight Display (Default) Garmin G1000 Pilot’s Guide for the Quest Kodiak 100 190-00590-00 Rev. C...
- Page 47 Alerts Window Selected Heading Barometric Minimum Descent Altitude Inset Map Annunciation Window Bearing Information Windows Vertical Deviation/Glideslope Indicator Selected Course Marker Beacon Annunciation Figure 2-2 Additional PFD Information 190-00590-00 Rev. C Garmin G1000 Pilot’s Guide for the Quest Kodiak 100...
-
Page 48: Airspeed Indicator
The trend vector is absent if the speed remains constant or if any data needed to calculate airspeed is not available due to a system failure. Garmin G1000 Pilot’s Guide for the Quest Kodiak 100 190-00590-00 Rev. C... - Page 49 Restoring all Vspeed defaults: 1) Press the TMR/REF Softkey. 2) Press the MENU Key. 3) Turn the FMS Knob to highlight ‘Restore Defaults’ and press the ENT Key. 190-00590-00 Rev. C Garmin G1000 Pilot’s Guide for the Quest Kodiak 100...
-
Page 50: Attitude Indicator
One bar displacement is equal to one ball displacement on a traditional Slip/Skid Indicator. Figure 2-9 Slip/Skid Indication Nose High Nose Low Figure 2-8 Pitch Attitude Warnings Garmin G1000 Pilot’s Guide for the Quest Kodiak 100 190-00590-00 Rev. C... -
Page 51: Altimeter
Turn the BARO (outer) Knob to select the desired barometric pressure setting for the Altimeter. Selecting standard barometric pressure (29.92 in Hg): 1) Press the PFD Softkey. 2) Press the STD BARO Softkey. 190-00590-00 Rev. C Garmin G1000 Pilot’s Guide for the Quest Kodiak 100... -
Page 52: Vertical Deviation/Glideslope Indicator
2000 fpm, the pointer appears at the corresponding edge of the tape and the rate appears inside the pointer. Marker Beacon Annunciation Vertical Speed Vertical Pointer Deviation/ Glideslope Indicator Figure 2-13 Vertical Speed Indicator Figure 2-12 Vertical Deviation/Glideslope Indicator Garmin G1000 Pilot’s Guide for the Quest Kodiak 100 190-00590-00 Rev. C... -
Page 53: Horizontal Situation Indicator (Hsi)
(GPS, VOR, OBS) or a diamond (LOC). Course Pointer Flight Phase Navigation Source Annunciation Course Deviation and Lateral Deviation Scale To/From Indicator Figure 2-15 Arc HSI 190-00590-00 Rev. C Garmin G1000 Pilot’s Guide for the Quest Kodiak 100... - Page 54 4 deg/sec, an arrowhead appears at the end of the magenta trend vector and the prediction is no longer valid (Figure 2-17). Half-std Turn Rate Arrow Shown for Turn Rate > Std Turn Rate 4 deg/sec Figure 2-17 Turn Rate Indicator and Trend Vector 2-10 Garmin G1000 Pilot’s Guide for the Quest Kodiak 100 190-00590-00 Rev. C...
- Page 55 3) Press the BRG Softkey again to change the bearing source to GPS. 4) To remove the bearing pointer and information window, press the BRG Softkey again. 190-00590-00 Rev. C Garmin G1000 Pilot’s Guide for the Quest Kodiak 100 2-11...
-
Page 56: Course Deviation Indicator
Softkey cycles through the navigation sources. Color indicates the current navigation source: magenta (for GPS) or green (for VOR and LOC). Figure 2-20 Navigation Sources with Example Annunciations 2-12 Garmin G1000 Pilot’s Guide for the Quest Kodiak 100 190-00590-00 Rev. C... - Page 57 • During approach operations, the CDI scale ramps down even further to 0.3 nm. This transition normally occurs within 2.0 nm of the final approach fix (FAF). 190-00590-00 Rev. C Garmin G1000 Pilot’s Guide for the Quest Kodiak 100 2-13...
- Page 58 flight and the selected setting is displayed instead of the flight phase annunciation. For example, if 1.0 nm is selected, the G1000 uses this for enroute and terminal phases and ramps down to 0.3 nm during an approach. Receiver Autonomous Integrity Monitoring (RAIM) protection limits follow the selected CDI scale and corresponding flight phases.
- Page 59 OBS Mode Extended Enabled Course Line Pressing the OBS Softkey Pressing the OBS Softkey Again Suspends Waypoint Sequencing Returns to Normal Operation Figure 2-24 Omni-bearing Selector (OBS) Mode 190-00590-00 Rev. C Garmin G1000 Pilot’s Guide for the Quest Kodiak 100 2-15...
- Page 60 2) Turn the CRS Knob to select the desired course to/from the waypoint. 3) Press the OBS Softkey again to return to normal operation. SUSP Annunciation SUSP Softkey Suspends Waypoint Sequencing Figure 2-25 Suspending Automatic Waypoint Sequencing 2-16 Garmin G1000 Pilot’s Guide for the Quest Kodiak 100 190-00590-00 Rev. C...
-
Page 61: Supplemental Flight Data
3) Enter the desired time and press the ENT Key. 4) With the UP/DN field highlighted, turn the small FMS Knob to select the timer counting direction. 190-00590-00 Rev. C Garmin G1000 Pilot’s Guide for the Quest Kodiak 100 2-17... -
Page 62: System Time
Offset’ field is highlighted (for local time formats). 5) Enter the desired time offset (±HH:MM) and press the ENT Key to confirm selection. Figure 2-28 System Setup Page, Date/Time Settings 2-18 Garmin G1000 Pilot’s Guide for the Quest Kodiak 100 190-00590-00 Rev. C... -
Page 63: Outside Air Temperature
4) Turn the small FMS Knob to select the desired unit. 5) Press the ENT Key to confirm the selection. Figure 2-30 System Setup Page, Display Units Settings 190-00590-00 Rev. C Garmin G1000 Pilot’s Guide for the Quest Kodiak 100 2-19... -
Page 64: Pfd Annunciations And Alerting Functions
G1000 message advisory occurs. System alert messages are provided to make the pilot aware of G1000 system problems or status and may not require pilot action. The Alerts Window allows system alerts to be displayed simultaneously. The FMS Knob can be used to scroll through the alert messages. -
Page 65: Traffic Annunciation
NOTE: visual alerts are generated. The G1000 System displays traffic symbolically on the Inset Map (PFD), the Navigation Map Page (MFD), and various other MFD page maps. Refer to the Hazard Avoidance Section and Appendix F for more details about the Traffic Information Service (TIS). -
Page 66: Marker Beacon Annunciations
Altitude), the Reference Altitude changes to yellow text on a black background and flashes for 5 seconds. Within 1000 ft Within 200 ft Deviation of ±200 ft Figure 2-35 Altitude Alerting Visual Annunciations 2-22 Garmin G1000 Pilot’s Guide for the Quest Kodiak 100 190-00590-00 Rev. C... -
Page 67: Barometric Minimum Descent Altitude
If the aircraft proceeds to climb after having reached the MDA, once it reaches 50 feet above the MDA, alerting is disabled. Within 2500 ft Within 100 ft Altitude Reached Barometric Minimum Bug Barometric Minimum Box Figure 2-37 Barometric Minimum Descent Altitude Alerting Visual Annunciations 190-00590-00 Rev. C Garmin G1000 Pilot’s Guide for the Quest Kodiak 100 2-23... - Page 68 FLIGHT INSTRUMENTS LANK 2-24 Garmin G1000 Pilot’s Guide for the Quest Kodiak 100 190-00590-00 Rev. C...
-
Page 69: Section 3 Engine Indication System (Eis)
Refer to the Aircraft Flight Manual (AFM) for limitations. NOTE: The G1000 Engine Indication System (EIS) for the Quest Kodiak 100 displays critical engine, electrical, fuel, and other system parameters on the left side of the Multi Function Display (MFD) during normal operations. In Reversionary Mode, the remaining display unit is re-configured to present Primary Flight Display (PFD) symbology... -
Page 70: Engine Display
ENGINE or BACK Softkey. At the top of all three EIS displays, the Torque, Interstage Turbine Temperature (ITT), Propeller Speed, and Generator Speed gauges are present. Trim and flap indications are also shown on all EIS displays. Figure 3-2 Engine Display Garmin G1000 Pilot’s Guide for the Quest Kodiak 100 190-00590-00 Rev. C... - Page 71 Flap Position Indicator Flap deflection is indicated with a pointer along a color-coded slide bar (FLAPS) Engine Start Normal Engine Off Figure 3-3 Interstage Turbine Temperature Gauge Status Annunciations 190-00590-00 Rev. C Garmin G1000 Pilot’s Guide for the Quest Kodiak 100...
-
Page 72: System Display
1) Press the ENGINE Softkey. 2) Press the SYSTEM Softkey. 3) To return to the default Engine Display, press the ENGINE or BACK Softkey. Figure 3-4 System Display Garmin G1000 Pilot’s Guide for the Quest Kodiak 100 190-00590-00 Rev. C... - Page 73 Elevator trim is indicated with a pointer along a slide bar; takeoff trim position (ELEV) is indicated with a white bar and T/O label Flap Position Indicator Flap deflection is indicated with a pointer along a color-coded slide bar (FLAPS) 190-00590-00 Rev. C Garmin G1000 Pilot’s Guide for the Quest Kodiak 100...
-
Page 74: Fuel Display
1) Press the ENGINE Softkey. 2) Press the FUEL Softkey. 3) To return to the default Engine Display, press the ENGINE or BACK Softkey. Figure 3-5 System Display Garmin G1000 Pilot’s Guide for the Quest Kodiak 100 190-00590-00 Rev. C... - Page 75 Elevator trim is indicated with a pointer along a slide bar; takeoff trim position (ELEV) is indicated with a white bar and T/O label Flap Position Indicator Flap deflection is indicated with a pointer along a color-coded slide bar (FLAPS) 190-00590-00 Rev. C Garmin G1000 Pilot’s Guide for the Quest Kodiak 100...
- Page 76 8) Enter the desired reserve fuel time (00:00 to 23:59; hours:minutes) and press the ENT Key. 9) Press the FMS Knob to return to the Navigation Map Page. Garmin G1000 Pilot’s Guide for the Quest Kodiak 100 190-00590-00 Rev. C...
-
Page 77: Section 4 Audio Panel And Cns
(PFD). The Transponder Data Box is located to the left of the System Time Box. The data box displays the active four-digit code, mode, and reply status (Figure 4-1). 190-00590-00 Rev. C Garmin G1000 Pilot’s Guide for the Quest Kodiak 100... -
Page 78: Pfd/Mfd Controls And Frequency Display
AUDIO PANEL AND CNS PFD/MFD CONTROLS AND FREQUENCY DISPLAY Figure 4-1 PFD/MFD Controls, COM/NAV Frequency Tuning Boxes, and NRST Window (PFD Shown) Garmin G1000 Pilot’s Guide for the Quest Kodiak 100 190-00590-00 Rev. C... - Page 79 The large knob moves the cursor in the window. The small knob selects individual characters for the highlighted cursor location. Transponder Data Box – Indicates the selected transponder code, operating mode, reply, and ident status for the transponder. 190-00590-00 Rev. C Garmin G1000 Pilot’s Guide for the Quest Kodiak 100...
-
Page 80: Audio Panel Controls
COM1 Key. COM2 – When selected, audio from the #2 COM receiver can be heard. COM3 MIC – Not used in Kodiak 100 aircraft. Garmin G1000 Pilot’s Guide for the Quest Kodiak 100 190-00590-00 Rev. C... - Page 81 PASS Knob – Turn to adjust Copilot/Passenger intercom volume or squelch. The MAN SQ Key must be selected to allow squelch adjustment. Display Backup Button – Manually selects Reversionary Mode. 190-00590-00 Rev. C Garmin G1000 Pilot’s Guide for the Quest Kodiak 100...
-
Page 82: Com Operation
During PA Mode, the COM MIC Annunciator is extinguished and the COM active frequency color NOTE: changes to white, indicating that neither COM transmitter is active. When turning on the G1000 for use, the system remembers the last frequencies used and the active NOTE: COM transceiver state prior to shutdown. -
Page 83: Com Transceiver Manual Tuning
Key to Transfer COM Frequencies Between Active and Standby Frequency Boxes Turn the COM Knob to Tune the Frequency in the Tuning Box Figure 4-5 COM Frequency Tuning 190-00590-00 Rev. C Garmin G1000 Pilot’s Guide for the Quest Kodiak 100... -
Page 84: Quick-Tuning And Activating 121.500 Mhz
In the example shown, pressing the Audio Panel COM2 MIC Key activates the transceiver. Press for Two Seconds to Load 121.500 MHz Figure 4-7 Quickly Tuning 121.500 MHz Garmin G1000 Pilot’s Guide for the Quest Kodiak 100 190-00590-00 Rev. C... -
Page 85: Auto-Tuning The Com Frequency
4) Press the Frequency Transfer Key to transfer the frequency to the COM Active Frequency Field. Press the NRST Softkey to Open the Nearest Airports Window Figure 4-8 Nearest Airports Window (PFD) 190-00590-00 Rev. C Garmin G1000 Pilot’s Guide for the Quest Kodiak 100... - Page 86 10) Press the Frequency Transfer Key to transfer the frequency to the COM Active Frequency Field. Nearest Airports Menu Nearest Frequencies Menu Nearest Airspaces Menu Figure 4-10 Nearest Pages PAGE MENU 4-10 Garmin G1000 Pilot’s Guide for the Quest Kodiak 100 190-00590-00 Rev. C...
- Page 87 COM Standby Field. Cursor then advances to the next frequency. Press INFO Softkey for AIRPORT, RUNWAYS, and FREQUENCIES Windows Figure 4-11 WPT – Airport Information Page 190-00590-00 Rev. C Garmin G1000 Pilot’s Guide for the Quest Kodiak 100 4-11...
- Page 88 NRST – Nearest Airports Pages on the MFD in a similar manner using the appropriate softkeys or MENU Key, the FMS Knob, and the ENT Key. Figure 4-12 NRST – Nearest Airspaces, NRST – Nearest Airports, and NRST – Nearest Frequencies Pages 4-12 Garmin G1000 Pilot’s Guide for the Quest Kodiak 100 190-00590-00 Rev. C...
-
Page 89: Frequency Spacing
AUDIO PANEL AND CNS FREQUENCY SPACING The G1000 COM radios can tune either 25-kHz spacing (118.000 to 136.975 MHz) or 8.33-kHz spacing (118.000 to 136.990 MHz) for 760-channel or 3040-channel configuration. When 8.33-kHz channel spacing is selected, all of the 25-kHz channel spacing frequencies are also available in the complete 3040-channel list. -
Page 90: Automatic Squelch
Volume level indication remains for two seconds after the change. COM Volume Level Remains for Two Seconds Figure 4-16 COM Volume Level 4-14 Garmin G1000 Pilot’s Guide for the Quest Kodiak 100 190-00590-00 Rev. C... -
Page 91: Nav Operation
The active NAV frequency displayed in green on the MFD is the same as on PFD1. See the Flight Instruments Section for selecting the Bearing Information windows and using VOR as the source for the bearing pointer. 190-00590-00 Rev. C Garmin G1000 Pilot’s Guide for the Quest Kodiak 100 4-15... -
Page 92: Nav Receiver Manual Tuning
Press the Frequency Transfer Key to Transfer NAV Frequencies Between Active and Standby Frequency Fields Turn the NAV Knob to Tune the Frequency in the Tuning Box Figure 4-19 NAV Frequency Tuning 4-16 Garmin G1000 Pilot’s Guide for the Quest Kodiak 100 190-00590-00 Rev. C... - Page 93 When adjusting, the level is displayed in place of the standby frequencies. Volume level indication remains for two seconds after the change. NAV Volume Level Remains for Two Seconds Figure 4-22 NAV Volume Levels 190-00590-00 Rev. C Garmin G1000 Pilot’s Guide for the Quest Kodiak 100 4-17...
-
Page 94: Auto-Tuning The Nav Frequency
Highlighted Frequency into the NAV Standby Turn the FMS Frequency Box Knob to Scroll Through a List of Frequencies Figure 4-23 NAV Frequency Auto-Tuning from the MFD 4-18 Garmin G1000 Pilot’s Guide for the Quest Kodiak 100 190-00590-00 Rev. C... - Page 95 11) Press the Frequency Transfer Key to transfer the frequency to the NAV Active Frequency Field. Nearest Airports Menu Nearest VOR Menu Figure 4-24 Nearest Pages PAGE MENU 190-00590-00 Rev. C Garmin G1000 Pilot’s Guide for the Quest Kodiak 100 4-19...
- Page 96 Place the Cursor on to Place the Cursor on the VOR Identifier the VOR Frequency Figure 4-25 Loading the NAV Frequency from the NRST – Nearest VOR Page 4-20 Garmin G1000 Pilot’s Guide for the Quest Kodiak 100 190-00590-00 Rev. C...
- Page 97 MENU Key, the FMS Knob, and the ENT Key. Figure 4-26 NRST – Nearest Frequencies, WPT – VOR Information, WPT – Airport Information, and NRST – Nearest Airports Pages 190-00590-00 Rev. C Garmin G1000 Pilot’s Guide for the Quest Kodiak 100 4-21...
- Page 98 • If the current CDI navigation source is NAV1 or NAV2, the approach frequency is transferred to the standby frequency fields of the selected CDI NAV radio. 4-22 Garmin G1000 Pilot’s Guide for the Quest Kodiak 100 190-00590-00 Rev. C...
-
Page 99: Marker Beacon Receiver
(annunciator illuminated) is used to provide an earlier indication when nearing a marker during an approach. The LO SENS function (annunciator extinguished) results in a narrower marker dwell while over a station. 190-00590-00 Rev. C Garmin G1000 Pilot’s Guide for the Quest Kodiak 100 4-23... -
Page 100: Gtx 33 Mode S Transponder
Pressing the IDENT Softkey while in Mode or Code Selection initiates the ident function and reverts to the top-level softkeys. After 45 seconds of transponder softkey inactivity, the system reverts back to the top-level softkeys. 4-24 Garmin G1000 Pilot’s Guide for the Quest Kodiak 100 190-00590-00 Rev. C... -
Page 101: Transponder Mode Selection
When Standby Mode has been selected on the ground, the transponder can be returned to Ground Mode by pressing the GND Softkey. Mode Figure 4-30 Ground Mode 190-00590-00 Rev. C Garmin G1000 Pilot’s Guide for the Quest Kodiak 100 4-25... - Page 102 If Altitude Mode is selected, a green ‘ALT’ indication and transponder code appear in the mode field of the Transponder Data Box, and all transponder replies requesting altitude information are provided with pressure altitude information. ALT Mode (Mode C Altitude Reporting) Figure 4-33 Altitude Mode 4-26 Garmin G1000 Pilot’s Guide for the Quest Kodiak 100 190-00590-00 Rev. C...
-
Page 103: Entering A Transponder Code
BKSP Softkey moves the code selection cursor to the previous digit. Five seconds after the fourth digit has been entered, the transponder code becomes active. Entering a Code Figure 4-35 Entering a Code 190-00590-00 Rev. C Garmin G1000 Pilot’s Guide for the Quest Kodiak 100 4-27... - Page 104 The pre-programmed VFR Code is set at the factory to 1200. If a VFR code change is required, contact a Garmin-authorized service center for configuration. VFR Code Figure 4-37 VFR Code 4-28 Garmin G1000 Pilot’s Guide for the Quest Kodiak 100 190-00590-00 Rev. C...
-
Page 105: Ident Function
After the IDENT Softkey is pressed while in Mode or Code Selection, the system reverts to the top-level softkeys. IDNT Indication Press the IDENT Softkey to Initiate the ID Function Figure 4-38 IDENT Softkey and Indication 190-00590-00 Rev. C Garmin G1000 Pilot’s Guide for the Quest Kodiak 100 4-29... -
Page 106: Flight Id Reporting
AUDIO PANEL AND CNS FLIGHT ID REPORTING If the Flight ID is required but the system is not configured for it, contact a Garmin-authorized service NOTE: center for configuration. When the Flight ID must be entered before flight operation, the identifier is placed in the Timer/References Window on the PFD. -
Page 107: Additional Audio Panel Functions
Certain aural alerts and warnings (autopilot, traffic, altitude) are always heard on the speaker, even when the speaker is not selected. The speaker volume is adjustable within a nominal range. Contact a Garmin-authorized service center for volume adjustment. Figure 4-40 Passenger Address and Speaker Keys 190-00590-00 Rev. -
Page 108: Intercom
MUSIC 1 Selected Radios, Selected Radios, Passengers, Passengers, Aural Alerts, Pilot, Aural Alerts, Pilot, MUSIC 2 MUSIC 2 Copilot Copilot Table 4-1 ICS Isolation Modes, Dual Audio Panels 4-32 Garmin G1000 Pilot’s Guide for the Quest Kodiak 100 190-00590-00 Rev. C... - Page 109 Copilot/Passenger to adjust Squelch when SQ Volume or Annunciation is lit, Volume Manual Squelch when VOL Annunciation is lit. Volume Annunciation Squelch Annunciation Figure 4-42 Volume/Squelch Control 190-00590-00 Rev. C Garmin G1000 Pilot’s Guide for the Quest Kodiak 100 4-33...
-
Page 110: Passenger Address (Pa) System
Pressing the PLAY Key while audio is playing begins playing the previously recorded memory block. Each subsequent press of the PLAY Key selects the previously recorded memory block. Powering off the unit automatically clears all recorded blocks. Figure 4-44 Play Key 4-34 Garmin G1000 Pilot’s Guide for the Quest Kodiak 100 190-00590-00 Rev. C... -
Page 111: Entertainment Inputs
For example, if passengers prefer their own music while the pilot listens to the XM Radio, the entertainment audio should be connected to the MUSIC 2 jack. 190-00590-00 Rev. C Garmin G1000 Pilot’s Guide for the Quest Kodiak 100 4-35... -
Page 112: Simultaneous Com Operation
The selected COM MIC Annunciator flashes when either pilot’ s microphone PTT is pressed. If both pilots select the same COM radio, the pilot has priority on COM1 and the copilot has priority on COM2. 4-36 Garmin G1000 Pilot’s Guide for the Quest Kodiak 100 190-00590-00 Rev. C... -
Page 113: Audio Panels Preflight Procedure
ICS system as well as during COM transmissions. After powering up the G1000 System, the following steps will aid in maximizing the use of the Audio Panels as well as prevent pilot and copilot induced issues. These preflight procedures should be performed each time a pilot boards the aircraft to insure awareness of all audio levels in the Audio Panel and radios. - Page 114 5) Adjust the PILOT/PASS Knob volume to the desired intercom level. Once this procedure has been completed, the pilot and copilot can change settings, keeping in mind the notes above. 4-38 Garmin G1000 Pilot’s Guide for the Quest Kodiak 100 190-00590-00 Rev. C...
-
Page 115: Abnormal Operation
AUDIO PANEL AND CNS 4.7 ABNORMAL OPERATION Abnormal operation of the G1000 includes equipment failures of the G1000 components and failure of associated equipment, including switches and external devices. STUCK MICROPHONE If the push-to-talk (PTT) Key becomes stuck, the COM transmitter stops transmitting after 35 seconds of continuous operation. -
Page 116: Reversionary Mode
The pilot side DISPLAY BACKUP Button controls the pilot side PFD (PFD1) and the MFD. The copilot side DISPLAY BACKUP Button controls the copilot side PFD (PFD2) and the MFD. See the System Overview Section for more information. Figure 4-48 Display Backup Button 4-40 Garmin G1000 Pilot’s Guide for the Quest Kodiak 100 190-00590-00 Rev. C... -
Page 117: Section 5 Gps Navigation
This section of the Pilot’ s Guide provides GPS navigation operating procedures for the G1000 installed in the Kodiak 100 aircraft. This section assumes some prior knowledge of the other sections of the G1000 Pilot’ s Guide, especially the “how-to” of entering data and MFD Page Groups. All screenshots shown in this section are for reference only and are subject to change. -
Page 118: Navigation Map (Mfd)
(not all map display items shown) Declutter Softkey MFD Navigation Map operations involving the display of traffic, terrain, and weather data are NOTE: described in the Hazard Awareness Section. Garmin G1000 Pilot’s Guide for the Quest Kodiak 100 190-00590-00 Rev. C... - Page 119 Navigation Data Bar: MAP – NAVIGATION MAP. In addition to turning the FMS Knobs, the Navigation Map Page can be selected from any page by pressing and momentarily holding the CLR (DFLT MAP) Key. 190-00590-00 Rev. C Garmin G1000 Pilot’s Guide for the Quest Kodiak 100...
- Page 120 • Traffic (refer to the Hazard Awareness Section) • Aviation • Land Figure 5-3 Map Setup Groups Refer to the appendices for a full description and interpretation of aviation map data. NOTE: Garmin G1000 Pilot’s Guide for the Quest Kodiak 100 190-00590-00 Rev. C...
- Page 121 2) Press the ENT Key. The Map Setup MENU is displayed. 3) Select the ‘ORIENTATION’ field. Select the desired orientation and press the ENT Key. 4) Press the FMS Knob to return to the Navigation Map Page. 190-00590-00 Rev. C Garmin G1000 Pilot’s Guide for the Quest Kodiak 100...
- Page 122 4) Press the ENT Key. 4) Highlight the ‘LAND DATA’ field. 5) Select ‘On’ or ‘Off.’. 6) Press the FMS Knob to return to the Navigation Map Page. Garmin G1000 Pilot’s Guide for the Quest Kodiak 100 190-00590-00 Rev. C...
- Page 123 4) Press the ENT Key. 5) Highlight the ‘TRACK VECTOR’ field. 6) Select ‘On’ or ‘Off’. 7) Press the FMS Knob to return to the Navigation Map Page. 190-00590-00 Rev. C Garmin G1000 Pilot’s Guide for the Quest Kodiak 100...
- Page 124 4) Press the ENT Key. 5) Highlight the ‘WIND VECTOR’ field. 6) Select ‘On’ or ‘Off’. 7) Press the FMS Knob to return to the Navigation Map Page. Garmin G1000 Pilot’s Guide for the Quest Kodiak 100 190-00590-00 Rev. C...
- Page 125 4) Press the ENT Key. 5) Highlight the ‘NAV RANGE RING’ field. 6) Select ‘On’ or ‘Off’. 7) Press the FMS Knob to return to the Navigation Map Page. 190-00590-00 Rev. C Garmin G1000 Pilot’s Guide for the Quest Kodiak 100...
- Page 126 The topo data range is the maximum map range on which topo data is displayed. TOPO Data Shown on Topo Scale TOPO Softkey Figure 5-9 TOPO Data 5-10 Garmin G1000 Pilot’s Guide for the Quest Kodiak 100 190-00590-00 Rev. C...
- Page 127 3) Select the ‘Map’ group and press the ENT Key. 4) Highlight the ‘TOPO Range’ field. 5) Select ‘On’ or ‘Off’. 6) Press the FMS Knob to return to the Navigation Map Page. 190-00590-00 Rev. C Garmin G1000 Pilot’s Guide for the Quest Kodiak 100 5-11...
- Page 128 8) To change the TERRAIN range setting, turn the small FMS Knob to display the range list. 9) Select the desired range 10) Press the ENT Key. 11) Press the FMS Knob to return to the Navigation Map Page. 5-12 Garmin G1000 Pilot’s Guide for the Quest Kodiak 100 190-00590-00 Rev. C...
- Page 129 11) Press the FMS Knob to return to the Navigation Map Page. Fuel Range Ring (Fuel RNG) (RSV) Refer to the EIS Section of the Pilot’ s Guide for information regarding the Fuel Range Ring. 190-00590-00 Rev. C Garmin G1000 Pilot’s Guide for the Quest Kodiak 100 5-13...
- Page 130 • Small: off - 100 nm • Runway Extension (RWY EXTENSION) - The zoom range sets the maximum range at which runway extensions appear on the display: • Off - 100 nm 5-14 Garmin G1000 Pilot’s Guide for the Quest Kodiak 100 190-00590-00 Rev. C...
- Page 131 2) Press the ENT Key. The Map Setup MENU is displayed. 3) Select the ‘Aviation’ group. 4) Press the ENT Key. The cursor flashes on the ‘ACTIVE FPL’ field. 190-00590-00 Rev. C Garmin G1000 Pilot’s Guide for the Quest Kodiak 100 5-15...
- Page 132 • LARGE CITY (approximate populations greater than 200,000): off - 1500 nm • MEDIUM CITY (approximate populations greater than 50,000): off - 200 nm • SMALL CITY (approximate populations greater than 5,000): off - 50 nm 5-16 Garmin G1000 Pilot’s Guide for the Quest Kodiak 100 190-00590-00 Rev. C...
- Page 133 6) Select the desired range. 7) Press the ENT Key to accept the selected option. 8) Press the FMS Knob to return to the Navigation Map Page. 190-00590-00 Rev. C Garmin G1000 Pilot’s Guide for the Quest Kodiak 100 5-17...
- Page 134 “SUA” listed in the following table stands for Special Use Airspace. These are controlled airspaces, military zones, etc. 5-18 Garmin G1000 Pilot’s Guide for the Quest Kodiak 100 190-00590-00 Rev. C...
- Page 135 SUA Group 5 Traffic Symbols Local Roads SUA Group 6 Traffic Labels Local Road Labels SUA Group 7 Railroads Obstacles Major Political Boundaries Table 5-1 Map Declutter Levels 190-00590-00 Rev. C Garmin G1000 Pilot’s Guide for the Quest Kodiak 100 5-19...
- Page 136 3) Push in the Joystick to remove the arrow and return to the present position. 5-20 Garmin G1000 Pilot’s Guide for the Quest Kodiak 100 190-00590-00 Rev. C...
- Page 137 3) Press the TOPO Softkey again to remove topo data from the Navigation Map. When topo data is removed from the page, the Jeppesen Nav data is presented on a black background. 190-00590-00 Rev. C Garmin G1000 Pilot’s Guide for the Quest Kodiak 100 5-21...
- Page 138 • Maximum Safe Altitude (MSA) • Track angle error (TKE) • Track angle (TRK) • Vertical speed required (VSR) • Cross track error (XTK) • Currently selected MFD page title 5-22 Garmin G1000 Pilot’s Guide for the Quest Kodiak 100 190-00590-00 Rev. C...
- Page 139 ENT Key. Controlled Airspace Obstacle Symbol Information Lat/Lon at Distance and Elevation Selected Position Bearing to the Selected Position Figure 5-19 Measure Bearing/Distance Box 190-00590-00 Rev. C Garmin G1000 Pilot’s Guide for the Quest Kodiak 100 5-23...
-
Page 140: Pfd Inset Map And Windows
The Map Inset Pop-up window can display the following information: • Moving map • Zoom scale legend • Orientation • Aircraft icon • TOPO data • Traffic data • Weather data 5-24 Garmin G1000 Pilot’s Guide for the Quest Kodiak 100 190-00590-00 Rev. C... -
Page 141: Pfd Windows
GPS navigation: • Nearest • Direct-to • Flight Plan • Procedures • Timer/References Window Location Figure 5-21 PFD Window Location 190-00590-00 Rev. C Garmin G1000 Pilot’s Guide for the Quest Kodiak 100 5-25... - Page 142 This feature applies to everything displayed on the map except for route lines. 3) Push in the Joystick to cancel the panning function and return to the present position on the map. 5-26 Garmin G1000 Pilot’s Guide for the Quest Kodiak 100 190-00590-00 Rev. C...
-
Page 143: Direct-To-Navigation (Mfd)
The “direct-to” navigation feature provides a quick method of setting a GPS course to a destination waypoint. Once a direct-to is activated, the G1000 establishes a point-to-point course line from the present position to the selected direct-to destination. Course guidance is provided until the direct-to is cancelled or replaced by a new destination. - Page 144 2) Turn the small FMS Knob to the left. Initially, a flight plan waypoint list is displayed as in Figure 5-24. The list is populated only when navigating a flight plan. 5-28 Garmin G1000 Pilot’s Guide for the Quest Kodiak 100 190-00590-00 Rev. C...
- Page 145 4) Press the ENT Key. The cursor now highlights ‘ACTIVATE?’. 5) Press the ENT Key again to begin navigation using the selected destination, altitude constraint, and course. 190-00590-00 Rev. C Garmin G1000 Pilot’s Guide for the Quest Kodiak 100 5-29...
- Page 146 2) Press the MENU Key to display the Direct-to options menu (Figure 5-25). 3) With ‘Cancel Direct-To NAV’ highlighted, press the ENT Key. If a flight plan is still active, the G1000 resumes navigating the flight plan along the closest leg.
-
Page 147: Direct-To Navigation Shortcuts From The Mfd
5) If the map pointer is placed on an open location, press the Direct-to Key. 6) Press the ENT Key twice to create a ‘MAPWPT’ waypoint and then navigate to it. 190-00590-00 Rev. C Garmin G1000 Pilot’s Guide for the Quest Kodiak 100 5-31... -
Page 148: Direct-To-Navigation (Pfd)
6) Press the ENT Key to highlight ‘Activate?’ or turn the large FMS Knob to highlight the ‘COURSE’ field. 7) Enter the desired course to the waypoint. 8) Press the ENT Key to highlight ‘ACTIVATE?’. 9) Press the ENT again to activate the Direct-to. 5-32 Garmin G1000 Pilot’s Guide for the Quest Kodiak 100 190-00590-00 Rev. C... - Page 149 Figure 5-29 Nearest Airport List 3) Select the desired airport. 4) Press the ENT Key. The cursor is now displayed on ‘ACTIVATE?’. 5) Press ENT again to activate a Direct-to. 190-00590-00 Rev. C Garmin G1000 Pilot’s Guide for the Quest Kodiak 100 5-33...
- Page 150 2) Press the MENU Key to display the Options Window. The cursor will be flashing on ‘Cancel Direct-to NAV’. 3) Press the ENT Key to cancel the Direct-to. 5-34 Garmin G1000 Pilot’s Guide for the Quest Kodiak 100 190-00590-00 Rev. C...
-
Page 151: Airport Information
3) Enter the desired identifier, facility name, or city location. 4) Press t he ENT Key. 5) To remove the flashing cursor, press the FMS Knob . 190-00590-00 Rev. C Garmin G1000 Pilot’s Guide for the Quest Kodiak 100 5-35... - Page 152 GPS NAVIGATION DUPLICATE WAYPOINTS As an identifier, facility name or location is entered, the G1000’ s Spell’N’Find™ feature scrolls through the database, displaying those waypoints matching the characters which have been entered to that point. If duplicate entries exist for the entered facility name or location, additional entries may be viewed by continuing to turn the small FMS Knob during the selection process.
- Page 153 Class B AWOS Class C Center Clearance Departure Gate Control Terminal Ground TRSA Helicopter Multicom Pre-Taxi Radar Ramp Other Tower Unicom Table 5-2 Frequency Descriptions and Abbreviations 190-00590-00 Rev. C Garmin G1000 Pilot’s Guide for the Quest Kodiak 100 5-37...
- Page 154 Airport Information Window. The map image range is displayed in the lower left corner and is adjustable using the joystick. For airports with multiple runways, information for each runway is available. 5-38 Garmin G1000 Pilot’s Guide for the Quest Kodiak 100 190-00590-00 Rev. C...
- Page 155 4) Press the ENT Key. A list containing the most recent 16 airports is displayed. 5) Select an airport. 6) Press the ENT Key. The Airport Information page for the selected airport is displayed. 190-00590-00 Rev. C Garmin G1000 Pilot’s Guide for the Quest Kodiak 100 5-39...
- Page 156 5) If desired, enter the identifier of the reference waypoint and the radial and distance to the reference waypoint. 6) Press the ENT Key to accept. 7) Press the FMS Knob to remove the flashing cursor. 5-40 Garmin G1000 Pilot’s Guide for the Quest Kodiak 100 190-00590-00 Rev. C...
-
Page 157: Intersection Information
1) With the Intersection Information Page displayed, press the FMS Knob to activate the cursor. 2) Enter a name for the identifier. 3) Press t he ENT Key. 4) Press the FMS Knob to remove the flashing cursor. 190-00590-00 Rev. C Garmin G1000 Pilot’s Guide for the Quest Kodiak 100 5-41... - Page 158 2) Select an Intersection from the list (16 maximum are listed). 3) Press the ENT K ey to view the selected Intersection. List of Recent Intersections Figure 5-35 Recent Intersection List 5-42 Garmin G1000 Pilot’s Guide for the Quest Kodiak 100 190-00590-00 Rev. C...
-
Page 159: Ndb Information
2) Highlight the desired selection field (identifier, name or closest city). 3) Enter an identifier, name or city. 4) Press t he ENT Key. 5) Press the FMS Knob to remove the flashing cursor. 190-00590-00 Rev. C Garmin G1000 Pilot’s Guide for the Quest Kodiak 100 5-43... - Page 160 3) Select an NDB from the list (16 maximum are listed). 4) Press the ENT Key. The selected NDB is now the active NDB. List of Recent NDBs Figure 5-37 Recent NDB List 5-44 Garmin G1000 Pilot’s Guide for the Quest Kodiak 100 190-00590-00 Rev. C...
-
Page 161: Vor Information
2) Highlight the desired selection field (identifier, name or closest city). 3) Enter an identifier, name or city. 4) Press t he ENT Key. 5) Press the FMS Knob to remove the flashing cursor. 190-00590-00 Rev. C Garmin G1000 Pilot’s Guide for the Quest Kodiak 100 5-45... - Page 162 4) Select a VOR from the list (16 maximum are listed). 5) Press the ENT Key. The selected VOR is now the active user VOR. List of Recent VORs Figure 5-39 Recent VOR List 5-46 Garmin G1000 Pilot’s Guide for the Quest Kodiak 100 190-00590-00 Rev. C...
-
Page 163: User Waypoint Information
Information Reference Waypoints Map of Surrounding Area/User Waypoint Location and Symbol User Waypoint List Number of Waypoint Slots Used/Avaialble Rename Softkey Figure 5-40 User WPT Information Page 190-00590-00 Rev. C Garmin G1000 Pilot’s Guide for the Quest Kodiak 100 5-47... - Page 164 3) Turn the small FMS Knob to make changes. 4) Press the ENT Key to accept the changes. 5) Press the FMS Knob to remove the flashing cursor. 5-48 Garmin G1000 Pilot’s Guide for the Quest Kodiak 100 190-00590-00 Rev. C...
- Page 165 1) Select the User Waypoint Information Page and press the MENU Key. 2) Select ‘Use Present Position’. 3) Press the ENT Key. 4) Highlight the position and press the ENT Key. 190-00590-00 Rev. C Garmin G1000 Pilot’s Guide for the Quest Kodiak 100 5-49...
- Page 166 3) The user waypoint field is highlighted. Rename the user waypoint. 4) Press the ENT Key. 5) The message ‘Would you like to rename the user waypoint’ is displayed. Select ‘YES’ to rename the new user waypoint. 5-50 Garmin G1000 Pilot’s Guide for the Quest Kodiak 100 190-00590-00 Rev. C...
- Page 167 Figure 5-41 User Waypoints on Navigation Map 3) If ‘Review Airspaces is selected, the Review Airspace Information Box is displayed (Figure 5-43). User Waypoint Name Figure 5-42 Naming a User Waypoint 190-00590-00 Rev. C Garmin G1000 Pilot’s Guide for the Quest Kodiak 100 5-51...
- Page 168 7) If desired, enter the identifier of the reference waypoint and the radial and distance to the reference waypoint. 8) Press the ENT Key to accept. 9) Press the FMS Knob to remove the flashing cursor. 5-52 Garmin G1000 Pilot’s Guide for the Quest Kodiak 100 190-00590-00 Rev. C...
-
Page 169: Nearest Airports
Displayed on Map Runway (or soft surface, if no hard surface runway exists) Primary Communications Frequency and Type Most Precise Approaches Available List Figure 5-44 Nearest Airports Page 190-00590-00 Rev. C Garmin G1000 Pilot’s Guide for the Quest Kodiak 100 5-53... - Page 170 2) Select the option ‘Select Airport Window’ and press the ENT Key. The cursor is placed in the ‘NEAREST AIRPORTS’ field. 3) Highlight the desired airport. 4) Press the FMS Knob to remove the flashing cursor. 5-54 Garmin G1000 Pilot’s Guide for the Quest Kodiak 100 190-00590-00 Rev. C...
- Page 171 4) Press the ENT Key. The selected frequency is placed in the COM standby frequency tuning box. 5) Press the FREQUENCY TRANSFER Key to place the frequency in the active field. 6) Press the FMS Knob to remove the flashing cursor. 190-00590-00 Rev. C Garmin G1000 Pilot’s Guide for the Quest Kodiak 100 5-55...
-
Page 172: Nearest Airports (Pfd)
City, State Airport Usage Type (e.g. public, private, military, heliport) Elevation Region Fuel Types Available (AV Gas, Jet) Position Field UTC Time Figure 5-47 Airport Information Window 5-56 Garmin G1000 Pilot’s Guide for the Quest Kodiak 100 190-00590-00 Rev. C... - Page 173 From the Nearest Airports Window, highlight the desired frequency, then press the ENT Key. The frequency is placed in the standby COM frequency field in the COM Tuning Box. COM Frequency Figure 5-49 COM Frequency 190-00590-00 Rev. C Garmin G1000 Pilot’s Guide for the Quest Kodiak 100 5-57...
-
Page 174: Nearest Intersections
Selecting a nearest intersection from the Nearest Intersections Page: 1) Press the FMS Knob to activate the cursor. 2) Select the desired intersection. The information on the Nearest intersection Page pertains to the selected intersection. 5-58 Garmin G1000 Pilot’s Guide for the Quest Kodiak 100 190-00590-00 Rev. C... -
Page 175: Nearest Ndb
Selecting an NDB from the Nearest NDB Page: 1) Press the FMS Knob to activate the cursor. 2) Select the desired NDB. The information on the Nearest NDB Page pertains to the selected NDB. 190-00590-00 Rev. C Garmin G1000 Pilot’s Guide for the Quest Kodiak 100 5-59... -
Page 176: Nearest Vor
4) Press the FMS Knob to remove the flashing cursor. VOR Identifier, Scroll Bar Symbol, Bearing, Distance (within 200 nm of current position) Figure 5-53 Selecting a Nearest VOR 5-60 Garmin G1000 Pilot’s Guide for the Quest Kodiak 100 190-00590-00 Rev. C... - Page 177 2) Select the option ‘Select Frequency Window’ and press the ENT Key. The cursor is placed in the ‘FREQUENCY’ field. 3) Select the desired frequency. 4) Press the FMS Knob to remove the flashing cursor. 190-00590-00 Rev. C Garmin G1000 Pilot’s Guide for the Quest Kodiak 100 5-61...
- Page 178 Transfer Key to place the VOR frequency in the active NAV field (Figure 5-57). 3) Press the FMS Knob to remove the flashing cursor. Figure 5-57 Loading a VOR Frequency 5-62 Garmin G1000 Pilot’s Guide for the Quest Kodiak 100 190-00590-00 Rev. C...
-
Page 179: Nearest Frequencies
If there is no database loaded or if there are no stations in range, then any or all of the lists may be empty with the display indicating as such. 190-00590-00 Rev. C Garmin G1000 Pilot’s Guide for the Quest Kodiak 100 5-63... - Page 180 4) Turn the large FMS Knob to select the desired ARTCC frequency. 5) Press the ENT Key to load the frequency into the COM frequency standby field. Figure 5-59 Nearest Frequencies Page Menu 5-64 Garmin G1000 Pilot’s Guide for the Quest Kodiak 100 190-00590-00 Rev. C...
- Page 181 4 ) Press the ENT Key to load the WX frequency into the COM frequency standby field. 5) Press the FMS Knob to remove the flashing cursor. 190-00590-00 Rev. C Garmin G1000 Pilot’s Guide for the Quest Kodiak 100 5-65...
-
Page 182: Nearest Airspaces
5.16 NEAREST AIRSPACES The G1000 alerts the pilot to as many as nine controlled or special use airspaces (three at the most at one time) near or in the flight path. The airspace name, class, controlling agency, vertical limits and associated frequencies are displayed for the selected airspace. - Page 183 Ahead, or Ahead < 2nm, otherwise “__:__:__” is used) is displayed. If there are more than three airspace alerts they are displayed in a scrollable list box with only three visible at one time. 190-00590-00 Rev. C Garmin G1000 Pilot’s Guide for the Quest Kodiak 100 5-67...
- Page 184 An altitude buffer is also provided on the System Setup Page to provide an extra margin of safety above or below the published limits. See the System Overview Section for additional details. 5-68 Garmin G1000 Pilot’s Guide for the Quest Kodiak 100 190-00590-00 Rev. C...
- Page 185 If there are more than three frequencies for an airport waypoint index then they are displayed in a scrollable list box with only three visible at a time. 190-00590-00 Rev. C Garmin G1000 Pilot’s Guide for the Quest Kodiak 100 5-69...
-
Page 186: Nearest User Waypoint
Information about the selected user waypoint includes the user comment and location (latitude and longitude). If there are no user waypoints, the user comment is blank and the position data is dashed. 5-70 Garmin G1000 Pilot’s Guide for the Quest Kodiak 100 190-00590-00 Rev. C... - Page 187 2) Turn the FMS Knob to select the desired waypoint. The remaining information on the Nearest User Waypoint Page pertains to the selected Nearest User Waypoint. 3) Press the FMS Knob to remove the flashing cursor. 190-00590-00 Rev. C Garmin G1000 Pilot’s Guide for the Quest Kodiak 100 5-71...
-
Page 188: Flight Planning
GPS NAVIGATION 5.18 FLIGHT PLANNING The G1000 can store up to 99 numbered flight plans. Each of the stored flight plans can be used in reverse and each one can contain up to 31 waypoints. FLIGHT PLANNING FROM THE MFD Creating a new flight plan:... - Page 189 1) Select the INVERT Softkey. The ‘Invert and activate stored flight plan?’ window is displayed. 2) With ‘OK’ highlighted, press the ENT Key. To cancel the operation, highlight ‘CANCEL’ and press the ENT Key. 190-00590-00 Rev. C Garmin G1000 Pilot’s Guide for the Quest Kodiak 100 5-73...
- Page 190 3) Select the COPY Softkey. A ‘Copy to flight plan?’ confirmation window is displayed. 4) With ‘OK’ highlighted, press the ENT Key to copy the flight plan. To cancel, highlight ‘CANCEL’ and press the ENT Key. 5-74 Garmin G1000 Pilot’s Guide for the Quest Kodiak 100 190-00590-00 Rev. C...
- Page 191 2) Highlight ‘Delete All’ and press the ENT Key. A ‘Delete all flight plans?’ confirmation window is displayed. 3) W ith ‘OK’ highlighted, press the ENT Key to delete all flight plans. To cancel, highlight ‘CANCEL’ and press the ENT Key. 190-00590-00 Rev. C Garmin G1000 Pilot’s Guide for the Quest Kodiak 100 5-75...
- Page 192 3) Turn the FMS Knobs to change or edit the name (Figure 5-65). 4) Press the ENT Key. Note that the title only changes on the Active Flight Plan Page, not the Flight Plan Catalog Page. 5-76 Garmin G1000 Pilot’s Guide for the Quest Kodiak 100 190-00590-00 Rev. C...
- Page 193 6) The new user waypoint is inserted into the flight plan before the waypoint in the list that was previously highlighted. If nothing is highlighted, it will be placed at the end of the flight plan. 190-00590-00 Rev. C Garmin G1000 Pilot’s Guide for the Quest Kodiak 100 5-77...
- Page 194 ‘Load Departure’ loads a published departure procedure into a flight plan. It replaces the current departure with the new selection. When flying a direct-to, the G1000 uses the nearest airport as a reference when displaying available departures. A published departure can be loaded into the flight plan using one of three methods: •...
- Page 195 10) With ‘LOAD’ highlighted, press the ENT Key. The departure procedure is displayed as part of the overall flight plan and is placed in front of the enroute flight plan. Figure 5-67 Selecting a Departure from the Procedures Window 190-00590-00 Rev. C Garmin G1000 Pilot’s Guide for the Quest Kodiak 100 5-79...
- Page 196 6) If the approach is not approved for GPS, a ‘NOT APPROVED FOR GPS’ message is displayed with ‘YES’ highlighted (Figure 5-69). Press the ENT Key to acknowledge the message. To cancel the approach, select ‘NO’ and press the ENT Key. 5-80 Garmin G1000 Pilot’s Guide for the Quest Kodiak 100 190-00590-00 Rev. C...
- Page 197 9) If the approach is not approved for GPS, a ‘NOT APPROVED FOR GPS’ messages is displayed with ‘YES’ highlighted. Press the ENT Key to acknowledge the message. To cancel the approach, select ‘NO’ and press the ENT Key. 190-00590-00 Rev. C Garmin G1000 Pilot’s Guide for the Quest Kodiak 100 5-81...
- Page 198 flight plan using one of three methods: • LD STAR Softkey • PROC Key • Active Flight Plan Page Options Menu The loaded arrival replaces the current arrival with the new selection. 5-82 Garmin G1000 Pilot’s Guide for the Quest Kodiak 100 190-00590-00 Rev. C...
- Page 199 9) With ‘LOAD’ highlighted, press the ENT Key. The arrival procedure is displayed as part of the overall flight plan and is placed in front of the enroute flight plan. 190-00590-00 Rev. C Garmin G1000 Pilot’s Guide for the Quest Kodiak 100 5-83...
- Page 200 2) Press the MENU Key. 3) Select ‘Activate Leg’. 4) Press the ENT Key. A confirmation window is displayed. 5) With ‘Activate’ highlighted, press the ENT Key. 5-84 Garmin G1000 Pilot’s Guide for the Quest Kodiak 100 190-00590-00 Rev. C...
- Page 201 flight plan is activated. When storing flight plans with an approach, departure or arrival, the G1000 uses the waypoint information from the current database to define the waypoints. If the database is changed or updated, the G1000 automatically updates the information if the procedure has not been modified.
- Page 202 2) Press the CLR Key. A confirmation window is displayed listing the waypoint. 3) Wi th ‘OK’ highlighted, press the ENT Key. To cancel the removal request, highlight ‘CANCEL’ and press the ENT Key. 5-86 Garmin G1000 Pilot’s Guide for the Quest Kodiak 100 190-00590-00 Rev. C...
- Page 203 5) Pr ess the ENT Key. 6) The G1000 displays the location, lat/lon, bearing (BRG), and distance (DIST) to the closest point along the flight plan from the selected reference waypoint. To create a user waypoint at this location and add it to the flight plan, highlight ‘LOAD’...
- Page 204 3) Press the CLR Key to display a confirmation window (Figure 5-75). 4) With ‘OK’ highlighted, press the ENT Key to remove the selected waypoint. Confirmation Window Figure 5-75 Removing a Waypoint 5-88 Garmin G1000 Pilot’s Guide for the Quest Kodiak 100 190-00590-00 Rev. C...
- Page 205 ‘Sort by Comment’ sorts flight plans alphanumerically based upon the comment assigned to each flight plan. Procedures on how to enter a comment (flight plan name) are described in the Active Flight Plan Page section. 190-00590-00 Rev. C Garmin G1000 Pilot’s Guide for the Quest Kodiak 100 5-89...
- Page 206 • CALIBRATE AS (calibrated airspeed) - in auto mode, the primary source of information is from the air data system, and the secondary source of information is the GPS ground speed. 5-90 Garmin G1000 Pilot’s Guide for the Quest Kodiak 100 190-00590-00 Rev. C...
- Page 207 • TRUE AIRSPEED • WIND DIRECTION, WIND SPEED, TAIL or HEAD WIND (only in auto mode) - the head wind is shown as a tail wind value if appropriate. 190-00590-00 Rev. C Garmin G1000 Pilot’s Guide for the Quest Kodiak 100 5-91...
- Page 208 Once the last value is entered, fuel statistics for the direct-to are displayed. Flight Plan Flight Plan Leg Number Number ‘To’ ‘From’ Waypoint Waypoint Figure 5-77 Flight Plan Mode 5-92 Garmin G1000 Pilot’s Guide for the Quest Kodiak 100 190-00590-00 Rev. C...
- Page 209 flight plan number and/or a desired leg of the flight plan instead of waypoints (Figure 5-79). Figure 5-79 Flight Plan and Leg Number Fields 190-00590-00 Rev. C Garmin G1000 Pilot’s Guide for the Quest Kodiak 100 5-93...
-
Page 210: Vertical Navigation
6) Select whether the previously set distance is ‘Before’ or ‘After’ the endpoint. 7) Press the ENT Key. The cursor is now placed over the VNAV profile endpoint field. 5-94 Garmin G1000 Pilot’s Guide for the Quest Kodiak 100 190-00590-00 Rev. C... - Page 211 The VNAV mesages (Figures 5-81 and 5-82) will only be displayed if the VNAV messages are enabled. NOTE: Press the MENU key on the VNAV Page to enable or disable the messages. 190-00590-00 Rev. C Garmin G1000 Pilot’s Guide for the Quest Kodiak 100 5-95...
- Page 212 To view the vertical speed required on any MFD Page, a field in the Navigation Status Bar must be configured to display VSR (Figure 5-84, see the System Setup Page Instructions for details). Figure 5-84 Vertical Navigation Page Menu 5-96 Garmin G1000 Pilot’s Guide for the Quest Kodiak 100 190-00590-00 Rev. C...
-
Page 213: Flight Planning From The Pfd
• Store, invert, or delete flight plan • Load or remove departure, arrival, or approach • Closest Point of FPL • Restore defaults Figure 5-86 Flight Plan Page Menu 190-00590-00 Rev. C Garmin G1000 Pilot’s Guide for the Quest Kodiak 100 5-97... - Page 214 3) Press the MENU Key 4) Highlight ‘Activate Leg’. 5) Press the ENT Key. A confirmation window is displayed with ‘ACTIVATE’ highlighted. 6) Press the ENT Key. 5-98 Garmin G1000 Pilot’s Guide for the Quest Kodiak 100 190-00590-00 Rev. C...
- Page 215 TORE LIGHT The active flight plan is erased when the G1000 is powered off or when another flight plan is activated. When storing flight plans with an approach, departure or arrival, the G1000 uses the waypoint information from the current database to define the waypoints in the flight plan. If the navigation database is changed or updated, the G1000 automatically updates the information if the procedure has not been modified.
- Page 216 3) Press the ENT Key. A window appears with the reference waypoint field highlighted. 4) Enter the identifier of the reference waypoint. 5) Press the ENT Key. The G1000 displays the bearing (BRG) and distance (DIS) to the closest point along the flight plan from the selected reference waypoint.
-
Page 217: Procedures
10) With ‘LOAD’ highlighted, press the ENT Key. The departure procedure is displayed as part of the overall flight plan and is placed in front of the enroute flight plan. 11) Highlight the desired transition waypoint. 190-00590-00 Rev. C Garmin G1000 Pilot’s Guide for the Quest Kodiak 100 5-101... - Page 218 10) Press the FMS Knob to remove the cursor. Airport Symbol Airport Usage Identifier Facility Name Location Available Departures Map Showing Selected Departure List of Legs in Departure Sequence Figure 5-88 Departure Loading Page 5-102 Garmin G1000 Pilot’s Guide for the Quest Kodiak 100 190-00590-00 Rev. C...
- Page 219 1) Select the Approach Information Page. 2) Press the MENU Key. 3) Highlight ‘View Departure Airport’. 4) Press the ENT Key. The Departure Information Page is displayed. 190-00590-00 Rev. C Garmin G1000 Pilot’s Guide for the Quest Kodiak 100 5-103...
- Page 220 3) Press the ENT Key. A confirmation window is displayed listing the procedure. 4) With ‘OK’ highlighted, press the ENT Key. To cancel the removal request, highlight ‘CANCEL’ and press the ENT Key. 5-104 Garmin G1000 Pilot’s Guide for the Quest Kodiak 100 190-00590-00 Rev. C...
- Page 221 8) With ‘LOAD’ highlighted, press the ENT Key. The arrival procedure is displayed as part of the overall flight plan and is placed in front of the enroute flight plan. 1) Press the PROC Softkey. 2) Highlight ‘SELECT ARRIVAL’. 190-00590-00 Rev. C Garmin G1000 Pilot’s Guide for the Quest Kodiak 100 5-105...
- Page 222 View an arrival: 1) Select the Departure Information Page. 2) Press the MENU Key. 3) Highlight ‘View Arrival’. 4) Press the ENT Key. The Arrival Information Page is displayed. 5-106 Garmin G1000 Pilot’s Guide for the Quest Kodiak 100 190-00590-00 Rev. C...
- Page 223 3) Press the ENT Key. A confirmation window is displayed listing the procedure. 4) With ‘OK’ highlighted, press the ENT Key. To cancel the removal request, highlight ‘CANCEL’ and press the ENT Key. 190-00590-00 Rev. C Garmin G1000 Pilot’s Guide for the Quest Kodiak 100 5-107...
- Page 224 ‘ACTIVATE’ adds the approach to the flight plan and begins navigating the approach course. 5-108 Garmin G1000 Pilot’s Guide for the Quest Kodiak 100 190-00590-00 Rev. C...
- Page 225 7) Press the ENT Key. The ‘LOAD?’ field is highlighted. 8) Press the ENT Key to load the approach. If navigating a flight plan previous to loading this approach, the G1000 will continue navigating the flight plan until the approach is activated. 9) Highlight the ‘ACTIVATE’ field.
- Page 226 2) Highlight ‘Remove Departure’, ‘Remove Arrival’, or ‘Remove Approach’ 3) Press the ENT Key. A confirmation window appears listing the procedure that is about to be removed with ‘OK’ highlighted. 4) Press the ENT Key. 5-110 Garmin G1000 Pilot’s Guide for the Quest Kodiak 100 190-00590-00 Rev. C...
- Page 227 2) Turn the large FMS knob to highlight ‘ACTIVATE MISSED APPROACH’. 3) Press the ENT key. A confirmation window will be displayed. 4) With ‘ACTIVATE’ highlighted, press the ENT key. 190-00590-00 Rev. C Garmin G1000 Pilot’s Guide for the Quest Kodiak 100 5-111...
-
Page 228: Departures, Arrivals, And Approaches (Pfd)
SELECT DEPARTURE ‘Select Departure’ selects a published standard instrument departure (SID) for the departure airport or replaces the current departure with a new selection. When using a direct-to, the G1000 uses the nearest airport as a reference when displaying available departures. - Page 229 9) Pr ess the ENT Key. A window appears listing the available runways for the arrival. 10) Select the desired runway. 11) Wi th ‘LOAD?’ highlighted, press the ENT Key to load the arrival. 190-00590-00 Rev. C Garmin G1000 Pilot’s Guide for the Quest Kodiak 100 5-113...
- Page 230 NOTE: If the approach is not approved for GPS, a ‘NOT APPROVED FOR GPS’ message is displayed with ‘YES’ highlighted. Press the ENT Key to acknowledge the message. To cancel the approach, select ‘NO’ and press the ENT Key. 5-114 Garmin G1000 Pilot’s Guide for the Quest Kodiak 100 190-00590-00 Rev. C...
- Page 231 Activating the approach with vectors to final: 1) From an active flight plan, press the PROC Key to display the Procedures Options Window. 2) Highlight ‘ACTIVATE VECTOR-TO-FINAL’. 3) Press the ENT Key. 190-00590-00 Rev. C Garmin G1000 Pilot’s Guide for the Quest Kodiak 100 5-115...
- Page 232 GPS NAVIGATION LANK 5-116 Garmin G1000 Pilot’s Guide for the Quest Kodiak 100 190-00590-00 Rev. C...
-
Page 233: Section 6 Hazard Avoidance
HAZARD AVOIDANCE SECTION 6 HAZARD AVOIDANCE The hazard avoidance features available for the G1000 system are designed to aid situational awareness and provide advisory information with regard to potential hazards to flight safety associated with weather, terrain, and air traffic. - Page 234 6) Press the DONE Softkey. 7) Turn the large FMS Knob to highlight ‘YES’. 8) To complete activation, press the ENT Key. XM Satellite Radio activation instructions are also available at www.garmin.com (P/N 190-00355-04). Audio Radio ID Data Radio ID...
-
Page 235: Using Xm Satellite Weather Products
The Weather Data Link Page is in the Map group of pages. It is the primary starting point for viewing weather data because it can display all available XM weather products. No other G1000 page can display all XM weather products. - Page 236 Data Link Receiver. Weather data is updated at intervals that are defined and controlled by XM Satellite Radio and its data vendors. Garmin G1000 Pilot’s Guide for the Quest Kodiak 100 190-00590-00 Rev. C...
-
Page 237: Weather Softkeys
When a weather product is selected for display, the corresponding softkey label changes to gray. This indicates that the product is enabled. Unavailable weather products have dimmed (disabled) softkey labels. Figure 6-3 Weather Softkeys (Two Tiers) 190-00590-00 Rev. C Garmin G1000 Pilot’s Guide for the Quest Kodiak 100... - Page 238 Never use NEXRAD data or any radar data to penetrate hazardous weather. Rather, use it in an early-warning capacity of pre-departure and enroute evaluation. Garmin G1000 Pilot’s Guide for the Quest Kodiak 100 190-00590-00 Rev. C...
- Page 239 Composite data from all the NEXRAD radar sites in the United States is shown. This data is composed of the maximum reflectivity from the individual radar sweeps. The display of the information is color-coded to indicate the weather severity level. 190-00590-00 Rev. C Garmin G1000 Pilot’s Guide for the Quest Kodiak 100...
- Page 240 (designated by the letter Z). The value of Z increases as the returned signal strength increases. Garmin G1000 Pilot’s Guide for the Quest Kodiak 100 190-00590-00 Rev. C...
- Page 241 • Sun strobes (when the radar antenna points directly at the sun) • Interference from buildings or mountains, which may cause shadows • Metallic dust from military aircraft, which can cause alterations in radar scans 190-00590-00 Rev. C Garmin G1000 Pilot’s Guide for the Quest Kodiak 100...
- Page 242 Displaying Echo Tops information: 1) Select the Weather Data Link Page. 2) Press the ECHO TOPS Softkey. Echo Tops data displays only on the Weather Data Link Page. 6-10 Garmin G1000 Pilot’s Guide for the Quest Kodiak 100 190-00590-00 Rev. C...
- Page 243 Cloud Tops and Echo Tops cannot be turned on at the same time. NOTE: Cloud Tops data (Figure 6-9) shows the altitude at the top of the clouds. This is determined from satellite imagery. Figure 6-9 Cloud Tops Data 190-00590-00 Rev. C Garmin G1000 Pilot’s Guide for the Quest Kodiak 100 6-11...
- Page 244 Lightning data (Figure 6-11) shows the approximate location of cloud-to-ground lightning strikes. Strike location is shown within a two kilometer region. The exact location of the lightning strike is not displayed. Lightning Strikes Figure 6-11 Lightning Data 6-12 Garmin G1000 Pilot’s Guide for the Quest Kodiak 100 190-00590-00 Rev. C...
- Page 245 Cell Movement data is shown with NEXRAD data on most maps. On the Weather Data Link Page, Cell Movement data is shown only when selected. Storm Cells Figure 6-13 Cell Movement Data 190-00590-00 Rev. C Garmin G1000 Pilot’s Guide for the Quest Kodiak 100 6-13...
- Page 246 Convective SIGMET is issued for hazardous convective weather. A localized SIGMET is a significant weather condition occurring at a localized geographical position. SIGMET and AIRMET data display on the Weather Data Link Page (Figure 6-15). Sig/Air Data Figure 6-15 SIG/AIR Data 6-14 Garmin G1000 Pilot’s Guide for the Quest Kodiak 100 190-00590-00 Rev. C...
- Page 247 To display the SIGMET and AIRMET legend (Figure 6-16), select the LEGEND Softkey when SIGMETs and AIRMETs are selected for display. Figure 6-16 SIGMET/AIRMET Legend Figure 6-17 shows sample SIGMET text. Figure 6-17 Sample SIGMET Text 190-00590-00 Rev. C Garmin G1000 Pilot’s Guide for the Quest Kodiak 100 6-15...
- Page 248 3) Press the FMS Knob or the CLR Key to return to the Weather Data Link Page if the airport was selected by panning from this page. 6-16 Garmin G1000 Pilot’s Guide for the Quest Kodiak 100 190-00590-00 Rev. C...
- Page 249 Figure 6-18 METAR and TAF Text on the WPT - Weather Information Page To display the METAR legend (Figure 6-19), press the LEGEND Softkey when METARs are selected for display. Figure 6-19 METAR Legend 190-00590-00 Rev. C Garmin G1000 Pilot’s Guide for the Quest Kodiak 100 6-17...
- Page 250 City Forecast information display on the Weather Data Link Page. Figure 6-20 Current Surface Analysis Data Figure 6-21 12-Hour Surface Analysis Data Figure 6-22 36-Hour Surface Analysis Data Figure 6-23 48-Hour Surface Analysis Data 6-18 Garmin G1000 Pilot’s Guide for the Quest Kodiak 100 190-00590-00 Rev. C...
- Page 251 New data appears at the next update. Figure 6-25 Freeze Level Data 190-00590-00 Rev. C Garmin G1000 Pilot’s Guide for the Quest Kodiak 100 6-19...
- Page 252 2) Press the MORE WX Softkey. 3) Press the FRZ LVL Softkey. Freeze Level data displays on the Weather Data Link page only. It does not display on other G1000 maps. To display the Freeze Level legend (Figure 6-26), press the LEGEND Softkey when Freeze Level is selected to be displayed.
- Page 253 Press the NEXT or PREV Softkey to display additional altitude softkeys. Figure 6-27 Winds Aloft Data at 27,000 Feet 190-00590-00 Rev. C Garmin G1000 Pilot’s Guide for the Quest Kodiak 100 6-21...
- Page 254 National Weather Service (NWS). This can include information on fires, tornadoes, severe thunderstorms, flood conditions, and other natural disasters. Flood Warning Icon Figure 6-29 County Flood Warning 6-22 Garmin G1000 Pilot’s Guide for the Quest Kodiak 100 190-00590-00 Rev. C...
- Page 255 3) Press the CYCLONE Softkey. Cyclone data displays only on the Weather Data Link Page. It does not display on other G1000 maps. To display the Cyclone legend (Figure 6-31), press the LEGEND Softkey when Cyclones are selected to be displayed.
-
Page 256: Setting Up The Weather Data Link Page
Figure 6-33 shows the Data Link Setup Window. The ‘ON’ and ‘OFF’ settings control the display of weather products the same way that softkeys do. Winds Aloft Data Selected Figure 6-33 Data Link Setup Window 6-24 Garmin G1000 Pilot’s Guide for the Quest Kodiak 100 190-00590-00 Rev. C... - Page 257 6) Press the FMS CRSR Knob to return to the Weather Data Link page with the changed settings. OR : Pr ess the MENU Key and then the ENT Key to restore the default settings. 190-00590-00 Rev. C Garmin G1000 Pilot’s Guide for the Quest Kodiak 100 6-25...
- Page 258 AIRMETs, County Warnings, TFRs (Temporary Flight Restrictions), Echo Tops, METARs, SIGMETs, and Cell Movement displays text information for the selection. This information is displayed in the same location as the map pointer information on the Navigation Map Page. 6-26 Garmin G1000 Pilot’s Guide for the Quest Kodiak 100 190-00590-00 Rev. C...
-
Page 259: Setting Up Xm Satellite Weather On The Navigation Map
NAVAIDS, obstacles, and other ground references. NEXRAD Products, Storm Legend, and Age NEXRAD Weather NEXRAD and XM Lightning Icons, 800 Cell Movement nm Range Indication Figure 6-35 Navigation Map Displaying NEXRAD Weather 190-00590-00 Rev. C Garmin G1000 Pilot’s Guide for the Quest Kodiak 100 6-27... - Page 260 Use the Map Setup Window (Figure 6-36) to customize the display of weather data on the Navigation Map Page. The Map Setup Window settings control the display of weather data on all G1000 pages except the Weather Data Link Page.
-
Page 261: Taws
TAWS uses terrain and obstacle information supplied by government sources. The data undergoes verification by Garmin to confirm accuracy of the content, per TSO-C151b. However, the displayed information should never be understood as being all-inclusive. COMPUTING GPS ALTITUDE FOR TAWS TAWS uses information provided from the GPS receiver to provide a horizontal position and altitude. -
Page 262: Using Taws
USING TAWS During G1000 power-up, the terrain/obstacle database versions are displayed along with a disclaimer to the pilot. At the same time, TAWS self-test begins. One of the following aural messages is generated: •... - Page 263 • 360˚ View—Displays surrounding terrain on all sides of aircraft (Figure 6-37). • ARC (120˚) View—Displays terrain ahead of and 60˚ to either side of the aircraft flight path (Figure 6-38). 190-00590-00 Rev. C Garmin G1000 Pilot’s Guide for the Quest Kodiak 100 6-31...
- Page 264 Between 100’ and 1000’ Below the Aircraft Altitude) Black Terrain (No Danger - Terrain More than 1000’ Below the Terrain Legend Aircraft Altitude) Figure 6-38 TAWS Page (120˚ View) 6-32 Garmin G1000 Pilot’s Guide for the Quest Kodiak 100 190-00590-00 Rev. C...
- Page 265 One of the following aural messages is generated: • “TAWS System Test, OK” • “TAWS System Failure” TAWS TEST is annunciated in yellow on the TAWS Page and in white on the PFD. 190-00590-00 Rev. C Garmin G1000 Pilot’s Guide for the Quest Kodiak 100 6-33...
-
Page 266: Taws Symbols
TAWS alerts typically employ either a CAUTION or a WARNING alert severity level, or both. When an alert is issued, visual annunciations are displayed. Aural alerts are simultaneously issued. 6-34 Garmin G1000 Pilot’s Guide for the Quest Kodiak 100 190-00590-00 Rev. C... - Page 267 Press the CLR Key. This acknowledges the pop-up alert and returns to the currently viewed page. • Press the ENT Key. This acknowledges the pop-up alert and accesses the TAWS Page. 190-00590-00 Rev. C Garmin G1000 Pilot’s Guide for the Quest Kodiak 100 6-35...
- Page 268 “Five-Hundred” Excessive Descent Rate Caution (EDR) “Sink Rate” Negative Climb Rate Caution (NCR) “Don’t Sink” “Too Low, Terrain” Indicates the default configuration Table 6-5 TAWS Alerts Summary 6-36 Garmin G1000 Pilot’s Guide for the Quest Kodiak 100 190-00590-00 Rev. C...
- Page 269 During the final approach phase of flight, FLTA alerts are automatically inhibited when the aircraft is below 200 feet AGL while within 0.5 nm of the approach runway or below 125 feet AGL while within 1.0 nm of the runway threshold. 190-00590-00 Rev. C Garmin G1000 Pilot’s Guide for the Quest Kodiak 100 6-37...
- Page 270 3) Press the ENT Key. The TAWS system is inhibited or enabled, depending on the previous status. The annunciation is displayed in the terrain annunciator field whenever terrain is inhibited. 6-38 Garmin G1000 Pilot’s Guide for the Quest Kodiak 100 190-00590-00 Rev. C...
- Page 271 • The distance from the departure airport is 2 nm or less. • The heading change from the heading at the time of departure is less than 110 degrees. 190-00590-00 Rev. C Garmin G1000 Pilot’s Guide for the Quest Kodiak 100 6-39...
- Page 272 TAWS continually monitors several system-critical items such as database validity, hardware status, and GPS status. If the terrain/obstacle database is not available, the aural message “TAWS System Failure” is generated along with a ‘TAWS FAIL’ annunciation. 6-40 Garmin G1000 Pilot’s Guide for the Quest Kodiak 100 190-00590-00 Rev. C...
-
Page 273: Traffic Information Service (Tis)
TIS uses the Mode S transponder for the traffic data link. TIS receives traffic information from ground stations and provides a five-second update rate. The G1000 displays up to eight traffic targets within a 7.5-nm radius, from 3000 feet below to 3500 feet above the requesting aircraft. -
Page 274: Displaying Traffic Data
• AUX - Trip Planning Page • Navigation Map • Nearest Pages • WPT - VOR Information Page • FPL - Active Flight Plan Page • PFD Inset Map 6-42 Garmin G1000 Pilot’s Guide for the Quest Kodiak 100 190-00590-00 Rev. C... -
Page 275: Traffic Map Page
• Traffic status banner - Displays in the lower left corner of the Traffic Map Page. Current Traffic Mode Range Marking Rings Surrounding Traffic Surrounding Traffic Traffic Status Banner Surrounding Traffic Surrounding Traffic Figure 6-48 Traffic Map Page 190-00590-00 Rev. C Garmin G1000 Pilot’s Guide for the Quest Kodiak 100 6-43... - Page 276 TANDBY AND PERATE Once the aircraft is airborne, TIS switches from Standby to Operating mode. The G1000 displays ‘TIS OPERATING’ in the upper left corner and begins to display traffic on the Traffic Map Page. TIS Traffic Advisories (TA) are issued to alert the crew to intruding aircraft.
- Page 277 TIS P OWER The G1000 performs and automatic test during power-up. If TIS passes the power-up test, the standby screen displays on the Traffic Map Page. If the aircraft is airborne during the test, traffic displays on the Traffic Map Page.
- Page 278 • TRFC FAIL - Traffic data has failed. • NO TRFC DATA - Traffic has not been detected. • TRFC UNAVAIL - The traffic service is unavailable or out of range. 6-46 Garmin G1000 Pilot’s Guide for the Quest Kodiak 100 190-00590-00 Rev. C...
-
Page 279: Navigation Map Page
• TRAFFIC LBL – Selects the maximum range at which traffic labels display (from 500 ft to 300 nm, with the option to disable) Figure 6-50 Page Menu 190-00590-00 Rev. C Garmin G1000 Pilot’s Guide for the Quest Kodiak 100 6-47... - Page 280 Figure 6-51 Map Setup Menu TIS LIMITATIONS While the G1000 does not display indications for TIS availability, the service may be unavailable in the radar coverage areas for any of the following reasons: • Radar Out – The radar site may be out of service. If the TIS Mode S sensor is not operational, TIS is not available.
- Page 281 Altitude, Level Flight and Climbing, Moving in the Resulting in Moving in the Direction of the Direction of the Line Coast Mode Line Figure 6-52 Traffic Map Page 190-00590-00 Rev. C Garmin G1000 Pilot’s Guide for the Quest Kodiak 100 6-49...
-
Page 282: Skywatch Traffic Advisory System (Sky497) (Optional)
5) If the self-test fails again, refer to the L-3 Skywatch Pilot’s Guide. Figure 6-53 shows the Traffic Map symbols that display when a user-initiated test is completed successfully: Figure 6-53 User-Initiated Test Results 6-50 Garmin G1000 Pilot’s Guide for the Quest Kodiak 100 190-00590-00 Rev. C... -
Page 283: Skywatch Tas Symbology
3) If ‘Operating Mode’ is selected from the FMS menu, press the ENT Key to confirm and place SKYWATCH in operating mode. 4) To switch to Standby Mode from the Traffic Page, press the STANDBY Softkey. 190-00590-00 Rev. C Garmin G1000 Pilot’s Guide for the Quest Kodiak 100 6-51... - Page 284 6) Press the STANDBY Softkey to place the system in the Standby mode. ‘TAS STANDBY’ displays in the upper left corner of the page. 7) Turn the Joystick clockwise to display a larger area or counter-clockwise to display a smaller area. 6-52 Garmin G1000 Pilot’s Guide for the Quest Kodiak 100 190-00590-00 Rev. C...
- Page 285 SKYWATCH altitude display range is indicated in hundreds of feet relative to the aircraft. In Figure NOTE: 6-54, SKYWATCH indicates that the non-bearing intruder aircraft is at 1100 feet above the aircraft and descending. 190-00590-00 Rev. C Garmin G1000 Pilot’s Guide for the Quest Kodiak 100 6-53...
- Page 286 3) Press the TRAFFIC Softkey. Traffic displays on the Navigation Map (Figure 6-55). Traffic Advisory Non-Bearing Traffic Off Non-Threat Traffic Advisories Scale Banner Traffic Figure 6-55 TAS Traffic on Navigation Map 6-54 Garmin G1000 Pilot’s Guide for the Quest Kodiak 100 190-00590-00 Rev. C...
-
Page 287: Section 7 Automatic Flight Control System
AUTOMATIC FLIGHT CONTROL SYSTEM SECTION 7 AUTOMATIC FLIGHT CONTROL SYSTEM Refer to the Aircraft Flight Manual (AFM) for the installed autopilot. 190-00590-00 Rev. C Garmin G1000 Pilot’s Guide for the Quest Kodiak 100... - Page 288 AUTOMATIC FLIGHT CONTROL SYSTEM LANK Garmin G1000 Pilot’s Guide for the Quest Kodiak 100 190-00590-00 Rev. C...
-
Page 289: Section 8 Additional Features
XM subscription has been activated. If a failure still exists, elementary diagnostic checks of the datalink receiver system are explained in Abnormal Operation at the end of this section. 190-00590-00 Rev. C Garmin G1000 Pilot’s Guide for the Quest Kodiak 100... -
Page 290: Xm Service Activation
XM Information Page and a yellow ‘Activation Required’ message shows up in the center of the Weather Data Link Page (Map Page Group). The ‘Service Class’ refers to the groupings of weather products available for subscription. Garmin G1000 Pilot’s Guide for the Quest Kodiak 100 190-00590-00 Rev. C... -
Page 291: Using Xm Radio
3) Press the RADIO Softkey to show the XM Radio Page where audio entertainment is controlled. Active Channel Channel List Volume Categories Field Field Figure 8-2 XM Radio Page 190-00590-00 Rev. C Garmin G1000 Pilot’s Guide for the Quest Kodiak 100... - Page 292 3) Press the numbered softkeys located on the bottom of the display to directly select the desired channel number. 4) Press the ENT Key to activate the selected channel. Garmin G1000 Pilot’s Guide for the Quest Kodiak 100 190-00590-00 Rev. C...
- Page 293 3) Turn the small FMS Knob to display the ‘Categories’ list. Highlight the desired category with the small FMS Knob and press the ENT Key. Selecting ‘All Categories’ places all channels in the list. Figure 8-3 Categories List 190-00590-00 Rev. C Garmin G1000 Pilot’s Guide for the Quest Kodiak 100...
- Page 294 Softkey is pressed, the volume can also be adjusted using the small FMS Knob.) 3) Press the MUTE Softkey to mute the audio. Press the MUTE Softkey again to unmute the audio. Figure 8-5 Volume Control Garmin G1000 Pilot’s Guide for the Quest Kodiak 100 190-00590-00 Rev. C...
-
Page 295: Abnormal Operation
1) Turn the large FMS Knob to select the AUX Page Group. 2) Turn the small FMS Knob to select the System Status Page. Figure 8-6 LRU Information Window on System Status Page 190-00590-00 Rev. C Garmin G1000 Pilot’s Guide for the Quest Kodiak 100... - Page 296 GDL69A CONFIG Data Link Receiver configuration error, service is required GDL69A FAIL Data Link Receiver has failed, service is required Table 8-1 GDL 69A Data Link Receiver Advisory Messages Garmin G1000 Pilot’s Guide for the Quest Kodiak 100 190-00590-00 Rev. C...
-
Page 297: Annunciations And Alerts
See the G1000 System Annunciations section for more information. • Audio Alerting System: The G1000 system issues audio alert tones when specific system conditions are met. See the Alert Levels Definitions section for more information. -
Page 298: Alert Level Definitions
APPENDIX A ALERT LEVEL DEFINITIONS The G1000 Alerting System, as installed in The Kodiak 100 aircraft, uses three alert levels. • WARNING: This level of alert requires immediate pilot attention. A warning alert is annunciated in the Annunciation Window and is accompanied by a continuous aural tone. Text appearing in the Annunciation Window is RED. - Page 299 PITO OFF L Left pitot heat is off. None PITO OFF R Right pitot heat is off. None PITO OFF L-R Left and right pitot heat are off. None Garmin G1000 Pilot’s Guide for the Quest Kodiak 100 190-00590-00 Rev. C...
-
Page 300: G1000 System Annunciations
The inactive alerts can be removed from the Alert Window by pressing the flashing ALERT Softkey. The G1000 System Messages convey messages to the pilot regarding problems with the G1000 system. When an LRU or an LRU function fails, a large red ‘X’ is typically displayed on windows associated with the failed data. - Page 301 APPENDIX A Upon power-up of the G1000 system, certain windows remain invalid as G1000 equipment begins to NOTE: initialize. All windows should be operational within one minute of power-up. Should any window continue to remain flagged, the G1000 system should be serviced by a Garmin-authorized repair facility.
- Page 302 Display is not receiving valid transponder information. A red ‘X’ through any other display field, such as engine instrumentation fields, Other Various Red X Indications indicates that the field is not receiving valid data. Garmin G1000 Pilot’s Guide for the Quest Kodiak 100 190-00590-00 Rev. C...
-
Page 303: G1000 System Message Advisories
Played when the traffic system fails or can- Available” not communicate. NOTE: Voice alerts are provided to the G1000 by GIA 63/W #1. Should this unit fail, audio and voice alerts will no longer be available. G1000 SYSTEM MESSAGE ADVISORIES This section describes various G1000 system message advisories. - Page 304 Recheck settings. The pilot may reconfigure the MFD & PFD with preferred settings, if desired. XTALK ERROR – A flight display The MFD and PFD are not communicating with each other. The G1000 system should crosstalk error has occurred. be serviced.
- Page 305 PFD1 DB ERR – PFD1 aviation The MFD and/or PFD detected a failure in the aviation database. Attempt to reload database error exists. the aviation database. If problem persists, the G1000 system should be serviced. PFD2 DB ERR – PFD2 aviation database error exists.
- Page 306 Number 1 audio panel self-test has detected a problem in the unit. Certain audio service. Return unit for repair. functions may still be available, and the audio panel may still be usable. The G1000 system should be serviced when possible.
- Page 307 GIA1 SERVICE – GIA1 needs service. Return the unit for repair. The GIA1 and/or GIA2 self-test has detected a problem in the unit. The G1000 system should be serviced. GIA2 SERVICE – GIA2 needs service. Return the unit for repair.
- Page 308 “pressed”) position. Press the PTT switch again to cycle its operation. COM2 PTT – COM2 push-to-talk key If the problem persists, the G1000 system should be serviced. is stuck. COM1 RMT XFR – COM1 remote The COM1 and/or COM2 transfer switch is stuck in the enabled (or “pressed”) posi- transfer key is stuck.
- Page 309 G1000 system should be serviced. transfer key is stuck. G/S1 FAIL – G/S1 is inoperative. A failure has been detected in glideslope receiver 1 and/or receiver 2. The G1000 system should be serviced. G/S2 FAIL – G/S2 is inoperative.
- Page 310 GPS information to augment the lack of airspeed. The G1000 system should be serviced. AHRS1 GPS – AHRS1 using backup The #1 AHRS is using the backup GPS path. Primary GPS path has failed. The G1000 GPS source. system should be serviced when possible.
- Page 311 Config service req’d. The G1000 system should be serviced. GDL69 FAIL – GDL 69 has failed. A failure has been detected in the GDL 69. The receiver is unavailable. The G1000 system should be serviced GDC 74A Message Advisories...
- Page 312 NO WGS84 WPT – Non WGS 84 The selected waypoint [xxxx] does not use the WGS 84 datum. Cross-check position waypoint for navigation -[xxxx] with alternate navigation sources. Garmin G1000 Pilot’s Guide for the Quest Kodiak 100 A-16 190-00590-00 Rev. C...
- Page 313 Miscellaneous Message Advisories (Cont.) Alerts Window Message Comments TRAFFIC FAIL – Traffic device has The G1000 is no longer receiving data from the traffic system. The traffic device failed. should be serviced. STRMSCP FAIL – Stormscope has Stormscope has failed. The G1000 system should be serviced.
-
Page 314: Taws Alerts
GPS signal “TAWS Available” will be heard when sufficient GPS signal is re-established. System Test in progress None None System Test pass None None “TAWS System Test OK” Garmin G1000 Pilot’s Guide for the Quest Kodiak 100 A-18 190-00590-00 Rev. C... -
Page 315: Sd Card Use
1) With the G1000 System OFF, insert the SD card containing the aviation database update into the top card slot of the PFD to be updated (Label of SD card facing left). 2) Turn the G1000 System ON. A prompt similar to the following is displayed in the upper left corner of the PFD: Figure B-1 Database Update Prompt 3) Press the ENT Key to start the database update. -
Page 316: Garmin Databases
6) Repeat steps 1 through 4 for the MFD. The MFD and PFD databases are now updated. Remove the SD card when finished. 7) Verify that the correct update cycle is loaded during startup of the MFD. GARMIN DATABASES The following G1000 databases are stored on Supplemental Data Cards provided by Garmin: • Basemap • Terrain • Airport terrain •... - Page 317 Chartview or FliteCharts database must be inserted into the bottom slot on the MFD. 2) Apply power to the G1000 System. View the MFD power-up splash screen. Check that the databases are initialized and displayed on the scrolling window of the splash screen. When updating the terrain and FliteCharts databases, an ‘in progress’...
- Page 318 4) At the MAP – NAVIGATION MAP Page, select the MAP Softkey and check to make sure that the TOPO and TERRAIN Softkeys are functional (not grayed out) and other database features are functioning. 5) Power down the G1000. Garmin G1000 Pilot’s Guide for the Quest Kodiak 100 190-00590-00 Rev. C...
-
Page 319: Glossary
B ALT barometric altitude BARO barometric setting BATT battery backcourse Bearing The compass direction from the present position to a destination waypoint. beat frequency oscillator BKSP backspace bearing Garmin G1000 Pilot’s Guide for the Quest Kodiak 100 190-00590-00 Rev. C... - Page 320 Cockpit Voice Recorder flight time based on available fuel on board. CVRG coverage engine control wheel steering ENGD engaged cylinder en route D ALT density altitude DB, DBASE database Garmin G1000 Pilot’s Guide for the Quest Kodiak 100 190-00590-00 Rev. C...
- Page 321 Fuel On Board Hold Terminating at Fix flight plan HFOM Horizontal Figure of Merit feet per minute mercury FREQ frequency high freezing HI SENS High Sensitivity Garmin G1000 Pilot’s Guide for the Quest Kodiak 100 190-00590-00 Rev. C...
- Page 322 Uses Grid MORAs to determine left, left runway a safe altitude within ten miles of latitude the aircraft present position. label marker beacon pound Military Operations Area Liquid Crystal Display Garmin G1000 Pilot’s Guide for the Quest Kodiak 100 190-00590-00 Rev. C...
- Page 323 Special Position Identification Push-to-Talk SPKR speaker power squelch SRVC, SVC service quantity STAL stall STAR Standard Terminal Arrival Route right, right runway STATS statistics radial Garmin G1000 Pilot’s Guide for the Quest Kodiak 100 190-00590-00 Rev. C...
- Page 324 UNAVAIL unavailable XFER, XFR transfer user XPDR transponder Coordinated Universal Time XTALK cross-talk UTM/UPS Universal Transverse Mercator / cross-track Universal Polar Stereographic Grid Garmin G1000 Pilot’s Guide for the Quest Kodiak 100 190-00590-00 Rev. C...
-
Page 325: Frequently Asked Questions
APPENDIX D FREQUENTLY ASKED QUESTIONS If a particular aspect of G1000 operational capability is not addressed by these commonly asked questions or in the index, contact Garmin (see the copyright page or back cover for contact information) or a Garmin-authorized dealer. - Page 326 BE FILED USING THE “/G” may be filed for a flight plan. The G1000 System meets the requirements of TSO-C129 Class A1 or A2 installation. Non-precision GPS approaches are not to be flown with an expired database. See the approved Aircraft Flight Manual Supplement (AFMS) as well as the Aeronautical Information Manual (AIM) for more information.
- Page 327 When OBS mode is active, the G1000 allows the pilot to set a desired course to/from a waypoint using the CRS/BARO Knob and HSI (much like a VOR). The most common application for using the OBS Softkey is the missed approach. The G1000 suspends automatic waypoint sequencing (indicated by a “SUSP”...
- Page 328 SCALE CHANGE When 30 nm from the destination, the G1000 begins a smooth CDI scale transition from 5.0 nm (en route mode) to 1.0 nm (terminal mode). When 2 nm from the FAF during an active approach, the CDI scale transitions to 0.3 nm (approach mode).
- Page 329 PFD Inset Map. Surveillance data includes all transponder-equipped aircraft within the coverage volume. The G1000 System displays up to eight traffic targets within a 7.5 nm radius, from 3,000 feet below, to 3,500 feet above the requesting aircraft.
- Page 330 APPENDIX E Garmin is not responsible for Mode S geographical coverage. Operation of the ground stations WARNING: is the responsibility of the FAA. Refer to the AIM for a Terminal Mode S radar site map. TIS is unavailable at low altitudes in many areas of the United States. This is often the case in NOTE: mountainous regions.
- Page 331 Item Symbol Intersection Non-Threat Traffic LOM (compass locator at outer marker) Proximity Advisory NDB (Non-directional Radio Beacon) Traffic Advisory, Out of Range VOR/DME Traffic Advisory VOR/ILS VORTAC TACAN Garmin G1000 Pilot’s Guide for the Quest Kodiak 100 190-00590-00 Rev. C...
- Page 332 Yellow Obstacle within 1000 ft of (CAUTION) aircraft altitude Gray Obstacle more than 1000 (NO DANGER) ft below aircraft altitude Table F-1 Obstacle Symbols and Colors Garmin G1000 Pilot’s Guide for the Quest Kodiak 100 190-00590-00 Rev. C...
- Page 333 Yellow (CAUTION) Terrain between 100 ft and 1000 ft of aircraft altitude Black (NO DANGER) Terrain more than 1000 ft below aircraft altitude Potential Impact Points Figure F-2 TAWS Symbols & Colors Garmin G1000 Pilot’s Guide for the Quest Kodiak 100 190-00590-00 Rev. C...
- Page 334 Wind Vector Unanchored Flight Path Waypoint Measuring Pointer Top of Descent (TOD) Overzoom Indicator Bottom of Descent (BOD) Terrain Proximity or TAWS Enabled Navigating using Dead Reckoning Traffic Enabled Garmin G1000 Pilot’s Guide for the Quest Kodiak 100 190-00590-00 Rev. C...
- Page 335 Data Link Receiver ----------------------------------------- 1-4 1-10–1-11 Date and time ---------------------------------------------1-25 Attitude Indicator -------------------------------------2-2, 2-6 Decision Height (DH) -------------------------------------2-23 Audio alerting system ------------------------------------- A-1 Declutter ---------------------------------------------------5-26 Audio Panel--------------------------------------------1-2, 1-9 Levels ----------------------------------------------------5-18 190-00590-00 Rev. C Garmin G1000 Pilot’s Guide for the Quest Kodiak 100...
- Page 336 Planning ----------------------------------5-25, 5-92–5-93 LD APR softkey ------------------------------------------ 5-109 Quantity --------------------------------------- 3-3, 3-5, 3-7 LD DP softkey-------------------------------------- 5-78, 5-80 Range ring ----------------------------------------------5-13 LD STAR softkey----------------- 5-83, 5-84, 5-105, 5-106 Garmin G1000 Pilot’s Guide for the Quest Kodiak 100 190-00590-00 Rev. C...
- Page 337 Nav radio selection ---------------------------------------4-15 RADIO softkey ---------------------------------------------- 8-3 Nearest --------------------------------------------------5-59 Range------------------------------------------------- 5-9, 5-91 Nearest Range, aircraft---------------------------------------- 3-7–3-8 Airports -----------------------------------1-30, 5-53–5-56 Receiver Autonomous Integrity Monitoring (RAIM) -- D-1 Intersection ---------------------------------------------5-58 190-00590-00 Rev. C Garmin G1000 Pilot’s Guide for the Quest Kodiak 100...
- Page 338 Format ---------------------------------------------------1-25 Volume ------------------------------------------------------ 8-6 Offset ----------------------------------------------------1-25 VOL Softkey ------------------------------------------------- 8-6 Frequency -----------------------------------------------5-62 TA ------------------------------------------------------------ A-7 Information ------------------------------------- 5-45–5-46 TAF ----------------------------------------------------------6-16 Nearest ------------------------------------------ 5-60–5-61 TAS --------------------------------------------------------- A-14 Recent ---------------------------------------------------5-46 Garmin G1000 Pilot’s Guide for the Quest Kodiak 100 190-00590-00 Rev. C...
- Page 339 XM LTNG Softkey -----------------------------------------6-13 XM radio entertainment ---------------------------------4-35 XM Satellite Radio ----------------------------------------- 1-4 XM satellite radio -------------------------------------8-1, 8-3 XM service activation ------------------------------------- 8-2 Zoom Auto------------------------------------------------------- 5-6 Range ----------------------------------------------------5-26 190-00590-00 Rev. C Garmin G1000 Pilot’s Guide for the Quest Kodiak 100...
- Page 340 INDEX LANK Garmin G1000 Pilot’s Guide for the Quest Kodiak 100 190-00590-00 Rev. C...
Need help?
Do you have a question about the G1000 and is the answer not in the manual?
Questions and answers