Hans Grohe Metris S 04135 0 Series Installation Instructions / Warranty
Hide thumbs
Also See for Metris S 04135 0 Series:
- Installation/user instructions/warranty (20 pages)
Table of Contents
Advertisement
Quick Links
Advertisement
Table of Contents

Related Manuals for Hans Grohe Metris S 04135 0 Series


Summary of Contents for Hans Grohe Metris S 04135 0 Series
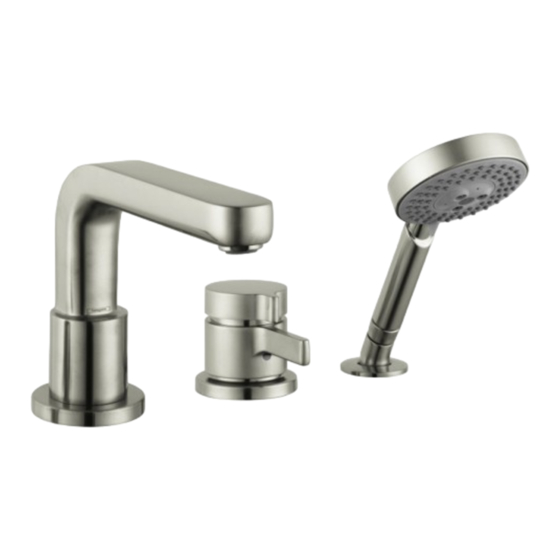
- Page 1 Installation Instructions / Warranty Metris S Talis S Focus S Solaris E 04135XX0 04136XX0 04137XX0 04138XX0 Allegro E Metro E Swing C 04139XX0 04140XX0 04143XX0 Metris S Talis S Focus S Solaris E 04126XX0 04127XX0 04128XX0 04129XX0 Allegro E Metro E Swing C 04130XX0 04131XX0...
- Page 2 Two-hole thermostatic tub filler -- requires rough 04125181 04135XX0 04136XX0 04137XX0 04138XX0 04139XX0 04140XX0 04143XX0...
- Page 3 Three-hole thermostatic tub filler -- requires rough 04124181 04126XX0 04127XX0 04128XX0 04129XX0...
-
Page 4: Technical Information
04130XX0 04131XX0 04134XX0 Technical Information Recommended water pressure 45 - 72 psi Recommended hot water temp. 120� - 140� F* Max. hot water temp 165�F* Max. flow rate 8 gpm Max. flow rate – handshower 2.5 gpm Safety stop 100° F *Please know and follow all applicable local plumbing codes when setting the temperature on the water heater. - Page 5 Install the valve trim Push the escutcheon over the valve. Install the handle. Tighten the screw with a 3 mm Allen wrench. The screw must engage the slot on the cartridge. Justify the handle. Set the high temperature limit stop. slot Install the spout Remove the plug.
- Page 6 Install the handshower Pull the end of the handshower hose from the holder. Push the escutcheon over the end of the hose. Push the elbow firmly over one end of the handshower hose. Tighten the hose nut. Thread the hose down through the handshower holder escutcheon and handshower holder.
- Page 7 Set the high temperature limit stop Turn the water on to the tub spout or handshower. Use a 3 mm Allen wrench to loosen the handle screw. Remove the handle from the valve. Carefully remove the retainer clip and the limit stop ring.
- Page 8 Install the stop ring so that it is against the stop -- you should not be able to turn the stem further counter-clockwise. Install the retainer clip. Install the handle. Tighten the screw. Justify the handle. Justify the handle Turn the water on to the tub spout or handshower. Place a thermometer in the water stream.
- Page 9 Loosen the handle screw with a 3 mm Allen wrench. Remove the handle. Hold the handle lever in one hand. With the other hand, turn the temperature control knob until the 100° mark is next to the indexing mark on the handle. Install the handle on the valve.
- Page 10 User Instructions - ThermoBalance valve Turn the lever clockwise to send the water to one function, counter-clockwise to send the water to the second function. The center position is off. Turn the temperature control knob clockwise to function 2 make the water cooler. Turn the knob counter-clockwise to make the water warmer.
- Page 11 If scale deposits build up on the spray face, pour about ¾" of a commercial scale remover, such as LimeAway™ or CLR™, into a shallow dish. Follow the label instructions with regard to dilution. Soak the spray face for the amount of time specified in the label instructions.
- Page 12 Grasp the wrench flats on the cartridge stop unit with a wrench. Hold the stop unit still with one wrench. Use a second wrench or a 17mm deep socket wrench to unscrew and remove the thermostatic cartridge. Failure to hold the stop unit steady may result in damage to the ceramic plates.
-
Page 13: Replacement Parts
Replacement parts... -
Page 14: Troubleshooting
Solaris E handle 88530XX0 Talis S handle 88549XX0 C handle 88610XX0 Metris S handle 88713XX0 Focus S handle 88714XX0 Allegro E handle 88719XX0 Metro E handle 88721XX0 handle escutcheon 88734XX0 elbow 28071XX0 handshower escutcheon 97159XX0 check valve 94074000 spout sealing ring 88512000 aerator 13956XX0... -
Page 15: Limited Lifetime Consumer Warranty
Cleaning Recommendation for Hansgrohe Products Modern lavatory faucets, kitchen faucets, and showers consist of very different materials to comply with the needs of the market with regard to design and functionality. To avoid damage and returns, it is necessary to consider certain criteria when cleaning. - Page 16 maintenance, misuse, abuse, negligence, accident or alteration, or (2) the use of abrasive or caustic cleaning agents or “no-rinse” cleaning products, or the use of the product in any manner contrary to the product instruc- tions. (3) Conditions in the home such as excessive water pressure or corrosion. C.
Need help?
Do you have a question about the Metris S 04135 0 Series and is the answer not in the manual?
Questions and answers