Advertisement
Quick Links
UTV/Rockcrawler Quad Camera and DVR Monitor
Please read thoroughly before starting installation and check that kit contents are complete.
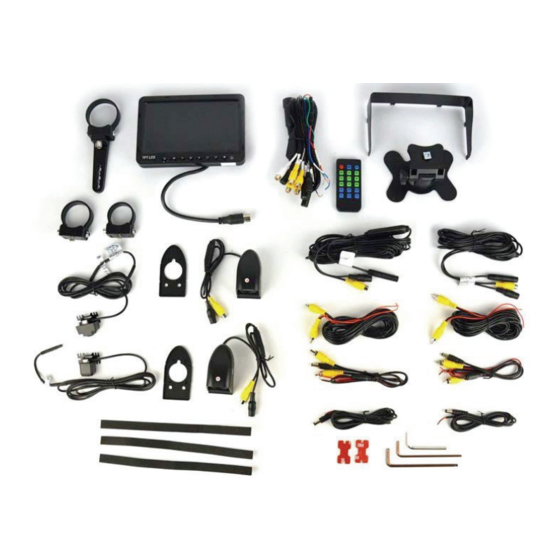
Items Included in the Kit:
Roll Bar Mounts (1.5" 1.75" 2")
7" Quad Screen Monitor with DVR
IR Remote
Monitor Sun Shade
Left & Rear Side View Camera's W/Cables
Front Camera W/Extension cable
Rear Infrared Camera W/Extension cable
SUTV-1040 Miscellaneous Parts Package
SUTV-1040 3-12-2018
(Kit #SUTV-1040)
Tools & Supplies Needed:
Plastic Trim Removal Tool
Phillips Screwdriver
Center Punch/Scribe Tool
Power Drill
1/2" Drill Bit
Wire Ties
Soldering Iron & Solder
Tape or Heat Shrink Electrical Tubing
Page 1 of 12
(Recommended)
Advertisement

Related Manuals for BrandMotion SUTV-1040


Summary of Contents for BrandMotion SUTV-1040
- Page 1 Left & Rear Side View Camera’s W/Cables 1/2” Drill Bit Front Camera W/Extension cable Wire Ties Rear Infrared Camera W/Extension cable Soldering Iron & Solder (Recommended) SUTV-1040 Miscellaneous Parts Package Tape or Heat Shrink Electrical Tubing SUTV-1040 3-12-2018 Page 1 of 12...
-
Page 2: Safety Precautions
• Only perform this task if confidence, skill, and physical ability permit. NOTE: We strive to provide accurate and up-to-date installation instructions. For additional assistance please call Brandmotion Technical Assistance at (734) 619-1250 then dial 2. Monitor bracket installation SUTV-1040 3-12-2018... - Page 3 Brackets: The SUTV kit comes with 3 different sizes Monitor mounting brackets depending on your mounting application. Step 2: After choosing the proper size use supplied foam and apply to inner ring of bracket. Then follow pictures to assemble bracket and mount SUTV-1040 3-12-2018 Page 3 of 12...
- Page 4 SUTV-1040 3-12-2018 Page 4 of 12...
- Page 5 SUTV-1040 3-12-2018 Page 5 of 12...
- Page 6 SUTV-1040 3-12-2018 Page 6 of 12...
- Page 7 Left & Right-Side View Camera Installation: When installing side view cameras always make sure the red arrow is facing upwards. Step 1: Disassemble for mounting. SUTV-1040 3-12-2018 Page 7 of 12...
- Page 8 Step 2: Using rubber gasket find good mounting location and drill hole for routing harness. Step 3: Align Camera to desired location and mount using Front & Rear mounting holes. Step 4: Reassemble side view Camera. Follow your disassembly steps in reverse order SUTV-1040 3-12-2018 Page 8 of 12...
- Page 9 Front & Rear Camera Installation: For mounting the Front & Rear Cameras. Find a flat and level Mounting location. Clean the area with Alcohol prep cleaner and mount to desired location. Mounting bracket can be mounted ether direction as long as arrow faces up on Camera. Front Camera: Front Camera Mounting. SUTV-1040 3-12-2018 Page 9 of 12...
- Page 10 Rear Camera: Rear Camera Mounting. SUTV-1040 3-12-2018 Page 10 of 12...
- Page 11 Trigger wires are only needed for auto switching inputs. Can Manual switch video inputs on monitor. SUTV Kit Wiring Red ACC Power Black Ground Trigger 1 Video 1 Trigger 2 Video 2 Trigger 3 Video 3 Trigger 4 Video 4 SUTV-1040 3-12-2018 Page 11 of 12...
- Page 12 Also needs the composite video output cable ran to Video inputs on monitor. (1-4). Can be hooked up to desired orientation on video screen. All outside connections please use supplied heat shrink as to not VOID WARRANTY. SUTV-1040 3-12-2018 Page 12 of 12...
- Page 13 REQUIRED VIDEO SETTING CHANGE: In order to properly use the supplied cameras, the system must be changed from PAL to NTSC. Follow these steps to make the change. 1. Insert a 2032 sized battery into the included remote. 2. Press the ENT key in the center to bring up the login menu 3.
- Page 14 5. Select PAL and change to NTSC 6. Select OK to confirm. 7. Press EXIT to close menus. VIDEO PLAYER FIX: If you are unable to view you .avi movie of the recording, please download this player. It will play the recordings no matter how long or short it is. http://www.videolan.org/vlc/...
Need help?
Do you have a question about the SUTV-1040 and is the answer not in the manual?
Questions and answers