Table of Contents
Advertisement
Quick Links
Infared Dual Mount Universal CMOS Camera with Optional Gridlines Installation Instructions
Please read thoroughly before starting installation and check that kit contents are complete.
Items Included in Kit:
Chassis Harness
Power Harness with RCA connectors
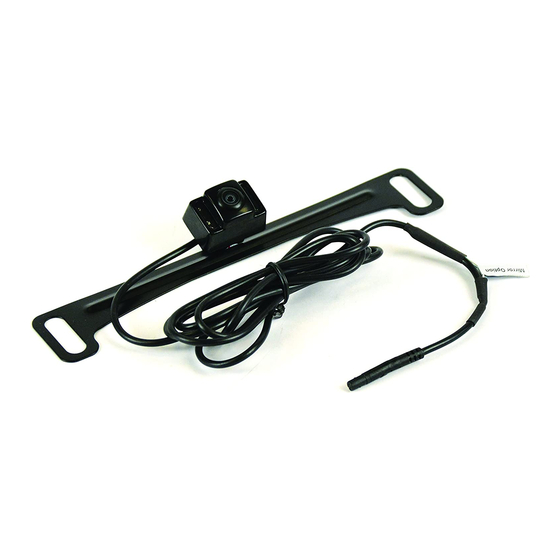
Camera mounted on license plate bracket
Small bag containing:
Two Screws
Allen Wrench
Alternate Camera Mount with Double-sided
Adhesive Foam
Instructions
Safety Precautions:
Work in well ventilated area that is clear of obstructions.
•
Secure vehicle with tire chucks in both front and rear of tires.
•
Turn vehicle accessories OFF and ensure ignition key is in OFF position.
•
Wear safety goggles and snug fitting clothes.
•
Use tools only for their intended purpose and which are in good repair.
•
Only perform this task if confidence, skill, and physical ability permit.
•
NOTE: We strive to provide accurate and up-to-date installation instructions. The latest full color
Step 1: Select and Install Camera Bracket
Determine which of the two supplied camera
mounting methods you prefer.
License Plate Bracket
Alternate Camera Mount Bracket
Place camera in desired position to confirm fitment
(Note: Some states prohibit items blocking the license
plate; check local authorities to confirm legal status for
your application).
7611 Instructions 5-28-14.docx
(Kit # FLTW-7611)
instructions can be accessed at www.brandmotion.com
Page 1 of 3
Tools & Supplies Needed:
¼" Drill Bit
Power Drill
Multi-meter or computer-safe test light
Ground Eyelet (recommended)
Soldering Iron
Wire Ties or Electrical Tape
Solder (recommended) or T-Taps
Plastic trim removal tool
Rubber Grommet or Silicone Caulk
(recommended)
Vehicle service manual (if needed)
Small sheet metal screws (recommended for
Alternative Camera Mount install)
If using License Plate Bracket, remove license plate.
Reattach license plate securing bracket behind.
If using Alternate Camera Mount Bracket, remove
camera from License Plate Bracket using supplied Allen
wrench. Attach camera to the Alternate Camera Mount
bracket and apply supplied self-adhesive foam to mount.
Use the Template included in the Installation
Instruction Overview to position the Alternate Camera
Mount on vehicle
Clean vehicle surface to which mount is to be
attached and affix with self-adhesive foam.
RECOMMENDED: Permanent attachment using screws.
Step 2: Measure, mark, and drill ¼" hole for
camera harness. NOTE: If your vehicle has a liftgate
panel/trunk trim cover, it must be removed.
Advertisement
Table of Contents

Related Manuals for BrandMotion FLEETWORKS FLTW-7611


Summary of Contents for BrandMotion FLEETWORKS FLTW-7611
- Page 1 Only perform this task if confidence, skill, and physical ability permit. • NOTE: We strive to provide accurate and up-to-date installation instructions. The latest full color instructions can be accessed at www.brandmotion.com Step 1: Select and Install Camera Bracket If using License Plate Bracket, remove license plate.
- Page 2 Infared Dual Mount Universal CMOS Camera with Optional Gridlines Installation Instructions (Kit # FLTW-7611) Step 3: Determine location of vehicle power and Step 5: Insert the connector end of the Camera ground. Using a vehicle specific service guide and/or Harness through the hole you drilled. specific wiring diagram and a multi-meter or computer- (RECOMMENDED: Protect Camera Harness from sharp safe test light, locate which side of the vehicle contains...
- Page 3 Infared Dual Mount Universal CMOS Camera with Optional Gridlines Installation Instructions (Kit # FLTW-7611) Step 13: Test the system. Inspect that all connections Step 9: Secure Camera Harness to existing vehicle are proper and secure. Clear all loose items removed from wiring.
Need help?
Do you have a question about the FLEETWORKS FLTW-7611 and is the answer not in the manual?
Questions and answers