Advertisement
Advertisement
Table of Contents

Related Manuals for Xterra FS3.9e


Summary of Contents for Xterra FS3.9e
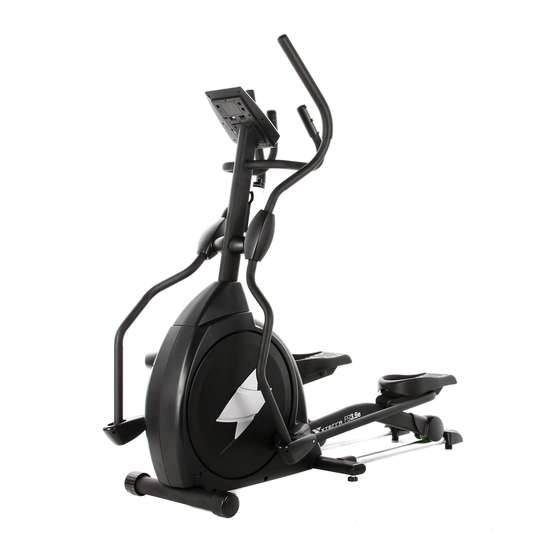
- Page 1 FS3.9e ELLIPTICAL...
-
Page 2: Table Of Contents
TABLE OF CONTENTS Important Safety Instructions Important Operation Instructions Transport Assembly Instructions Lubrication & Transport Operation of Your Console Heart Rate Programs Exploded View Diagram Parts List ATTENTION THIS ELLIPTICAL IS INTENDED FOR RESIDENTIAL USE ONLY AND IS WARRANTED FOR THE APPLICATION. -
Page 3: Important Safety Instructions
Important Safety Instructions When using an electrical appliance, basic precautions should always be followed, including the following: Read all instructions before using this appliance. DANGER - To reduce the risk of electric shock: 1. Always unplug this appliance from the electrical outlet immediately after using and before cleaning. WARNING - To reduce the risk of burns, fire electric shock, or injury to persons: 1. -
Page 4: Important Operation Instructions
IMPORTANT ELECTRICAL INSTRUCTIONS WARNING! NEVER remove any cover without first disconnecting AC power supply. If A.C. voltage varies by ten percent (10%) or more, the performance of your elliptical may be affected. Such conditions are not covered under your warranty. If you suspect the voltage is low, contact your local power company or a licensed electrician for proper testing. - Page 5 ASSEMBLY PACK CHECKLIST HARDWARE STEP 1 #97. 5/16” × 23 × 1.5T_ #102. 5/16” × 23 × 2T_ Flat Washerr (4pcs) Curved Washer (2pcs) #78. M5 x 10m/m #70. 5/16” × 15m/m_ Phillips Head Screw (4pcs) Hex Head Bolt (6pcs) * these four screws are attached in the back of the console HARDWARE STEP 2...
- Page 6 HARDWARE STEP 3 #71. 5/16” × 32m/m_ #105. 5/16” × 7T_ #89. 3/8” × 7T_ Hex Head Bolt (2 pcs) Nyloc Nut (2 pcs) Nyloc Nut (2 pcs) #94. 3/8” × 19 × 1.5T_ #98. 5/16” × 20 × 1.5T_ Flat Washer (2 pcs) Flat Washer (4 pcs) #77.
- Page 7 ASSEMBLY TOOLS #108. Combination M5 Allen Wrench & Phillips Head Screw Driver (1 pc) #110. 12m/m Wrench ( 1pc) #111. 13/14m/m Wrench ( 2pcs) ASSEMBLY UNPACKING THE UNIT 1. 1. Using a razor knife (Box Cutter) cut the outside, bottom, edge of box along the dotted Line.
-
Page 8: Assembly Instructions
ASSEMBLY INSTRUCTIONS CONSOLE MAST ASSEMBLY 1. Locate the Console Mast (10) and Console Mast Cover (41) and slide the Cover onto the Mast as far as it will go. Make sure the Console Mast Cover (41) is facing the correct way. 2. - Page 9 HANDLE BAR ASSEMBLY 1. Install the 2pcs of Ø 17 Wave Washers (101) onto the Left and Right side of the Handle Bar axle. 2. Slide the Lower Left and Right Lower Handle Bars (4 & 5) onto the appropriate side of the axle.
- Page 10 CONNECTING ARM ASSEMBLY 1. Align the hole in the end of the Connecting arms (L & R)(7 & 8)(pivoting rod end) with the hole in the bracket of the Lower Handle Bars (L & R)(4 & 5). The rod end should be on the inside of the Lower Handle Bars (L &...
- Page 11 PLASTICS ASSEMBLY 1. Install the Connecting Arm Covers (L & R) (59 & 60) over the connection of the rod end and Lower Handle Bars (L & R) (4 & 5) with 4pcs of M5 x 15m/m Phillips Head Screws(79) and 2pcs of Ø 3.5 × 12m/m Sheet Metal Screws (84) by using the Combination M5 Allen Wrench &...
-
Page 12: Lubrication & Transport
LUBRICATION 1. Pour 2c.c of the lubricant under the middle of Rail. You must be pour lubricant each three months. 2. If the user felt the exercise is not smooth or there were some noise during exercising, please pour 2 c.c.of the lubricant on the middle of Rails. ... -
Page 13: Operation Of Your Console
OPERATION OF YOUR CONSOLE Starting a program Quick Start After the console power on you must to set date and time by rotating Enter key, then press Enter key to confirm. After finishing the installation time you may press the Start key to begin, this will initiate the Quick Start mode. - Page 14 Manual After power up, or reset, highlight the Manual icon at the bottom of the display and press Enter key. The profile will be blinking and you may rotate the Enter key to adjust the program workload and then press Enter. The Time window will now be blinking. Rotate the Enter key to adjust the program Time and then press Enter.
- Page 15 You may use the Enter key to choose either 55%, 75%, 90% or THR. The percentage choices will automatically set the target to a percent of your maximum heart rate, based on your age. This is why it is important to adjust the age properly. The console will use a formula to determine the correct percentage: 220 –...
-
Page 16: Heart Rate Programs
HEART RATE PROGRAMS Before we get started, a word about Heart Rate: The old motto, “no pain, no gain”, is a myth that has been overpowered by the benefits of exercising comfortably. A great deal of this success has been promoted by the use of heart rate monitors. With the proper use of a heart rate monitor, many people find that their usual choice of exercise intensity was either too high or too low and exercise is much more enjoyable by maintaining their heart rate in the desired benefit range. - Page 17 RATE OF PERCEIVED EXERTION Heart rate is important but listening to your body also has a lot of advantages. There are more variables involved in how hard you should workout than just heart rate. Your stress level, physical health, emotional health, temperature, humidity, the time of day, the last time you ate and what you ate, all contribute to the intensity at which you should workout.
-
Page 18: Exploded View Diagram
EXPLODED VIEW DIAGRAM... -
Page 19: Parts List
PARTS LIST DESCRIPTION O'TY Main Frame Pedal Arm (L) Pedal Arm (R) Lower Handle Bar (L) Lower Handle Bar (R) Bushing Housing, Pedal Arm Connecting Arm (L) Connecting Arm (R) Cross Bar Console Mast Idler Wheel Assembly Crank Axle Swing Arm (L) Swing Arm (R) Rail Tube Rail Strap... - Page 20 DESCRIPTION O'TY Pedal Arm Cover (L) Pedal Arm Cover (R) Pedal (L) Pedal (R) Slide Wheel Cover Button Head Plug Front Handle Bar Cover (L) Rear Handle Bar Cover (L) Front Handle Bar Cover (R) Rear Handle Bar Cover (R) Round Cap Connecting Arm Cover (L) Connecting Arm Cover (R)
- Page 21 DESCRIPTION O'TY 5/16" × 23 × 1.5T_Flat Washer 5/16" × 20 × 1.5T_Flat Washer 1/4" × 19m/m_Flat Washer J Bolt Ø 17_Wave Washer 5/16" × 23 × 2T_Curved Washer M8 × 20m/m_Carriage Bolt Ø 17 × Ø 23.5 × 1T_Flat Washer 5/16"...
Need help?
Do you have a question about the FS3.9e and is the answer not in the manual?
Questions and answers
Where do I put in the powercable?