
Subscribe to Our Youtube Channel
Related Manuals for Vega HAN 8D


Summary of Contents for Vega HAN 8D
- Page 1 Supplementary instructions Plug connector Harting HAN 8D for continuously measuring sensors Document ID: 30376...
-
Page 2: Table Of Contents
Please note the Ex-specific safety information for installation and op- eration in Ex areas. These safety instructions are part of the operating instructions and come with the Ex-approved instruments. Editing status: 2019-09-17 Plug connector Harting HAN 8D • for continuously measuring sensors... -
Page 3: For Your Safety
Those are sensors whose power supply and measurement signal are transmitted over two separate pairs of wires. General safety instructions The safety information in the operating instructions manual of the respective sensor must be noted. Plug connector Harting HAN 8D • for continuously measuring sensors... -
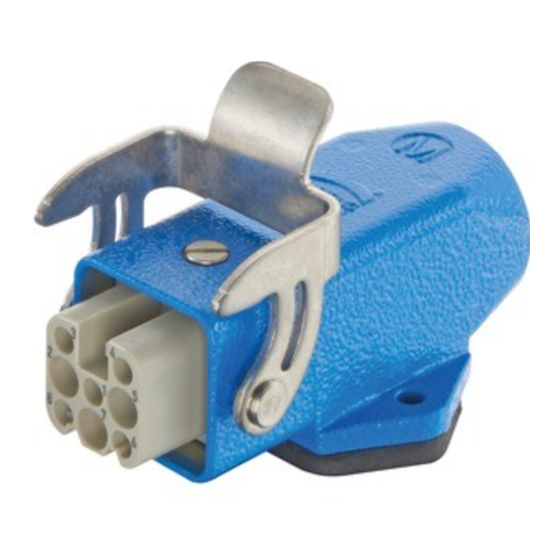
Page 4: Product Description
The connector housing is available in straight and bent version. Fig. 1: Configuration plug connector Harting HAN 8D - Example straight version Connection cable Counter nut... - Page 5 2 Product description Fig. 2: Plug connector Harting HAN 8D - straight and bent version Straight version Bent version Application area The plug connector is used instead of the cable gland in the single or double chamber housing. It is available Ex factory, either integrated in the sensor or unassembled as retrofitting set.
-
Page 6: Mounting
3. Screw in the plug connector and secure it with the counternut 4. Connect the wires according to chapter "Connect" The mounting of the plug connector is finished. Disassembly is carried out in reverse order. Plug connector Harting HAN 8D • for continuously measuring sensors... -
Page 7: Connecting To Power Supply
6. Snap the contact socket from the rear into the socket insert 7. Screw the socket insert into the connector housing 8. Put the screwed housing and the connector housing together and close the safety catch Plug connector Harting HAN 8D • for continuously measuring sensors... -
Page 8: Wiring Plan
Power supply/- Green/Yellow Shielding Additional current output Contact Colour, connection ca- Terminal, elec- Function/Po- ble in the sensor tronics module larity Black Terminal 7 Power supply/+ Blue Terminal 8 Power supply/- Plug connector Harting HAN 8D • for continuously measuring sensors... - Page 9 4 Connecting to power supply Contact Colour, connection ca- Terminal, elec- Function/Po- ble in the sensor tronics module larity Green/Yellow Shielding Plug connector Harting HAN 8D • for continuously measuring sensors...
-
Page 10: Supplement
Pollution degree Electrical protective measures Protection rating - plug connector, sepa- IP 65 rate in locked status Protection rating - plug connector The lower protection category applies mounted on the sensor Plug connector Harting HAN 8D • for continuously measuring sensors... -
Page 11: Dimensions
5 Supplement Dimensions Fig. 8: Harting plug connector Plug connector Harting HAN 8D • for continuously measuring sensors... - Page 12 Subject to change without prior notice © VEGA Grieshaber KG, Schiltach/Germany 2019 VEGA Grieshaber KG Phone +49 7836 50-0 Am Hohenstein 113...
Need help?
Do you have a question about the HAN 8D and is the answer not in the manual?
Questions and answers