Table of Contents

Subscribe to Our Youtube Channel
Related Manuals for Satel INT-IORS


Summary of Contents for Satel INT-IORS
- Page 1 INT-IORS DIN rail-mounted zone and output expander INT-ORS DIN rail-mounted output expander Firmware version 6.01 int-iors_en 08/22 SATEL sp. z o.o. • ul. Budowlanych 66 • 80-298 Gdańsk • POLAND tel. +48 58 320 94 00 www.satel.eu...
- Page 2 Changes, modifications or repairs not authorized by the manufacturer shall void your rights under the warranty. SATEL aims to continually improve the quality of its products, which may result in changes in their technical specifications and software. Current information about the changes being introduced is available on our website.
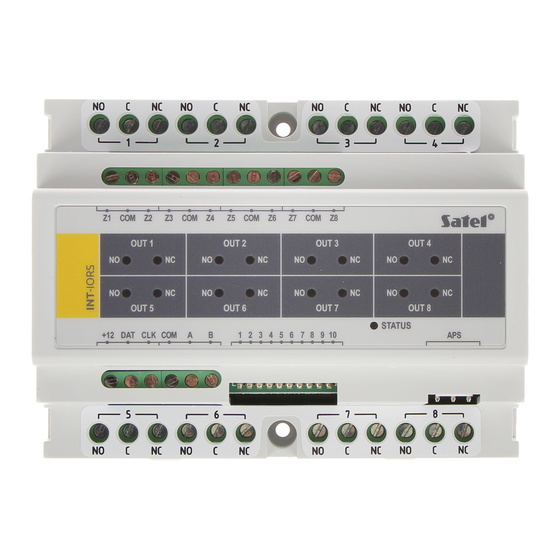
- Page 3 The INT-IORS expander enables the system to be expanded by 8 programmable wired zones and 8 programmable wired outputs. It is supported by: INTEGRA-series alarm control panels, ACCO-NT access control panels. The INT-ORS expander enables the system to be expanded by 8 programmable wired outputs.
- Page 4 – communication with the control panel OK. ” DIP-switches used to configure the expander (see “Configuring the expander connector for a SATEL power supply unit (e.g. APS-412). 4. Configuring the expander Address setting An individual address must be set in the expander. It must be different from that in the other devices connected to the communication bus.
- Page 5 If the SATEL power supply is connected to the expander connector, the expander will be identified as an expander with power supply. The INT-IORS expander is an exception. It will be identified as an expander with power supply when no power supply is connected to its connector, if: 10-position DIP-switch: switch 10 is set in ON position, 6-position DIP-switch: switch 6 is set in OFF position.
- Page 6 Table 4. 6-position DIP-switch Use the switch 6 to select the type of device – see table 5 for the INT-IORS expander and table 6 for the INT-ORS expander. Set the switch 6 in OFF position if the expander is connected to one of the control panels: ...
- Page 7 SATEL INT-IORS / INT-ORS 5. Depending on the selected method of expander powering, connect the SATEL power supply unit to the dedicated expander connector or connect the power leads to the +12 and COM terminals (the expander may be powered directly from the control panel, from an expander with power supply or from a power supply unit).
- Page 8 1. Use the RS-485 bus to connect the expander to the ACCO-USB converter (see the ACCO-USB converter manual). 2. Connect the ACCO-USB converter to the computer USB port. 3. Download the program for updating the expander firmware from support.satel.pl. 4. Launch the program. 5. Click on the button.
Need help?
Do you have a question about the INT-IORS and is the answer not in the manual?
Questions and answers