
Related Manuals for Emax Tinyhawk II


Summary of Contents for Emax Tinyhawk II
- Page 1 Thanks for purchasing the Tinyhawk II. Designed in California, assembled in China.
-
Page 2: Precautions
Please fly in a safe area away from people Do not modify or use other parts and accessories not approved for the use of EMAX. Do not use this product in harsh environments (such as winds, rain, lightning, snow, etc.). -
Page 3: Table Of Contents
Changing VTX setting via Betaflight OSD............... 6 Tinyhawk II All-in-One Flight Controller................8 Emax On-Board Receiver....................8 Binding Procedure......................8 Emax Tinyhawk II Flight Controller (FC)................9 Stock Flight Controller Settings..................9 Adjusting Software Settings (Betaflight Configurator)..........9 Reprogramming Tinyhawk II Flight Controller............10 Set the Correct Settings..............错误!未定义书签。... -
Page 4: Disclaimer
Product list 1. Tinyhawk II × 1 2. Instruction manual × 1 3. Emax 1s HV 450 mAh × 1 4. Emax 2s HV 300 mAh × 1 5. Charger × 1 6. Extra Propeller Set (2x CW, 2x CCW) 7. -
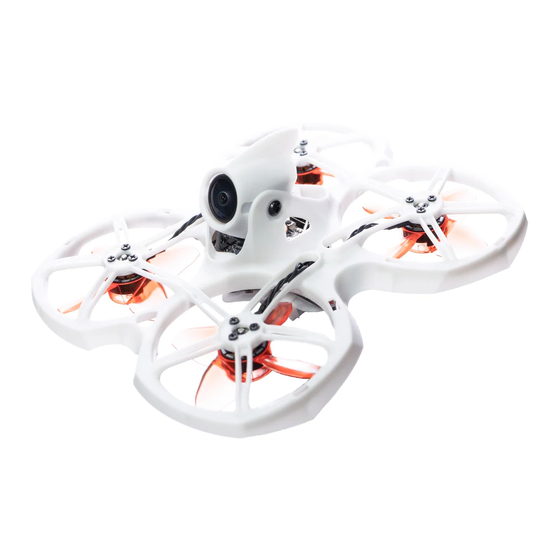
Page 5: Tinyhawk Ii Structure
Tinyhawk II Tinyhawk II Structure emax-usa.com... -
Page 6: Tinyhawk Ii
Caution: Failure to mount the propellers in the correct orientation will cause Tinyhawk II to not fly correctly and with no control. Please double check for the correct orientation. 1. Line up the 3 struts of the propeller with the 3 struts on the motor bell. -
Page 7: Tinyhawk Ii Vtx Settings
Tinyhawk II Tinyhawk II VTX Settings NOTE: You must “disable” VTX Smart AUDIO on UART 2 in order for push button VTX adjustment to work as described below. Vtx Schematic and Button Diagram VTX Channel Settings with the Button 1. Normal display When powered on, the parameters of frequency group band, frequency point and power are displayed twice by LED cycle., then the LED is extinguished. -
Page 8: Ce And Fcc Unlicensed User Chart
Notice: If you change to an illegal channel using SmartAudio, there will be no image transmitting from Tinyhawk II. To switch back to a legal channel, press the button on the vtx and follow the vtx menu guide shown below. -
Page 9: Unlocked Fcc Ham Licensed User Chart
HAM radio license or prior consent from the FCC.By purchasing this equipment, the user is agreeing that they understand these responsibilities and will operate the equipment legally. Emax cannot be held responsible for your actions if you purchase and/or use this product in violation of your government's regulations. - Page 10 Tinyhawk II stick right to enter “SET” and choose “YES” and turn ROLL stick right to save setting parameters, as shown in Figure 5. 5. In the menu of VTX SA, moving cursor to "CONFIG" to enter menu; While moving cursor to "PIT FMODE"...
-
Page 11: Tinyhawk Ii All-In-One Flight Controller
Tinyhawk II Tinyhawk II All-in-One Flight Controller Tinyhawk II’s main electronic board is shown above. This board contains a F4 flight controller with all 4 esc’s and an 8CH receiver. Emax On-Board Receiver The receiver is integrated into the main flight controller board and is set up via betaflight. -
Page 12: Emax Tinyhawk Ii Flight Controller (Fc)
AUX 1, AUX 2, AUX 3, and AUX 4. The arm switch on Tinyhawk II is set on AUX 1 and armed with the highest value. AUX 2 is configured for a 3 stage switch to select flight modes: Acro, Horizon, and Angle activating in an increasing order. -
Page 13: Reprogramming Tinyhawk Ii Flight Controller
Restoring the Tinyhawk default settings 1. Download the latest CLI Dump File from https://emax-usa.com/ 2. Connect Tinyhawk II to Betaflight configurator and select the CLI tab 3. Open the CLI Dump File in a text editor and copy all the text. - Page 14 Tinyhawk II emax-usa.com...
-
Page 15: Flight
Power on Tinyhawk II by sliding the battery into the battery tray and plugging it in. Once the battery is plugged in, set Tinyhawk II on a stable surface so it can calibrate. -
Page 16: Arming
The AUX 2 switch is set to change this mode on a 3 stage switch. When AUX 2 is in a high state, Tinyhawk II will be in angle mode where control sets the attitude of the aircraft. When the switch is in the middle state, Tinyhawk II will be in Horizon mode. - Page 17 Tinyhawk II left. Tinyhawk II can fly for a maximum of 4 minutes. When the battery reaches 3.2v, land Tinyhawk II. Drawing the battery below 3.2v is not suggested and can damage the battery. Tips: Work on maintaining a controlled altitude flight to begin while driving Tinyhawk II with pitch and yaw.
Need help?
Do you have a question about the Tinyhawk II and is the answer not in the manual?
Questions and answers