Table of Contents
Advertisement
Advertisement
Table of Contents

Related Manuals for Emax Buzz


Summary of Contents for Emax Buzz
- Page 1 Thanks for purchasing the Buzz. Designed in California, assembled in China.
-
Page 2: Precautions
Please fly in a safe area away from people Do not modify or use other parts and accessories not approved for the use of EMAX. Do not use this product in harsh environments (such as winds, rain, lightning, snow, etc.). -
Page 3: Table Of Contents
........................... 7 Stock Flight Controller Settings ................7 Current Sensor Jumper ..................8 Adjusting Software Settings (Betaflight Configurator) ..........8 Reprogramming Buzz Flight Controller ............... 8 ........................... 8 Set the Correct Settings ..................8 VTX Power Cut Off Switch ..................9 Operation: ...................... -
Page 4: Disclaimer
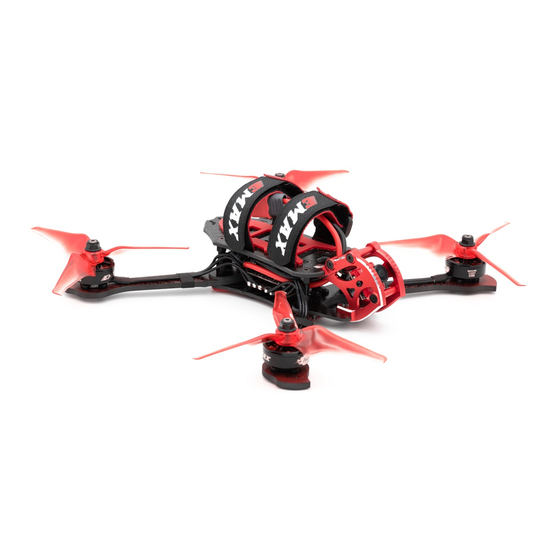
Smart Audio Battery Recommended 1300-1800 mAh 4S (Not Included) Product list 1. Buzz × 1 2. Avan Flow 5x4.3x3 (3x CW, 3x CCW) 3. Avan Scimitar 5x2.6x3 (3x CW, 3x CCW) 4. Extra Parts Package × 1 5. Instruction manual × 1 6. -
Page 5: Buzz Assembly
Avan Scimitar 5x2.6x3 flies slower but with an increase of flight time. Antenna Mount Mount the provided pagoda antenna to the back of the Buzz where the SMA port mounts. Periodically check tightness to insure good video quality during each flight. emax-usa.com... -
Page 6: Buzz Vtx Operation
Buzz Buzz VTX Operation Vtx Schematic and Button Diagram VTX Channel Settings with the Button 1. Menu Entry / Exit (1)Press the button and hold for 5s to enter the menu (2)Press the button and hold for 5s again to save parameters and exit the menu. -
Page 7: Button Menu Diagram
HAM radio license or prior consent from the FCC. By purchasing this equipment, the user is agreeing that they understand these responsibilities and will operate the equipment legally. Emax cannot be held responsible for your actions if you purchase and/or use this product in violation of your government's regulations. -
Page 8: Changing Vtx Setting Via Betaflight Osd
Buzz Changing VTX setting via Betaflight OSD Buzz is equipped with SmartAudio and is already configured with stock settings. The SmartAudio line is operated on UART 6 TX. 1. Power on Buzz, Goggles, and Controller. 2. Follow the tips on screen to enter the main settings menu: THROTTLE MID+ YAW LEFT+ PITCH UP to enter OSD parameter adjustment menu. -
Page 9: Buzz Esc
Buzz Buzz ESC ESC Schematic and pinout Diagram. The Buzz is using 4-in-one 45A 32-bit ESC. Buzz supports 3-6S Lipo. Recommended 1300-1800 mAh 4S. Signal Wires: S1-S4 is the signal input of ESC1-ESC4. Tx is ESC telemetry output connected to UART 3 RX on the Buzz Flight Controller. -
Page 10: Buzz Flight Controller
AUX Channels. The arm switch on Buzz is set on AUX 1 and armed with the highest value. AUX 3 is set to beeper with beeping on in a high state. AUX 4 is set to the VTX power switch: High value is VTX on and Low value is VTX off. -
Page 11: Current Sensor Jumper
OmnibusF4 and the correct firmware can be found on emax-usa.com. DISCLAIMER: We do not suggest changing any PID settings on Buzz or upgrading the firmware to new or old versions. Buzz comes stock with an optimal tune for superior flight performance. Changing this can affect flight time, overall speed, control of the aircraft, or excessive heat within the motors. -
Page 12: Vtx Power Cut Off Switch
The Buzz flight controller is configured with a switch for power for the vtx controllable from an RC channel. This allows turning off the VTX from a switch on a controller. This is useful when testing Buzz and you do not want to spam your video or in a team race situation. -
Page 13: Binding Procedure
A receiver can only be bound to one transmitter module. Follow the steps below to finish the binding procedure. 1. Power on Buzz while holding the BIND button on the module (please refer to the module instruction manual for switch positions). Release the button when a green light starts flashing.
Need help?
Do you have a question about the Buzz and is the answer not in the manual?
Questions and answers