
Related Manuals for Emax TINYHAWK III


Summary of Contents for Emax TINYHAWK III
- Page 1 Thanks for purchasing the Tinyhawk III. Please follow the instruction manual to assemble and configure your Tinyhawk III. Design in California, Made in China...
- Page 2 3. Please fly in a safe area away from people 4. Do not modify or use other parts and accessories not approved for the use of EMAX. 5. Do not use this product in harsh environments (such as winds, rain, lightning, snow, etc.).
-
Page 3: Table Of Contents
Product list ............................4 Tinyhawk III propeller ........................5 Tinyhawk III structure diagram....................5 Propeller installation & removal....................5 Tinyhawk III Video Transmission....................7 Tinyhawk III image transmission diagram ................7 Betaflight OSD change VTX settings..................7 Press key to set VTX channel ......................7 Tinyhawk III receiver ........................10... -
Page 4: Product Specifications
Motor TH0802 II 15000KV Propeller Avan TH Turnlemode-3 F4( STM32F411 firmware) Main board 4in1 5A ESC EMAX Tiny receiver (SPI receive mode, Frsky D8 ) Camera RunCam Nano 4 Camera 200-100-25MW adjustable frequency 37CH, support SmartAudio Battery 1S HV 450mAh Product list Tinyhawk III ..........×... -
Page 5: Tinyhawk Iii Propeller
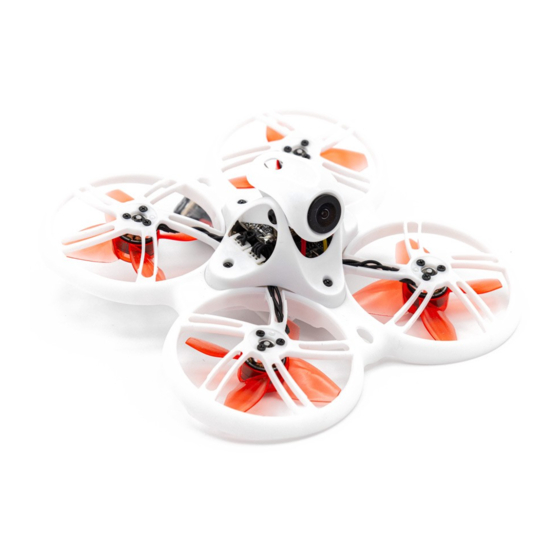
Tinyhawk III structure diagram Propeller installation & removal The Tinyhawk III propeller has two directions of rotation: clockwise (CW) and counterclockwise (CCW). When purchasing a set of propellers, please purchase 2 clockwise blades and 2 counterclockwise blades. The blade rotates along the blunt edge of the blade. - Page 6 Use a small tool (such as a 1.5mm hex wrench or a small screwdriver) to press on the metal at the bottom of the motor and Tinyhawk III. Grasp the blade of the propeller with your fingers until the propeller pops out of the motor.
-
Page 7: Tinyhawk Iii Video Transmission
In the menu interface, switch the pitch up/down (PITCH) and select the menu option. Move the cursor to "FEATURES" and stir the ROLL lever to the right to enter the next menu. as shown in Figure 2. Use the PITCH joystick to move the cursor to "VTX SA", as shown in Figure 3. - Page 8 After choosing menu, press the button and hold for 2s to enter parameter option. Notice: If you use SmartAudio to switch to an illegal channel, Tinyhawk III will not have video transmission. To switch back to a legal channel, press the button on vtx and follow the...
- Page 9 * When the user purchases this product, it means that he/she understands these responsibilities and will operate the equipment legally. EMAX does not assume any responsibility for the user's purchase and/or use of this product in violation of...
-
Page 10: Tinyhawk Iii Receiver
Binding Procedure Binding is the process of uniquely associating a particular receiver to a transmitter module. A transmitter module can be bound to multiple receivers (not to be used simultaneously). A receiver can only be bound to one transmitter module. 1.Hold the bind button while powering on the receiver. -
Page 11: Tinyhawk Iii Flight Control
Stock Flight Controller Settings PID profile 1 is tuned and optimized for Tinyhawk III and Emax 1S HV 450 mAh for proper flight indoors and outdoors. Please do not change these values. This configuration has been professionally adjusted by many parties, and EMAX strongly... -
Page 12: Adjust Software Settings (Betaflight Configurator)
We do not suggest changing any PID settings on TinyhawkIII or upgrading the firmware to new versions. Tinyhawk III comes stock with an optimal tune for proper flight performance. Changing this can affect flight time, overall speed, control of the aircraft, and excessive heat within the motors. -
Page 13: Restore Tinyhawk Iii Default Settings
After the battery is inserted, place the Tinyhawk III on a level and stable surface so that it can be calibrated. Calibration takes a few seconds, and then Tinyhawk III can fly. Tinyhawk III can fly for up to 4 minutes when the battery is fully charged. When the battery power reaches 3.2v, please land... -
Page 14: Tinyhawk Iii Flight
Unlock Arming refers to setting Tinyhawk III to begin flying. When Tinyhawk III is powered on for the first time, it will not spin the propeller until it is armed. 1. First move the throttle to the bottom position to control the aircraft, 2. - Page 15 To learn how to fly Tinyhawk III, you must first fly within sight (without wearing Transporter 2 Goggles). Turn on the power of Tinyhawk III and place it in a safe and empty room. Start Tinyhawk III, then use the left stick to raise the throttle to the hovering position. First try to maintain a stable altitude, the left and right thumbs control the throttle pitch angle of the joystick, so that the Tinyhawk III can fly normally.
-
Page 16: Airplane Mode
Tinyhawk III can fly up to 4 minutes. When the battery reaches 3.2v, let Tinyhawk III land. It is not recommended that the battery voltage be below 3.2v, otherwise the battery will be damaged.
Need help?
Do you have a question about the TINYHAWK III and is the answer not in the manual?
Questions and answers