
Related Manuals for Emax Tinyhawk II Race


Summary of Contents for Emax Tinyhawk II Race
- Page 1 Thanks for purchasing the Tinyhawk II Race. Designed in California, assembled in China.
-
Page 2: Precautions
Please fly in a safe area away from people Do not modify or use other parts and accessories not approved for the use of EMAX. Do not use this product in harsh environments (such as winds, rain, lightning, snow, etc.). -
Page 3: Table Of Contents
Tinyhawk II Race All-in-One Flight Controller ............8 On-Board Receiver ....................8 Binding Procedure ....................8 Emax Tinyhawk II Race Flight Controller (FC) ............9 Stock Flight Controller Settings ................9 Adjusting Software Settings (Betaflight Configurator) ......... 9 Reprogramming Tinyhawk II Race Flight Controller ........... 9 Restoring the Tinyhawk II Race default settings .......... -
Page 4: Disclaimer
Battery 2x 1 Cell 450 mAh HV lipo battery Product list 1. Tinyhawk II Race × 1 2. Emax 1s HV 450 mAh × 2 3. Charger × 1 4. Screwdriver x 1 5. Spare screws x 1 6. FC damper x 1... -
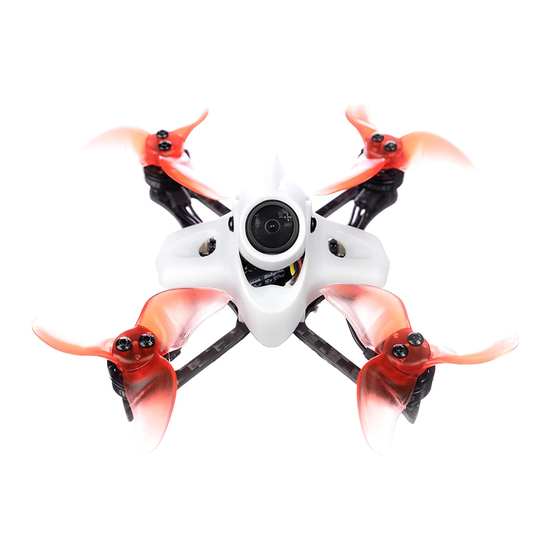
Page 5: Tinyhawk Ii Race Structure
Tinyhawk II Race Tinyhawk II Race Structure emax-usa.com... -
Page 6: Tinyhawk Ii Race
Caution: Failure to mount the propellers in the correct orientation will cause Tinyhawk II Race to not fly correctly and with no control. Please double check for the correct orientation. -
Page 7: Tinyhawk Ii Race Vtx Settings
Tinyhawk II Race Tinyhawk II Race VTX Settings NOTE: Under normal operating conditions, please use the Betaflight OSD function to change VTX (video transmitter) settings. Only use the VTX push button to unlock as allowed for under the FCC and HAM licensing requirements, see below. If using the VTX push button to change settings, please note that the settings will revert to the Betaflight OSD's settings once the drone is power-cycled. -
Page 8: Ce And Fcc Unlicensed User Chart
Notice: If you change to an illegal channel using SmartAudio, there will be no image transmitting from Tinyhawk II Race. To switch back to a legal channel, press the button on the vtx and follow the vtx menu guide shown below. -
Page 9: Changing Vtx Setting Via Betaflight Osd
Changing VTX setting via Betaflight OSD Tinyhawk II Race is equipped with SmartAudio and is already configured with stock settings. The SmartAudio line is operated on UART 2 TX. - Page 10 Tinyhawk II Race Figure 5 Figure 6 emax-usa.com...
-
Page 11: Tinyhawk Ii Race All-In-One Flight Controller
Tinyhawk II Race Tinyhawk II Race All-in-One Flight Controller Tinyhawk II Race’s main electronic board is shown above. This board contains a F4 flight controller with all 4 esc’s and an 8CH receiver. On-Board Receiver The receiver is integrated into the main flight controller board and is set up via betaflight. -
Page 12: Emax Tinyhawk Ii Race Flight Controller (Fc)
That is the channel map is in the respective order: throttle, aileron, elevator, rudder, AUX 1, AUX 2, AUX 3, and AUX 4. The arm switch on Tinyhawk II Race is set on AUX 1 and armed with the highest value. AUX 2 is configured for a 3 stage switch to select flight modes: Acro, Horizon, and Angle activating in an increasing order. -
Page 13: Restoring The Tinyhawk Ii Race Default Settings
Restoring the Tinyhawk II Race default settings 1. Download the latest CLI Dump File from https://emax-usa.com/ 2. Connect Tinyhawk II Race to Betaflight configurator and select the CLI tab 3. Open the CLI Dump File in a text editor and copy all the text. -
Page 14: Flight
Power on Tinyhawk II Race by sliding the battery into the battery tray and plugging it in. Once the battery is plugged in, set Tinyhawk II Race on a stable surface so it can calibrate. Calibration takes a few seconds then Tinyhawk II Race is ready to fly. -
Page 15: Arming
The AUX 2 switch is set to change this mode on a 3 stage switch. When AUX 2 is in a high state, Tinyhawk II Race will be in angle mode where control sets the attitude of the aircraft. When the switch is in the middle state, Tinyhawk II Race will be in Horizon mode. - Page 16 Tinyhawk II Race Thank you for purchasing our product! Enjoy Flying Tinyhawk II Race. Warning: Please pay attention to your surroundings. Not recommended for persons under 18 years of age. emax-usa.com...
Need help?
Do you have a question about the Tinyhawk II Race and is the answer not in the manual?
Questions and answers