Agria 8000 comfort Translation Of The Original Operating Instructions
Brush mower
Hide thumbs
Also See for 8000 comfort:
- Operating instructions manual (40 pages) ,
- Operating instructions manual (40 pages)
Table of Contents
Advertisement
Quick Links
Advertisement
Table of Contents

Related Manuals for Agria 8000 comfort


Summary of Contents for Agria 8000 comfort
- Page 1 Translation of the original Operating In- structions Brush mower agria 8000 agria 8000 comfort agria 8000 premium 8000 622, -641 Before commissioning please read the operating instructions and note the safety and warning information! Operating Instructions No. 998 489 01.21...
-
Page 2: Nameplate
Motor type and motor no. see page 59, 61; Fig. B/7, C/7 Please provide this information for each spare parts order, to prevent errors in delivery. Only use genuine Agria spare parts! The technical data, illustrations and dimensions provided in these operating instructions are non-binding. No claims may be derived from them. -
Page 3: Symbols
After each cleaning (in Engine oil level particularly with a high- pressure cleaner) Annually Clutch See separate engine op- erating instructions Mower drive - agria-Service - = contact your agria service centre Wheel drive Fast Slow Brush mower agria 8000... -
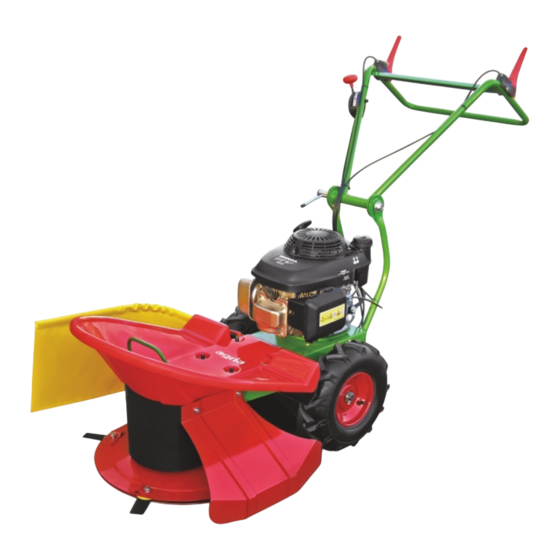
Page 4: Designation Of Parts Fig. A
Designation of parts Fig. A agria 8000... - Page 5 Handlebars Toggle nut Engine Front cover (protective device) Tarpaulin (protective device) Mower rotor Mower blade Driving wheel Nameplate / ID no. Gear shift bracket Tail guard (protective device) Start button electric starter Travel speed adjustment lever Brush mower agria 8000...
-
Page 6: Table Of Contents
Traction ...................... 32 Mowing ....................... 33 Stopping ..................... 34 Mowing on slopes ..................35 Notes on mowing ..................36 Safety instructions for handling ..............37 5 Maintenance and Repair ............. 38 Petrol engine ....................39 Machine ...................... 40 Brush mower agria 8000... - Page 7 Petrol engine ....................50 Machine ...................... 52 7 Decommissioning / Disposal ............53 Inspection and Maintenance Overview........... 54 Electric diagram of petrol engine ............ 56 Paints, Wear parts................57 Designation of parts ................. 58 Declaration of Conformity ..............63 Brush mower agria 8000...
-
Page 8: Unpacking And Assembly Instructions
Assembly Adjust the handlebars (A/4) to working height. See page 23. Attach the tarpaulin (A/8) to the tarpaulin bar. Mount the tarpaulin bar with the attached tarpaulin into the square tube on the brush mower. Brush mower agria 8000... -
Page 9: Safety Instructions
It can also impair the func- The brush mower agria 8000 is de- tionality of the machine. signed exclusively for cutting thin, non- woody brushwood, grass and similar... - Page 10 For your own safety, only use There is a risk of crushing and shearing original Agria spare parts. on power-operated parts! Suitable shoes must be worn depending Riding on the implement during opera- on the type of ground surface (vegeta- tion is not permitted.
- Page 11 Work across the slope along contour Damaged cutting tools must be re- lines if possible. If possible, turn the placed! machine in uphill direction. When replacing cutting tools use suita- ble tools and protective gloves. Brush mower agria 8000...
- Page 12 In the interests of safety, replace the fuel installed and properly adjusted! tank cap and other tank caps if dam- Only use genuine Agria spare parts. aged. Carry out a functional and safety test Store anti-corrosion agents and stabi- after completing the work.
- Page 13 There is a risk of explosion from Persons with cardiac pacemakers are excessive tyre pressure. not allowed to touch the energized parts Observe the required tyre pressure of the ignition system as long as the when you use ballast. engine is running. Brush mower agria 8000...
- Page 14 Danger of overturning! Do not drive on slopes greater than 20°. When working with the machine wear individual hearing protection and safety goggles. Wear sturdy footwear. Check the engine oil level at least every 8 operating hours. Wear protective gloves. Brush mower agria 8000...
-
Page 15: Technical Data
Tyres: ................. Pneumatic tyres 13x5.00-6 AS V-belt:Traction drive ................10x475 Li ZX Mower drive ..................A13x1490 LW Use only genuine Agria V-belts! (see wearing parts page 57) Tyre pressure: ..................1.0 - 1.2 bar Noise values: Sound pressure level at the ear of the operator to EN 11201: ....................... - Page 16 Tyres: ................. Pneumatic tyres 13x5.00-6 AS V-belt:Traction drive ..............AX 505 Lw - 475 Li Mower drive ..................A13x1490 LW Use only genuine Agria V-belts! (see wearing parts page 57) Tyre pressure: ..................1.0 - 1.2 bar Noise values: Sound pressure level at the ear of the operator to EN 11201: .......................
-
Page 17: Petrol Engine
2 Technical Data Petrol engine Scrub mower agria 8000 comfort Engine make: ....................Honda Type: ......................GCVx200 Bore x stroke: ..................66 x 59 mm Displacement: ....................201 cm Net output: ..............4.2 kW (5.7PS) at 3600 rpm Torque: ..................12.7 Nm at 2500 rpm Design: ....... - Page 18 2 Technical Data Scrub mower agria 8000 premium Engine make: ................. Briggs & Stratton Type: ...................... 875iS Series Bore x stroke: ..................68.3 x 51.8 mm Displacement: ....................190 cm Net output: ..............4.3 kW (5.8 PS) at 3600 rpm Torque: ..................12.0 Nm at 2900 rpm Design: .......
-
Page 19: Devices And Operating Elements
3 Devices and Operating Elements 3 Devices and Operating Elements The brush mower agria 8000 is de- ground. However, it is not suitable for signed exclusively for cutting thin, non- lawns in parks! (Intended use) woody brushwood, grass and similar... -
Page 20: Speed Regulating Lever
Never tamper with the safety circuit. Never tie up the safety lever. The safety lever is used as an emergency off switch: Release the lever in a dangerous situation. It swings automatically to "STOP" position! Brush mower agria 8000... -
Page 21: Traction Drive
Replace severely damaged or bent blades with new ones. Only operate the brush mower when all blades are correctly inserted and fastened, and when all guards and safety devices are in protective position and in working order! Brush mower agria 8000... - Page 22 Before switching on, press the locking bar on the clutch lever (A/1) for the mower drive. The mowing and travel drives are switched off when the switch bar (A/13) is released. Brush mower agria 8000...
-
Page 23: Steering Bar
The handlebar (A/4) can be swivelled into a space-saving transport position. • See the steering bar chapter. Ensure that the engine is switched off! Wear protective gloves! Only start the machine when the han- dlebars are fixed in working position! Brush mower agria 8000... -
Page 24: Attachment Points
Check straps for damage and replace if neces- sary! Do not use sharp-edged load carrying equipment (e.g. sharp-edged hooks, eyes etc.)! Do not lift the brush mower by the front cover (A/7)! Never walk or stand under suspended loads. Danger to life! Brush mower agria 8000... -
Page 25: Commissioning And Operation
Use only branded petrol. Caution is needed when handling fuel. Petrol is highly flammable and explosive under certain conditions! Do not refuel in closed rooms. Refuel only with the engine switched off and cooled down. Brush mower agria 8000... -
Page 26: Danger Zone
30 m from the machine. Foreign objects are to be removed from the area to be worked on prior to starting work. Watch out for other foreign particles while working. Brush mower agria 8000... -
Page 27: Before Starting The Engine
Keep a sufficient distance from hot surfaces and keep children away from the running engine. When the petrol engine is running, do not touch or remove the ignition cable or spark plug connector. Brush mower agria 8000... -
Page 28: Starting The Petrol Engine
Guide the handle back after the engine has started. Do not allow it to shoot back. Briggs&Stratton engine: Start the engine electrically by pressing the start button (A/15) on the right-hand steering bar. B&S Brush mower agria 8000... - Page 29 4 Commissioning and Operation Once the engine is running, set the engine speed to min. and allow the engine to warm up for a short time. Brush mower agria 8000...
-
Page 30: Stopping The Petrol Engine
If you want to shut down the machine for a longer time, do not stop the engine at the engine stop switch. Close the fuel cock(s) and let the engine run until it stops. This empties the carbu- rettor and prevents resinification. Brush mower agria 8000... - Page 31 Brush mower agria 8000...
-
Page 32: Traction
Only operate the stepless adjustment of the travel speed when the engine is running! If ignored, the machine may be damaged. Stopping Switch off the traction drive - Release the clutch lever (A/2) Set engine speed to min. Brush mower agria 8000... -
Page 33: Mowing
Switch on the travel drive - Pull the clutch lever (A/2) towards the handle When turning or reversing the mower, it is not necessary to disengage the mower drive so that the energy of the rotating rotor is not wasted unnecessarily. Brush mower agria 8000... -
Page 34: Stopping
At the end of the mowing work or in case of plugging: Disengage the traction drive; the mower stops, but the mower rotor continues to move and cut free; then switch off the mower drive Never leave the machine unattended while the engine is running. Brush mower agria 8000... -
Page 35: Mowing On Slopes
The machine is too heavy. You can not hold it. If possible, steer the machine across the slope. Release the safety lever to activate the safety circuit. Turn the machine only in uphill direc- tion! Mowing flat surfaces Mowing on slopes Brush mower agria 8000... -
Page 36: Notes On Mowing
When mowing, ensure that the lower is necessary to reduce the mower's skid disc always rests on the ground working width to an appropriate extent and does not jump away. Brush mower agria 8000... -
Page 37: Safety Instructions For Handling
Ensure that your feet are at a safe distance from the tools. • Never approach your hands or feet to rotating parts. • Never lift or carry the machine while the engine is running. Brush mower agria 8000... -
Page 38: Maintenance And Repair
Bio-lubricants bio-anti-corrosive Only use genuine Agria spare parts. agents are environmentally friendly, as Carry out a functional and safety test they are quickly biodegradable. after completing the work. -
Page 39: Petrol Engine
- agria-Service - - agria-Service - Exhaust Regularly clean the area of the exhaust pipe B/9, C/9 from grass, dirt, and com- bustible debris. Notes battery system premium version: Engine operating manual, chapter Charging the battery system Brush mower agria 8000... -
Page 40: Machine
Never exceed the maximum tyre pressure! The max. tyre pressure is shown on the side of the tyre. There is a risk of explosion from ex- cessive tyre pressure. Brush mower agria 8000... - Page 41 Check the tarpaulin (A/8) and the rear pro- tective tarpaulin (A/14 or D/11) before each use; replace damaged parts. Put the machine only into operation when all protective devices and safety devic- es are in protective position and functional! Brush mower agria 8000...
- Page 42 For all spare parts, use the manufacturer's original version. 1 Blade screw Wear protective goggles and gloves 2 Nut when resharpening the mower blades! 3 Blades 4 Lock washer 5 Blade damping washer Brush mower agria 8000...
- Page 43 The adjustment must be carried out in such a way that the machine cannot be reversed when the traction drive is engaged. • Adjustment is made with the Bowden cable adjusting screw (H/2) and the adjusting screw on the clutch lever (A/2). Brush mower agria 8000...
- Page 44 (A/2). • Install the plastic cover at the front (A/7) again. Put the machine only into operation when all protective devices and safety devic- es are in protective position and functional! Brush mower agria 8000...
- Page 45 Reassemble the plastic cover at the front (A/7) and the lower cover (D/5) Do not use commercially available V- belts. Use only genuine Agria special V-belts! Put the machine only into operation when all protective devices and safety devices are in...
-
Page 46: Labels
5 Maintenance and Repair Labels Replace worn-out and missing signs for operating and safety instructions. Brush mower agria 8000... -
Page 47: General
To protect the bearings against penetrating dirt, sap and water, there shall be a grease collar at the bearing points. Brush mower agria 8000... -
Page 48: Storage
Never smoke in the working area. Stay away from naked flames and sparks. Alternatively fill the fuel tank completely and add a fuel stabilizer (Agria no. 799 09) to the fuel - Observe the operation instructions! Let the engine run for approximately 10 minutes. - Page 49 To avoid heavy corrosion: • Protect against weather influence • Do not store in - damp rooms - synthetic fertiliser stores - stables and adjacent rooms (5) Cover the machine Cover the machine with a cloth or something similar Brush mower agria 8000...
-
Page 50: Troubleshooting And Remedies
Observe the safety instructions! Faults on the machine or on the engine that make a major intervention necessary must always be repaired by a specialist agria workshop that have the necessary tools. Incorrect intervention will only lead to damage. Petrol engine... - Page 51 - agria-Service - Petrol engine Ignition distance too large; Adjust or replace sparking plug frequently stalls sparking plug defective when idling Carburettor incorrectly adjust- Adjust carburettor *, BM - agria-Service - Air filter contaminated Clean air filter Brush mower agria 8000...
-
Page 52: Machine
Excessive vibra- Fixing screws loose Tighten fixing screws tion * = Contact your agria specialist workshop! BM = See separate operating instructions for engine Brush mower agria 8000... -
Page 53: Decommissioning / Disposal
Take the machine including the remain- ing technical fluids to a recycling facility for disposal. Dispose of old batteries and elec- trical/electronic parts in accordance with the applicable legal provisions. Do not dispose of as domestic waste. Brush mower agria 8000... -
Page 54: Inspection And Maintenance Overview
Clean sparking plug, adjust elec- trode gap Clean cooling system; earlier if necessary! Check V-belt tension Check V-belt Replace sparking plug Lubricate wheel hub and free- wheel Lubricate Bowden cables Check gearbox for oil leaks Replace fuel hoses Brush mower agria 8000... - Page 55 = before each start-up = after each cleaning, especially with a high-pressure cleaner = See separate operating instructions for engine = maintenance tasks should be performed by your agria service centre = at least annually = inspection and maintenance tasks can be performed by the operator...
-
Page 56: Electric Diagram Of Petrol Engine
Electric diagram of petrol engine Engine flywheel Ignition coil unit Sparking plug Engine stop switch sw = black Brush mower agria 8000... -
Page 57: Paints, Wear Parts
V-belt for traction drive 10x475 Li ZX (comfort version) V-belt for traction drive (premium version) 479 002 Tarpaulin 479 003 Tail protective tarpaulin Attention: Use only genuine Agria V-belts! Honda engine 761 99 Air filter element, set 759 99 Spark plug NGK BPR6ES Bosch WR7DC Briggs &... -
Page 58: Designation Of Parts
Fig. B Honda GCVx200 Fuel tank cap Starter handle Top cover Oil filler plug, dipstick Air filter Carburettor, speed governor Engine model ID No. Sparking plug, sparking-plug connector Exhaust with contact protection Fuel tank Fuel cock Brush mower agria 8000... - Page 59 Fig. B Honda GCVx200 agria 8000...
- Page 60 Fuel tank cap Top cover Oil filler plug, dipstick Air filter Carburettor, speed governor Engine model ID No. Sparking plug, sparking-plug connector Exhaust with contact protection Fuel tank Fuel cock Oil filter electric starter version Lithium-ion battery system Brush mower agria 8000...
- Page 61 Fig. C Briggs & Stratton 875iS series agria 8000...
- Page 62 Brush mower agria 8000...
-
Page 63: Declaration Of Conformity
Declaration of Conformity Brush mower agria 8000... - Page 64 Agria-Werke GmbH Bittelbronner Straße 42 D-74219 Möckmühl Tel.: +49 6298 39-0 Fax: +49 6298 39-111 E-Mail: info@agria.de Internet: www.agria.de Your local agria specialist dealer:...
Need help?
Do you have a question about the 8000 comfort and is the answer not in the manual?
Questions and answers