Table of Contents
Advertisement
Quick Links
Operating Instructions
Operating Instructions
Operating Instructions
Operating Instructions
Operating Instructions
Translation of the original operating instructions
Translation of the original operating instructions
Translation of the original operating instructions
Translation of the original operating instructions
Translation of the original operating instructions
Power Mower
Power Mower
Power Mower
Power Mower
Power Mower
5400
5400
5400
5400
5400
5400 KL
5400 KL
5400 KL
5400 KL
5400 KL
5400 with
Planetary Mowing Attachment
Stroke 85 mm, Crank Stone 45 mm
Mountain brake
Engines:
4-Stroke, Robin EH 17
4-Stroke, Robin EH 25
5400 KL with
Planetary Mowing Attachment
Stroke 85 mm, Crank Stone 45 mm
or:
Double-Knife Mowing Attachment
Stroke 60/24 mm
Steering Brake Clutch
Central Brake
4-Stroke-Engine, Robin EH 25
5143, 5146, 5321
Before commissioning the machine, read operating
instructions and observe warnings and safety instructions.
Operating Instructions No. 998 765-B 10.11
Advertisement
Table of Contents

Related Manuals for Agria 5400


Summary of Contents for Agria 5400
- Page 1 Stroke 85 mm, Crank Stone 45 mm Mountain brake Engines: 4-Stroke, Robin EH 17 4-Stroke, Robin EH 25 5400 KL with Planetary Mowing Attachment Stroke 85 mm, Crank Stone 45 mm Double-Knife Mowing Attachment Stroke 60/24 mm Steering Brake Clutch...
-
Page 2: Symbols, Name Plate
66, figure E/13 Please state these data when Clutch ordering spare parts to avoid wrong deliveries. Mowing drive Only use original agria spare Wheel drive parts! Forward Specifications, figures and dimen- sions stated in these instructions are Reverse not binding. -
Page 3: Designation Of Parts
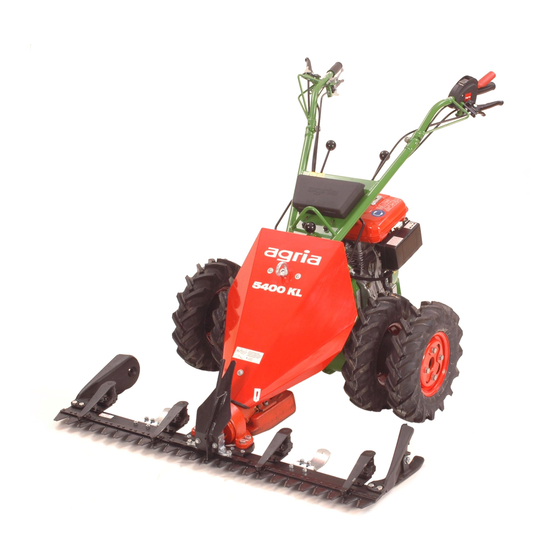
Designation of Parts Figure A 5400 with planetary mowing drive Figure B 5400 Steering Handle agria Power Mower 5400... - Page 4 Designation of Parts Figure A 5400 with planetary mowing drive 1 Grass distributor / knife driver 2 Mowing drive hood 3 Eyelet for assist rope 4 Tool kit 5 Steering handle 6 Cutter bar 7 Planetary mowing drive 9 Gearbox - oil filler plug, dipstick...
-
Page 5: Table Of Contents
Designation of Parts Commissioning the Machine ..32 Machine, Steering Handle 5400 ..3 Starting the 4-Stroke-Engine ..34 Machine, Steering Handle 5400 KL . 7 Switching off the Engine ....35 Robin-Engine EH 17, EH 25 ... 66 Mowing ..........36 1. -
Page 6: Recommendations
Maintenance and Repair: The trained mechanics of your agria workshop carry out expert mainte- nance and repair. You should only carry out major main- tenance work and repairs on your own,... - Page 7 Designation of Parts Figure C 5400 KL with planetary mowing drive 5400 KL with double-knife mowing drive Figure D 5400 KL steering handle agria Power Mower 5400...
- Page 8 10 Pawl for F-R shifting 11 Hand lever for F-R shifting 13 Hand lever for steering brake clutch left 14 Hand lever for steering brake clutch right 15 Hand lever for central- and park brake 16 Pawl for park brake agria Power Mower 5400...
-
Page 9: Safety Instructions
Due use includes compliance with manufacturer’s instructions on opera- Careful with rotating tools – keep at a tion, maintenance and repair. safe distance! Any unauthorized changes to the mower render manufacturer liability null and void. agria Power Mower 5400... - Page 10 – danger! sures to prevent damage to tools. During operation the operator must keep at a distance as defined by the steering handle, especially when turning the ma- chine. agria Power Mower 5400...
- Page 11 Only fit implements with the engine and PTO switched off. Always use appropriate tools and wear gloves when changing implements and parts thereof. For fitting and dismounting implements bring support leg into proper position and ensure stability. agria Power Mower 5400...
- Page 12 If sickness and vomiting occur, see a doc- Only use original agria spare parts. tor. If fuel has contacted eyes, rinse All other commercial spare parts must...
-
Page 13: Electrical System
Re-tighten attachment bolts of drive- wheels or check tightness when doing maintenance work. Electrical System Persons having a pacemaker must not touch live parts of ignition system when the engine is running! agria Power Mower 5400... -
Page 14: Specifications
Recommendation: DEA "Paragon EP1", height adjustable. Mobilgrease MB2, Glisando EP2, ARAL HL2 or LF2, ESSO Beacon EP2. Vibration acceleration value: on handlebar grip Planetary mowing drive . a = 16 m/s in accordance with EN 12733 agria Power Mower 5400... - Page 15 2. Specifications Type: ........5400 KL Dimensions [mm] Tyre: ......4.00-8 field tyre ..... optional 5.0-10 field tyre Tyre air pressure: ....1,5 bar ... optional 16 x 6.50-8 Terra Grip Tyre air pressure: ....0,8 bar Weight : ....
-
Page 16: Track Width Plan
1025 1050 5.0-10 AS 16 x 6,50 - 8 630 465 300 = Intermediate flange 5519 011 Track Width Plan [mm] Municipal Power Mower 5400 KL 4.00-8 AS 645 535 425 1074 1005 695 550 405 1105 5.0-10 AS 755 590 425 16x6.50-8 TG... -
Page 17: Robin Engine Eh 17 D
In accordance with EN 12733 appendix B: Noise level at operator’s ear ............L = 90 dB(A) In accordance with 2000/14/EU, appendix III, part B, chapter 32 lawn mower: Acoustic power level: ............L = 105,7 dB(A) agria Power Mower 5400... -
Page 18: Robin Engine Eh 25 D
In accordance with EN 12733 appendix B: Noise level at operator’s ear ........... L = 96,4 dB(A) In accordance with 2000/14/EU, appendix III, part B, chapter 32 lawn mower: Acoustic power level: ............L = 106,6 dB(A) agria Power Mower 5400... -
Page 19: Devices And Operating Elements Engine
3. Devices and Operating Elements The power mower agria type 5400 is Cooling system suited for all common applications and Cooling system is fan-cooled. Therefore tasks in farming and forestry and for win- keep grille at recoil starter and cooling ter service operation. -
Page 20: Hand Lever For Engine Stop
D/3) and fasten with pawl (B/4 or D/4). Operating position: To operate the machine press safety lever (B/2 or D/2). Do not fasten safety lever. Release the safety lever for fast engine switch-off. The lever automatically goes to STOP position. agria Power Mower 5400... -
Page 21: Clutch
3. Devices and Operating Elements Clutch / Mountain Park Clutch Brake Power Mower 5400 KL Power Mower 5400 The operation of the dry bevel clutch is via the hand clutch lever (D/6). Operation of clutch and mountain park The ma- brake is via the hand lever (B/3). -
Page 22: Gearbox
2nd gear = shifter pulled backward There is no neutral position Engaging Mowing Drive Mowind drive shifter (B/8 or D/8) B/8; D/8 pushed forward = mowing drive engaged Mowind drive shifter pulled back- ward = mowing drive disengaged agria Power Mower 5400... -
Page 23: Single Wheel Steering Brake Clutch
Swivel excentric lever (D/12) backwards D/15 beyond the dead centre. Eccentric le- ver automatically comes to a stop - both drive-wheels are decoupled and blocked. To release park brake, swivel eccentric lever back to original position – brake is released. agria Power Mower 5400... -
Page 24: Steering Handle Adjustment
For transport facilities and for fixing the security rope when working on slopes, the power mower 5400 is equipped with a hook (A/3) and the 5400 KL with an ring (C/3). Do not use any loading devices with sharp edges (e.g. sharp-edged hooks, eyelets etc.). -
Page 25: Planetary Mowing Attachment
17 Knife guard instructions cutter bar Switch off engine, Remove The cutter bar is exposed to spark plug connector! extreme strain. Therefore, it evi- dently must be maintained and adjusted Wear safety gloves! with special care. agria Power Mower 5400... - Page 26 Attach the cutter bar to the cutter bar carrier using bolts (7) and washers (8) - tighten evenly at 45 Nm. Mount the mowing knives (see page 28). Dismounting the cutter bar is in reverse order. agria Power Mower 5400...
-
Page 27: Double-Knife Mowing Attachment 26 Knife Attachment Removal
Pull with little tip- ping movements. Lift bottom knife out of pivot arms. Use a screw driver or similar tool. Pull with little tipping movements. Before you put down both- mowing knives, mount knife guard! agria Power Mower 5400... -
Page 28: Knife Attachment Mounting
Tighten the clamping bolts at 100 Messerpilz Tighten the clamping bolts at 100 Nm to secure the link pins holding the top and bottom knives after fitting the mowing knives before each operation! agria Power Mower 5400... -
Page 29: Running Bases, Extra Weights
(item no. 5547 931). In addition, a second pair of extra weights can be attached in place of the running bases. This takes a long hex head bolt M 8 x 45. agria Power Mower 5400... -
Page 30: Wheel Locking Bolts
(7). 8 Snap ring 9 Spring Make sure that wheel carriers point to machine, when looked into travel direction (see fig.). Block the tommy screw by positioning the spring (9). agria Power Mower 5400... -
Page 31: Twin-Wheels
Remove snap ring (4) with a pair of pli- 2 Flange ers. 3 Lubrication nipple Position the wheel flange (2) with the 4 Snap ring (Seeger circlip ring) tang nocken between both tang pins and Rigid fit the snap ring. agria Power Mower 5400... -
Page 32: Commissioning And Operation
Check transmission oil level (see page 43) Note: For reasons of transport, the engine is not filled completey with engin oil! Before you operate the engine the first time, fill in engin oil (see page 38)! agria Power Mower 5400... - Page 33 Do not touch the hot engine – dan- ger of burns! Do not touch or remove the ig- nition line and spark plug connector while the engine is running. agria Power Mower 5400...
-
Page 34: Starting The 4-Stroke-Engine
After the start, let the EH 17 EH 25 rope glide back. Do not let it snap back. As soon as the engine has warmed up, move the CHOKE back to the oper- ating position (if it was operated). agria Power Mower 5400... -
Page 35: Switching Off The Engine
Instead, close the fuel tap and op- erate the engine until it comes to a stop by lack of fuel. This is to ensure the car- burettor is empty and to avoid resin de- posits. agria Power Mower 5400... -
Page 36: Mowing
15 - 30 operating minutes and than every 4 oper- ating hours (particularly of the cutter bar carrier, knife driver and cutter bar mounting flange). agria Power Mower 5400... -
Page 37: Danger Zone
Starting the engine on slopes Keep the mowing drive and the travelling drive in engaged mode; brak- ing effect. Move the hand clutch lever and emergency-off-switch to "Start" posi- tion. Start the engine. agria Power Mower 5400... -
Page 38: 5. Maintenance: 4-Stroke Engine
Clean filling- and drain plug and sur- rounding parts. Change the oil and dispose of prop- erly. Check sealing washer for good condition and exchange, if necessary! - For engine oil quality refer to “Specifi- cations”. agria Power Mower 5400... -
Page 39: Air Filter
Reinstall the filter element and the foamed preliminary filter. Reposition the filter cap Replace the filter element after 5 cleaning actions or approx. every 200 operating hours. Replace immediately damaged filter elements. agria Power Mower 5400... - Page 40 Reinstall the filter element and the foamed preliminary filter. Reposition the filter cap and fasten the wing nut. Replace the filter element af- ter 5 cleaning actions or approx. every 200 operating hours. Replace immediately damaged filter elements. agria Power Mower 5400...
- Page 41 Hold for sufficient di- stance from hot surfaces and keep child- ren away from the running engine. agria Power Mower 5400...
- Page 42 Governor accident and will render the warranty spring in and type approval null and void! hole 3 Keep governor spring, lever and linkages free from dirt and plant trash at all times. agria Power Mower 5400...
-
Page 43: Machine
(A/12) after the first 2 operating hours, then every 50 operating hours with 100 Nm. 100 Nm Check the tyre air pressure regularly. For smooth driving, make sure that there is the same pressure in both tyres. agria Power Mower 5400... - Page 44 Adjust stop buffer (1) by turning it to 3 Adjustment nut for steering handle central the above stated play. mounting Re-tighten hexagonal nuts (2) (lock) Municipal Mower 5400 KL Steering Handle Locking Bolt Occasionally lubricate nipple on locking J, B bolt of steering handle with Bio-lubrica- tion grease.
- Page 45 5. Maintenance Municipal Mower 5400 KL Steering Handle Central Mounting Re-tighten adjustment nut (3) with 100 Nm after the first 4 operating hours, then after every 50 operating hours. Remove pin retention to unscrew fas- tening nut for steering handle (5).
-
Page 46: Safety Circuit
The engine-off-switch in position „0“, the engine must come to a stop. Check electric conductors and con- nections for good condition. - Service agria Power Mower 5400... -
Page 47: Hand Lever Adjustment
(B/10 or D/10). 1 Hand lever ! = The Bowden 2 Retaining spring cable must be 3 Threaded end of placed in the cable 4 Adjusting pin hand lever sup- port on bottom position! agria Power Mower 5400... -
Page 48: Mountain Brake
Loosen and unscrew the hex head nut (1) on both sides. Dismount the angles (2) with discs and brake housing. Replace the brake linings (4 + 5). Mount the park brake in the opposite 100 h order. Adjust agria Power Mower 5400... -
Page 49: Planetary Mowing Attachment
If the problem re- 10 Nm occurs, also exchange distance plate on oppo- site side. Play Crank stone The attachment bolts M 6×16 Kit distance plates 632 21 must not project inwards. agria Power Mower 5400... -
Page 50: Double-Knife Mowing Attachment
Lubricate the lower rocker bearings every 4 operating hours ; in case of very humid working conditions: Use a water resistant grease (agria no. 604 80, car- tridge 400 g) instead of the Bio-lubrica- tion grease! Every 8 operating hours lubricate the... -
Page 51: Cutter Bar
(glowed out and soft). Do not round-off the tips of the blades (P). Do not grind the blades in a bow (P) Remove any burr with a hand grind- ing stone. Correct grinding agria Power Mower 5400... -
Page 52: General Maintenance, Cleaning
Remove the knife and re- move dir t col- lected between knife blades. Af- ter cleaning, ap- ply Bio-lubricat- ing oil or Bio-lu- bricating grease to all gliding parts. Fit knife guard! agria Power Mower 5400... -
Page 53: Storage
Engine preservation Drain fuel completely or fill the fuel e) Clutch tank, add fuel stabilizer (agria No. 799 09) to the fuel tank - observe instruc- Always park mower with hand clutch le- tions. ver pulled (pawl Operate the engine for approx. -
Page 54: Accessories For Cutter Bar
Pair of running bases 5547 961 height-adjustable, ecological, cutting height: 3-12 cm Pair of running bases 5547 951 rigid, ecological, cutting height: approx. 9 cm Pair of running bases 713 22 adjustable, cutting height: up to approx. 5 cm agria Power Mower 5400... - Page 55 Accessories for cutter bar Grass distributor Double-knife cutter bar optional agria 690 55 Cutter bar limit stops, Double-knife cutter bar Pair: 719 85 agria Power Mower 5400...
-
Page 56: Troubleshooting
6. Troubleshooting Observe safety instructions! Have all serious malfunctions on the machine or engine repaired by your agria workshop. They have the proper tools. Improper repairs can only add to the damage. Problem Possible cause Remedy Page Engine- - Spark plug connector not connected... - Page 57 - Bent blades or knives, Check whether knives are straight, top of each other twisted knife back realign, if necessary, until blades align as well = Contact your agria workshop! MB = Refer to cutter bar operating instructions agria Power Mower 5400...
-
Page 58: Varnishes, Wear Parts
Emergency Tyre Repair: 713 13 Tyre sealing gel Terra-S Bottle 1 l. Spare Part Lists: 997 022 Power Mower 5400, Municipal Mower 5400 KL 997 077 Robin Engines Electric Circuit 1 Engine 2 Magnet ignition system 3 Engine-off-switch 4 Switch in clutch lever... -
Page 59: Lubrication Chart
50 h, B Once a year Municipal cutter bar A; 8 h; B 8 h; B (25 h) 50 h (50 h) 200 h 50 h A; 8 h; B 50 h agria Power Mower 5400... - Page 60 Lubrication Chart Municipal Mower 5400 KL With planetary mowing drive Each time before You take up operation Once a year and after every air- cleaning with compressed water jets J, B 50 h, B Once a year Municipal cutter bar A;...
- Page 61 Lubrication Chart Municipal Mower 5400 KL With double-knife mowing drive Each time before You take up operation Once a year and after air- every cleaning with J, B 50 h, B compressed water jets Once a year 8 h; B A;...
- Page 62 Power Mower 5400...
- Page 63 Power Mower 5400...
-
Page 64: Inspection And Maintenance Chart
Replace spark plug Replace air filter insert, 39,40 earlier, if required Clean carburetor and adjust idle speed Clean cylinder head Adjust valve clearance Grease steering handle locking bolt K 44 Replace fuel hoses Clean fuel filter agria Power Mower 5400... -
Page 65: Operation
P = Position lubrication chart W = Maintenance to be executed by professional workshop A = Each time You take up operation F = Maintenance to be executed by agria workshop B = After each cleaning * = after 2 years... -
Page 66: Machine, Steering Handle 5400 Kl . 7 Robin-Engine Eh 17, Eh 25
Designation of Parts Figure E 4-Stroke Petrol Engine, 4-Stroke Petrol Engine, Robin EH 25 D Robin EH 17 D agria Power Mower 5400... -
Page 67: Ec Conformity Declaration
Conformity Declaration agria Power Mower 5400... - Page 68 GmbH Bittelbronner Straße 42 D-74219 Möckmühl Tel. +49/ (0)6298 /39-0 Fax +49/ (0)6298/39-111 e-mail: info@agria.de Internet: www.agria.de Your local agria specialist dealer:...
Need help?
Do you have a question about the 5400 and is the answer not in the manual?
Questions and answers
Kako se menja lamela