Table of Contents
Advertisement
Quick Links
Advertisement
Table of Contents
Troubleshooting

Related Manuals for Agria 9200 371


Summary of Contents for Agria 9200 371
- Page 1 Power Machines for Soil Cultivation, Grass and Property Maintenance Operating Instructions ® für agria Universal Mower 9200 371 9200 381 Before commissioning the engine, read operating instructions and observe warnings and safety instructions. Operating instructions No. 998 732 12.96...
-
Page 2: Table Of Contents
Index Amount of Delivery ......3 4. Commission and Operation Commissioning the Machine ..18 Assembly ......... 4 Starting the Engine ......19 Cutting off the Engine ..... 19 Designation of Parts ....5, 32 Mowing ........... 20 Wheel drive ........20 Lubricants, Varnishes, Wear Parts ........ -
Page 3: Amount Of Delivery
C/8 and D/8; Please state these data when ordering Fast spare parts to avoid wrong deliveries. Only use original agria spare parts! Specifications, figures and dimensions Slow stated in these instructions are not bind- ing. No claims can be derived from them. -
Page 4: Assembly
Assembly Unpack the universal mower, fit the Adjusting the Steering Handle front running gear and adjust the Remove the cap from the clamp- steering handle to an ergonomic ing bolt. height. Undo the clamping bolt (8). Fitting the Front Running Adjust the steering handle to an er- Gear gonomic working height. -
Page 5: Designation Of Parts
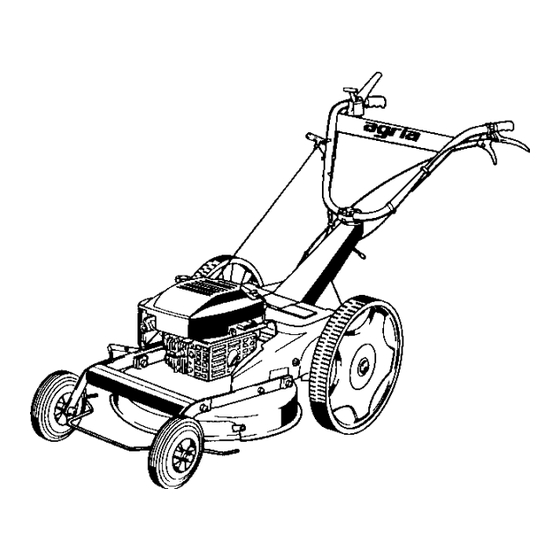
Designation of Parts Type 9200 371 Type 9200 381 Edition 12.96 Universal Mower 9200... - Page 6 Designation of Parts 1 Lever for cutting height adjustment 2 Lever for wheel drive engagement 3 Safety lever 4 Speed control lever 5 Steering handle 6 Starter handle 7 Air intake hose (Type 9200 381) 8 Clamping bolt for steering handle height adjustment 9 Tommy screw for steering handle side adjustment 10 Engine (see also fig.
-
Page 7: Recommendations
(do not apply on painted exter- nal covers). Oil can be brushed or Maintenance and Repair: sprayed on. Anti-corrosive agents are environmen- The trained mechanics of your agria tally friendly and degrade fast. workshop carry out expert maintenance and repair. Using ecologically safe Bio-lubricants... -
Page 8: Safety Instructions
1. Safety Instructions Before starting the engine, read the For safety reasons do not use the uni- operating instructions and note: versal mower to drive other tools or at- tachments. The universal mower (equipped with wheel drive) is not suited for pulling lawn sweepers and spread- Warning ers. - Page 9 1. Safety Instructions Teenagers younger than 16 years are Check the immediate surroundings of not allowed to operate the universal the machine before you start it. Watch mower! out for children and animals. Only work in good light and visibility. Before you start work, clear the area from any foreign object.
- Page 10 1. Safety Instructions Careful when starting the mower and If steering causes problems, immedi- during operation. Keep your hands ately bring the universal mower to a halt and feet off the rotary blades! and turn it off. Have the malfunction re- moved without delay.
- Page 11 If fuel has contacted eyes, rinse Only use original AGRIA spare parts. All them thoroughly, avoid inhaling of va- other conventional spare parts must pours.
-
Page 12: Dimensions
1. Safety Instructions Before you dispose of opened and Explanation of Warning Symbols seemingly empty pressurised tins (e.g. Before doing any of assist-starting liquids) make sure they maintenance and are completely empty. Empty them in repair work, cut off ventilated places safe from spark forma- the engine and re- tion or flames. -
Page 13: Lawn Mower
2. Specifications Type 9200 371 Engine manufacturer: ..Briggs & Cutting width: ......51 cm Stratton Cutting height adjustment: Type: ..... Quantum XTE 55, Central handle ....4 notches 128 802 – 0865 Cutting height: ....40–100 mm Version: ..Fan-air-cooled 1-cylinder- Ejection: ...... - Page 14 2. Specifications Type 9200 381 Engine manufacturer: ..Briggs & Cutting width: ......55 cm Stratton Cutting height adjustment: Type: ..... Quantum XTS 60, Central handle ....4 notches 129 882 – 1111 Cutting height: ....40–100 mm Version: ..Fan-air-cooled 1-cylinder- Ejection: ......
-
Page 15: Engine
3. Devices and Operating Elements The universal mower AGRIA type 9200 Ignition system is suitable for usual operation in horti- The engine is equipped with a mainte- culture and maintenance of parks and nance-free, contact-less, electronic gardens. ingnition system. We recommend hav-... -
Page 16: Safety Switch
3. Devices and Operating Elements Safety Switch Steering Handle Side Adjustment The universal mower is equipped with a Loosen the tommy screw (9) (approx. safety switch. 3 turns) until the notches are free. Stop position: Adjust the steering handle as appro- As you release the safety lever (3) the priate and fit it into the notches. -
Page 17: Wheel Drive
3. Devices and Operating Elements Wheel drive Cutting height adjustment Wheel Drive Engagement Before you set the cutting Pull hand lever (2) height shut off the engine and wait until the rotary blade has Wheel Drive Disengagement stopped! Release hand lever (2) Pull lever (1) Do not tie up the lever (2). -
Page 18: Commission And Operation
4. Commissioning and Operation Commissioning the Before each start: Machine Oil filler neck Oil dip stick Please note that longevity and opera- tional safety of the engine depend to a large extent on its breaking-in. Always allow a cold engine to warm up for some minutes and never run it at full throttle at the beginning. -
Page 19: Starting The Engine
4. Commissioning and Operation Starting the Engine (Press only if the engine is cold) Engine cold Press PRIMER (11) 3 times (fuel is injected) Move speed control lever (4) to “max” (full throttle) Engine warm Move speed control lever (4) to 1/4 to 1/2 speed Press safety lever all the way down to the handle... -
Page 20: Mowing
4. Commissioning and Operation Mowing Set speed lever to the desired posi- tion ranging from 1/2 to Max. (after starting the engine) Engage wheel drive. Before you take up operation, check the immediate sur- roundings for animals and children. In high grass do several passes, if possible, to avoid blockages. -
Page 21: Maintenance, Service Wheel Drive
V-belt. tenance instructions. Only use special AGRIA V- Warning: Only do mainte- belts. Do not use conven- nance work with the engine tional V-belts. -
Page 22: Rotary Blades
5. Maintenance Rotary blades After every 10 operating hours tighten the attachment bolt (G/2) on the rotary blade (G/1) using a spanner. Attachment bolt Torque ........45Nm 1 Rotary blade 2 Attachment bolt for rotary blade 3 Washer 4 Washer 5 Hub of rotary blade To ensure a clean cut sharpen the rotary blades (G/1) periodically. -
Page 23: Engine
5. Maintenance Engine To drain the oil, open drain plug (19) and collect the engine oil in a suitable container. Checking engine oil level Each time you take up operation and after every 5 operating hours! Ensure the engine is level and is cut off. -
Page 24: Air Filter
5. Maintenance Air Filter Air Intake Hose Clean air filter after a maximum of 3 (only on version 9200 381) months or at least after 25 operating Always keep the slots for ventilation hours (in dusty conditions earlier). on the hose (B/7) clean from dirt, leaves, Proceed as follows: and grass clippings. -
Page 25: Spark Plug
Check each tional detergent. time before you take up operation! Exchange spark plugs after approx. Type 9200 371 100 operating hours. Exchanging spark plug: clean here Screw new spark plug into cylinder head by hand. -
Page 26: Safety Circuit
– Danger of fire! Check the Bowden cable for proper Check each time before you take up condition and replace, if necessary. operation. To do this, contact your agria work- shop. Removing Carbon Speed Actuating Devices Deposits Devices for actuating engine speed... -
Page 27: General
5. Maintenance General Watch out for fuel and oil leakage and repair, if necessary. Regularly check and tighten nuts and bolts. Slightly grease all gliding and mov- ing parts (e.g. speed control lever, hand lever bearing, etc.) with bio-lubricating grease and bio-slushing oil. Cleaning After each cleaning (with water, espe- cially with pressure washer) lubricate all... -
Page 28: Storage
Do not store the universal mower in lack of fuel or add fuel stabilizer (AGRIA wet rooms, in rooms where fertiliser is No. 673 50). stored, in stables and adjacent rooms... -
Page 29: Lubricants, Varnishes, Wear Parts
Lubricants, Varnishes, Wear Parts agria Order No. Lubricants and Anti-Corrosive Agents 118 24 Engine oil 10 W-40 690 34 Bio-lubrication oil bottle 500ml 690 35 Bio-lubrication grease cartridge 400g 690 36 Bio-Slushing oil bottle 500ml 673 50 Fuel stabilizer bottle... -
Page 30: Troubleshooting
6. Troubleshooting Observe safety instructions! Have all serious malfunctions on the machine or engine repaired by your agria workshop. They have the proper tools. Improper repairs can only add to the damage. Problem Possible cause Remedy Page Engine - Spark plug connector not connected... -
Page 31: Troubleshooting
Clean rotor housing - Rotary blades are dull Sharpen the blades = For this purpose contact your agria workshop. A = Each time you take up operation B = After each cleaning K = Inspections and Servicing to be carried out by operator W = Maintenance to be carried out by professional workshop Edition 12.96... - Page 32 Designation of Parts Engine XTE 55 "PRIMER" 1 Fuel filler neck 2 Recoil starter handle 3 Grille 4 Engine oil filler neck and dip-stick 5 Air filter 6 PRIMER (Fuel injection pump for cold starts) 7 Carburetor/Speed control linkages 8 Engine type/type no. 9 Spark plug, spark plug connector 10 Exhaust with protective grille Engine XTS 60...
- Page 33 Notes Edition 12.96 Universal Mower 9200...
-
Page 34: Inspection And Maintenance Chart
7. Inspection and Maintenance Chart After operating hours min. min. 50 100 250 3 months yearly B page Clean engine, check bolts and nuts Check engine oil level, refill, if necessary First engine oil change subsequent oil changes Check air filter Clean air filter insert Replace air filter insert, earlier, if required... -
Page 35: Conformity Declaration
GmbH D-74215 Möckmühl/Württ. herewith declare in sole responsibility that the product Universal Mower, Type 9200 371 and 9200 381 to which this declaration refers, corresponds to the standard fundamental safety and health requirements as stipulated in EC directive 89/392/EEC and the directive on EMC 89/336/EEC. - Page 36 Hobby two-wheelers AllShredd Cutterbar mowers Lawn mowers Verticutters All-purpose machines Quality, to be proud of Contact your authorised agria dealer for service and prompt delivery of spare parts agria-Werke GmbH, D-74215 Möckmühl, Phone 0049 62 98/39-0, Fax 0049 62 98/39-111...
Need help?
Do you have a question about the 9200 371 and is the answer not in the manual?
Questions and answers