Circutor Raption 150C Series Installation Manual
Hide thumbs
Also See for Raption 150C Series:
- Instruction manual (120 pages) ,
- Installation manual (52 pages)
Table of Contents
Advertisement
Quick Links
Advertisement
Table of Contents

Related Manuals for Circutor Raption 150C Series


Summary of Contents for Circutor Raption 150C Series
- Page 1 Raption 150C Series INSTALLATION GUIDE (M358A01-03-22A)
- Page 2 Raption 150C Installation guide...
-
Page 3: Disclaimer
CIRCUTOR, SA reserves the right to make modifications to the device or the unit specifications set out in this instruction manual without prior notice. CIRCUTOR, SA on its web site, supplies its customers with the latest versions of the device specifica- tions and the most updated manuals. - Page 4 C O P Y R I G H T I N F O R M AT I O N This document is copyrighted, 2022 by CIRCUTOR, S.A. All rights are reserved. CIRCUTOR, S.A. reserves the right to make improvements to the products described in this manual at any time without notice.
-
Page 5: Table Of Contents
Raption 150C Here’s your guide to install Raption 150C Disclaimer ..............................3 Revision log ............................. 3 Here’s your guide to install Raption 150C ..................5 1.-So, hello! ............................. 6 2.-Before the installation ........................8 A.-Important safety instructions...................... 8 B.-Electrical wiring considerations ....................9 C.-Important Electrical Safety instructions ................. - Page 6 Failure to follow safety instructions may involve personal injury, equipment damage and danger of death. CIRCUTOR is not responsible for events arising from such breach. THE FOLLOWING SYMBOLS ARE USED FOR IMPORTANT SAFETY INFORMATION IN THIS DOCUMENT...
-
Page 7: So, Hello
Raption 150C So, hello! • Compliant with IEC 61851; Electric vehicle conductive charging system (IEC 61851-1, IEC 61851-21-2 and IEC 61851-23). • Compliant with IEC 62196, Plugs, sockets-outlets, vehicle connectors and vehicles inlets, Conductive charging of electric vehicles (IEC 62196-1 and IEC 62196-3). - Page 8 • Do not use this unit for anything other (broken plugs, caps that don’t close...). than electric vehicle charging modes • Use only CIRCUTOR supplied spare parts. expected in IEC 61851-1. • Do not modify this unit. If modified, • Do not use this unit if the enclosure or the...
-
Page 9: Before The Installation
Raption 150C Before the installation Electrical wiring considerations Take into consideration this section before start wiring connections of the Charge Point. 1 - I N P U T P O W E R S U P P LY The input power supply line for the Charge Point must be hardwired from a dedicated power transformer or generator and not by LV overhead power lines. -
Page 10: C Important Electrical Safety Instructions
Raption 150C Important Electrical Safety Instructions Read carefully all the instructions before starting in order to ensure properly handling of electrical parts. A safe work environment is not enough to control all potential electrical hazards. It is recommended to be very cautious and work safely. So, the safety rules shown below could help to control risks of injury or death from workplace hazards. -
Page 11: Devse Classification
Raption 150C EVSE Classification Classification of the unit according to the IEC 61851-1:2017: 1 — Power supply Input • EV supply equipment connected to AC supply network • Permanently connected 2 — Power supply Output • DC EV supply equipment 3 —... -
Page 12: E Storage
Raption 150C Storage Whenever possible, the Charge point must be unloaded in their place of installation and operation. In case of unloaded to a temporary location for storage, it is convenient to not remove the packaging and store them meeting the following minimum requirements: •... -
Page 13: F Unloading And Handling
Raption 150C Unloading and handling All processes of unloading and handling of the Charge Point must be executed and monitored by qualified personnel attending to the significant weight of the unit, complying with safety rules and using the appropriate points of support. Important notes: •... - Page 14 Raption 150C Dimensions • Units specified in millimeters: 1290 1140 Installation guide...
-
Page 15: Dimensions And Overview
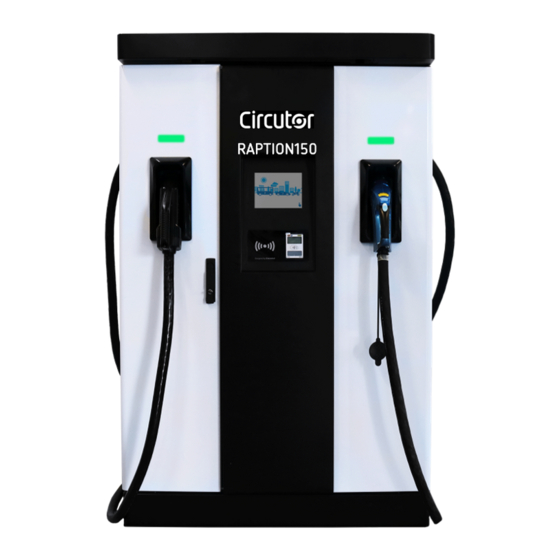
Raption 150C Dimensions and Overview Overview 1- Cover 2- CCS light beacon 3- CCS holder 4- CCS connector 5- Handle 6- RFID reader 7- Card payment 8- Touch screen 9- Air inlet Unit 10- CHAdeMO light beacon 11- CHAdeMO holder 12- CHAdeMO connector 13- Power M. - Page 16 Raption 150C Minimum distances When installing the Charge Point, respect the minimum distances for maintenance and safety reasons. Please comply accordingly to your country specifications. The next picture shows how it should be installed. • Do not install near areas where water or fluids can penetrate into the unit. •...
-
Page 17: Installation
Raption 150C Installation Foundation The purpose of this chapter is the technical definition and basic requirements for implementing the base and fixing the Charge Point. • The unit is adequate for indoor and outdoor installation • A foundation kit with a mounting template is provided to ensure the distances between the foundation bolts. - Page 18 Raption 150C Installation guide...
- Page 19 Raption 150C Installation guide...
- Page 20 Raption 150C • Place the foundation bolts into the templates using provided nuts with the help of a 24mm open-end wrench. Take into consideration the following measures. Step 1 Step 2 Installation guide...
- Page 21 Raption 150C 160,5 Before fixing the template inside of the concrete basement make sure front mark must face with the front side of the charger. • Once the kit is assembled, it must be placed in the ground. If the Charge Point has to be installed outside and there is no limitation of depth, is recommended to make a concrete base.
- Page 22 Raption 150C FOUNDATION MEASUREMENTS ORIENTATIONAL FOUNDATIONS FOR RAPTION 150 COMPACT TYPE OF TERRAIN FOUNDATION SIZE COMMENTS (kg/cm (Az x Bz x Hz) cm SOFT 130 x 65 x 65 For example vegetal not compact terrain COMPACT 130 x 60 x 55 For example mix vegetable land with engraved compactors VERY COMPACT...
-
Page 23: C Opening
Raption 150C Opening Step 1 • Left door: Step 2 Step 3 Steps: 1.- Insert the key supplied in the lock and turn it 90 ° counterclockwise. 2.- Pull back the handle. 3.- Turn the handle 90 ° clockwise direction. Installation guide... - Page 24 Raption 150C • Right door: In the rear side Step 1 Steps: 1.- Push on the round metallic button placed behind to the mechanic lock. On the top and the bottom part of the Right door. Installation guide...
-
Page 25: D Placing
Raption 150C Placing In order to place the Charge Point in its final location, please follow the next steps: 1 — R E M O V I N G T H E C H A R G E P O I N T F R O M PA L L E T The Charge Point is mounted on a pallet so as to do a safe transport. - Page 26 Raption 150C 2 — P L A C I N G T H E C H A R G E P O I N T T O T H E F I N A L L O C AT I O N Once the Charge Point is free from the pallet, there are two options to move it to the final location.
- Page 27 Raption 150C Step 3 <60º Step 4 Step 5 Steps: 3.- Hold the sling to the eyebolts, raise the Charge Point up and placed on the final location. 4.- Screw the 6 x M16 nuts with washers on the threaded rods already installed on the base (on both sides), place again the decorative front panel.
- Page 28 Raption 150C b) Move the Charge Point with manual forklift or forklift truck . Step 1 Step 2 Steps: 1.- Remove the decorative rear panel. Pull outward the metal flange (on both sides). 2.- Move out the metal flange (on both sides) and remove the decorative rear panel. Once the decorative panels have been removed, it will be available enough space to introduce the forklift, 758 mm Once Charge Point installation has been finished, remember...
-
Page 29: E Wiring
Raption 150C Wiring Regardless of the electrical power line characteristics, be sure to supply the Charge Point with the necessary electrical features specified on the model-identification plate, such as supply voltage, grid frequency and required apparent power. In case of power line characteristics are different from those required, it is mandatory to adapt that in order to meet this requirement. - Page 30 In order to make a secure cable installation it is necessary to use the metal plate provided. In the case of not using this metal plate and any damage to internal components arises due to the entry of dirt, animals or any other external element, CIRCUTOR will reject any warranty claim against the unit:...
- Page 31 Raption 150C Power input connection - Connecting cable - OPTION A: Charge Point must be supplied with: 1. -Three phases + Neutral (400V 50Hz) 2.- Earth cable 400V 50Hz III+PE Orange cables are powered al- though MCCB is disconnected. L1 L2 Installation guide...
- Page 32 Raption 150C Power input connection - Connecting cable - OPTION B: Charge Point must be supplied with: 1.- Three-phase power source - Three phases + Neutral (400V 50Hz) - Earth cable 2.- Single-phase power source - 230V 50Hz 230V 50Hz 400V 50Hz III+PE Eliminate L1 L2...
- Page 33 Raption 150C Power input connection - Wiring: PHASE NEUTRAL Minimum recommended 150 mm 70 mm 70 mm 2(5) cable cross sectional area This is the minimum recommended cable cross sectional area for the maximum AC input current (see datasheet) using multi-core copper cables with three loaded conductors for in- stallations in conduit in a thermally insulated wall (A2 method according to IEC-60364-5-52).
-
Page 34: F Verification
Check for abnormal noise while charging a vehicle. How to use and configure In order to use and configure the Charging Station there is an User Manual. To get it, download it from the CIRCUTOR web or send a mail to sat@circutor.com Installation guide... - Page 35 Raption 150C Installation guide...
- Page 36 Raption 150C MODELS SPECIFICATIONS Models CCS2 CCS2 CHA CCS2 CCS2 CCS2: 150 kW CCS2: 150 kW Maximum output power 150 kW CHA: 100 kW CCS2: 150 kW CCS2: 150-920 V CCS2: 150-920 V Output voltage range 150-920 V CHA: 150-500 V CCS2: 150-920 V CCS2: 375 A CCS2: 375 A...
-
Page 37: Technical Data
Raption 150C Technical Data CONNECTIVITY Network connection Ethernet 10/100BaseTX Interface protocol OCPP 1.5 or OCPP 1.6J SM Wireless Comunication EU 4G LTE/WiFi Hotspot/GPRS/GSM OPTIONAL DEVICES Wireless Comunication LATAM/APAC/4G LTE/GPRS/GSM Surge protection Four pole transient surge protector IEC 61643-1 (class II) Cable Length 5.5 meters (all cables) Anti-vandal connector protection... - Page 38 Raption 150C Installation guide...
-
Page 39: Need Help
CIRCUTOR guarantees its products against any manufacturing defect for two years after the delivery of the devices. CIRCUTOR will repair or replace any defective factory product returned during the guar- antee period. • No returns will be accepted and no device will be repaired or replaced if it is not accompanied by a report indicating the defect detected or the reason for the return. - Page 40 CIRCUTOR, SA. Vial Sant Jordi, s/n 08232 - Viladecavalls (Barcelona) Tel: (+34) 93 745 29 00 - Fax: (+34) 93 745 29 14 www. circutor.com central@circutor.com...
Need help?
Do you have a question about the Raption 150C Series and is the answer not in the manual?
Questions and answers