Table of Contents
Advertisement
Quick Links
Advertisement
Table of Contents

Related Manuals for MAHA MSD 3000


Summary of Contents for MAHA MSD 3000
- Page 1 MSD 3000 Axle Damping Tester Original Operating Instructions BA031701-en...
-
Page 2: Table Of Contents
BA031701-en 2022-08-26 © MAHA Maschinenbau Haldenwang GmbH & Co. KG The reproduction, distribution and utilization of this document as well as the communication of its contents to others without explicit authorization is prohibited. Offenders will be held liable for the payment of damages. -
Page 3: Safety
Safety Introduction Thoroughly read this manual before operating the equipment and comply with the instructions. Always display the manual in a conspicuous location. Personal injury and property damage incurred due to non-compliance with these safety instructions are not covered by the product liability regulations. Symbols Important safety instructions. -
Page 4: What To Do In The Event Of An Accident
Turn off and padlock the main switch before doing any repair, maintenance or setup work. What to Do in the Event of an Accident The injured person is to be removed from the danger area. Find out where dressing and bandages are kept. - Page 5 BA031701-en...
-
Page 6: Operation
Operation Important Information Operation of this tester is supported by the EUROSYSTEM Software ≥ V 7.10. The tester shows its highest measuring accuracy at a limit value of D = 0.1 ± 0.01. Fully functional shock absorbers have a somewhat higher deviation (D = 0.25 ±... -
Page 7: Test Procedure
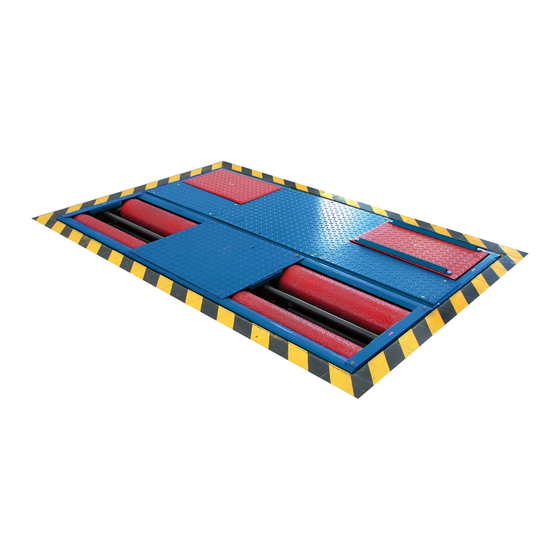
Test Procedure 1 Drive the vehicle onto the test plates with the front axle. The wheels must be positioned straight in the center of the test plates and must not be blocked by an engaged gear or brake. The tester is activated automatically once the load on both test plates exceeds 100kg. -
Page 8: Limit Values
Limit Values 3.4.1 Interpretation of Results Display GREEN YELLOW D > 0.1 D ≤ 0.1 D > 0.1 D ≤ 0.1 2nd Measurement (automatic, and/or and/or D ≤ 40% D > 40% D ≤ 40% D > 40% single wheel) Interpretation Defective Defective... -
Page 9: Redisplay Of Measurements
Redisplay of Measurements 1 In the main menu: Menu item <1> 4 <M> External equipment. Select vehicle. 5 <G> Shock tester. 2 Mark desired entry and load data 6 Use <F2> and <F3> to switch using <F8>. between front and rear axle. 3 <3>... -
Page 10: Additional Functions
Additional Functions 3.6.1 Noise Detection The Noise Detection option can be activated via software. Selecting Noise Detection 1 From the main menu, switch to the second level using < Dn>. 1 In the main menu, select <7> Test 2 <F8> Shock absorber. procedure. - Page 11 Changing the Frequency Use <F9> or <F11> to reduce or in- crease the frequency of the test plates. Use <F10> to determine one particu- lar side to be changed. Storing Noise Points After setting the frequency the noise point can be stored using <F8>.
-
Page 12: Weighing Mode
Setting the Installation Variables Accessing the Installation Variables requires a hardlock. 1 From the main menu, switch to the third level using < Dn>. 2 <F5> System. 3 <1> LON Service. 4 <F> Installation variables. The following Noise Detection variables can be set: ... -
Page 13: Operation With Iw/Mbt Lon Brake Testers
Operation with IW/MBT LON Brake Testers Test 1 Drive onto the tester (A). Weight measurement (B)! 2 Both sides start up simultaneously (C). 3 After measurement completion the pointers move to test value 0 to 0.3 D. If the test value is above 0.3, the pointers move slightly above 0.3 D. ... -
Page 14: Maintenance
Printing and Re-display of the Measurement Values (Re-display of the measurement values is not possible with the RECO remote control.) The print program is started with F7. Enter Program 1 and confirm with star key (*). Printout follows. Re-display of the shock absorber with Shift + Axle number + key F10. If AN5 displays are present, press the F10 key again to switch to the wheel weight. -
Page 15: Troubleshooting
Contents of the Declaration of Conformity MAHA Maschinenbau Haldenwang GmbH & Co. KG herewith declares as a manufacturer its sole responsibility to ensure that the product named hereafter meets the safety and health regulations both in design and construction required by the EC directives stated below. - Page 16 BA031701-en...
Need help?
Do you have a question about the MSD 3000 and is the answer not in the manual?
Questions and answers