
Related Manuals for HBM espressoDAQ DQ401


Summary of Contents for HBM espressoDAQ DQ401
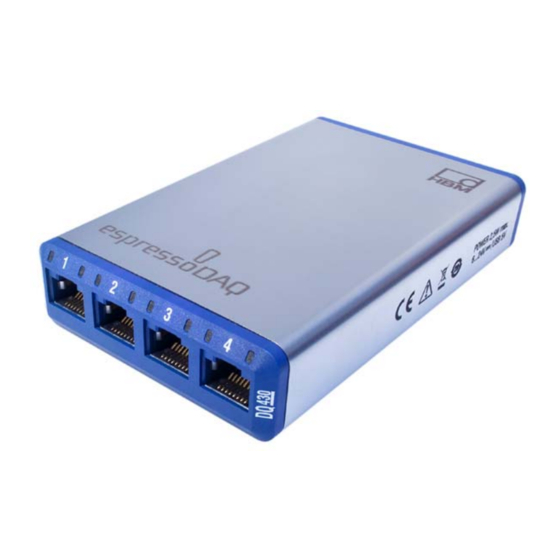
- Page 1 Operating manual Bedienungsanleitung Measuring amplifier Messverstärker DQ401 DQ430 DQ809 A2888-1.1 en/de...
- Page 2 English ..........Page 3−73 Deutsch .
-
Page 3: Table Of Contents
Content Content Page Safety instructions ..........Product description −... - Page 4 Content LED states when ready for measurement ..... . 8.1 System inputs/outputs ........8.2 Transducer inputs .
-
Page 5: Safety Instructions
Safety instructions Safety instructions Appropriate use An espressoDAQ module with its connected sensors or transducers is to be used exclusively for measurement tasks. Use for any purpose other than the above is deemed to be non-designated use. In the interests of safety, the module should only be operated as described in the Operating Manual. - Page 6 Safety instructions Maintenance and cleaning The espressoDAQ system is maintenance-free. − Before cleaning, disconnect the module from all connections. − Clean the housing with a soft, slightly damp (not wet!) cloth. You should never use solvents, since these could damage the labeling. −...
- Page 7 Safety instructions Warning signs and danger symbols Important instructions for your safety are specifically identified. It is essential to follow these instructions, in order to prevent accidents and damage to pro- perty. The safety instructions take the following form: Signal word Consequences of non-compliance Averting the danger −...
- Page 8 In particular, any repair or soldering work on motherboards is prohibited. When exchanging complete modules, use only original parts from HBM. The module is delivered from the factory with a fixed hardware and software confi- guration.
- Page 9 Safety instructions Qualified personnel Qualified personnel means persons entrusted with siting, mounting, starting up and operating the product, who possess the appropriate qualifications for their function. This module is only to be installed and used by qualified personnel strictly in accordance with the specifications and with the safety rules and regulations which follow.
-
Page 10: Product Description − Espressodaq
Product description − espressoDAQ Your decision to buy an amplifier of the espressoDAQ series has brought you compact, USB-based measurement modules in the usual HBM quality. A vast number of different measurement tasks can be resolved with this mea- surement system. With pocket-sized amplifiers, you can very quickly and ea- sily achieve your measurement result. - Page 11 Product description Connection technique Transducers are connected to the amplifiers by RJ45 connectors. These con- nectors can also be assembled without tools, using an insulation displace- ment connection. TEDS The DQ401 and DQ430 espressoDAQ amplifiers support TEDS (Transducer Electronic Data Sheet). When transducers are connected, they are automati- cally detected.
-
Page 12: User Information
Make sure that all the documents you possess and use are always the cur- rent version. The current documentation version for your HBM products can be found at http://www.hbm.com/hbmdoc 2.1 Using this manual Read this operating manual thoroughly and in full before operating the equipment for the first time. -
Page 13: About The Espressodaq Documentation
On the espressoDAQ system CD supplied with the modules Up-to-date versions are always available from our website at http://www.hbm.com/hbmdoc There is a general overview of the espressoDAQ system in Chapter 3 ”Model overview, scope of supply and accessories”. -
Page 14: Symbols Used In This Manual
The CE mark enables the manufacturer to guarantee that the product complies with the requirements of the relevant EC directives (the Declaration of Conformity can be found at http://www.hbm.com/HBMdoc). Statutory waste disposal mark see Chapter 8, Waste disposal Statutory mark of compliance with emission limits in... -
Page 15: Technical Support
Im Tiefen See 45, 64293 Darmstadt, Germany Tel. +49 6151 8030, Fax +49 6151 8039100 E-mail: info@hbm.com www.hbm.com North and South America HBM, Inc., 19 Bartlett Street, Marlborough, MA 01752, USA Tel. +1-800-578-4260 / +1-508-624-4500, Fax +1-508-485-7480 E-mail: info@usa.hbm.com Asia Hottinger Baldwin Measurement (Suzhou) Co., Ltd. -
Page 16: Model Overview, Scope Of Supply And Accessories
Model overview Model overview, scope of supply and accessories 3.1 The espressoDAQ family The espressoDAQ family is a modular and highly adaptable measurement system. The modules can be combined and intelligently connected according to the measurement task. The espressoDAQ system comprises 3 modules: Module Description Transducers that can be... - Page 17 Model overview All modules have the following in common: Voltage supply via USB (5 V) for a single module; low voltage connection possible via SYS IN / SYS OUT ( page 28) in battery operation USB interface for data communication with a PC and USB HUB for several modules ...
-
Page 18: Software Package
USB cable 1 x USB to RJ45 adapter cable, 2 m long 1-KAB286-2 1 TEDS module (1-wire) 1-TEDS-BOARD HBM TEDS dongle for writing and reading TEDS 1-TEDS-DONGLE RJ45 to 2 MINI THERMO thermoadapter, for connecting 2 thermo- 1-KAB418 couples Temperature sensor (1-wire); with open ends; 1 sensor per... -
Page 19: Degree Of Protection / Housing
> 12 mm New Greenline shielding design: To improve electromagnetic interference protection, HBM has developed an effective measure, the Greenline shielding design. The shield is connected to the connector housing. Appropriate routing of the cable shield means that the entire measuring chain is completely enclosed by a Faraday cage. - Page 20 Use standard HBM cables for connecting the transducers. When using other shielded, low-capacitance measurement cables, attach the shield of the trans- ducer cable to the connector housing in accordance with HBM Greenline in- formation (www.hbm.com/greenline). This ensures EMC protection. A2888− 1.1 en/de...
-
Page 21: Starting Up
Starting up Starting up Important The (RJ45) module connector sockets are designed for connecting suit- able transducers and compatible system connections. 5.1 System requirements To operate the current version of the espressoDAQ modules, you need a PC with the following minimum requirements: ... -
Page 22: Connecting And Setting Up The System
Starting up 5.2 Connecting and setting up the system Single module operation Fig. 5.1: Connection example for single module operation Multi-module operation (max. 4 modules) Power supply Active USB HUB DQ 430 DQ 809 DQ 401 Transducer for voltage and current sources Thermoadapter Full and half... -
Page 23: Transducer Plug-In Detection
Starting up 5.3 Transducer plug-in detection Before the module can be in active measurement mode for a selected chan- nel, the module must have recognized that a transducer has been plugged in. The module faultlessly detects when a transducer is plugged in or removed, if plug-in detection has been implemented through a TEDS module or a jumper. - Page 24 Starting up If no transducers are plugged in at the transducer connector, then: DQ401: ... the measured value is in positive overload (for voltage channel only) ... the TEDS chip or the jumper cannot be read/detected. The relevant LED glows red. *>...
-
Page 25: Active Usb Hub Connection (X4)
Starting up 5.4 Active USB HUB connection (x4) A maximum of four espressoDAQ modules can be connected to the active USB hub recommended by HBM. This allows a small, and fully-synchronized system to be set up. NOTE The USB HUB must comply with the current USB 2.0 High-Speed standard (see Universal Serial Bus Revision 2.0 specification), and be listed... -
Page 26: Plug-In Sequence
Starting up 5.4.1 Plug-in sequence 1. Connect the power supply to the USB HUB and turn on the voltage (230 V) The green Power LED on the back of the housing must light up Power supply Fig. 5.5: Connecting the power supply 2. - Page 27 Starting up Overcurrent performance A maximum of 4 modules can be connected to the USB HUB. If the USB HUB detects an overcurrent, this is indicated by the relevant LED on the USB HUB (1 to 4) glowing red. Fig. 5.7: Overcurrent detection Possible cause and remedy: ...
-
Page 28: Electrical Connections
Elektrical connections Electrical connections System-side connection The three system-side connections make up the back of the module. The connector sockets are implemented as RJ45 sockets, each with 8 con- tacts ( Section 8.1, page 43). Significance of system-side connections: USB: connection and USB port of the PC that simultaneously serves as a voltage supply for an individual module. - Page 29 Elektrical connections System-side Transducer-side Module: Transducer: DQ 401: 4 current/voltage connections, 4 temperature sensors DQ 809: 8 thermocouples via thermoadapters, 4 temperature sensors DQ 430: 4 strain gage full or half bridges, 4 temperature sensors Fig. 6.1: Front and back views Applicable to measurement channels: ...
-
Page 30: Module Voltage Supply
Elektrical connections 6.1 Module voltage supply 6.1.1 Connection to a PC (USB input) Connect the espressoDAQ module to the PC’s USB port via the USB chan- nel (USB connection cable 1-KAB286-2). The module is supplied with 5 V at max. 500 mA via the USB cable. One module can be supplied via the PC’s USB socket in this way. -
Page 31: Connection To Battery / Rechargeable Battery / On-Board Supply System, Etc
Elektrical connections 6.1.2 Connection to battery / rechargeable battery / on-board supply system, etc. A module can be supplied with voltage by a 6 V to 28 V battery. If a module is connected to PC and is also supplied by a battery, battery operation is selec- ted automatically. -
Page 32: Transducer Connection
EEPROM via the serial 1-wire interface, reads the data sheet and makes the corresponding amplifier settings. The TEDS module that HBM provides under the 1-TEDS-BOARD product number can, for example, be fitted in a field-assembled, (espressoDAQ) RJ45 connector (insulation displacement connection). -
Page 33: Starting Up The Teds Module
The relevant connector is plugged into the RJ45 socket of the TEDS don- gle. The TEDS editor “scans” the TEDS module and then indicates that it is ready for programming (also see the HBM brochure: TEDS data memory in the transducer − Contents and editing data memory). A2888−1.1 en/de... -
Page 34: Temperature Sensor For All Modules
Transducer connection 7.2 Temperature sensor for all modules Clip-on temperature sensor or other temperature sensor in 1-wire technology, available at www.wiregate.de RJ45-connector DATA PIN 6 at DQ401 PIN 4 at DQ430 Cable color code: wh= white; bk= black; bu= blue; rd= red; ye = yellow; gn= green; gy= gray Cable wire assignment when using an RJ45 connector: Function Color (WireGate sensors) -
Page 35: Transducer Connection To Module Dq401
Transducder connection 7.3 Transducer connection to module DQ401 DC voltage sources " 10 V Transducer connector socket Maximum input voltage to housing and ground = " 60 V, to signal ground = "12 V (−) Cable Hsg. shield Plug-in detection: DATA TEDS module (option) TEDS... - Page 36 Transducer connection DC power source "25 mA; 4 − 20 mA Transducer connector socket Maximum input voltage to housing and ground = " 60 V, to signal ground = "12 V (−) Cable Hsg. shield Plug-in detection: DATA TEDS module (option) TEDS 1-TEDS-BOARD Jumper...
-
Page 37: Transducer Connection To Module Dq430
Transducder connection 7.4 Transducer connection to module DQ430 Strain gage full bridge, can be combined with TEDS inputs. Transducer connector socket Measurement signal (+) Excitation (−) Excitation (+) Measurement signal (−) 0-wire Cable shield Hsg. Sense lead (+) Sense lead (−) Plug-in detection: DATA TEDS module (option) - Page 38 Transducer connection Strain gage half bridge, can be combined with TEDS inputs Transducer connector socket Measurement signal (+) Excitation (−) Excitation (+) 0-wire Cable shield Hsg. Sense lead (+) Sense lead (−) Plug-in detection: DATA TEDS module (option) 1-wire TEDS 1-TEDS-BOARD Jumper Hsg.
-
Page 39: Transducer Connection To Module Dq809
Transducder connection 7.5 Transducer connection to module DQ809 Thermocouples Transducer 1-KAB418 connector socket Thermocouple Measurement − signal (−) Thermocouple A Measurement type-dependent signal (+) 1-KAB419 DATA (contains a cold spot compensation element) Measurement Thermocouple − signal (−) Thermocouple B type-dependent Measurement signal (+) Hsg. - Page 40 Transducer connection DQ809 combination options: Temperature sensor 100 mV Thermo- Measurement Thermo- couples signal (+) 100 mV adapters Measurement Channel 1 + 2 signal (−) Temperature sensor DATA −40 to 125 Channel 3 + 4 Channel 5 + 6 Channel 7 + 8 Hsg.
-
Page 41: Thermoadapters
Transducder connection 7.5.1 Thermoadapters To operate the DQ809 with thermocouples, the 1-KAB419 thermoadapter is connected to the relevant transducer connector socket (see page 39). Two thermocouples can be connected to one thermoadapter. The identifying letters A and B on the thermoadapter make the distinction bet- ween the two channels. - Page 42 Transducer connection Fig. 7.1: Thermocouple connection on thermoadapters Thermoadapters can be stacked and are attached to the next adapter by a magnet on the lower side of the housing..n modules Magnet Fig. 7.2: Stackable thermocouple adapters A2888−1.1 en/de...
-
Page 43: Led States When Ready For Measurement
Meaning of the LEDs LED states when ready for measurement There are always 4 distinctly different modes of operation: a. Events that should lead to a reaction right at the sensor input (TEDS, plug-in detection) b. Events that are evoked manually, e.g. by the ... - Page 44 Meaning of the LEDs SYS OUT connection: LED “A” indicates the module status (the same for all module types) LED “B” inactive Status Significance Remedy inactive , constant Module status OK green Running pattern Module in maintenance mode (e.g. firm- ware download) , flashing Start phase...
-
Page 45: Transducer Inputs
Meaning of the LEDs 8.2 Transducer inputs Status Significance LED glows green Transducer present DQ401: − TEDS present − Jumper present (1-wire lead) DQ430: − Both bridges/sense leads connected − TEDS present DQ809: − TEDS present − Jumper present (1-wire lead) LED glows orange Transducer present, but has Overflow or Underflow status... - Page 46 Meaning of the LEDs DQ401, DQ430 DQ401: A: Voltage B: Current DQ430: A: Full bridge B: Half bridge Fig. 8.2: Transducer-side connections, DQ401, DQ430 The transducer connection in these modules corresponds to the channel in- put. So there are always 2 LEDs available to each channel. Left LED: LED A , Right LED: LED B (see diagram).
-
Page 47: Led Performance In The Run-Up Phase
Meaning of the LEDs 8.3 LED performance in the run-up phase 8.3.1 System connection side LEDs The module run-up phase begins after the supply voltage is connected. This is indicated by glowing LEDs on the system side of the module. Supply via USB: Connection LED (green) SYS IN... - Page 48 Meaning of the LEDs Supply via SYS IN / OUT: Connection LED (green) SYS IN SYS OUT constantly flashes Phase 1 − − − − − twice constantly Phase 2 − − − − flashing Phase 3 − − − −...
-
Page 49: Transducer Connection Side Leds
Meaning of the LEDs 8.3.2 Transducer connection side LEDs The module run-up phase begins after the supply voltage is connected. This is indicated by all the LEDs on the transducer side of the module succes- sively lighting up. Sequence: 1. All the red LEDs light up 2. -
Page 50: Default Settings After The Run-Up Phase
Meaning of the LEDs for module DQ430: Full bridge: LED A (channels 1, 2, 3, 4) 1 V excitation Overflow: +12 mV/V Underflow: −12 mV/V 2.5 V excitation Overflow: +4.8 mV/V Underflow: −4.8 mV/V Half bridge: LED B (channels 1, 2, 3, 4) 1 V excitation Overflow: +12 mV/V Underflow: −12 mV/V... -
Page 51: Starting And Saving Measurement
Starting measurement Starting and saving measurement 9.1 Recommended procedure Install catman Starter ( Section 9.2, page 51) Connect the transducers ( Chapter 7 “Transducer connection”, page 32) Connect the voltage supply ( Section 9.2, page 51) Connect the PC ( Section 6.1.1 “Connection to a PC”, page 30) Start measurement ( Section 9.4, page 52) -
Page 52: Starting Measurement With Catman Starter
Starting measurement 9.4 Starting measurement with catman Starter Launch catman Starter A welcome screen appears containing general information about catman Starter. The dialog can be deactivated for the next call. Click “Next” Click “New measurement project” or open an existing one A2888−1.1 en/de... - Page 53 Starting measurement The “Measurement channels” mask (1) is displayed. Sensor database Measurement channels mask Live measured values Setup Zero setting Start Measurement channel activation Assign the connected sensors to channels. Allocate unique channel names. Mark the channels to be set to zero and run a zero adjustment. ...
-
Page 54: Before Sensor Assignment
Starting measurement 9.4.1 Before sensor assignment Deactivate the Live measured values checkmark (2) 9.4.2 Assigning sensors Activate a measurement channel (4) Double-click the relevant sensor (in the sensor database, on the right) (5) or Drag and Drop the sensor from the sensor database 9.4.3 Setting filters and data rates ... -
Page 55: Opening The "Visualization Setup" Dialog
Starting measurement 9.4.4 Opening the “Visualization setup” dialog Press the “Start” button (top left) (7) You can select the different visualization elements here. A2888−1.1 en/de... - Page 56 Starting measurement Automatic visualization: The combination of “Automatic” and pressing the “Use default setting” but- ton generates a Scope Panel that is divided into four. 1 Stop Each panel represents one espressoDAQ channel in single module operation: Measured values are acquired and displayed in channels 2 and 4. Press the “Stop”...
- Page 57 Starting measurement Manual visualization: Alternatively, visualization can also be set up manually, by clicking on the “Vi- sualization” tab. Visualization Visualization objects Activate the “Visualization” tab (1) to display a blank visualization screen. Open the “Visualization objects” drop-down box (2) to select the different vi- sualization objects.
- Page 58 Starting measurement Further information about “Configuration and measurement” can be Starter online Help found in catman The online Help describes other important catman Starter functions, such as: Online calculations Trigger functions Saving projects Viewing saved projects ...
-
Page 59: Software Support
The package also includes a LabVIEW -driver and libraries, as well as a .NET / .COM API for self-programmers. 10.1 LabVIEW -driver HBM provides a driver to integrate the espressoDAQ modules into the Lab- VIEW graphic programming system. The LabVIEW components are virtual instruments (VIs) or sub-programs, ... - Page 60 Software support Once you have installed espressoDAQ for LabVIEW, the VIs will be located in the directory HBM.espressoDAQ (default: “C:\Program Files\National Instruments\Lab- VIEW 2009\user.lib\HBM.espressoDAQ”). From LabVIEW, you can find the espressoDAQ VIs under “Functions/My libra- ries/HBM.espressoDAQ”. A2888−1.1 en/de...
- Page 61 Software support Links to the documentation, the VIs and the examples can be reached via the Windows Start menu (default: “Start/Programs/HBM/HBM espressoDAQ for LabVIEW”). “Examples” contains various VI examples that give fast access to the basic li- brary functions. The “Demo.vi” VI is slightly more complex and demonstrates the principle of operation of all the relevant espressoDAQ library VIs.
- Page 62 Software support Read the instructions for the demo VI under Help for LabVIEW (default link at “Start/HBM/HBM espressoDAQ for LabVIEW/Documentation/espressoDAQ LabVIEW Documentation”) A2888−1.1 en/de...
-
Page 63: Api / Dll Programming Interface
The “espressoDAQ .Net and ActiveX API” installation package covers not only the actual installation, but also: the installation of the “HBM espressoDAQ USB driver” the installation of “Microsoft Visual C++ Redistributable” and the installation of the “Microsoft .Net Framework 2.0 Runtime” (if this is not yet installed on your computer). -
Page 64: Application
Software support 10.2.1Application Sample projects are installed as standard under “c:\programs\HBM\espressoDAQ API\Examples”. The programs are restricted to using the actual API functions by way of exam- ple. Open the appropriate projects (.Net C# or VB6) for .Net or ActiveX applica- tions development, to view the program code that is executed when the but- tons are pressed. -
Page 65: Firmware Upload
.Net C# API demo VB6 COM demo 10.2.2Firmware upload An update program is available to you on the HBM homepage www.hbm.com/firmware, for keeping the firmware status of your espresso- DAQ module up to date. The software monitors the current status (firmware and hardware status) of your module and informs you whether it it necessary and feasible to update (depending on your hardware status). -
Page 66: Troubleshooting
HBM Transducer inputs: Status Significance All LEDs flashing No adjustment data present : send the module to HBM LED glows No transducer plugged in, faulty TEDS no jumper cable breakage − TEDS is present, but is not written −... -
Page 67: Module Not Found
Troubleshooting 11.1.1 Module not found Check whether LEDs on espressoDAQ are lit. If LEDs are not lit or are only glowing weakly, either the USB cable is not correctly inserted or the USB connection is either not providing any power or is not providing sufficient power The latter can occur particularly when there are several modules connected, or if more devices are additionally connected via the USB, that also have to... -
Page 68: What Happens If The Cable Breaks
DQ809: Significance Orange Measurement channel supply lead: measured value goes to overload 1-wire supply lead: transducer not present Specifications Module specifications for espressoDAQ can be found in separate data sheets (PDF) on the system CD, and at http://www.hbm.com/hbmdoc A2888−1.1 en/de... -
Page 69: Waste Disposal And Environmental Protection
As waste disposal regulations within the EU may differ from country to coun- try, we ask that you contact your supplier as necessary. Packaging The original packaging of HBM devices is made from recyclable material and can be sent for recycling. For ecological reasons, empty packaging should not be returned to us. - Page 70 Waste disposal Environmental protection The product will comply with general hazardous substances limits for at least 20 years, and will be ecologically safe to use during this period, as well as re- cyclable. This is documented by the following symbol. On the module Statutory mark of compliance with emission limits in electronic equipment supplied to China...
-
Page 71: Index
Index Index Active USB hub, 18 , 22 Greenline, 19 Battery, connection, 31 Jumper, 23 Cable breakage, 68 Overcurrent, 27 catmanSTARTER, **installationr**, Overflow, 49 Connection, 22 to a battery, 31 , 32 PC connection, 51 to a PC, 30 to a USB HUB, 25 Pin assignment to transducers, 28 RJ45 connector, 31... - Page 72 Index SYS IN connection, 43 connection, 41 SYS OUT connection, 44 , 66 Thermocouple, 16 System−side connection, 28 Thermocouple amplifier, 16 System−side connections, 28 Thermocouples, connection, 39 Transducers, with TEDS, 58 TEDS, 16 TEDS module, 32 Underflow, 49 Installation , 32 USB connection, 44 Starting up, 33 USB HUB, 18...
- Page 73 Index A2888−1.1 en/de...
- Page 75 Inhaltsverzeichnis Inhalt Seite Sicherheitshinweise ..........Produktbeschreibung espressoDAQ .
- Page 76 Inhaltsverzeichnis 8.3 LED-Verhalten in der Hochlaufphase ......8.3.1 Systemanschlussseitige LED’s ......8.3.2 Aufnehmeranschlussseitige LED’s .
-
Page 78: Sicherheitshinweise
Sicherheitshinweise Sicherheitshinweise Bestimmungsgemäße Verwendung Ein espressoDAQ-Modul mit den angeschlossenen Sensoren bzw. Aufneh- mern ist ausschließlich für Messaufgaben zu verwenden. Jeder darüber hin- ausgehende Gebrauch gilt als nicht bestimmungsgemäß. Zur Gewährleistung eines sicheren Betriebes darf das Modul nur nach den Angaben in der Bedienungsanleitung betrieben werden. Bei der Verwendung sind zusätzlich die für den jeweiligen Anwendungsfall erforderlichen Rechts- und Sicherheitsvorschriften zu beachten. - Page 79 Sicherheitshinweise Wartung und Reinigung Das espressoDAQ-System ist wartungsfrei. − Trennen Sie vor der Reinigung die Verbindung zu allen Anschlüssen. − Reinigen Sie das Gehäuse mit einem weichen und leicht angefeuchteten (nicht nassen!) Tuch. Verwenden Sie auf keinen Fall Lösungsmittel, da diese die Beschriftung angreifen könnten.
- Page 80 Sicherheitshinweise Warnzeichen und Gefahrensymbole Wichtige Hinweise für Ihre Sicherheit sind besonders gekennzeichnet. Beach- ten Sie diese Hinweise unbedingt, um Unfälle und Sachschäden zu vermei- den. Sicherheitshinweise sind wie folgt aufgebaut: Signalwort Folgen bei Nichtbeachtung Gefahrenabwehr − Warnzeichen: macht auf die Gefahr aufmerksam −...
- Page 81 Haftung unsererseits für daraus resultierende Schäden aus. Insbesondere sind jegliche Reparaturen, Lötarbeiten an den Platinen unter- sagt. Bei Austausch gesamter Baugruppen sind nur Originalteile von HBM zu verwenden. Das Modul wurde ab Werk mit fester Hard− und Softwarekonfigu- ration ausgeliefert. Änderungen sind nur im Rahmen der in den Handbüchern dokumentierten Möglichkeiten zulässig.
- Page 82 Sicherheitshinweise Qualifiziertes Personal Qualifiziertes Personal sind Personen, die mit Aufstellung, Montage, Inbe- triebsetzung und Betrieb des Produktes vertraut sind und die über die ihrer Tätigkeit entsprechende Qualifikationen verfügen. Dieses Modul ist nur von qualifiziertem Personal ausschließlich entsprechend der technischen Daten in Zusammenhang mit den nachstehend aufgeführten Sicherheitsbestimmungen und Vorschriften einzusetzen bzw.
-
Page 83: Produktbeschreibung Espressodaq
Produktbeschreibung Produktbeschreibung espressoDAQ Mit dem Kauf des Messverstärkers der Serie espressoDAQ haben Sie sich für kompakte USB-basierte Messmodule in gewohnter HBM-Qualität entschie- den. Mit dem Messsystem lassen sich eine Vielzahl unterschiedlichster Messauf- gaben lösen. Die Messverstärker im Westentaschenformat erlauben Ihnen, sehr schnell und einfach zu Ihrem Messergebnis zu kommen. - Page 84 Produktbeschreibung Anschlusstechnik Die Aufnehmer werden mit RJ45-Steckern an die Messverstärker angeschlos- sen. Diese Stecker können auch ohne Werkzeug mit Schneid-Klemm-Technik konfektioniert werden. TEDS Die espressoDAQ-Messverstärker DQ401 DQ430 unterstützen TEDS (Trans- ducer Electro−nic Data Sheet). Die Aufnehmer werden beim Anschließen au- tomatisch erkannt.
-
Page 85: Benutzerhinweise
Bedienung des Produktes führen. Stellen Sie sicher, dass Sie stets die aktuelle Version aller Dokumentatio- nen besitzen und verwenden. Die aktuelle Version der Dokumentation von HBM-Produkten finden Sie unter http://www.hbm.com/hbmdoc 2.1 Anwendung dieser Anleitung Lesen Sie die Bedienungsanleitung gründlich und vollständig, bevor Sie das Gerät zum ersten Mal in Betrieb nehmen. -
Page 86: Wissenswertes Über Die Espressodaq-Dokumentation
Aufgaben durchgeführt werden Sie finden diese Dokumente auf der mit den Modulen gelieferten espressoDAQ-System-CD immer aktuell auf unseren Internetseiten unter http://www.hbm.com/hbmdoc Eine Gesamtübersicht über das espresoDAQ-System finden Sie im Kapitel 3 “Typenübersicht, Lieferumfang und Zubehör”. A2888−1.1 en/de... -
Page 87: In Dieser Anleitung Verwendete Symbole
Informationen. Kennzeichnung Mit der CE-Kennzeichnung garantiert der Hersteller, dass sein Produkt den Anforderungen der relevanten EG-Richtlinien entspricht (die Konformitätserklärung finden Sie unter http://www.hbm.com/HBMdoc). Gesetztlich vorgeschriebene Kennzeichnung zur Entsorgung siehe Kapitel 8, Entsorgung Gesetztlich vorgeschriebene Kennzeichnung für die Einhaltung von Schadstoff-Grenzwerten in elektronischen Geräten für die Lieferung nach China... -
Page 88: Technische Unterstützung
Im Tiefen See 45, 64293 Darmstadt, Deutschland Tel. +49 6151 8030, Fax +49 6151 8039100 E−Mail: info@hbm.com www.hbm.com Nord− und Südamerika HBM, Inc., 19 Bartlett Street, Marlborough, MA 01752, USA Tel. +1−800−578−4260 / +1−508−624−4500, Fax +1−508−485−7480 E−Mail: info@usa.hbm.com Asien Hottinger Baldwin Measurement (Suzhou) Co., Ltd. -
Page 89: Typenübersicht, Lieferumfang Und Zubehör
Typenübersicht Typenübersicht, Lieferumfang und Zubehör 3.1 Die espressoDAQ-Familie Bei der espressoDAQ-Familie handelt es sich um ein modulares und flexibel einsetzbares Messystem. Die Module können entsprechend der Messaufgabe kombiniert und intelligent verbunden werden. Das espressoDAQ-System besteht aus 3 Modulen: Modul Beschreibung Anschließbare Aufnehmer Bestell−Nr. - Page 90 Typenübersicht Alle Module haben folgendes gemein: Spannungsversorgung über USB (5V) bei einem einzelnen Modul; Niederspannungsanschluss möglich über SYS IN / SYS OUT ( Seite 28) bei Batteriebetrieb USB-Schnittstelle zur Datenkommunikation mit einem PC bzw. USB−HUB bei mehreren Modulen ...
-
Page 91: Softwarepaket
Kabel 1 Adapterkabel USB auf RJ45, 2 m lang 1−KAB286−2 1 TEDS-Modul (1−Wire) 1−TEDS−BOARD HBM TEDS-Dongle zum beschreiben und lesen von TEDS 1−TEDS−DONGLE Thermoadapter RJ45 auf 2 MINI THERMO, zum Anschluss von 2 1−KAB419 Thermoelementen Temperatursensor (1−Wire); mit offenen Enden; 1 Sensor pro Kanal erhältlich bei... -
Page 92: Schutzart / Gehäuse
Neues Schirmungskonzept Greenline: Für eine Verbesserung des Schutzes vor elektromagnetischen Störungen hat HBM als wirkungsvolle Maßnahme das Schirmungskonzept Greenline entwik- kelt. Der Schirm ist mit dem Steckergehäuse verbunden. Die komplette Meß- kette wird durch geeignete Führung des Kabelschirmes von einem Faraday- schen Käfig vollständig umschlossen. - Page 93 Schutzart HINWEIS Verwenden Sie zum Anschluß der Aufnehmer Standardkabel von HBM. Bei Verwendung anderer geschirmter, kapazitätsarmer Meßkabel legen Sie den Schirm des Aufnehmerkabels entsprechend den HBM-Greenline-Informatio- nen (www.hbm.com/greenline) auf das Steckergehäuse. Damit ist der EMV- Schutz gewährleistet. A2888−1.1 en/de...
-
Page 94: Inbetriebnahme
Inbetriebnahme Inbetriebnahme Wichtig Die Anschlussbuchsen (RJ45) der Module sind für den Anschluss von geeigneten Aufnehmern und passenden Systemanschlüssen vorgese- hen. 5.1 Systemvoraussetzungen Für den Betrieb mit den espressoDAQ-Modulen in der aktuellen Version benö- tigen Sie einen PC mit folgenden Mindestvoraussetzungen: ... -
Page 95: Anschließen Und Einrichten Des Systems
Inbetriebnahme 5.2 Anschließen und Einrichten des Systems Einmodul-Betrieb Abb. 5.1: Anschlussbeispiel für den Einmodul-Betrieb Mehrmodul-Betrieb (max. 4 Module) Netzteil Aktiver USB-HUB DQ 430 DQ 809 DQ 401 Aufnehmer für Spannungs- und Stromquellen Thermoadapter Voll- und Thermoelement Halbbrückenaufnehmer Abb. 5.2: Anschlussbeispiel einer kompletten Messkette A2888−1.1 en/de... -
Page 96: Ansteck-Erkennung Der Aufnehmer
Inbetriebnahme 5.3 Ansteck-Erkennung der Aufnehmer Bevor das Modul für einen selektierten Kanal in den aktiven Messmodus geht, muss das Modul das Aufstecken eines Aufnehmers erkannt haben. Das Auf- stecken oder Abziehen eines Aufnehmers wird vom Modul einwandfrei er- kannt wenn die Aufsteckerkennung durch ein TEDS-Modul oder eine Kurz- schlussbrücke realisiert wurde. - Page 97 Inbetriebnahme Wenn am Aufnehmeranschluss kein Aufnehmer aufgesteckt ist, so: DQ401: ... geht der Messwert in die positive Übersteuerung (nur bei Spannungs- kanal) ... kann der TEDS-Chip bzw. die Kurzschlussbrücke nicht gelesen/erkannt werden. Die entsprechende LED leuchtet rot. *> DQ430: ...
-
Page 98: Anschluss Des Aktiven Usb-Hubs (4Fach)
Inbetriebnahme 5.4 Anschluss des aktiven USB-HUBs (4fach) An den von HBM empfohlenen aktiven USB−Hub können maximal vier espressoDAQ-Module angeschlossen werden. Damit lässt sich ein kleines, voll synchronisiertes System aufbauen. HINWEIS Der USB-HUB muss der aktuellen USB 2.0 High-Speed-Norm (siehe Univer- sal Serial Bus Revision 2.0 specification) entsprechen und gelistet sein... -
Page 99: Ansteckreihenfolge
Inbetriebnahme 5.4.1 Ansteckreihenfolge 3. Netzteil mit dem USB-HUB verbinden und Spannung einschalten (230 V) Die grüne Power-LED auf der Gehäuserückseite muss leuchten Netzteil Abb. 5.5: Netzteil anschließen 4. PC und weitere Module anschließen 1−KAB286−2 Standard USB-Kabel, 1−USBHUB−4A Netzteil Abb. 5.6: USB-HUB-Anschluss mit 4 Modulen Das Anschließen in der richtigen Reihenfolge verhindert, dass der USB−HUB einen oder mehrere seiner Kanäle und damit entsprechende espressoDAQ- Modul von der Spannungsversorgung abtrennt und dieses Modul beim Aufruf... - Page 100 Inbetriebnahme Verhalten bei Überstrom Es können max. 4 Module an den USB−HUB angeschlossen werden. Erkennt der USB−HUB einen Überstrom, so wird dies durch die entspre- chende rot leuchtende LED (1 bis 4) am USB−HUB signalisiert. Abb. 5.7: Überstrom-Erkennung Mögliche Ursache und Abhilfe: ...
-
Page 101: Elektrische Anschlüsse
Elektrische Anschlüsse Elektrische Anschlüsse Systemseitiger Anschluss Die drei systemseitigen Anschlüsse stellen die Rückseite des Moduls dar. Die Anschlussbuchsen sind als RJ45-Buchsen mit je 8 Kontakten ausgeführt Kapitel 8.1, Seite 43). Bedeutung der systemseitigen Anschlüsse: USB: Anschluss and den USB-Port des PCs der bei einem einzelnen Modul gleichzeitig als Spannungsversorgung dient. - Page 102 Elektrische Anschlüsse Systemseitig Aufnehmerseitig Modul: Aufnehmer: DQ 401: 4 Strom−Spannungsanschlüsse, 4 Temperatursensoren DQ 809: 8 Thermoelemente über Thermoadapter, 4 Temperatursensoren DQ 430: 4 DMS Voll- oder Halbbrücken, 4 Temperatursensoren Abb. 6.1: Front- und Rückseite Für die Messkanäle gilt: galvanische Trennung (DQ401, DQ809) ...
-
Page 103: Spannungsversorgung Der Module
Elektrische Anschlüsse 6.1 Spannungsversorgung der Module 6.1.1 Anschluss an einen PC (USB-Eingang) Das esspressoDAQ-Modul über den USB-Kanal mit dem USB-Port des PCs verbinden (USB-Anschlusskabel 1−KAB286−2). Über die USB-Leitung wird das Modul mit 5 V bei max. 500 mA versorgt. Damit kann ein Modul über die USB-Buchse des PCs versorgt werden. Anschlussbelegung USB-Anschlusskabel: Benennung Ader-... -
Page 104: Anschluss An Batterie / Akku / Bordnetz Etc
Elektrische Anschlüsse 6.1.2 Anschluss an Batterie / Akku / Bordnetz etc. Ein Modul kann über eine Batterie mit 6 V bis 28 V mit Spannung versorgt werden. Wenn ein Modul an einen PC angeschlossen ist und zusätzlich mit einer Batterie versorgt wird, wird automatisch auf Batteriebetrieb umgeschal- tet. -
Page 105: Aufnehmer Anschließen
TEDS − Transducer Electronic Data Sheet). Der Verstärker kommuniziert über die serielle 1−wire−Schnittstelle mit diesem EEPROM, liest das Datenblatt aus und stellt den Messverstärker entsprechend ein. HBM bietet unter der Bestellbezeichnung 1−TEDS−BOARD ein TEDS-Modul an das u.a. in einem feldkonfektionierbaren RJ45-Stecker (espressoDAQ) montiert werden kann (Schneid/Klemmtechnik). -
Page 106: Inbetriebnahme Des Teds-Moduls
Hierzu wird der entsprechende Stecker in die RJ45-Buchse des TEDS-Dongles gesteckt. Der TEDS-Editor “scannt” das TEDS-Modul ab und signalisiert dann seine Bereitschaft zur Programmierung (siehe auch HBM−Druckschrift: TEDS Da- tenspeicher im Aufnehmer − Inhalt und Bearbeiten des Datenspeichers). A2888−1.1 en/de... -
Page 107: Temperatursensor Für Alle Module
Aufnehmer anschließen 7.2 Temperatursensor für alle Module Anlegetemperatursensor oder andere Temperatursensor in 1−Wire−Technolo- gie, zu beziehen unter www.wiregate.de RJ45-Stecker DATA PIN 6 bei DQ401 PIN 4 bei DQ430 Kabeladerfarben: ws= weiß; sw= schwarz; bl= blau; rt= rot; ge= gelb; gn= grün; gr= grau Kabeladerbelegung bei Verwendung eines RJ45-Steckers: Funktion Farbe (WireGate-Sensoren) -
Page 108: Aufnehmeranschluss An Das Modul Dq401
Aufnehmer anschließen 7.3 Aufnehmeranschluss an das Modul DQ401 Gleichspannungsquellen " 10 V Aufnehmer- anschlussbuchse Maximale Eingangsspannung gegen Gehäuse und Masse = " 60 V, gegen Messmasse = "12 V (−) Kabelschirm Geh. Aufsteckerkennung: DATA TEDS-Modul (optional) TEDS 1−TEDS−BOARD oder Kurzschlussbrücke Geh.=Gehäuse Kapitel 5.3, Seite 23 Aufnehmeranschlussbuchse 1 ... - Page 109 Aufnehmer anschließen Gleichstromquellen "25 mA; 4 − 20 mA Aufnehmer- anschlussbuchse Maximale Eingangsspannung gegen Gehäuse und Masse = " 60 V, gegen Messmasse = "12 V (−) Kabelschirm Geh. Aufsteckerkennung: DATA TEDS-Modul (optional) TEDS 1−TEDS−BOARD oder Kurzschlussbrücke Geh.=Gehäuse Kabeladerfarben: ws= weiß; sw= schwarz; bl= blau; rt= rot; ge= gelb; gn= grün; gr= grau Aufnehmeranschlussbuchse 1 ...
-
Page 110: Aufnehmeranschluss An Das Modul Dq430
Aufnehmer anschließen 7.4 Aufnehmeranschluss an das Modul DQ430 DMS-Vollbrücke, kombinierbar mit TEDS-Eingängen. Aufnehmer- anschlussbuchse Messsignal (+) Speisung (−) Speisung (+) Messsignal (−) 0−Wire Kabelschirm Geh. Fühlerleitung (+) Fühlerleitung (−) oder Aufsteckerkennung: DATA TEDS-Modul (optional) 1−Wire TEDS 1−TEDS−BOARD oder Kurzschlussbrücke Geh.=Gehäuse Kabeladerfarben: ws= weiß;... - Page 111 Aufnehmer anschließen DMS-Halbbrücke, kombinierbar mit TEDS-Eingängen Aufnehmer- anschlussbuchse Messsignal (+) Speisung (−) Speisung (+) 0−Wire Kabelschirm Geh. Fühlerleitung (+) Fühlerleitung (−) Aufsteckerkennung: DATA TEDS-Modul (optional) 1−Wire TEDS 1−TEDS−BOARD oder Kurzschlussbrücke Geh.=Gehäuse Kabeladerfarben: ws= weiß; sw= schwarz; bl= blau; rt= rot; ge= gelb; gn= grün; gr= grau Aufnehmeranschlussbuchse 1 ...
-
Page 112: Aufnehmeranschluss An Das Modul Dq809
Aufnehmer anschließen 7.5 Aufnehmeranschluss an das Modul DQ809 Thermoelemente Aufnehmer- 1−KAB419 anschlussbuchse Thermoelement Messsignal (−) − Thermoelement A Messsignal (+) typabhängig 1−KAB419 DATA (enthält ein Kaltstellen- Kompensationselement) Thermoelement Messsignal (−) − Thermoelement B typabhängig Messsignal (+) Geh. Geh. EEPROM Thermomaterial 1 (+) Thermomaterial 2 (−) Eisen Kupfer-Nickel... - Page 113 Aufnehmer anschließen Kombinationsmöglichkeiten DQ809: Temperatursensor oder 100 mV Thermo- Thermo- Messsignal (+) 100 mV elemente adapter Messsignal (−) Kanal 1 + 2 Temperatursensor DATA −40...125 Kanal 3 + 4 Kanal 5 + 6 Kanal 7 + 8 Geh. Geh. A2888−1.1 en/de...
-
Page 114: Thermoadapter
Aufnehmer anschließen 7.5.1 Thermoadapter Zum Betrieb des DQ809 mit Thermoelementen wird der Thermoadapter 1−KAB419 mit den entsprechenden Aufnehmeranschlussbuchsen verbunden (siehe Seite 110). An einem Thermoadapter können zwei Thermoelemente angeschlossen wer- den. Zur Unterscheidung der Kanäle befinden sich auf dem Thermoadapter die Kennzeichnungsbuchstaben A und B. - Page 115 Aufnehmer anschließen Abb. 7.1: Thermoelentanschluss an Thermoadapter Die Thermoadapter sind stapelbar und werden durch einen Magneten auf der Gehäuseunterseite auf den nächsten Adapter fixiert..n Module Magnet Abb. 7.2: Thermoelentadapter stapelbar A2888−1.1 en/de...
-
Page 116: Led-Zustände Bei Messbereitschaft
Bedeutung der LEDs LED-Zustände bei Messbereitschaft Es sind grundsätzlich 4 Betriebsarten zu unterscheiden: a. Ereignisse, die direkt am Sensoreingang zu einer Reaktion führen sollen (TEDS, Aufsteckerkennung) b. Ereignisse die manuell hervorgerufen werden z.B. durch die Software catman Starter c. Ereignisse die durch messtechnische Fehlfunktionen hervorgerufen werden (Overflow, Underflow) d. - Page 117 Bedeutung der LEDs SYS OUT-Anschluss: LED “A” zeigt den Modulstatus (einheitlich für alle Modultypen) an LED “B” inaktiv Zustand Bedeutung Abhilfe inaktiv , dauerhaft Modulstatus OK grün Laufmuster Modul im Wartungsmodus (z.B. Firmware- Download) , blinkend Startphase grün USB-Anschluss: LED “A” zeigt den Status der USB-Versorgung an LED “B”...
-
Page 118: Aufnehmereingänge
Bedeutung der LEDs 8.2 Aufnehmereingänge Zustand Bedeutung LED leuchtet grün Aufnehmer vorhanden DQ401: − TEDS vorhanden − Kurzschlussbrücke vorhanden (1−Wire−Leitung) DQ430: − beide Brücken/Fühlerleitungen verbunden − TEDS vorhanden DQ809: − TEDS vorhanden − Kurzschlussbrücke vorhanden (1−Wire−Leitung) LED leuchtet orange Aufnehmer vorhanden, aber im Over- bzw. Underflow-Zustand Bedeutung der LED-Position: Modul Position... - Page 119 Bedeutung der LEDs DQ401, DQ430 DQ401: A: Spannung B: Strom DQ430: A: Vollbrücke B: Halbbrücke Abb. 8.2: Aufnehmerseitige Anschlüsse DQ401, DQ430 Der Aufnehmeranschluss entspricht bei diesen Modulen dem Kanaleingang. So stehen jedem Kanal jeweils 2 LED’s zur Verfügung. Linke LED: LED A , Rechte LED: LED B (siehe Abbildung). DQ809 Beim DQ809 entspricht ein Aufnehmeranschluss zwei Kanaleingängen.
-
Page 120: Led-Verhalten In Der Hochlaufphase
Bedeutung der LEDs 8.3 LED-Verhalten in der Hochlaufphase 8.3.1 Systemanschlussseitige LED’s Die Hochlaufphase der Module beginnt nach dem Anschluss der Versor- gungsspannung. Dies wird durch Aufleuchten der LED’s auf der Systemseite des Moduls angezeigt. Versorgung über USB: Anschluss-LED (grün) SYS IN SYS OUT dauerhaft Phase 1... - Page 121 Bedeutung der LEDs Versorgung über SYS IN / OUT: Anschluss-LED (grün) SYS IN SYS OUT dauerhaft Phase 1 − − − − − blinkt zwei- Phase 2 − − − − dauerhaft Phase 3 − − − − blinkend Phase 4 −...
-
Page 122: Aufnehmeranschlussseitige Led's
Bedeutung der LEDs 8.3.2 Aufnehmeranschlussseitige LED’s Die Hochlaufphase der Module beginnt nach dem Anschluss der Versor- gungsspannung. Dies wird durch nacheinander folgendes Aufleuchten aller LED’s auf der Auf- nehmerseite des Moduls angezeigt. Reihenfolge: 1. Alle roten LED’s leuchten 2. Alle orangenen LED’s leuchten im Abstand von einer Sekunde 3 Nach einer weiteren Sekunde: alle grünen LED’s leuchten Im Anschluss zeigen die LED’s den aktuellen Status am Aufnehmeranschluss 8.4 Anzeige bei Overflow / Underflow... -
Page 123: Default-Einstellungen Nach Der Hochlaufphase
Bedeutung der LEDs für Modul DQ430: Vollbrücke: LED A (Kanal 1, 2, 3, 4) 1V Speisung Overflow: + 12 mV/V Underflow: − 12 mV/V 2,5 V Speisung Overflow: + 4,8 mV/V Underflow: − 4,8 mV/V Halbbrücke: LED B (Kanal 1, 2, 3, 4) 1V Speisung Overflow: + 12 mV/V Underflow: −... -
Page 124: Messung Starten Und Speichern
Messung starten Messung starten und speichern 9.1 Empfohlene Vorgehensweise catman Starter installieren ( Kapitel 9.2, Seite 122) Aufnehmer anschließen ( Kapitel 7 “Aufnehmer anschließen”, Seite 32) Spannungsversorgung anschließen ( Kapitel 9.2, Seite 122) PC anschließen ( Kapitel 6.1.1 “Anschluss an einen PC”, Seite 30) Messung starten ( Kapitel 9.4, Seite 123) ... -
Page 125: Messung Starten Mit CatmanStarter
Messung starten 9.4 Messung starten mit catman Starter Starten Sie catman Starter Es öffnet sich ein Begrüßungsbildschirm mit allgemeinen Informationen zu catman Starter. Für den nächsten Aufruf kann der Dialog deaktiviert werden. klicken auf “Weiter” ... - Page 126 Messung starten Die Maske “Messkanäle ” (1) wird angezeigt. Sensordatenbank Maske der Messkanäle Live Messwerte Einrichten Nullstellen Start Messkanal aktivieren Weisen Sie den Kanälen die angeschlossenen Sensoren zu. Vergeben Sie eindeutige Kanalnamen. Markieren Sie die Kanäle, die auf Null gesetzt werden sollen und führen Sie den Nullabgleich durch.
-
Page 127: Vor Der Sensorzuweisung
Messung starten Live Messwerte der Messkanäle werden in mV/V angezeigt wenn keine TEDS Sensoren angeschlossen sind. Live Messwerte der Messkanäle werden einheitenrichtig angezeigt wenn TEDS Sensoren angeschlossen sind 9.4.1 Vor der Sensorzuweisung den Haken Live Messwerte (2) deaktivieren 9.4.2 Sensoren zuweisen ... -
Page 128: Dialog "Visualisierung Einrichten" Öffnen
Messung starten 9.4.4 Dialog “Visualisierung einrichten” öffnen Drücken des ”Start” Buttons oben links (7) Hier können Sie unterschiedliche Visualisierungselemente auswählen. A2888−1.1 en/de... - Page 129 Messung starten Visualisierung automatisch: Mit der Kombination “Automatisch” und drücken von “Voreinstellung ver- wenden” wird ein viergeteiltes Scope-Panel erzeugt. 1 Stopp Jedes Panel repräsentiert einen espressoDAQ-Kanal bei Einmodul-Betrieb: Auf Kanal 2 und 4 werden Messwerte erfasst und angezeigt. Durch Drücken des ”Stopp” Buttons (1) wird die Messung gestoppt und die Messdaten können in verschiedenen Formaten für spätere Analysen abgelegt werden.
- Page 130 Messung starten Visualisierung manuell: Alternativ kann die Visualisierung auch manuell eingerichtet werden durch klick auf das Register “Visualisierung”. Visualisierung Visualisierungsobjekte Durch Aktivieren des Reiters ”Visualisierung” (1) wird ein leerer Visualisie- rungs Bildschirm gezeigt. Durch Öffnen der Drop Down Box ”Visualisierungsobjekte” (2) können ver- schiedene Visualisierungselemente ausgewählt werden.
- Page 131 Messung starten Tipp Weitergehende Informationen zu “Konfigurieren und Messen” finden Sie Starter. in der Onlinehilfe zu catman Die Onlinehilfe beschreibt weitere wichtige Funktionen von catman Starter, wie z.B.: Onlineberechnungen Triggerfunktionen Speichern von Projekten Ansehen von gespeicherte Projekten ...
-
Page 132: Softwareunterstützung
Das Installationspaket ”espressoDAQ für LabVIEW” umfasst neben der ei- gentlichen Installation noch die Installation des ”HBM espressoDAQ USB Treiber” die Installation des ”Microsoft Visual C++ Redistributable” sowie die Installation der ”Microsoft .Net Framework 2.0 Runtime” (falls diese noch nicht auf Ihrem Rechner installiert ist). - Page 133 Bitte entfernen Sie diese Pakete bei Bedarf manuell (über Systemsteuerung/ Software). Nach der Installation von espressoDAQ für LabVIEW befinden sich die VIs unter dem Verzeichnis HBM.espressoDAQ (Default: ”C:\Program Files\National Instruments\Lab- VIEW 2009\user.lib\HBM.espressoDAQ”). Von LabVIEW aus können Sie die espressoDAQ VIs unter ”Funktionen/Ei- gene Bibliotheken/HBM.espressoDAQ” finden.
- Page 134 Softwareunterstützung Verknüpfungen zu der Dokumentation, den VIs und den Beispielen sind über das Windows Startmenu erreichbar (Default: ”Start/Programme/HBM/HBM espressoDAQ for LabVIEW”). Unter ”Examples” sind verschiedene Beispiel-VIs zu finden, die einen schnel- len Zugang zu den grundlegenden Funktionen der Bibliothek vermitteln.
- Page 135 Softwareunterstützung Bitte lesen Sie die Hinweise zu dem Demo−VI unter der Hilfe für LabVIEW (Default−Verknüpfung unter ”Start/HBM/HBM espressoDAQ for LabVIEW/Do- cumentation/espressoDAQ LabVIEW Documentation”) A2888−1.1 en/de...
-
Page 136: Programmierschnittstelle Api / Dll
Das Installationspaket ”espressoDAQ .Net und ActiveX API” umfasst neben der eigentlichen Installation noch die Installation des ”HBM espressoDAQ USB Treiber” die Installation des ”Microsoft Visual C++ Redistributable” sowie die Installation der ”Microsoft .Net Framework 2.0 Runtime” (falls diese noch nicht auf Ihrem Rechner installiert ist). -
Page 137: Anwendung
Softwareunterstützung 10.2.1Anwendung Die Beispielprojekte werden standardmäßig unter ”c:\programme\HBM\espressoDAQ API\Examples” installiert. Die Programme beschränken sich darauf, die eigentlichen API Funktionen beispielhaft zu nutzen. Öffnen Sie die entsprechenden Projekte (.Net C# bzw. VB6) für .Net oder Acti- veX Anwendungsentwicklung, um den Programmcode, der beim Drücken der Buttons ausgeführt wird, anzusehen. -
Page 138: Firmware Upload
.Net C# API−Demo VB6 COM−Demo 10.2.2Firmware Upload HBM stellt Ihnen auf seiner Homepage www.hbm.com/firmware ein Update− Programm zur Verfügung , mit der Sie ihr espressoDAQ Modul auf den neue- sten Firmware−Stand bringen können. Die Software kontrolliert den aktuellen Status (Firmware−/und Hardware−Stand) ihres Modules und teilt ihnen mit, ob ein Update notwendig und machbar (abhängig vom Hardwarestand) ist. -
Page 139: Problembehebung
Modul an HBM Aufnehmereingänge: Zustand Bedeutung alle LED blinken keine Abgleichdaten vorhanden : senden Sie das Modul an HBM LED leuchtet kein Aufnehmer aufgesteckt, TEDS defekt keine Kurzschlussbrücke Kabelbruch − TEDS vorhanden, muss aber nicht beschrieben sein − Kurzschlussbrücke vorhanden (1−Wire−Leitung) -
Page 140: Modul Nicht Gefunden
Problembehebung 11.1.1 Modul nicht gefunden Überprüfen Sie, ob die LEDs am espressoDAQ leuchten. Falls die LEDs dunkel sind oder nur schwach glimmen, ist entweder das USB-Kabel nicht richtig eingesteckt oder der USB-Anschluss liefert keine oder zumindest keine ausreichende Stromversorgung Letzteres kann insbesondere bei mehreren angeschlossenen Modulen auftre- ten oder wenn zusätzlich weitere Geräte über USB angeschlossen sind, die... -
Page 141: Was Passiert Bei Kabelbruch
Zuleitung 1−Wire: Aufnehmer nicht vorhanden (wenn kein 0−Wire- Modul) DQ809: Bedeutung Orange Zuleitung Messkanal: Messwert geht in die Übersteuerung Zuleitung 1−Wire: Aufnehmer nicht vorhanden Technische Daten Die technischen Daten der espressoDAQ-Module finden Sie in gesonderten Datenblättern (PDF) auf der System-CD sowie auf http://www.hbm.com/hbmdoc A2888−1.1 en/de... -
Page 142: Entsorgung Und Umweltschutz
Sie, im Bedarfsfall Ihren Lieferanten anzu- sprechen. Verpackungen Die Originalverpackung der HBM-Geräte besteht aus wiederverwertbarem Material und kann der Wiederverwertung zugeführt werden. Aus ökologischen Gründen sollte auf den Rücktransport der leeren Verpackungen an uns ver- zichtet werden. - Page 143 Entsorgung Umweltschutz Das Produkt hält für mind. 20 Jahre die allgemeinen Grenzwerte gefährlicher Stoffe ein, ist für diesen Zeitraum umweltsicher zu verwenden und recyclebar. Dies wird durch das folgende Symbol dokumentiert. Auf dem Modul Gesetzlich vorgeschriebene Kennzeichnung für die Einhaltung von Schadstoff-Grenzwerten in elektronischen Geräten für die Lieferung nach China A2888−1.1 en/de...
-
Page 144: Index
Index Index Aktiver USB−Hub, 89 , 93 Fehlermeldungen, 137 Anschliesen, 93 Firmware Update, 136 an USB−HUB, 96 Firmware−Upload, 136 Anschließen an Aufnehmer, 99 an eine Batterie, 102 , 103 Gleichspannungsquellen, anschlie- an einen PC, 101 ßen, 106 Anschlussbelegung Gleichstromquellen, anschließen, RJ45 Stecker, 102 USB Anschlusskabel, 101 Greenline, 90... - Page 145 Index Thermoadapter, 88 , 113 anschließen, 112 Schirmungskonzept, 90 Thermoelement, 87 Schutzart, 90 Thermoelement−Messverstarker, Spannungsquellen, 87 Strom/Spannungsmessverstärker, Thermoelemente, anschließen, 110 Stromquellen, 87 SYS IN−Anschluss, 114 SYS OUT−Anschluss, 115 , 137 Uberstrom, 98 Systemseitige Anschlüsse, 99 Underflow, 120 Systemseitiger Anschluss, 99 USB−Anschluss, 115 USB−HUB, 89 anschließen, 96...
- Page 146 Form. Sie stellen keine Beschaffenheits− oder Halbarkeits− garantie im Sinne des §443 BGB dar und begründen keine Haftung. Hottinger Baldwin Messtechnik GmbH Im Tiefen See 45 S 64293 Darmstadt S Germany Tel. +49 6151 803−0 S Fax: +49 6151 803−9100 Email: info@hbm.com S www.hbm.com...