Otto Bock Zenit Instructions For Use Manual
Hide thumbs
Also See for Zenit:
- Instructions for use manual (40 pages) ,
- Instructions for use manual (36 pages)

Related Manuals for Otto Bock Zenit


Summary of Contents for Otto Bock Zenit
- Page 1 Zenit Instructions for use (user) ..................
- Page 2 Zenit...
-
Page 3: Table Of Contents
Lap belt (seat belt) ..........................7.13 Additional options ..........................7.14 Disassembly and transport ........................7.15 Use in vehicles for transporting persons with reduced mobility ..............7.15.1 Zenit, Zenit R without CLT option ......................7.15.1.1 Required accessories .......................... 7.15.1.2 Installation ............................Zenit... - Page 4 Table of contents 7.15.1.3 Using the product in a vehicle ....................... 7.15.1.4 Restrictions for use ..........................7.15.2 Zenit CLT, Zenit R CLT Option ......................7.16 Care ..............................7.16.1 Cleaning ............................7.16.1.1 Cleaning by hand ..........................7.16.1.2 Cleaning the seat cushion ........................
-
Page 5: Foreword
Your product may differ from the models shown. In particular, not all the options described in these instruc tions for use will be installed on your product. • The manufacturer reserves the right to make technical changes to the model described in these instructions for use. Zenit... -
Page 6: Product Description
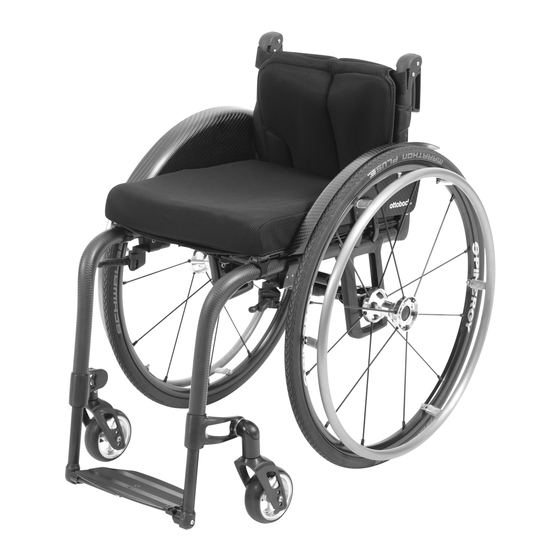
2.2 Product overview Zenit folding wheelchair The Zenit folding wheelchair is equipped with an open frame made of aluminium, or optionally of carbon. Thanks to the Easy-Go folding system, it can be unfolded with little effort. 1 Back support/back support upholstery... - Page 7 Zenit CLT folding wheelchair The Zenit CLT folding wheelchair is equipped with an open frame made of aluminium. Thanks to the Easy-Go fold ing system, it can be unfolded with little effort. The caster fork mountings, side supports with drive wheel attach...
- Page 8 Zenit R rigid frame wheelchair The Zenit R rigid frame wheelchair is equipped with a frame made of aluminium, or optionally of carbon. The rigid frame wheelchair version with rigid axle and fixed leg support provides a frame geometry that is particularly resist...
- Page 9 Zenit R CLT rigid frame wheelchair The Zenit R CLT rigid frame wheelchair is equipped with a frame made of aluminium. The rigid frame wheelchair with rigid axle and fixed leg support provides a frame geometry that is particularly resistant to warping, for sporty driving characteristics with high torsional stiffness.
-
Page 10: Intended Use
► Do not modify the settings established by the qualified personnel. Only the settings described in the section “Use” in these instructions for use may be adjusted independently. ► In case of problems with the settings, please contact the qualified personnel who adjusted your product. Zenit... - Page 11 ► Do not lean too far out of the wheelchair when trying to pick up objects. ► Lean well forward with your upper body when climbing gradients, overcoming obstacles on gradients or on ramps. If users cannot lean their upper body forward, accompanying persons must support the wheelchair from behind. Zenit...
- Page 12 Tipping over, falling of the user due to lifting by removable components ► Only lift the product by firmly mounted components (e.g. main frame, push handles). ► Be sure that the clamping levers of the height-adjustable push handles are firmly tightened. Zenit...
- Page 13 This includes uncontrolled movements as well as sounds that are unexpected or previously not noted or odours that deviate significantly from the state of the product at the time of delivery. ► Contact the qualified personnel. Zenit...
-
Page 14: Side Effects
UDI-PI to GS1 standard; UDI = Unique Device Identifier, PI = Product Identifier UDI-DI to GS1 standard; UDI = Unique Device Identifier, DI = Device Identifier Label Meaning Fixation point to attach the product in vehicles for transporting persons with reduced mobility Zenit... -
Page 15: Delivery
► Check the tyre pressure. The correct tyre pressure is printed on the sidewall. Ensure that the pressure is the same in both tyres. INFORMATION The assembly described below may also be carried out the same way on the CLT model (not illustrated). The "Folding back support" option is not offered for the Zenit CLT. Zenit... - Page 16 On the topic of disassembly/transport: see Page 27. It only takes a few simple steps to prepare the wheelchair (see fig. 5) for use: Zenit; Zenit CLT – folding version 1) Only if necessary: Attach the drive wheels to the quick-release axle mounting (see fig. 6). The quick-release axles must not be removable after releasing the push-button.
-
Page 17: Use
Zenit R; Zenit R CLT – rigid frame version 1) Only if necessary: Attach the drive wheels to the quick-release axle mounting (see illustration above). The quick-release axles must not be removable after releasing the push-button. 2) Only with “Folding back support” option: Pull the release strap for the folding mechanism of the back sup... -
Page 18: Legrests
Tipping over, falling due to errors in handling the product ► Fold up the footplates before getting in. The purpose of the leg supports is to support the legs of the user (Zenit folding wheelchair: see fig. 11; Zenit CLT folding wheelchair: see fig. 12). -
Page 19: Removing And Fastening The Seat Cushion
2) Fold down the back support pad and secure it to the upholstery straps with the hook-and-loop fasteners (see fig. 19). 3) Pull the part of the flap that can be fastened forward and attach it to the seat upholstery with the hook-and-loop fastener. Zenit... -
Page 20: Backrest
1) Press in the push-button on the inner side of the side panel (see fig. 21, item 1). 2) Bring the forearm support to the desired position. 3) Release the push-button. The forearm support locks into place automatically. Zenit... -
Page 21: Push Handles
► Wear wheelchair gloves when travelling at high speeds. The wheelchair is moved, steered, braked and stopped with the help of the handrims on the drive wheels. To make transport easier, drive wheels with quick-release axle can be taken off the wheelchair. Zenit... -
Page 22: Removing And Mounting The Drive Wheels
3) Close the lock-release assist (see fig. 23: locked – handle is parallel to wheel hub; see fig. 24: unlocked – handle is perpendicular to wheel hub). INFORMATION: The wheels must fit in to the wheel attachment device without there being any play after closure. Zenit... -
Page 23: Caster Wheels And Caster Forks
1) Push the handle of the knee lever wheel lock forward (see fig. 25). → The wheel lock bolt secures the wheel. 2) Pull the handle of the knee lever wheel lock up (see fig. 26). → The wheel lock bolt releases the wheel. Zenit... -
Page 24: Using The Wheel Lock Lever Extension
2) Fold the wheel lock lever extension either forward (see fig. 29, right) or to the side (see fig. 30). 3) To mount, pull on the handle of the wheel lock lever extension and slide the wheel lock lever extension back onto the wheel lock lever. Zenit... -
Page 25: Anti-Tipper/Tip-Assist
2) Swing the anti-tipper back by 180° and allow it to engage (see fig. 31, item 2; see fig. 32, item 2). Deactivation 1) From above, press on the anti-tipper with the hand or foot until it disengages (see fig. 33, item 1; see fig. 34, item 1). 2) Rotate the anti-tipper forward by 180° and release it (see fig. 33, Pos. 2; see fig. 34, Pos. 2). Zenit... -
Page 26: Using The Tip-Assist
► Have the settings of the belt system checked regularly. Adjustments may be required due to the growth of the user or because of changes in the course of the disease or different clothing. The lap belt (seat belt) prevents the user from slipping and supports positioning. Zenit... -
Page 27: Additional Options
The disassembly described below may also be carried out the same way on the CLT model (not illustrated). The "Folding back support" option is not offered for the Zenit CLT. The wheelchair must be prepared for transport in a passenger vehicle. - Page 28 Pull off the drive wheel outwards (see fig. 6). INFORMATION: For the “lock-release assist” option, see the section “Drive wheels”. Zenit R; Zenit R CLT – rigid frame version 1) Apply the wheel lock. 2) Remove the seat cushion.
-
Page 29: Use In Vehicles For Transporting Persons With Reduced Mobility
To use the product as a seat in a vehicle for transporting persons with reduced mobility, additional accessories have to be mounted: • Zenit, Zenit R: 481S160=SK010 anchor point kit (2x tension strap, 4x S-hook) • The following accessories are required, but not included in the 481S160=SK010 anchor point kit: four belt loops (e.g. from the manufacturers Q’STRAINT or Unwin Safety Systems, tested according to ISO 10542-1) -
Page 30: Installation
The stickers that label the front fixation points are found above the caster attachment device on each side: see fig. 44, item 1. • The stickers that label the rear fixation points are found above the folding mechanism (Zenit) or above the rigid axle (Zenit R) on each side: see fig. 45, item 1. Zenit... - Page 31 4) Rear fixation points: Attach one belt loop around the side supports on the left and right sides above the fold ing mechanism (Zenit) or above the rigid axle (Zenit R) (see fig. 47, item 1). CAUTION! Note that the belt loops always have to be wrapped around the side supports at the highest possible position (opening) (see fig. 42).
- Page 32 3) Secure the shoulder harness on the mounting point/pin provided on the lap belt (not illustrated). → The restraint lap belt is pulled through and fastened. → The belt runs between the side panel and seat cushion on each side. Zenit...
-
Page 33: Restrictions For Use
► Information on the current status of our measures is available from the qualified personnel. The Zenit CLT and Zenit CLT R wheelchairs have not been approved by the manufacturer for use as a seat in a vehicle for transporting persons with reduced mobility. -
Page 34: Cleaning The Seat Cushion
1) Thoroughly clean the pads and handles before disinfecting. 2) Wipe all parts of the wheelchair with a disinfectant. Important information about disinfecting • If the product is used by more than one person, using a conventional disinfectant is required. Zenit... -
Page 35: Maintenance And Repair
The drive wheels are equipped with a quick-release axle system as standard equipment. To keep this system operational, ensure that no dirt adheres to the quick-release axle or receiver bushing. Periodically lubricate the quick-release axle lightly with thin, resin-free oil (sewing machine oil). • If the wheelchair becomes wet, it should be rubbed dry again. Zenit... -
Page 36: Repair
1) Behind the valve, push one side of the tyre over the edge of the rim. 2) Slightly inflate the tube until it starts to assume its round shape. 3) Unscrew the valve nut from the tube and push the valve through the valve opening in the rim. Zenit... -
Page 37: Disposal
10.3 Service life Expected lifetime: 4 years The design, manufacturing and requirements for the intended use of the product are based on the expected life time. These also include the requirements for maintenance, ensuring effectiveness and the safety of the product. Zenit... -
Page 38: Technical Data
Depending on selected option: 100 kg/120 kg. See nameplate for exact information. The specified weights vary according to the selected options and model. Does not apply for Zenit R and Zenit R CLT. Varies according to tyre option; see the marking on the tyre wall. -
Page 39: Appendices
60 mm under the footrest for going forward at the end of the slope) Maximum inclination angle on which the wheelchair will 6 (dynamic stability in all directions) remain stable [°] 9 (static stability in all directions, also when wheel lock engaged) Zenit... - Page 40 Zenit...
- Page 41 Zenit...
- Page 42 Zenit...
- Page 43 · www.ottobock.de 143441 Moscow Region/Krasnogorskiy Rayon info@ottobock.com.co · www.ottobock.com.co Russian Federation Otto Bock Healthcare Products GmbH Otto Bock de Mexico S.A. de C.V. T +7 495 564 8360 · F +7 495 564 8363 Brehmstraße 16 · 1110 Wien · Austria Prolongación Calle 18 No. 178-A info@ottobock.ru · www.ottobock.ru F +43 1 5267985...
- Page 44 Ihr Fachhändler | Your specialist dealer Otto Bock Mobility Solutions GmbH Lindenstraße 13 · 07426 Königsee/Germany www.ottobock.com...
Need help?
Do you have a question about the Zenit and is the answer not in the manual?
Questions and answers