
Related Manuals for ZyXEL Communications VMG4005-B50B


Summary of Contents for ZyXEL Communications VMG4005-B50B
- Page 1 VMG4005 -B50B VDSL2 Bonding Single Line Bridge Field Tech Overview Guide 22 April 2020 Illustrations & info based on firmware: V5.13(ABRL.2)C0...
- Page 2 Contents of this Presentation ● Introduction ● Configuration ● Installation ○ Bridged Setup ○ About the VMG4005 ○ Routed Setup ○ Bonded DSL ○ IPv6 Routed Setup ○ Setup and LEDs ○ Advanced WAN Settings ● Logging In ○ Using Multiple Services ○...
- Page 3 Introduction About the VMG4005...
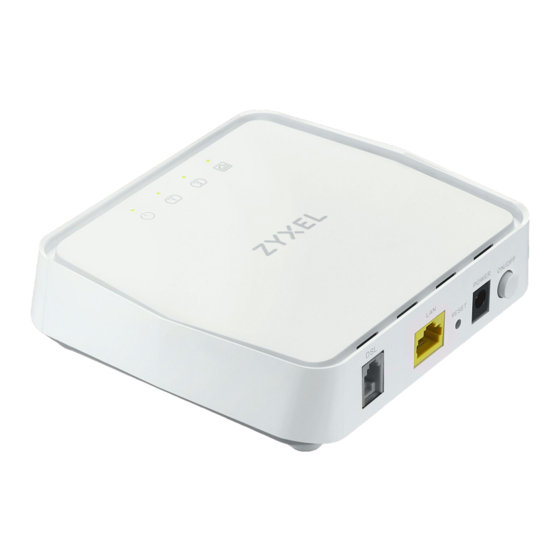
- Page 4 The VMG4005 VDSL2 Bonding Single Line Bridge ● Bonded VDSL2 Port ● Supports 17a and 35b Single Ethernet 1Gbps Port ● Modem or Single-port Router ● © 2020...
-
Page 5: Online References
Online References Product Web Page General product info Quick Start Guide For info on accessing the web interface, installation, and mounting Users Guide Covers all aspects of the device’s functions © 2020... - Page 6 Introduction Bonded DSL...
- Page 7 Overview of Bonded DSL Bonding uses two (or more) DSL lines to provide one CPE with • more DSL bandwidth than provided by one DSL line alone. • Zyxel CPEs support 2-line bonding. Two phone lines must be terminated between the CPE and •...
- Page 8 Overview of Bonded DSL (Cont’d) Advantages: • Multiplies single line rate. • • Increased bandwidth for bandwidth -hungry applications like multiple Hi-Def IPTV feeds for multiple Set-Top Boxes. Typically cheaper than Fiber to the Home (FttH) installations. • Disadvantages: • •...
- Page 9 Diagram of DSL Line Bonding G.Bond Bonded DSL Pair Fiber Loop CPE with G.Bond Curbside DSLAM with support G.Bond support Ex. using VDSL Profile 17a (under excellent conditions): Upstream Downstream 50Mbps 100Mbps x2 lines 100Mbps 200Mbps © 2020...
- Page 10 Introduction Setup and LEDs...
- Page 11 Package Contents & Installation Refer to the Quick Start Guide for package contents and installation instructions. © 2020...
-
Page 12: Led Readout
LED Readout © 2020... - Page 13 Logging In Multi-Level Login...
- Page 14 The Bottom Label On the bottom of the device on which the rubber feet • are located is the device’s bottom label. • This label displays the unit’s admin username and password, as well as its Serial Number and MAC Address. This info is important for registering the device to an ACS •...
- Page 15 The Supervisor Password When configuring the router, you’ll want to use the “supervisor” account to: • Have access to all the device settings • Create a default configuration for your customers. • By default, the supervisor password is: • admin password + last 5 characters of the WAN MAC address (found on the side and bottom labels respectively) •...
-
Page 16: Accessing The Web Interface
Logging In Accessing the Web Interface... - Page 17 Note About the Default Settings In the following sections, illustrations of the unit’s Web GUI will be shown. • Unless otherwise noted, the illustrations will reflect the default settings of the unit. Summary of the default settings on the router: WAN: •...
- Page 18 Accessing the Web Interface • Direct your computer’s web browser to: 192.168.1.1 • You’ll be presented with a login screen. The default username and password are: supervisor | <supervisor password> (as previously described) • admin | <admin password> (as printed on side label) •...
-
Page 19: Change Password
Change password For User and Administrator accounts, you’ll next be asked to change the administrative password. • Enter a New Password, Verify the New Password, and click Apply. The new password must contain at least 6 • characters, 1 letter, and 1 number. You can also change the admin password without this window in the Maintenance >... - Page 20 Successful Login When you first log into the router, you’ll see the Status screen. We’ll discuss this screen and the other Network Map screens in the next section. User and Administrator • accounts will see the Welcome to the Quick Start Wizard popup screen after they log in.
- Page 21 Logging In Tiered Account Access...
- Page 22 3 Levels of Device Access By default, the router has three types of accounts, each tied to the three • tiers of access: • supervisor for full device access (recommended for NOC/ head end) • admin for normal administration (recommended for field techs) user for basic administration (recommended for end users) •...
- Page 23 Controlling Access Per Tier To change access privileges using the supervisor account: Log into the device using the supervisor • account. • In the Status menu, click on the Login Privileges link. • Select the Account Type you wish to alter from the drop down menu, check or uncheck menu options to allow or deny access, and click the Save button.
- Page 24 Logging In Connection Status Screen & Menu System...
- Page 25 The Connection Status Screens The Connection Status Screen is the first screen one will see when one logs into the router. Clicking on the arrow on the right side of the screen will toggle between the • Network Map and Status screens. ©...
-
Page 26: Status Screen
Status Screen This screen shows important device info, such as the firmware version, WAN IP address (for any routed interfaces), WAN encapsulation mode, interface statuses, up time, CPU and memory usage, etc. © 2020... - Page 27 Network Map Screen • This screen shows any device connected to the router via LAN or WLAN. If the device has a • network name, it will be displayed on the map for easy reference. • You can use the Info icon in the far right column for a connected device to find out more info on that...
- Page 28 Login Privilage and Logout Links At the top of the window, you’ll see the Login Privilege and Logout links. • Language will allow you to select between supported languages • Currently, only English is supported. • Login Privileges (available to the Supervisor account only) controls to which menus Administrator and User accounts have access (covered in the previous section)and customize the Supervisor password.
-
Page 29: The Menu System
The Menu System At the bottom of the web interface, there is a menu system that allows easy navigation between the different menu pages of the router. © 2020... - Page 30 The Five Main Menus Connection Status Network Settings Security Settings System Monitor Maintenance Navigates back to Controls the basic Controls advanced Allows viewing of Controls the Connection interface settings of settings such as system logs, DLS maintenance Status screen the unit, such as Firewall and admin status, the ARP features such as...
- Page 31 Configuration Bridged Setup...
- Page 32 Editing Broadband Settings The device will come • with default broadband settings, but you may need to replace these with the settings and credentials specific to your ISP. • Point your mouse over the Network Settings menu and then click the Broadband link.
-
Page 33: Default Settings
Default Settings • By default, the device comes with two broadband interfaces which are routed. These are largely for use by the TR069 client settings, which won’t work on a bridged interface. • If you want to bridge traffic through the device, creating a bridged interface is fairly simple and straightforward. - Page 34 Creating a Bridged Interface • When you create the new interface, Enable it and select the Mode as Bridged. Give the interface an easy to • identify Name. For ADSL over ATM, you’ll also • need to insert your VPI and VCI settings.
- Page 35 Editing the Default Interfaces If you need TR069 management to the device, you’ll need to edit one (or both) of the routed interfaces with VLAN settings. • Edit the interface. Scroll down to the VLAN section and set the appropriate 902.1q tag.
- Page 36 Configuration Routed Setup...
- Page 37 Adding a Broadband Interface • Whether adding or modifying a broadband interface, you will see a screen like the examples on the right. • The next few slides will explain the basics of setting up a routed Broadband interface. © 2020...
- Page 38 Configuring a Broadband Interface • First, Enable the interface and Name it. • In the Type field, you can choose from the DSL interfaces, depending on the deployment/ rollout. Then, select either Routing or Bridging modes, depending on the requirements for the interface •...
- Page 39 Configuring an Interface (Cont’d) • If using PPPoE Encapsulation, enter the PPP User Name and PPP Password in the appropriate fields. For the PPP Connection Trigger: • • Enabling PPP Auto Connect will keep the connection up at all times. •...
- Page 40 Configuring a Broadband Interface • In the IP Address section, you’ll be asked to have the interface either Obtain an IP Address Automatically or assign a Static IP Address. For the latter, you’ll need to assign an IP Address, Subnet •...
- Page 41 Configuring an Interface (Cont’d) If using an ADSL over ATM type of interface: Different services will require • different VPI & VCI settings in order to properly operate. • Enter the appropriate VPI and VCI based on the COE port settings. Also, choose the proper Encapsulation Mode type.
- Page 42 Configuring an Interface (Cont’d) • Different services will require different VLAN settings in order to properly operate. To apply VLAN settings, make sure to select the Enable radio button, select • the proper 802.1p tag, and enter the proper 802.1q VLAN tag appropriate for the service utilizing the interface (data, IPTV, etc.) You can also change the MTU size if necessary, although this is commonly •...
- Page 43 Configuring an Interface (Cont’d) • Typically, NAT Enable should be set to Enable for proper WAN-to-LAN IP translation. Enabling Fullcone NAT Enable may help with passing SIP and multicast traffic • on an interface, but is less secure than the default Symmetric NAT used by interfaces.
- Page 44 Configuring an Interface (Cont’d) The broadband interface is typically set to Obtain DNS Info • Automatically. However, if the router isn’t receiving a DHCP address, be sure to manually enter the Primary and Secondary DNS Server addresses after selecting the Use the Following Static DNS Address option.
- Page 45 Configuring an Interface (Cont’d) For the router’s WAN interface, you can choose to use its • Factory Default MAC address, or to Clone a LAN Host’s MAC Address from a specific host IP address or to statically Set the WAN MAC Address. This is mostly important for ISPs that check or cache a •...
- Page 46 Configuring an Interface (Cont’d) • DHCP Options are used when ISPs require DHCP Options 43, 60, 61, 121, and/ or 125. • These features are usually used to assign ACS URLs or static routes when the router obtains a DHCP address.
- Page 47 Basic Triple Play Setup Routed Setup for IPv6...
- Page 48 Supported IPv6 Schemes When routing, the following IPv6 schemes are supported: • Dual Stack: the device performs IPv4 and IPv6 IPv4 ISP IPv4 Internet Network simultaneously. Both IPv4 and IPv6 are supported on IPv6 ISP the “LAN” side of the IPv6 Internet Network device.
- Page 49 Supported IPv6 Schemes (Cont’d) 6RD: IPv6 Rapid Deployment allows ISPs to deploy IPv6 • utilizing IPv4 tunneling, a 6RD gateway, and DHCP Option 212. IPv6 Internet IPv4 ISP Network Gateway IPv6 Tunnel IPv4 Internet IPV4 & IPv6 Network © 2020...
- Page 50 Supported IPv6 Schemes (Cont’d) IPv6 Only: the device delivers a full IPv6 experience on the • LAN and WAN side of the router. IPv6 IPv6 Internet Network IPv6 Network © 2020...
- Page 51 Configuring Broadband IPv6 • When editing a Broadband Interface to use IPv6, set the Mode to IPoE. • Next, select the IPv4/IPv6 Mode you’ll want to use. If using 6RD, keep the mode set to • IPv4 Only. • Using the previous slides as a guide, determine what IPv6 scheme the ISP is using, and make the appropriate selection from the...
- Page 52 Address Configuration for Dual Stack or IPv6 Only Finally, in the IPv6 Address area: Decide if you need to Obtain an • IPv6 Address Automatically or use a Static IPv6 Address. • Enable MLD Proxy Enable if the interface is to be used for IP video. Apply as Default Gateway if the interface •...
- Page 53 Address Configuration for 6RD To use 6RD, you’ll need to Enable 6RD in the 6RD section. • Decide if your 6RD info will be Automatically configured by • DHCP or Manually Configured. For the latter: • Specify the Service Provider IPv6 Prefix, IPv4 Mask Length, and Border Relay IPv4 Address (for the 6RD Border Relay router).
-
Page 54: Advanced Wan Settings
Other Important Settings Advanced WAN Settings... - Page 55 Advanced DSL Settings In the Broadband > Advanced • tab, you can control the advanced DSL features for the device. Enable the features you want • to use (and also supported by your COE) and click Apply. © 2020...
- Page 56 Configuration Using Multiple Services...
- Page 57 Multiple Service Example VDSL services using VLAN tags can pass right through a bridged interface to a • service provider. However, if using ADSL over ATM, VLAN tags will need to be translated into the ATM’s Virtual Paths (VPIs) and Virtual Channels (VCIs) for proper packet handling to occur.
- Page 58 Creating Broadband Interfaces Create broadband interfaces using the instructions in the previous section. • • In our example, we’ve created these broadband interfaces and edited the default interfaces. VPI:3 / VCI:55 VPI:0 / VCI:55 VPI:1 / VCI:55 VPI:2 / VCI:55 ©...
- Page 59 Adding LAN VLAN Groups For your Interface Groups, you’ll first need to make LAN VLAN Groups. Go to the Network Setting > VLAN Group menu, then click on Add New Group to • configure the VLAN Groups that match the correct VLAN IDs for your network. Make a VLAN Group Name and assign a VLAN ID.
- Page 60 Creating Interface Groups with VLANs Go to the Network Setting > Interface Group menu, then • click on Add New Interface Group to configure an interface group per each VLAN Group that was created. The next slide has more details on the Add New Interface •...
- Page 61 Creating Interface Groups with VLANs (Cont’d) For the Add New Interface Group menu: • Assign a Group Name • Select the ATM Type for the VLAN to ATM translation Instead of selecting LAN1, click the Add • button in teh •...
- Page 62 Creating Interface Groups with VLANs (Cont’d) Repeat the last two slides for any additional VLAN-based Interface Groups you need in order to translate an services to ATM frames. For our example, we need two new VLAN-based Interface Groups. © 2020...
- Page 63 Testing the VLAN-Based Interface Groups Because our VLAN Groups use TC Tagging to send VLAN tags to devices on the LAN, we can easily check that they’re working by using a packet sniffer between the VMG4005’s Ethernet port and the connected switch or router to ensure those tags are being sent. Refer to the WAN Frame Capture section for capturing ATM frames for review.
- Page 64 Configuration TR069 & Remote Management Settings...
- Page 65 TR069 Client Settings By default, access to this menu requires Supervisor account access; otherwise, you won’t be able to access this menu. • In the Maintenance > TR069 Client menu, you can Enable Inform, set the Inform Interval, set the ACS URL, ACS User Name and ACS Password for the CPE so it can perform TR069 configurations with an ACS.
-
Page 66: Remote Management
Remote Management Traditional remote management settings can be found in the Maintenance > Remote Management menu, MGMT Services tab. By default, no remote • management settings are set to WAN to ensure device security. • If you want to open the service for any Internet source address, select the WAN option. - Page 67 Remote Management Trust Domains In the Maintenance > Remote Management menu, Trust Domains tab, you can add trust domains to keep access to the device’s remote management interfaces restricted to source IPs or subnets you specify. • This reduces the likelihood of a device being accessed by unauthorized sources.
-
Page 68: Time Settings
Other Important Settings Time Settings... - Page 69 Time Settings In order to ensure your device is • logging with the correct time zone in mind, be sure to use the Maintenance > Time settings to ensure the device has the correct time zone, time server, and Daylight Saving Time settings. •...
-
Page 70: Using The Leds
Troubleshooting Using the LEDs... - Page 71 LED Readout Use the LEDs to quickly check the device’s status. © 2020...
- Page 72 General LED Issues S – Ensure the power supply is plugged into the wall outlet and router, and that the router’s power switch is in the On position. If that does not solve the problem, try replacing the router’s power supply. Otherwise, replacement of the router may be necessary.
-
Page 73: Power Led
Power LED Problem: The POWER LED turns solid red. Solution: A blinking red LED can indicate a firmware upgrade, but a solid red LED can indicated a firmware upgrade failure. Try restarting the device. If the LED still turns solid red, try replacing the power supply or making sure the device is using the correct power supply;... - Page 74 DSL LEDs Problem: The DSL light will not turn on. Solution: Ensure that the router is connected to a phone wall jack using the included cable. Also, ensure DSL service is active on that line. Otherwise, replace the telephone cable to the router as it may be faulty.
-
Page 75: Ethernet Led
Ethernet LED Problem: The Ethernet LED flickers. Solution: This is normal. The ETHERNET light will flicker when data is being transmitted/ received. Problem: The Ethernet LED does not blink, flicker, or turn on at all. Solution: Ensure that the end device is connected to the unit with an Ethernet cable, and that the other device is turned on. -
Page 76: Using The Web Interface
Troubleshooting Using the Web Interface... - Page 77 Status Screen If the device is • terminating any WAN IPs, it will display IP info in the WANx Information section of the Device Information screen. For Bridged or routed • interfaces, you can easily view the Interface Status for DSL1 and/ or DSL2.
-
Page 78: Dsl Statistics
DSL Statistics You can also use the System Monitor > xDSL Statistics menu to determine what the link condition is (in terms of SNR), and what the upstream and downstream values are (frames sent/ received, etc.). • SNR margin may indicate poor line condition, requiring line maintenance/ replacement. - Page 79 Ping, Traceroute, & NSLookup Tests For devices performing routing, the • Maintenance > Diagnostics > Ping & TraceRoute & NSLookup menu allows you to execute a basic ICMP ping, traceroute, or NSLookup (DNS test) to a local or remote address. You can use this menu to test upper-layer IP connectivity and routing.
- Page 80 Troubleshooting Scenarios...
- Page 81 Situational Troubleshooting This section is designed to help troubleshoot the most common problems installers or customers may see when using the router router. Use this section as a basic guide to aide in step-by-step troubleshooting. © 2020...
- Page 82 Can’t remember the admin password If the customer cannot remember the password, then you • are locked out of the unit; there is NO WAY to recover a lost password for security reasons. If the device is connected via ACS, passwords can be •...
- Page 83 Can’t access the router Ensure the computer is connected to the router router via an Ethernet • cable, or via the default Wireless Network Name as printed on the belly label (if available). • Ensure that the computer and router or both connected to a power source and powered on.
- Page 84 Can’t access the Web GUI Ensure the computer is connected to the EMG6726 as previously described. • • If using DHCP, the Web GUI access IP will be the same as your computer’s Gateway Address (default: 192.168.1.1). • Try clearing your computer’s browser cache to remove any cached info from other routers or devices.
- Page 85 Troubleshooting WAN Frame Capture...
- Page 86 Capturing WAN frames Sometimes you’ll need to capture frames between the • router and the ISP to troubleshoot issues. • Connecting a switch between the router and the ONT to add a monitor computer for frame capture can be bothersome, especially for multiple VLANs. •...
- Page 87 Capturing WAN frames • To use the built-in frame mirror tool, go to the following URL, assuming the device is using the default LAN settings: http://192.168.1.1/debug-engdebug.cmd Enable the INcoming or OUTgoing traffic • you wish to mirror from your atm (ADSL in ATM mode) or ptm (ADSL or VDSL in PTM mode) interface.
-
Page 88: Additional Support
Additional Support For devices or custom firmware, contact your Zyxel Sales Representative. Zyxel Communications Inc., North America 1130 N. Miller St. Anaheim, CA 92806-2001 Phone: 714-632-0882 Fax: 714-632-0858 Normal Business Hours: 8am – 5pm PST Mon. – Fri. - Page 89 Please check the Users Guides of your Zyxel products for more information on settings, features, and warranty information. © Zyxel Communications, Inc. All rights reserved. Reproduction of this material in any manner whatsoever without the express written permission of Zyxel Communications, Inc.
Need help?
Do you have a question about the VMG4005-B50B and is the answer not in the manual?
Questions and answers