CARDIOSTRONG CST-BC70-B Assembly And Operating Instructions Manual
For more information, please visit cardiostrong.com, sport-tiedje.com

Subscribe to Our Youtube Channel
Related Manuals for CARDIOSTRONG CST-BC70-B


Summary of Contents for CARDIOSTRONG CST-BC70-B
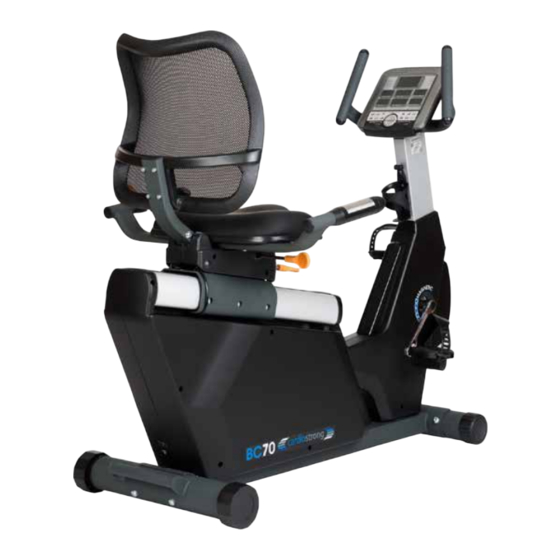
- Page 1 Assembly and Operating Instructions Art. No. CST-BC70-B CSTBC70B.01.01 Ergometer BC70...
- Page 2 BC70...
- Page 3 Dear Customer, Thank you for deciding for a high-quality training equipment of the brand cardiostrong®, the brand that makes athlete‘s hearts beat faster. cardiostrong® offers a wide range of home fitness equipment like elliptical cross trainers, ergometers, treadmills and rowing machines. cardiostrong® equipment is the optimal equipment for all those who want to train at home independent of goals and fitness level.
-
Page 4: Table Of Contents
CONTENTS GENERAL INFORMATION 1.1 Technical data 1.2 Personal safety 1.3 Electrical safety 1.4 Set-up place ASSEMBLY INSTRUCTIONS, MAINTENANCE AND CARE 2.1 General instructions 2.2 Faults and Troubleshooting 2.3 Maintenance and service calendar ASSEMBLY 3.1 Package contents 3.2 Assembly instructions BEDIENUNGSANLEITUNG 4.1 Konsolenanzeige 4.2 Button functions 4.3 User memory... - Page 5 WARRANTY INFORMATION DISPOSAL ORDERING ACCESSORIES ORDERING SPARE PARTS 9.1 Service hotline 9.2 Serial number and model name 9.3 Parts list 9.4 Exploded drawing...
-
Page 6: General Information
GENERAL INFORMATION Technical data LED display Speed in km/h Training time in min Training distance in km Cadence (rotations per minute) Calorie consumption Heart rate (when using the hand pulse sensors or a chest strap) Power output in watts Resistance level Resistance system: electronic magnetic brake system Resistance level: Watt:... -
Page 7: Personal Safety
Personal safety Before you start using the equipment, you should consult your physician that this type of exercise is suitable for you from a health perspective. Particularly affected are persons who: have a hereditary disposition to high blood pressure or heart disease, are over the age of 45, smoke, have high cholesterol values, are overweight and/or have not exercised regularly in the past year. -
Page 8: Electrical Safety
Electrical safety The equipment requires a 220 - 230V / 50 Hertz mains power supply. The equipment should be connected directly to a grounded plug socket only by means of the power cable supplied. The use of multi-socket adapters or similar is not recommended. -
Page 9: Assembly Instructions, Maintenance And Care
You should therefore immediately replace damaged or worn components. Please contact your contract partner in such a case. The equipment should no longer be used until it has been repaired. When needed, only use original cardiostrong® spare parts. -
Page 10: Faults And Troubleshooting
Check the tightness of all screw connections once a month. In order to be able to guarantee the constructively defined safety level of this equipment, we recommend having the equipment regularly maintained (at least once a year) by specialists (service technicians of your contract partner). The equipment may be cleaned of dust, dirt and sweat using a damp cloth. -
Page 11: Maintenance And Service Calendar
Maintenance and service calendar The following routine work must be done in the specified time intervals: Part Weekly Monthly 2x annually Annually Display console Tighten the pedals Plastic covers Seat rail Legends: C = cleaning; I = inspect... -
Page 12: Assembly
ASSEMBLY Package contents The package contains the parts represented in the illustration, including a power cable with mains plug. If one of the illustrated parts is missing, please contact your contract partner. IV-M IV-M3 & IV-M4 IV-M1 & IV-M2 Pedal IV-M5 Lever IV-M6 Plug Cover... - Page 13 IV-A IV-B Frame Front base foot IV-C Rear base foot IV-D IV-E console mast Front handles IV-F Side handles IV-G Backrest mast IV-K IV-L IV-L Console Backrest Seat cushion IV-J Bottle Holder (IV-J1)
-
Page 14: Assembly Instructions
Assembly instructions Before starting assembly, look carefully through the individual assembly steps shown and assemble the equipment in the order indicated. Step 1: Assembly of the front and back feet (1) Mount the rear base foot (IV-C) on the frame (A) with two washers (IV-N2), two spring washers (IV-N15) and two screws (IV-N1). - Page 15 Step 2: Assembly of the console mast First loosen the screws (IV-N12) from the frame. (1) Connect the sensor cables (IV-E1 and IV-E2) from the console mast with the sensor cables (IV-A1 and IV-A2) from the frame. (2) Mount the console mast (IV-E) on the frame (IV-A) with two screws (IV-N12). (3) Slide the covers (IV-M3 and IV-M4) on the frame (IV-A) and mount with two screws (IV-N6).
- Page 16 Step 3: Assembly of the upper handles and the console (1) Set the upper handles (IV-D) on the iron plate of the console mast (IV-E) and mount with two nuts (IV-N9). (2) Loosen the four screws (IV-H1) from the console (IV-H) (3) Connect the sensor cables (IV-E1 and IV-E2) from the console mast with the cables from the console.
- Page 17 Step 4: Assembly of the backrest mast and the side handles (1) Mount the backrest mast (IV-G) on the frame (IV-A) with two screws (IV-N4) and spring washers (IV-N2). (2) Connect the sensor cables (IV-F5 and IV-F4) from the handle with the sensor cables (IV-A2) from the frame.
- Page 18 Step 5: Assembly of the backrest and the seat cushion (1) Mount the backrest (IV-L) on the backrest mast (IV-G) with four screws (IV-N7). IV-L (2) Mount the seat cushion (IV-K) on the frame of IV-L IV-K the side handles (IV-F) with four washers (IV-N2) IV-N7 and four screws (IV-N10).
- Page 19 Step 7: Assembly of the pedals (1) Move the right pedal on to the right crank and mount it by turning the pedal clockwise. (2) Move the left pedal on to the left crank and mount it by turning the pedal clockwise.
- Page 20 Step 9: Adjusting the backrest Press the adjusting lever back, move the seat to the desired position and move the adjusting lever back to the front. Step 10: Adjustment of the seat Pull the lever (IV-G44) up, place the seat at the desired distance and move the lever back down.
- Page 21 Step 11: Adjusting the backrest Pull the lever (IV-M7) up in order to increase the seat angle and press it down to lower the seat angle IV-M7 Step 12: Transport The front base has transport wheels. Stand behind the machine and lift it up until the weight is placed on the transport wheels.
-
Page 22: Bedienungsanleitung
OPERATING INSTRUCTIONS Console display BC70... - Page 23 Time 0:00-99:59 minutes Speed 0.0-99.9 km/h RPM (cadence; rotations per minute) 0-999 RPM Distance 0.0-99.99 km Calories (calorie consumption) 0-9999 Cal Male (m)/Female (f ) Pulse (heart rate; beats per minute) 30-240 BPM Heart-rate symbol Flashing on and off Programs P1-P12 User data U0-U4...
-
Page 24: Button Functions
Button functions START/STOP: Press this button to start, pause or end the workout. RECOVERY: After your workout, you can measure your recovery heart rate using this button. When you have completed your workout, press the Recovery button and grasp the hand pulse sensors, if you are not wearing a chest strap. A one- minute countdown then begins. -
Page 25: User Memory
RESET: If you press the RESET button, the console returns to program selection. If you press and hold this button for two seconds, the console returns to the start screen where you can select the user. ENTER: Your various settings are confirmed using this button. QUICK KEYS: The QUICK KEYS can be used to jump directly to the programs displayed on the console. -
Page 26: Programs
Program selection After entering all of the user values, you can select one of the following program categories using the ARROW BUTTONS: • Manual (manual workout program): • Program (pre-set workout programs): • Watt (Watt-based workout program): • User setting (user-defined workout program): •... -
Page 27: Preset Programs
4.4.2 Preset programs Select one of the workout programs (P1-P12) using the ARROW BUTTONS. The workout programs will be shown in the Watt/Level display. You can then use the ARROW BUTTONS to enter the values for resistance level, time, distance, calories and pulse, one after another. After each setting, press ENTER to confirm and to move on to the next value. -
Page 28: Watt-Controlled Program
4.4.3 Watt-based program When you have selected the Watt-based program, use the ARROW BUTTONS to enter the desired watt value at which you would like to work out. The Watt value will be shown in the Watt/Level display. Confirm your selection with the ENTER button. -
Page 29: Heart Rate Controlled Program
4.4.5 Heart-rate controlled programs After you have selected the H.R.C. program you can enter the desired target heart rate. Either choose one of the three preset target heart rates (55%, 75% or 90% of your maximum heart rate) or select „TAG“ and enter a target heart rate manually. -
Page 30: Workout Instructions
WORKOUT INSTRUCTIONS Heart-rate measuring Pulse measuring via hand sensors The hand sensors integrated in the handles beside the seat allow you to determine your heart rate. You can measure your heart rate by lightly grasping the sensors with both hands at the same time. Blood pressure changes occur due to the heartbeat. The sensors measure the changes to the electric skin resistance caused by it. - Page 31 while exercising. The transmitter turns on automatically once it is put on. In order to allow for a precise measuring, you should moisten the rubber electrodes. This is best done with a special chest strap contact gel, which is also used for ultrasound scans. Note: If you have not been active in doing sports for a longer period of time, you should first go to your physician in order to discuss your training with them.
- Page 32 Example: For a 45-year-old man or woman, the maximum heart rate is 175 (220 - 45 = 175). • The fat burning target zone (55%) is at approximately 96 beats/min. = (220 - age) x 0.55. • The cardio target zone (75%) is at approximately 131 beats/min. = (220 - age) x 0.75.
-
Page 33: 10 Tips For Effective Ergometer Training
10 tips for effective ergometer training 1. Set goals What would you like to achieve with your training? Weight regulation, improved stamina, prevent risk of disease, more mobility, cardiovascular training, etc. In order to achieve your long-term training goal, set individual partial goals, e. g., weekly or monthly goals. -
Page 34: Designing A Workout
9. Workout journal Keep a record of your training sessions. Note the date, resting pulse, active pulse, recovery pulse, resistance level, time, distance, calories burnt and fitness level. 10. Reward yourself Do something good for you and your body after training or after achieving a partial goal. Go to the sauna or a swimming pool. - Page 35 WEEK 5 + 6 Beginner Advanced Days Duration Intensity Duration Intensity 30 min. Moderate speed, keep 40 min. Vary speed, increase resistance low low resistance 30 min. Moderate speed, keep 40 min. Vary speed, increase resistance low resistance 30 min. Moderate speed, keep 40 min.
-
Page 36: Stretching Exercises For Leg And Chest Muscles
Stretching exercises for leg & chest muscles Trapezius Splenius capitis Sternocleidomastoideus Trapezius Deltoid muscle Pectoralis major Deltoid muscle Elevator scapolae M. Teres major Triceps Rhomboid muscle Dentatus anterior Biceps Arm-radius muscle Major back muscle Obliquus externus Straight abdominal muscle Anconaeus Extensor Sartorius muscle digitorum... - Page 37 3. Exercise: Stretching the calf muscles (gastrocnemius) • Place feet parallel to each other pointing forward, the heels touch the floor • Support yourself on a chair coming from a lunge • Move your body weight to the front leg, press your heel from the rear leg towards the floor and hold the contact •...
-
Page 38: Workout Journal
Workout journal Date Time (min.) Training weight Calories burnt Body weight Ø Pulse Distance Resistance level I feel ... BC70... -
Page 39: Warranty Information
WARRANTY INFORMATION cardiostrong‘s fitness equipment is subject to strict quality controls. However, if a fitness equipment purchased from us does not work perfectly, we take it very seriously and ask you to contact our customer service as indicated. We are happy to help you by phone via our service hotline. - Page 40 The terms of use are defined as follows: • Home use: solely for private use in private households up to 3 hours per day • Semi-professional use: up to 6 hours per day (e. g. rehabilitation centers, hotels, clubs, company gyms) •...
-
Page 41: Disposal
Service outside of the warranty period We are also happy to issue an individual cost estimate if there is a problem with your fitness equipment after the warranty has expired, or in cases which do not fall under the terms of the warranty, e. g. normal wear and tear. Please contact our customer service team to find a quick and cost-effective solution to your problem. -
Page 42: Ordering Accessories
ORDERING ACCESSORIES Sport-Tiedje floor mat, size XL Art. no. ST-FM-XL Sport-Tiedje 122 kHz chest strap Art. no. ST1030 Chest-strap contact gel 250ml Art. no. BK-250 Fitness equipment care kit Art. no. HF-500 BC70... -
Page 43: Ordering Spare Parts
9:00 - 18:00 10:00 - 17:00 Serial number and model name Before assembling your equipment, find the serial number on the white sticker and enter it in the appropriate space. Serial number: Brand / category: Model name: cardiostrong recumbent ergometer BC70... -
Page 44: Parts List
Parts list Qty. Description Qty. Description IV-A Main Frame IV-A32 Steel Shield IV-A1 Sensor(1100Mm) IV-A33 Magnetic Housing IV-A2 Sensor(1350Mm) IV-A34 IV-A3 Motor IV-A35 Screw IV-A4 Sensor Housing IV-A36 Screw IV-A5 Sensor(950Mm) IV-A37 IV-A6 Screw IV-A38 Washer IV-A7 Sensor Holder IV-A39 Washer IV-A8 Bearing... - Page 45 Qty. Description Qty. Description IV-A62 Screw IV-F10 Control Box(Below) IV-A63 IV-F11 Control Box(Above) IV-A64 End Cap IV-F12 Mylar Button(R) IV-A65 Front Chain Cover(L) IV-F13 Mylar Button (L) IV-A66 Front Chain Cover(R) IV-F14 Screw IV-A67 Rear Chain Cover(R) IV-F16 Sensor Sheet Metal IV-A68 Rear Chain Cover(L) IV-G1...
- Page 46 Qty. Description Qty. Description IV-G29 Screw IV-H Console IV-G30 Moving Basement IV-H1 Screw IV-G31 Sliding Housing (R ) IV-J2 Bottle Holder IV-G32 Sliding Housing (L) IV-K Saddle IV-G33 Washer IV-L Back Pad IV-G34 Screw IV-M1 Pedal(L) IV-G35 Screw IV-M2 Pedal(R) IV-G36 Washer IV-M3...
-
Page 47: Exploded Drawing
Exploded drawing IV-L IV-D1*4 IV- H IV-K IV-D IV-G1 IV-N7*4 IV-G IV-E1 IV-N2*15 IV-E2 IV-N16*3 IV-F16*4 IV-F13 IV-N10*4 IV-N9*2 IV-H1*4 IV-F11 IV-F15*4 IV-F11-1 IV-F12 IV-E IV-F4 IV-F8*2 IV-F3*2 IV-N14*2 IV-F10 IV-N12*4 IV-F10-1 IV-F5 IV-J 1 IV-F9*2 IV-A2 IV-N2*15 IV-F6*2 IV-G2 IV-F7*2 IV-F2*2 IV-G44... - Page 48 BC70...
- Page 49 DISCLAIMER ©2010 cardiostrong® is a registered brand of the company Sport- Tiedje GmbH. All rights reserved. Any use of this trademark without the explicit written permission of Sport-Tiedje is prohibited. Product and manual are subject to change. Technical data can be changed without advance notice.
- Page 50 Note BC70...
- Page 52 Ergometer BC70...
Need help?
Do you have a question about the CST-BC70-B and is the answer not in the manual?
Questions and answers