CARDIOSTRONG Ergometer BC70 Assembly And Operating Instructions Manual
For more information, please visit cardiostrong.com, sport-tiedje.com
Hide thumbs
Also See for Ergometer BC70:
- Assembly and operating instructions manual (56 pages) ,
- Assembly and operating instructions manual (52 pages)

Related Manuals for CARDIOSTRONG Ergometer BC70


Summary of Contents for CARDIOSTRONG Ergometer BC70
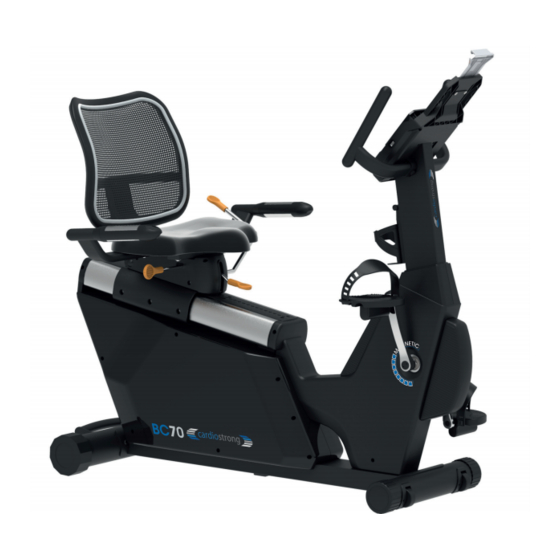
- Page 1 Assembly and Operating Instructions Art. No. CST-BC70-B-2 CSTBC70B.02.02 Ergometer BC70...
- Page 2 BC70...
- Page 3 Dear Customer, Thank you for deciding for a high-quality training equipment of the brand cardiostrong®, the brand that makes athlete‘s hearts beat faster. cardiostrong® offers a wide range of home fitness equipment like elliptical cross trainers, ergometers, treadmills and rowing machines. cardiostrong® equipment is the optimal equipment for all those who want to train at home independent of goals and fitness level.
-
Page 4: Table Of Contents
CONTENTS GENERAL INFORMATION 1.1 Technical data 1.2 Personal safety 1.3 Electrical safety 1.4 Set-up place ASSEMBLY INSTRUCTIONS, MAINTENANCE AND CARE 2.1 General instructions 2.2 Faults and Troubleshooting 2.3 Maintenance and service calendar ASSEMBLY 3.1 Package contents 3.2 Assembly instructions OPERATING INSTRUCTIONS 4.1 Console display 4.2 Button functions 4.3 Turn on the machine... -
Page 5: General Information
GENERAL INFORMATION Technical data LED display Speed in km/h Training time in min Training distance in km Cadence (rotations per minute) Calorie consumption Heart rate (when using the hand pulse sensors or a chest strap) Power output in watts Resistance level Resistance system: electronic magnetic brake system Resistance level:... -
Page 6: Personal Safety
Personal safety Before you start using the equipment, you should consult your physician that this type of exercise is suitable for you from a health perspective. Particularly affected are persons who: have a hereditary disposition to high blood pressure or heart disease, are over the age of 45, smoke, have high cholesterol values, are overweight and/or have not exercised regularly in the past year. -
Page 7: Electrical Safety
Electrical safety The equipment requires a 220 - 230V / 50 Hertz mains power supply. The equipment should be connected directly to a grounded plug socket only by means of the power cable supplied. The use of multi-socket adapters or similar is not recommended. Extension leads must comply with local electrical safety guidelines. -
Page 8: Assembly Instructions, Maintenance And Care
You should therefore immediately replace damaged or worn components. Please contact your contract partner in such a case. The equipment should no longer be used until it has been repaired. When needed, only use original cardiostrong® spare parts. Check the tightness of all screw connections once a month. -
Page 9: Faults And Troubleshooting
Faults and Troubleshooting The equipment runs through regular quality controls during production. Nevertheless, errors or malfunctions on the equipment may occur. Individual parts are often the cause of faults and replacement is usually sufficient. Please use the following overview to see the five most common errors and how to repair them. -
Page 10: Assembly
ASSEMBLY Package contents The package contains the parts represented in the illustration, including a power cable with mains plug. If one of the illustrated parts is missing, please contact your contract partner. IV-M IV-M3 & IV-M4 IV-M1 & IV-M2 Pedal IV-M5 Lever IV-M6 Plug Cover... - Page 11 IV-A IV-B Frame Front base foot IV-C Rear base foot IV-D IV-E console mast Front handles IV-F Side handles IV-G Backrest mast IV-K IV-L IV-L Console Backrest Seat cushion IV-J Bottle Holder (IV-J1)
-
Page 12: Assembly Instructions
Assembly instructions Before starting assembly, look carefully through the individual assembly steps shown and assemble the equipment in the order indicated. Step 1: Assembly of the front and back feet (1) Mount the rear base foot (IV-C) on the frame (A) with two washers (IV-N2), two spring washers (IV-N15) and two screws (IV-N1). - Page 13 Step 2: Assembly of the console mast First loosen the screws (IV-N12) from the frame. (1) Connect the sensor cables (IV-E1 and IV-E2) from the console mast with the sensor cables (IV-A1 and IV-A2) from the frame. (2) Mount the console mast (IV-E) on the frame (IV-A) with two screws (IV-N12). (3) Slide the covers (IV-M3 and IV-M4) on the frame (IV-A) and mount with two screws (IV-N6).
- Page 14 Step 3: Assembly of the upper handles and the console (1) Set the upper handles (IV-D) on the iron plate of the console mast (IV-E) and mount with two nuts (IV-N9). (2) Loosen the four screws (IV-H1) from the console (IV-H) (3) Connect the sensor cables (IV-E1 and IV-E2) from the console mast with the cables from the console.
- Page 15 Step 4: Assembly of the backrest mast and the side handles (1) Mount the backrest mast (IV-G) on the frame (IV-A) with two screws (IV-N4) and washers (IV-N2). (2) Connect the sensor cables (IV-F5 and IV-F4) from the handle with the sensor cables (IV-A2) from the frame.
- Page 16 Step 5: Assembly of the backrest and the seat cushion (1) Mount the backrest (IV-L) on the backrest mast (IV-G) with four screws (IV-N7). IV-L (2) Mount the seat cushion (IV-K) on the frame of the side handles (IV-F) with four washers (IV-N2) and four screws (IV- IV-L IV-K N10).
- Page 17 Step 7: Assembly of the pedals (1) Move the right pedal on to the right crank and mount it by turning the pedal clockwise. (2) Move the left pedal on to the left crank and mount it by turning the pedal counter- clockwise.
- Page 18 Step 9: Adjusting the backrest Press the adjusting lever back, move the seat to the desired position and move the adjusting lever back to the front. Step 10: Adjustment of the seat Pull the lever (IV-G44) up, place the seat at the desired distance and move the lever back down.
- Page 19 Step 11: Adjusting the backrest Pull the lever (IV-M7) up in order to increase the seat angle and press it down to lower the seat angle IV-M7 Step 12: Transport The front base has transport wheels. Stand behind the machine and lift it up until the weight is placed on the transport wheels.
-
Page 20: Operating Instructions
OPERATING INSTRUCTIONS Console display BC70... - Page 21 The time counts from 00:00 to a maximum of 99:59 in Time 1-minute increments. Displays the current speed. Speed The maximum speed is 99.9 km/h or mph. RPM (cadence; rotations per Displays the rotations per minute. minute) Range from 0 to 999 RPM. Counts the total distance from 0.0 to 999.9 km or miles in Distance increments of 0.1kilometres or miles.
-
Page 22: Button Functions
Button functions Start or stop the training. Press it in the Standby mode to start Quick Start in START/STOP the MANUAL programme. DOWN Reduce the functional values or the training resistance Increase the functional values or the training resistance ENTER Confirm the settings Reset the current setting, the screen returns to the initial training mode in the RESET... -
Page 23: Turn On The Machine
Turn on the machine (1) Connect the monitor to the power and press RESET for two seconds. The LCD screen displays all segments for two seconds and a signal sounds (see fig. 1). Go to the settings of calendar and time (fig. 2 to 5). Set the time and the calendar with the UP/DOWN buttons. - Page 24 (2) To choose the user (U) form 1 to 4, press the UP/DOWN buttons. Confirm with ENTER (fig. 6). Enter the user data for gender, age, height, and weight (fig. 7 to 10). Fig. 6 Fig. 7 Fig. 8 Fig. 9 Fig.
-
Page 25: Programmes
Programmes The programmes can be chosen as followed: MANUAL - PROGRAM - USER PROG - WATT - H.R.C. (fig. 11 to 15). Fig. 11 Fig. 12 Fig. 13 Fig. 14 Fig. 15... -
Page 26: Quick Start In The Manual Programme
4.4.1 QUICK START in the manual programme (1) Press ENTER in the MANUAL programme (fig. 19). (2) Press START/STOP to start the training (fig. 20). The resistance can be adjusted during the training. (3) Press START/STOP to stop the training. Fig. -
Page 27: Profile Programmes
4.4.3 Profile programmes (1) After entering the PROGRAM mode (fig. 18) you can choose one of the 12 hill programs with the UP/DOWN buttons (fig. 19 to 30). Confirm with ENTER. (2) The TIME can be pre-set. Press START/STOP to start the training (fig. 31). (3) After the training starts, the time is counted down. - Page 28 Fig. 24 Fig. 25 Fig. 26 Fig. 27 Fig. 28 Fig. 29 Fig. 30 Fig. 31 BC70...
-
Page 29: User-Defined Programmes
4.4.4 User-defined programmes (1) When you entered the USER PROG (PROGRAM mode, fig. 32) the first section blinks (fig. 33). You can increase or reduce the intensity level (from 1 to 6) with the UP/DOWN buttons for all the 20 sections. -
Page 30: Watt-Controlled Programme
4.4.5 Watt-controlled programme (1) When you entered the watt-controlled program (WATT mode), the pre-set value of 120 Watt blinks. You can set the value between 10 and 350 Watt with the UP/DOWN buttons. To set the target values, press ENTER. To immediately star the training, press START. -
Page 31: Heart Rate Control
4.4.6 Heart rate control (1) In the H.R.C. mode (fig. 38), the screen displays 55%, 75%, 90%, and TARGET (fig. 32 to 35). Choose the preferred heart rate with the UP/DOWN buttons. (2) The time can be pre-set. To start the training, press START/STOP. (3) After the training start, the time is counted down. -
Page 32: Recovery
4.4.6 Recovery Press RECOVERY after the pure training time and grasp both handles. All function displays stop except for TIME. It counts down from 00:60 to 00:00 (fig. 44). When the console detects a pulse signal, the LCD screen displays RECOVERY SCANNING. When the console does not detect a pulse signal, the LCD screen reminds of it by displaying PULSE INPUT! The screen displays your recovery pulse status with F1 to F6 (fig. - Page 33 Fig. 46 Fig. 47 Fig. 49 Fig. 48 Fig. 51 Fig. 50 Fig. 53 Fig. 52...
- Page 34 Fig. 55 Fig. 54 Fig. 57 Fig. 56 Fig. 58 Fig. 59 Fig. 60 BC70...
-
Page 35: Battery Compartment
Battery compartment The battery runs the calendar. If you want to set the calendar, remove the battery and restart the console (fig. 61). Fig. 61 (1) Loosen the screw at the battery compartment. (2) Remove the battery compartment coverage. (3) Insert the battery and close the battery comparment by tighten up the screw again. Note: 1. -
Page 36: Heart-Rate Measuring
Heart-rate measuring Pulse measuring via hand sensors The hand sensors integrated in the handles beside the seat allow you to determine your heart rate. You can measure your heart rate by lightly grasping the sensors with both hands at the same time. Blood pressure changes occur due to the heartbeat. - Page 37 Fat burning (weight management): The main goal here is to burn deposits of fat. In order to achieve this training goal, a low training intensity (approximately 55% of the maximum heart rate) and a longer training period are required. Cardiovascular training (cardio training): The primary goal is to increase stamina and fitness through an improved provision of oxygen through the cardiovascular system.
-
Page 38: Warranty Information
WARRANTY INFORMATION cardiostrong‘s fitness equipment is subject to strict quality controls. However, if a fitness equipment purchased from us does not work perfectly, we take it very seriously and ask you to contact our customer service as indicated. We are happy to help you by phone via our service hotline. - Page 39 Warranty conditions For the warranty to be valid, the following steps must be taken: Please contact our customer service by email or phone. If the product under warranty has to be sent in for repair, the seller bears costs. After expiry of the warranty, the buyer bears the costs of transport and insurance.
-
Page 40: Disposal
DISPOSAL At the end of its operational life, this equipment cannot be disposed of in normal household waste. Instead, it must be disposed of via an electricals recycling centre. Further information can be obtained from your local authority‘s recycling service. The materials can be recycled as per their symbols. -
Page 41: Ordering Spare Parts
9:00 - 18:00 10:00 - 17:00 Serial number and model name Before assembling your equipment, find the serial number on the white sticker and enter it in the appropriate space. Serial number: Brand / category: Model name: cardiostrong recumbent ergometer BC70... -
Page 42: Parts List
Parts list Qty. Description Qty. Description IV-A Main Frame IV-A32 Steel Shield IV-A1 Sensor(1100Mm) IV-A33 Magnetic Housing IV-A2 Sensor(1350Mm) IV-A34 IV-A3 Motor IV-A35 Screw IV-A4 Sensor Housing IV-A36 Screw IV-A5 Sensor(950Mm) IV-A37 IV-A6 Screw IV-A38 Washer IV-A7 Sensor Holder IV-A39 Washer IV-A8 Bearing... - Page 43 Qty. Description Qty. Description IV-A62 Screw IV-F10 Control Box(Below) IV-A63 IV-F11 Control Box(Above) IV-A64 End Cap IV-F12 Mylar Button(R) IV-A65 Front Chain Cover(L) IV-F13 Mylar Button (L) IV-A66 Front Chain Cover(R) IV-F14 Screw IV-A67 Rear Chain Cover(R) IV-F16 Sensor Sheet Metal IV-A68 Rear Chain Cover(L) IV-G1...
- Page 44 Qty. Description Qty. Description IV-G29 Screw IV-H Console IV-G30 Moving Basement IV-H1 Screw IV-G31 Sliding Housing (R ) IV-J2 Bottle Holder IV-G32 Sliding Housing (L) IV-K Saddle IV-G33 Washer IV-L Back Pad IV-G34 Screw IV-M1 Pedal(L) IV-G35 Screw IV-M2 Pedal(R) IV-G36 Washer IV-M3...
-
Page 45: Exploded Drawing
Exploded drawing... - Page 46 BC70...
- Page 47 DISCLAIMER ©2010 cardiostrong® is a registered brand of the company Sport- Tiedje GmbH. All rights reserved. Any use of this trademark without the explicit written permission of Sport- Tiedje is prohibited. Product and manual are subject to change. Technical data can be changed without advance notice.
- Page 48 Note BC70...
- Page 49 Note...
- Page 50 Note BC70...
- Page 52 Ergometer BC70...
Need help?
Do you have a question about the Ergometer BC70 and is the answer not in the manual?
Questions and answers
Hi good day just want to ask about the plug of cardio strong bc 70 plug
The CARDIOSTRONG Ergometer BC70 uses a power cable with a mains plug.
This answer is automatically generated
I want to buy only plug of the cardio strong bc70