Evenflo NurtureMax Owner's Manual

Evenflo NurtureMax Owner's Manual

Hide thumbs Also See for NurtureMax:

Advertisement

Quick Links

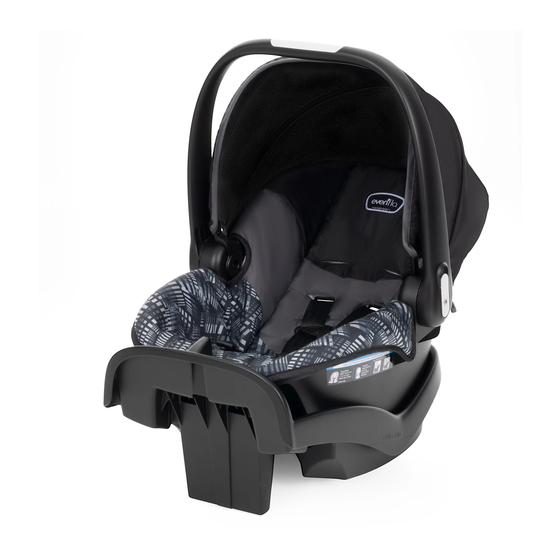
NurtureMax™/First Choice™
Infant Car Seat
Owner's Manual
Keep instructions for future use.
Rear-facing with
Base*
1.8 to 10 kg
(4 to 22 lbs)
43 to 73 cm
(17 to 29 in.)
Rear-facing
without Base*
1.8 to 10 kg
(4 to 22 lbs)
43 to 73 cm
(17 to 29 in.)
* See page 4 for complete requirements.
Para instrucciones en Español, llamar al:
1-800-233-5921
WARNING!
To reduce the risk of serious injury or death, read
this owner's manual prior to installing and using this
child restraint.
© 2021 Evenflo Company, Inc.
25701689
11/21

Advertisement

Table of Contents
loading

Summary of Contents for Evenflo NurtureMax

  • Page 1 * See page 4 for complete requirements. Para instrucciones en Español, llamar al: 1-800-233-5921 WARNING! To reduce the risk of serious injury or death, read this owner’s manual prior to installing and using this child restraint. © 2021 Evenflo Company, Inc. 25701689 11/21...
  • Page 2 According to the U.S. National Highway Traffic Safety Administration (NHTSA), car seats and boosters provide protection for infants and children in a crash, yet car crashes are a leading cause of death for children. To reduce the risk of SERIOUS INJURY or DEATH, read this owner’s manual and your vehicle owner’s manual before installing and using this child restraint.
  • Page 3: Table Of Contents

    Table of Contents Important Information ..........4 Child Requirements ............4 Premature Infant Use ............. 5 Warnings ................ 6 Motor Vehicle/Aircraft Usage ........14 Recall Information for U.S. Customers......15 Public Notice for Canadian Customers ......15 Child Restraint Features ..........16 Removing and Storing Lower Anchor Connectors ..
  • Page 4: Important Information

    To use this child restraint MUST properly, children meet the size and age requirements below. In addition, Evenflo recommends consulting with your child’s physician before allowing your child to transition from a rear-facing to forward- facing child restraint.
  • Page 5: Premature Infant Use

    Preterm and low birth weight infants are at additional risk of breathing difficulties and heart problems when placed in a Child Restraint. Evenflo requires that the evaluation recommended by the AAP be conducted for all infants born earlier than 37 weeks and all newborn infants who weigh less than 2.26 kg (5 lbs) at birth before their first...
  • Page 6: Warnings

    • DO NOT attach additional padding, toys or other devices not made by Evenflo, or described in these instructions, to the child restraint. Items not tested with the child restraint could injure the child. • Be sure that the handle is firmly locked in Position 1 before lifting the child restraint (see “Using the Carrier...
  • Page 7 WARNING! DEATH or SERIOUS INJURY can occur. Airbag Warnings • DO NOT place rear-facing child seat on front seat with air bag. DEATH OR SERIOUS INJURY CAN OCCUR. The back seat is the safest place for children 12 and under. •...
  • Page 8 DO NOT restraint cannot be properly installed, use this child restraint. Consult vehicle owner’s manual, try a different seating location, or call Evenflo at 1-800-233-5921 (U.S) or 1-937-773-3971 (Canada). VEHICLE TYPES IN WHICH THE RESTRAINT SYSTEM CAN NOT BE USED: This child restraint is not to be used in vehicles that do not have vehicle seat belts or UAS lower anchorages.
  • Page 9 WARNING! DEATH or SERIOUS INJURY can occur. Seat Belt Warnings • ALWAYS read your vehicle Retractor owner’s manual to determine what vehicle belts and retractors are used in your vehicle belt. The vehicle belt MUST lock and MUST NOT loosen after the seat belt is tightened.
  • Page 10 WARNING! DEATH or SERIOUS INJURY can occur. Seat Belt Warnings • DO NOT use with lap/shoulder belts with two retractors. If the vehicle seat belts are not routed and fastened correctly, the child restraint may not protect the child in a crash.
  • Page 11 WARNING! DEATH or SERIOUS INJURY can occur. Seat Belt Warnings If you have any of these types of vehicle belt systems listed, these are SAFE to use to install your child restraint in the vehicle. Review vehicle owner’s manual for specific instructions on child restraint installation. LATCH/UAS can be used IN PLACE OF these vehicle belt types.
  • Page 12 WARNING! DEATH or SERIOUS INJURY can occur. LATCH/UAS Warnings LATCH (Lower Anchors and Tethers for CHildren) and UAS (Universal Anchorage System) are acronyms that refer to a pair of fixed Lower Anchors (or bars) and a Top Tether anchor that are built into your vehicle, in vehicles built after September 1, 2002.
  • Page 13 WARNING! DEATH or SERIOUS INJURY can occur. LATCH/UAS Warnings • In addition to these instructions, read and follow your vehicle owner’s manual regarding installation of the child restraint and LATCH/UAS. If there is a discrepancy, follow your vehicle owner’s manual. •...
  • Page 14: Motor Vehicle/Aircraft Usage

    WARNING! DEATH or SERIOUS INJURY can occur. Usage Warnings • Failure to follow installation instructions could result in serious injury or death. These instructions, the instructions in your vehicle owner’s manual, and the instructions on your child restraint must be followed carefully.
  • Page 15: Recall Information For U.s Customers

    Please fill this card out using blue or black ink and mail it NOW, Vehicle Safety Hotline at 1-888-327-4236 (or register online at: www.evenflo.com/registercarseat) (TTY:1-800-424-9153), or go to http://www.NHTSA. while you are thinking about it. The card is already addressed and we've paid the postage.
  • Page 16: Child Restraint Features

    Child Restraint Features Front View Handle Canopy* Harness Straps Buckle Release LATCH/UAS Pouch* (see pg. 17) Chest Clip Convenience Base* (optional) Harness Seat Pad Adjuster Adjustment Lever Strap (under seat pad) Back View Release Handle Harness Slots Splitter Plate Buckle Strap Slots *Not all features are available on all models.
  • Page 17: Removing And Storing Lower Anchor Connectors

    Child Restraint Features NurtureMax Convenience Base* (Bottom) Lower Anchor Connector Assembly Vehicle Seat Belt Path / Lower Anchor Connector Strap Openings Lower Anchor Connector Storage LATCH/UAS (First Choice Only)* LATCH/UAS Pouch* (only on models sold without convenience base) LATCH/UAS Hooks LATCH/UAS Adjuster *Not all features are available on all models.
  • Page 18: Using The Carrier Handle

    Using the Carrier Handle To change carrier handle positions, push down and rotate the handle to the desired position until it locks into place. IMPORTANT: • ONLY use Positions 1 or 3 when traveling in a vehicle. • NEVER use Positions 2 or 3 to carry your child.
  • Page 19: Proper Installation With The Base

    Proper Installation WITH the Base Child Requirements • Weight: 1.8 to 10 kg (4 to 22 lbs) • Height: 43 to 73 cm (17 – 29 in.) and top of child’s head is at least 2.5 cm (1 in.) below the top of the child restraint seat back.
  • Page 20: Installing The Base With Lower Anchor Connectors

    Installing the Base with Lower Anchor Connectors WARNING! DEATH or SERIOUS INJURY can occur. • This lower anchor connector assembly system is ONLY intended to be used as described in these instructions. • In addition to these instructions and the instructions on your child restraint, read and follow your vehicle owner’s manual regarding installation of the child restraint and LATCH/UAS.
  • Page 21 Installing the Base with Lower Anchor Connectors Before you begin, be sure the level line is parallel to the floor of the vehicle. Place the base on the vehicle seat and unhook the lower connectors. Route the lower anchor connector strap and hook through the lower anchor connector strap openings.
  • Page 22 Installing the Base with Lower Anchor Connectors Using your full weight, push the base firmly into the vehicle seat, while pulling up on the strap to tighten. The lower anchor connector assembly strap must be as tight as possible. WARNING! DEATH or SERIOUS INJURY can occur.
  • Page 23: Installing The Base With The Vehicle Seat Belt

    Installing the Base with the Vehicle Seat Belt WARNING! DEATH or SERIOUS INJURY can occur. MUST • The carrier be locked firmly into the convenience base. Check by lifting up on the carrier. NEVER • use the vehicle seat belts when using the lower anchor connector.
  • Page 24 Installing the Base with the Vehicle Seat Belt If level line is not level with the ground, uninstall the base and place a tightly rolled towel or small blanket beneath the front edge of the base in order to provide enough recline for an infant’s head to lie back comfortably.
  • Page 25: Placing The Carrier In The Base

    WARNING! DEATH or SERIOUS INJURY can occur. DO NOT use this child restraint if it moves more than 2.5 cm (1 in.) forward or side-to-side at the seat belt path. Move the child restraint to another seating location, try to tighten the seat belt again, or use the lower anchors instead.
  • Page 26: Releasing The Carrier From The Base

    Placing the Carrier in the Base With the infant car seat installed, check that the base is still level with the ground. Front of Carrier UNDER Hook Push down and rotate the handle to the desired position until it locks into place. ALWAYS place the handle in Position 1...
  • Page 27: Checklist: Installation With Base

    Checklist: Installation with Base WARNING! DEATH or SERIOUS INJURY can occur. MUST Child’s head be at least 2.5 cm (1 in.) below the top of the carrier. 1. Secure the convenience base to the vehicle seat. Convenience base is securely installed with lower anchor connector assembly system (page 20) Convenience base is securely installed with vehicle seat belt (page 23).
  • Page 28: Proper Installation Without The Base

    Proper Installation WITHOUT the Base Child Requirements • Weight: 1.8 to 10 kg (4 to 22 lbs) • Height: 43 to 73 cm (17 to 29 in.) and top of child’s head is at least 2.5 cm (1 in.) below the top of the child restraint seat back.
  • Page 29: Installing The Carrier Without The Base Using Vehicle Seat Belts

    Installing the Carrier without the Base Using Vehicle Seat Belts WARNING! DEATH or SERIOUS INJURY can occur. MUST • This child restraint face the rear of the vehicle. • NEVER use this child restraint in the forward-facing position. • Check your vehicle owner’s manual to determine how to lock your seat belt for child restraint installation.
  • Page 30 Installing the Carrier without the Base Using Vehicle Seat Belts LAP BELT ONLY Route the vehicle seat belt through the belt guides on the carrier. LAP/SHOULDER BELT In vehicles with a lap and shoulder belt, route the LAP PORTION ONLY through the belt guides.
  • Page 31 Installing the Carrier without the Base Using Vehicle Seat Belts The seat belt must be as tight as possible. Push down on the bottom of the seat using your full weight as you tighten the vehicle belt. WARNING! DEATH or SERIOUS INJURY can occur.
  • Page 32: Installing The Carrier Without The Base Using Lower Anchor Connectors

    Installing the Carrier without the Base Using Vehicle Seat Belts Push down and rotate the handle to Position 1 or 3 when traveling in a vehicle (page 18). Installing the Carrier without the Base Using Lower Anchor Connectors* After securing the infant, place the restraint into your vehicle.
  • Page 33 Installing the Carrier without the Base Using Lower Anchor Connectors* Feed lower anchor connectors through belt guides, making sure the connector straps do not become twisted. Refer to your vehicle owner’s manual to locate the lower anchor bars on your vehicle seat, then attach the right hook to the right anchor bar and the left hook to...
  • Page 34 Installing the Carrier without the Base Using Lower Anchor Connectors* Make sure the lower anchor connector assembly is tight. Grab the Infant Carrier at the belt path as shown. If you can move the carrier more than 25 mm (1 in.) side-to-side or front to back, the installation is not tight enough.
  • Page 35: Checklist: Installation Without Base

    Checklist: Installation without Base WARNING! DEATH or SERIOUS INJURY can occur. MUST Child’s head be at least 2.5 cm (1 in.) below the top of the carrier. 1. Place the child in the carrier. The child’s back and bottom are flat against the back and bottom surfaces of the carrier.
  • Page 36: General Information

    General Information Securing the Child in the Carrier Place the baby in the carrier. Baby’s bottom and back should be flat against the seat. If there is a gap, baby will not be comfortable. Slide each harness strap over the child’s shoulders. MUST Harness straps start...
  • Page 37 Securing the Child in the Carrier Align the two sides of the chest clip at the child’s armpit level and snap them together. Tighten the harness straps by pulling on the adjuster strap at the child’s feet. The harness straps must be snug against the child.
  • Page 38: Removing The Child From The Carrier

    Removing the Child from the Carrier Press the red buckle release and remove the buckle tongues. Push the release button and pull the chest clip apart. To loosen the harness, push down on the harness adjustment lever and pull harness straps.
  • Page 39 Changing the Harness Position As your child grows, you will need to change the harness strap position so that the harness straps are routed through the slots closest to the child’s shoulders. The shoulder harness straps should always be as close as possible to, but never above, the child’s shoulders.
  • Page 40: Changing The Harness Position

    Changing the Harness Position Insert harness strap into new harness position slot. IMPORTANT: When inserting harness straps through the slots in the seat pad, make sure you route them correctly through their corresponding slots in the seat shell. Make sure the harness strap is installed completely on the splitter plate as shown, then repeat steps 2-5 for other side.
  • Page 41: Changing The Buckle Strap Position

    Changing the Buckle Strap Position As your child grows, you will need to change the buckle strap position so that it is in the slot closest to your child. The buckle strap should always be as close as possible to, but not under, the child’s bottom. There are four positions in which to use the buckle strap, based upon your child’s comfort.
  • Page 42 Changing the Buckle Strap Position Loosen the harness straps (p. 38) and move the strap out of the way. Remove the Buckle Strap anchor from its position on the bottom of the carrier, and push the anchor up through the slot to the top of the seat. Insert the Buckle Strap anchor into the slot that is the closest to the child, but not under the child’s bottom.
  • Page 43 Changing the Buckle Strap Position For Newborn Mode, place the anchor through the rear slot then feed it through the middle slot. Make sure the anchor is completely through the middle slot and is lying flat against the bottom of the seat.
  • Page 44: Changing The Waist Strap Position

    2.7 - 10 kg Outer Slot Large (6 - 22 lbs) NOTE: NurtureMax ships with both waist anchors in the outer slots. To reposition waist straps from outer to inner slots, loosen the harness straps by pressing the harness release button while pulling on the harness straps.
  • Page 45 Changing the Waist Strap Position Unhook the front of the child restraint’s seat pad and move it out of the way to expose the waist strap slots and anchors. Remove the waist strap anchor from the outer slot on bottom of the seat, and push the anchor up through the slot to the top of the seat.
  • Page 46: Using A Locking Clip

    Using a Locking Clip If your vehicle was built prior to model year 1996, and has a lap/shoulder belt that is equipped with an emergency Locking Clip locking retractor (ELR) AND installed properly. MUST sliding latch plate, you use a Locking Clip. Check your vehicle owner’s manual 13 mm to identify which vehicle belt...
  • Page 47 Using a Locking Clip While holding the belts and buckle tongue, thread the locking clip onto the seat belt, and slide it into place. Note: Locking clip must be placed within 13 mm (0.5 13 mm in.) of seat belt buckle. (0.5 in.) Buckle the seat belt with the locking clip in place.
  • Page 48: Using As An Infant Carrier

    Using as an Infant Carrier WARNING! DEATH or SERIOUS INJURY can occur. • Child Restraints should be used only for travel. Potential adverse health effects from excessive use of infant child restraints have been documented. You should limit the time spent each day in a child NEVER restraint as much as possible.
  • Page 49: Installing The Canopy

    Using as an Infant Carrier WARNING! DEATH or SERIOUS INJURY can occur. DO NOT carry on your hip. CARRY AT YOUR SIDE, using the handle as shown. IMPORTANT: Make sure that the handle is firmly locked on both sides and that the harness is securely buckled before lifting the infant carrier.
  • Page 50: Removing The Seat Cover

    Removing the Seat Cover Disconnect Canopy from seat pad using hook and loop connector at rear of infant car seat. At rear of seat, unhook three hook connectors from seat shell. Pull the two fabric slots from tabs near the handle. Repeat on other side of infant car seat.
  • Page 51 Removing the Seat Cover At bottom of seat, unhook harness straps from the splitter plate. Pull harness strap, adjuster strap and buckle through fabric slots and remove seat cover as shown. Replacing the Seat Cover Pull harness strap, adjuster strap and buckle through fabric slots of seat cover.
  • Page 52: Replacing The Seat Cover

    Replacing the Seat Cover Reconnect the two elastic loops to the tabs at the front of the seat. Pull the two fabric slots onto the tabs near the handle. Repeat on other side of infant car seat. Reconnect the three hook connectors to the seat shell at rear of seat.
  • Page 53: Securing Your Child Restraint In Aircraft

    Securing Your Child Restraint in Aircraft The Federal Aviation Administration (FAA) recommends that you secure your child for air travel in an appropriate child restraint based on your child’s weight and size. Turbulence can happen with little or no warning. When turbulence occurs, the safest place for your child is in a properly installed child restraint, not in an adult’s lap or on the aircraft seat with its seat belt.
  • Page 54 Installing Child Restraint in Aircraft Route the aircraft seat belt through the belt slots on the carrier, as shown below. Fasten the aircraft seat belt.
  • Page 55 Installing Child Restraint in Aircraft The aircraft seat belt must be as tight as possible. Using your full weight, push the child restraint firmly onto the aircraft seat while pulling on the excess seat belt strap to tighten. Route the excess seat belt strap back through the belt slots, as shown above.
  • Page 56: Care And Cleaning

    Care and Cleaning • DO NOT lubricate or immerse in water the LATCH/ UAS connectors, the buckle, or any other part of this child restraint, unless rinsing is permitted, as stated on the back of the buckle for your restraint. •...
  • Page 57: Replacement Parts

    Lower Anchor Connector Assembly IMPORTANT If you decide to obtain an additional base for your NurtureMax child restraint, look for sku/part number “6401000.” #6401000 This sku/part number will appear on a label on the back of the base and will be sku/part number printed on the front of the carton.
  • Page 58: Proper Disposal Of This Child Restraint

    Proper Disposal of this Child Restraint When this child restraint reaches the expiration date found on the date of manufacture label, Evenflo encourages you to dispose of it properly. Most components of this child restraint are recyclable. 1. Remove all fabric and padding.
  • Page 59: Storing Your Instructions

    Storing Your Instructions After thoroughly reading and following these instructions, store them in the carrier behind the seat pad, as shown. For future reference, record the model number of your child restraint AND the date of manufacture below. Model Number: Date of Manufacture:...
  • Page 60: Limited Warranty

    Evenflo’s sole obligation under this express limited warranty shall be, at Evenflo’s option, to repair or replace any Product that is determined to be defective by Evenflo and determined to be covered by this warranty.

This manual is also suitable for:

First choice

Table of Contents