
Related Manuals for Thermo Scientific 2076 Series


Summary of Contents for Thermo Scientific 2076 Series
- Page 1 Precision High Performance Incubators - Double Door Series 2076 Operating Manual and Parts List LT2076X2 Rev. 0 _________________________________________________________________________________ Part of Thermo Fisher Scientific...
- Page 2 PR205075M (6878) 11.2 cu ft 120V Mechanical PR205070M (6875) 11.2 cu ft 240V Mechanical PR205070MCN (6876) 11.2 cu ft 240V Mechanical MANUAL NUMBER LT2076X2 (7006873) 6/3/10 Transfer to Marietta (was LT2076X2 4/8/09) ECR/ECN DATE DESCRIPTION Thermo Scientific High Performance Incubator...
- Page 3 Thermo Fisher Scientific makes no representations or warranties with respect to this manual. In no event shall Thermo be held liable for any damages, direct or incidental, arising out of or related to the use of this manual. ©2010 Thermo Scientific. All rights reserved. High Performance Incubator Thermo Scientific...
- Page 4 Always use the proper protective equipment (clothing, gloves, goggles, etc.) 4 Always dissipate extreme cold or heat and wear protective clothing. 4 Always follow good hygiene practices. 4 Each individual is responsible for his or her own safety. Thermo Scientific High Performance Incubator...
- Page 5 We can also provide you with a quotation on our Extended Warranty for your Thermo Scientific products. Whatever Thermo Scientific products you need or use, we will be happy to discuss your applications. If you are experiencing technical problems, working together, we will help you locate the problem and, chances are, correct it yourself...over the telephone without a service...
-
Page 6: Table Of Contents
Troubleshooting ..........6-1 Thermo Scientific... - Page 7 Ordering Procedures ........9-2 High Performance Incubator Thermo Scientific...
-
Page 8: Description
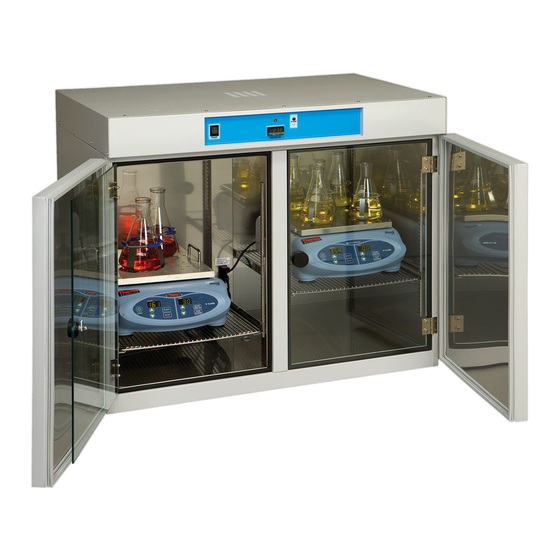
Description Section 1 Thermo Scientific High Performance Incubators are useful in all types of general incubating and paraffin imbedding. Cabinets are made of heavy-gauge steel with a powder-coated finish for optimum appearance and easy cleaning, while the interior walls are stainless steel to spread warmwall radiant heat evenly throughout the chamber. -
Page 10: Safety Information
Safety Information Section 2 Your Thermo Scientific High Performance Incubator has been designed with function, reliability, and safety in mind. It is your responsibility to install it in conformance with local electrical codes. It is most important that the user follow installation instructions exactly as written. Failure to do so is likely to lead to improper operation, erroneous calibrations and possible damage to the equipment. -
Page 12: Specifications
Operating: 15°C to 40°C; 20% to 80% RH, non-condensing. Installation category II (overvoltage) in accordance with IEC 664. Pollution degree 2 in accordance with IEC 664. Altitude Limit: 2,000 meters. Storage: -25°C to 65°C, 10% to 85% relative humidity Thermo Scientific High Performance Incubator... -
Page 14: Unpacking And Installation
2. Push down on the bracket to ensure proper seating. 3. Repeat this procedure for the opposing bracket making sure it is on the same level as the first bracket (count the slots). 4. Install remaining shelf brackets, then slide shelves into place. Thermo Scientific High Performance Incubator... -
Page 16: Operation
5. OVER-TEMPERATURE THERMOSTAT: This hydraulic thermostat is set by the operator to back up the control thermostat and safeguard the incubator. Thermo Scientific High Performance Incubator... -
Page 17: Temperature Controller
2. HEAT ON INDICATOR: The heat ON indicator lamp is lit when the chamber heater is receiving power. The lamp will normally flash when the chamber temperature is at set point. High Performance Incubator Thermo Scientific... -
Page 18: Autotune
3. The controller display should now be alternating between ‘tunE’ and ‘oFF’. 4. Press and hold the “STAR” (*) key. Press and release the up arrow key until ‘At.SP’ is displayed. Release the “STAR” () key. Thermo Scientific High Performance Incubator... -
Page 19: Temperature Calibration
8. Allow the unit to run for at least 30 minutes. 9. Re-check the thermometer reading, the controller display and the thermometer should agree to within ±0.5°C. If not repeat steps 4, 5 and 6 above. High Performance Incubator Thermo Scientific... -
Page 20: Troubleshooting
Press in the circuit breakers (located on the back panel) to reset. If the circuit breaker pops repeatedly, check the equipment that is connected to the convenience outlet; check wiring from circuit breaker to the convenience outlet. Thermo Scientific High Performance Incubator... -
Page 22: Maintenance
Warning Electrolysis can damage stainless steel. This occurs when an Stainless Steel object is allowed to rest directly on the surface of stainless steel, trapping moisture that becomes oxygen-starved, but is surrounded by water containing oxygen. Thermo Scientific High Performance Incubator... -
Page 23: The Ph Factor
If pH is >10.0, add sodium bisulfate to decrease pH to a 7 to 9 value. Avoid adding harsh alkalines or acids since these may cause localized corrosion and result in unstable pH. High Performance Incubator Thermo Scientific... -
Page 24: Special Considerations
Do not use any metallic pads. Instead, for stubborn stains, use a plastic light-duty cleansing pad and rub gently in the direction of the metal grain. If stains continue to persist, use one of the following chemicals and methods. Thermo Scientific High Performance Incubator... -
Page 25: Cleaning Methods
Note This information is intended as guidelines only and we make no claim as to the suitability to any particular situation. Consult your staff chemist to determine what would be best for your stainless steel product and laboratory. High Performance Incubator Thermo Scientific... -
Page 26: Servicing Guide
3. Reverse procedure to install new lamp. 4. Press replacement switch in from the front of the panel and then reconnect the leads as noted. Switch is to be oriented so that the green lamp is toward the top. Thermo Scientific High Performance Incubator... -
Page 27: Replacing Temp Controller
Carefully slide new controller into controller housing. b) Press controller bezel into controller housing until bezel tabs securely lock controller into place. 5. Plug incubator into outlet power supply. 6. Place ON/OFF switch in ON position. High Performance Incubator Thermo Scientific... -
Page 28: Replacement Parts
Configured Temperature Controller CN71X134 RTD Temp. Sensor 410-632-00 Circuit Breaker 5 Amps 330-118-00 Circuit Breaker 10 Amps 330-119-00 Circuit Breaker 3 Amps 330-125-00 Wiring Diagrams Models PR205075G, PR205075M LT2076X3 Models PR205070G, PR205070M, LT2076X5 PR205070GCN, PR205070MCN Thermo Scientific High Performance Incubator... -
Page 29: Decontamination Statement
All parts listed herein may be ordered from the Thermo Scientific dealer from whom you purchased this unit or can be obtained promptly from the factory. - Page 30 Thermo Scientific 401 Millcreek Road Marietta, Ohio 45750 United States www.thermofisher.com...
Need help?
Do you have a question about the 2076 Series and is the answer not in the manual?
Questions and answers