Advertisement
Quick Links
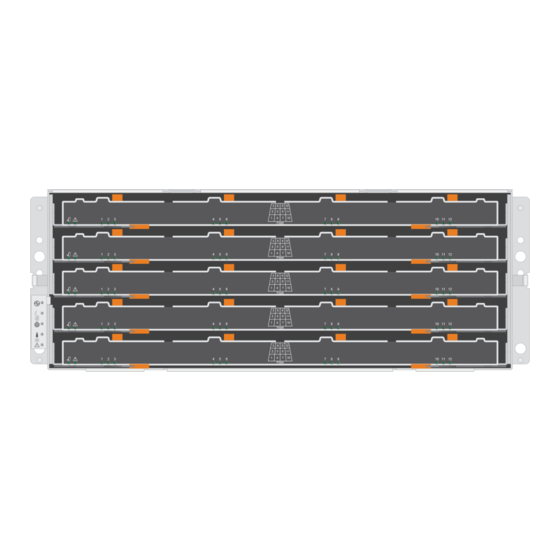
Replacing a Drive Drawer in a 60-Drive Tray
The steps to replace a failed drive drawer in an E-Series 60-drive tray depend on whether the volumes in the drawer are
protected by Drawer Loss Protection. If all volumes in the drive drawer are in volume groups or disk pools that have Drawer
Loss Protection, you can perform this procedure online. Otherwise, you must stop all host I/O activity and power off the tray
before replacing the drive drawer.
This procedure applies to the following controller-drive trays and expansion drive trays:
•
E2660 controller-drive tray
•
E2760 controller-drive tray
•
E5460 controller-drive tray
•
E5560 controller-drive tray
•
E5660 controller-drive tray
•
DE6600 drive tray
Each of these 60-drive trays has five drive drawers.
And each of the five drawers can hold up to 12 drives.
215-10780_B0
January 2017
Copyright
Web: www.netapp.com • Feedback: doccomments@netapp.com
©
2017 NetApp, Inc. All rights reserved.
E-Series
1
Advertisement

Related Manuals for NetApp E2760


Summary of Contents for NetApp E2760
- Page 1 DE6600 drive tray Each of these 60-drive trays has five drive drawers. And each of the five drawers can hold up to 12 drives. © 215-10780_B0 January 2017 Copyright 2017 NetApp, Inc. All rights reserved. Web: www.netapp.com • Feedback: doccomments@netapp.com...
- Page 2 Before you begin You need these items for this procedure: • Antistatic protection Possible hardware damage – To prevent electrostatic discharge damage to the drive tray, use proper antistatic Attention: protection when handling drive tray components. • Replacement drive drawer •...
- Page 3 About this task When you issue the CLI command, all drives in the affected drive Set Drawer Service Action Allowed Indicator drawer are checked to ensure they belong to volume groups or disk pools that have Drawer Loss Protection, as follows: •...
- Page 4 4. Ensure that no I/O operations are occurring between the storage array and all connected hosts. For example, you can perform these steps: • Stop all processes that involve the LUNs mapped from the storage to the hosts. • Ensure that no applications are writing data to any LUNs mapped from the storage to the hosts. •...
- Page 5 ◦ Flashlight ◦ Orange cable chain removal tool, which is included with the replacement drawer The cable chain removal tool makes it easier to reach into the enclosure and easier to unplug the cable chain Note: connectors. If you do not have the tool, you can use your fingers to unplug the connectors. About this task Each drive drawer has left and right cable chains.
- Page 6 Possible equipment damage due to overheating – If the tray is powered on, do not remove both fans at Attention: the same time. Otherwise, the equipment might overheat. 3. Determine which drive drawer you need to replace, as follows: • If the power is on, the blue Service Action Allowed LED indicates the cable chain you need to disconnect.
- Page 7 b. Insert the hooked end of the cable chain removal tool into the orange ring. The hook should point in, toward the bracket. If you do not have a cable chain removal tool, insert your finger into the orange ring. c.
- Page 8 b. Insert the hooked end of the cable chain removal tool into the orange ring. The hook should point down. If you do not have a cable chain removal tool, insert your finger into the orange ring. c. Pull the tool (or your finger) toward you to unplug the cable chain. 6.
- Page 9 Removing a drive drawer After removing the right and left cable chains, you can remove the drive drawer from the drive tray. Removing a drive drawer entails sliding the drawer part of the way out, recording the locations of the drives, removing the drives, and removing the drive drawer.
- Page 10 c. Place the drive on a flat, static-free surface and away from magnetic devices. Attention: Possible loss of data access – Magnetic fields can destroy all data on the drive and cause irreparable damage to the drive circuitry. To avoid loss of data access and damage to the drives, always keep drives away from magnetic devices.
- Page 11 Installing a drive drawer Installing a drive drawer into a drive tray entails sliding the drawer into the empty slot, installing the drives, and replacing the front bezel. Before you begin • You know where to install each drive. • You have obtained the following items: ◦...
- Page 12 4. Carefully push the drive drawer all the way in until the latch fully engages. Risk of equipment damage — Stop pushing the drive drawer if you feel excessive resistance or binding. Use Attention: the release levers at the front of the drawer to slide the drawer back out. Then, reinsert the drawer into the slot, and ensure that it slides in and out freely.
- Page 13 6. Slide the drawer back into the drive tray by pushing it from the center and closing both levers. Risk of equipment malfunction – Make sure to completely close the drive drawer by pushing both levers. Attention: You must completely close the drive drawer to allow proper airflow and prevent overheating. 7.
- Page 14 a. Locate the horizontal and vertical connectors on the left cable chain and the corresponding horizontal and vertical brackets inside the enclosure. b. Align both cable chain connectors with their corresponding brackets. c. Slide the cable chain's horizontal connector under the guide rail on the horizontal bracket, and push it in as far as it can Attention: Risk of equipment malfunction —...
-
Page 15: Copyright Information
Software derived from copyrighted NetApp material is subject to the following license and disclaimer: THIS SOFTWARE IS PROVIDED BY NETAPP "AS IS" AND WITHOUT ANY EXPRESS OR IMPLIED WARRANTIES, INCLUDING, BUT NOT LIMITED TO, THE IMPLIED WARRANTIES OF MERCHANTABILITY AND FITNESS FOR A PARTICULAR PURPOSE, WHICH ARE HEREBY DISCLAIMED. -
Page 16: Trademark Information
NetApp reserves the right to change any products described herein at any time, and without notice. NetApp assumes no responsibility or liability arising from the use of products described herein, except as expressly agreed to in writing by NetApp. The use or purchase of this product does not convey a license under any patent rights, trademark rights, or any other intellectual property rights of NetApp.
Need help?
Do you have a question about the E2760 and is the answer not in the manual?
Questions and answers