
Related Manuals for Tuxedo JMC9KAC-TUX


Summary of Contents for Tuxedo JMC9KAC-TUX
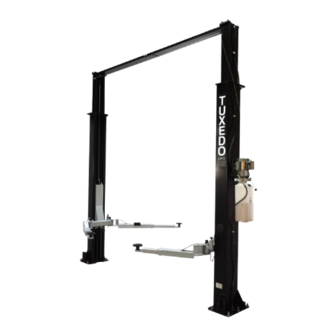
- Page 1 TP9KAC-TUX Two-Post Clear Floor Lift (Asymmetric) 9,000 lbs. Capacity (2,250 lbs. Max per Arm) INSTALLATION & OPERATION MANUAL Mar 2019...
-
Page 2: Important Notes
IMPORTANT NOTES READ THE INSTALLATION AND OPERATION MANUAL IN ITS ENTIRETY BEFORE ATTEMPTING TO INSTALL THE LIFT. · Do not install this lift on any surface other than concrete, conforming to minimum specifications. · Do not install this lift over expansion joints or cracks. Check with building architect. ·... -
Page 3: General Information
PREPARATION The installation of this lift is relatively simple and can be accomplished by 2 men in a few hours. The following tools and equipment are needed: · 12 quarts of Non-Detergent / Non-Foaming Hydraulic Oil - SAE-10, AW 32 or equivalent ·... - Page 4 4 TP9KAC-TUX Mar 2019...
-
Page 5: Installation Instructions
INSTALLATION INSTRUCTIONS STEP 1: (Selecting Site) Before installing your new lift, check the following: 1. LIFT LOCATION: Always use architects plans when available. Check layout dimension against floor plan requirements making sure that adequate space is available (Figs. 2, 3 & 4). Fig. - Page 6 Fig. 3 (Swing Arm & Column Layout) (134-5/8”) Fig. 4 (Column / Floor Layout) 2. OVERHEAD OBSTRUCTIONS: The area where the lift is located should be free of overhead obstructions such as heaters, building supports, electrical lines, etc. (Fig 2.) 6...
- Page 7 3. DEFECTIVE CONCRETE: Visually inspect the site where the lifts will be installed and check for cracked or defective concrete. (Details on Page 4) 4. FLOOR REQUIREMENTS: The lift should be installed on a 3000 PSI concrete with minimum of 4-1/4” thickness.
- Page 8 STEP 4: (Installing MAIN COLUMN w/ Power Unit Bracket) 1. Before proceeding, double check measurements and make certain that the bases of each column are square and aligned with the chalk line. 2. Assemble the uprights to the columns. Raise the columns to a vertical position. (See Fig. 6) Fig.
- Page 9 1. Raise OFFSIDE column and position at the designated chalk locations, ensuring the Column ‘upright’ Extension is pre-installed to the top of the OFFSIDE column. 2. Using bolts provided, construct the 2 piece Overhead Beam into a one (Fig. 8). 3.
- Page 10 STEP 7: (Installing / Routing EQUALIZER CABLES) 1. Raise and lock each carriage on the first safety latch engagement, approximately 30” high. 2. Make sure that the safety locks on each column are fully engaged before attempting to route equalizer cables. 3.
-
Page 11: Safety Notice
STEP 9: (Installing Swing Arms & Arm Restraints) 1. Install the swing arms on the carriages using the included 1-1/2” swing arm pins. Note: (Asymmetric Lifts – the short, asymmetric swing arms are designed for front vehicle placement, with the long, asymmetric arms for rear vehicle placement. - Page 12 STEP 10: (Electrical Connection to POWER UNIT & OVERHEAD LIMIT SWITCH) 1. Have a certified electrician make the electrical connection to the power unit. Use a separate circuit for each power unit, as shown below in (Fig. 14). Fig. 14 IMPORTANT! The wiring must comply with local code.
- Page 13 STEP 11: (Checking Operation) See next page for detailed Operation Instructions: Safety Latch 1. Do not place any vehicle on the lift at this time. Cycle the lift up ‘Cable Pull’ Release and down several times to ensure carriage latches click together and all air is removed from the hydraulic system.
- Page 14 OPERATION INSTRUCTIONS RAISE LIFT 1. Read operating and safety manuals before using lift. 2. Always lift a vehicle according to the manufacturers recommended lifting points 3. Position vehicle between columns, as equally as possible. 4. Adjust swing arms so that the vehicle is positioned with the center of gravity midway between pads. 5.
-
Page 15: Safety Procedures
SAFETY PROCEDURES · Never allow unauthorized persons to operate lift. Thoroughly train new employees in the operation and care of the lift. · Caution: the power unit operates at high pressure. · Remove passengers before raising vehicle. · Prohibit unauthorized persons from being in shop area while lift is in use. ·... -
Page 16: Responsibility Of The User
WARNING!! OSHA AND ANSI REQUIRE USERS TO INSPECT LIFTING EQUIPMENT AT THE START OF EVERY SHIFT. THESE AND OTHER PERIODIC INSPECTIONS ARE THE RESPONSIBILITY OF THE USER. DAILY PRE-OPERATION CHECK (8 HOURS) The user should perform Daily check. Daily check of the safety latch system is very important to prevent expensive property damage, lost production time, serious personal injury and even death. - Page 17 Only trained maintenance experts should perform lift service for the following items. · Replace hydraulic hoses · Replace chains and rollers. · Replace cables and sheaves. · Replace or rebuild air and hydraulic cylinders as required. · Replace or rebuild pumps / motors as required. ·...
-
Page 18: Troubleshooting
TROUBLE SHOOTING Motor does not run: Breaker or fuse blown Faulty wiring connections. Call electrician. Defective up button. Call electrician for checking. Defective Capacitor. Call electrician for checking. Motor runs but will not raise: A. Oil level too low. Oil level should be just under the vent cap port when the lift is down!!! B. -
Page 19: Power Unit Priming
POWER UNIT PRIMING WARNING!! Failure to properly relieve pressure in the following steps can cause injury to personnel. 19 TP9KAC-TUX Mar 2019... -
Page 20: Exploded View
EXPLODED VIEW #1 20 TP9KAC-TUX Mar 2019... - Page 21 EXPLODED VIEW #2 21 TP9KAC-TUX Mar 2019...
-
Page 22: Parts List
PARTS LIST ITEM Tux P/N M-Ref P/N DESCRIPTION TP9KAC-TUX-001A TPF4-100-00 (A) Mainside Column TP9KAC-TUX-001B TPF4-100-00 (B) Offside Column TP9KAC-TUX-002 TPF4-100-10-05 Cable Pulley, Column TP9KAC-TUX-003 GB894.1-86 Circlips TP9KAC-TUX-004 TPF4-100-12 Plastic Cover, Column TP9KAC-TUX-006 GB5781-86 Bolt TP9KAC-TUX-007 GB6170-86 TP9KAC-TUX-008 GB97.2-85 Flat Washer TP9KAC-TUX-009 GB93-87 Spring Washer... - Page 23 TP9KAC-TUX-040 TPF4-400-06-00 Swing Arm Pin TP9KAC-TUX-041 GB819-85 Screw TP9KAC-TUX-042 TPF4-400-04-00 Saddle Pad Weldment TP9KAC-TUX-043A TPF4-400-05K-00M (A) Front / Short Asy. Arm-PS TP9KAC-TUX-043B TPF4-400-05K-00M (B) Front / Short Asy. Arm-DS TP9KAC-TUX-044 GB5781-86 Hex Bolt TP9KAC-TUX-045 GB6170-86 TP9KAC-TUX-046 GB97.2-85 Flat Washer TP9KAC-TUX-047 GB93-87 Spring Washer TP9KAC-TUX-048...
-
Page 24: Limited Warranty
There is no other express warranty on the Tuxedo lifts and this warranty is exclusive of and in lieu of all other warranties, expressed or implied, including all warranties of merchantability and fitness for a particular purpose. To the fullest extent allowed by law, Tuxedo shall not be liable for loss of use, cost of cover, lost profits, inconvenience, lost time, commercial loss or other incidental or consequential damages.
Need help?
Do you have a question about the JMC9KAC-TUX and is the answer not in the manual?
Questions and answers