
Related Manuals for Tuxedo TP9KACX


Summary of Contents for Tuxedo TP9KACX
- Page 1 TP9KACX / TP9KSCX Two-Post Clear Floor Lifts (Asymmetric / Symmetric) 9,000 lbs. Capacity (2,250 lbs. Max per Arm) INSTALLATION & OPERATION MANUAL Jun 2017...
-
Page 2: Important Notes
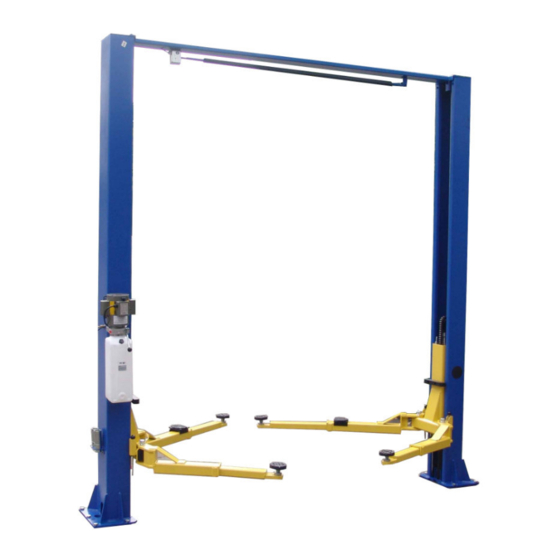
Surface Mounted, Two-Post, Clear-Floor Lift w/ Overhead Beam, Hydraulic ‘chain-over’ Drive, 9,000 lbs. Capacity. The name / model numbers are designated below: • Model number TP9KACX - Asymmetric Swing Arms configuration • Model number TP9KSCX - Symmetric Swing Arms configuration BASIC SPECIFICATIONS... -
Page 3: General Information
Every column comes with its cylinder, carriage, cables & chains, lifting arms, swivel pads, height extensions, hoses and overhead beam with the hardware box located in one of the columns. • The electric-hydraulic motor pump is packaged separately and banded to top of lift. Fig. 1 TP9KACX / TP9KSCX 3 Jan 2017... - Page 4 TP9KACX / TP9KSCX 4 Jan 2017...
-
Page 5: Installation Instructions
LIFT LOCATION: Always use architects plans when available. Check layout dimension against floor plan requirements making sure that adequate space is available (Fig. 2, 2a, 2b & Fig. 3). Fig. 2 (TP9KACX & TP9KSCX) TP9KACX / TP9KSCX 5 Jan 2017... - Page 6 Fig. 2a (TP9KACX - Asymmetric Lift) Fig. 2b (TP9KSCX - Symmetric Lift) TP9KACX / TP9KSCX 6 Jan 2017...
- Page 7 Take out the lifting arms, swivel pads, height extensions, hardware box, hoses, covers, etc., from the column. Check the quantity of each item with the parts list. If anything is missing, please contact your dealer at once. TP9KACX / TP9KSCX 7 Jan 2017...
- Page 8 With the shims and anchor bolts in place, tighten by securing the nut to the base then turning 2-3 full turns clockwise. Ensure anchor bolts are tightened to a minimum of 130 ft-lbs. of torque. DO NOT use an impact wrench for this procedure. Fig. 5 TP9KACX / TP9KSCX 8 Jan 2017...
- Page 9 4. Use a tape measure to measure the diagonal distance between the opposite corners of the base plates on the columns. Equal values will ensure the lifting arms will be in square. 5. Secure OFFSIDE column to the floor following the same procedures as outlined in STEP 4. TP9KACX / TP9KSCX 9 Jan 2017...
- Page 10 Screw the nut on the cable stud so that half thread pass through the nut. Pull the other end of the cable and screw the nut on it also. Then tighten both nuts. Fig. 8 Fig. 9 (Cable Route Diagram) TP9KACX / TP9KSCX 10 Jan 2017...
- Page 11 1. Install the swing arms on the carriages using the included 1-1/2” swing arm pins. Note: (Asymmetric Lifts – the short, asymmetric swing arms are designed for front vehicle placement, with the long, asymmetric arms for rear vehicle placement. TP9KACX / TP9KSCX 11 Jan 2017...
-
Page 12: Safety Notice
2. Install arm restraint mechanisms to each swing arm, as shown below in (Fig. 13). 3. Check for proper engagement for the arm restraints as the gear rack should fully engage the gear on the arm. SAFETY NOTICE! Fig. 13 TP9KACX / TP9KSCX 12 Jan 2017... - Page 13 2. Have a certified electrician make the electrical connection for the K2 overhead limit switch to power unit’s switch box, as shown in (Fig. 14b). Fig. 14b 3. Route limit switch cable thru Overhead Beam & Main Column, as shown below in (Figs. 15-17). Fig. 15 Fig. 16 Fig. 17 TP9KACX / TP9KSCX 13 Jan 2017...
- Page 14 3. If latches click out of sync, tighten the equalization cable on the one that clicks first. Fig. 18 THE LIFT IS NOW READY FOR USE. IMPORTANT! Read Safety & Operating Information on following pages before using lift. TP9KACX / TP9KSCX 14 Jan 2017...
- Page 15 5. Before removing vehicle from lift area, position lift arms and supports to provide an unobstructed exit. WARNING: NEVER DRIVE OVER LIFT’S ARMS. Note: It is normal for an empty lift to lower slowly, it may be necessary to add weight. TP9KACX / TP9KSCX 15 Jan 2017...
-
Page 16: Safety Procedures
The following periodic maintenance is the suggested minimum requirements and minimum intervals; accumulated hours or monthly period, whichever comes sooner. If you hear a noise or see any indication of impending failure - cease operation immediately – inspect, correct and / or replace parts as required. TP9KACX / TP9KSCX 16 Jan 2017... -
Page 17: Responsibility Of The User
Change the hydraulic fluid. Good maintenance procedure makes it mandatory to keep hydraulic fluid clean. No hard fast rules can be established; operating temperature, type of service, contamination levels, filtration, and chemical composition of fluid should be considered. If operating in a dusty environment, shorter interval may be required. TP9KACX / TP9KSCX 17 Jan 2017... - Page 18 / or capped until just prior to use. Air hoses can be used to clean fittings and other components. However, the air supply must be filtered and dry to prevent contamination. Contamination is the most frequent cause of malfunction or hydraulic equipment. TP9KACX / TP9KSCX 18 Jan 2017...
-
Page 19: Troubleshooting
Cylinder pulley assembly or cable pulley assembly is not moving freely. Check and grease it. May have excessive wear on pins or cylinder yoke. Check and replace them. Seals are dry in hydraulic cylinder(s). TP9KACX / TP9KSCX 19 Jan 2017... -
Page 20: Power Unit Priming
POWER UNIT PRIMING WARNING!! Failure to properly relieve pressure in the following steps can cause injury to personnel. TP9KACX / TP9KSCX 20 Jan 2017... -
Page 21: Exploded View
EXPLODED VIEW #1 TP9KACX / TP9KSCX 21 Jan 2017... - Page 22 EXPLODED VIEW #2 TP9KACX / TP9KSCX 22 Jan 2017...
-
Page 23: Parts List
Split Pin D2.5x14 TP9KACX-034 TPF4A-200-11-01 Rod, Arm Restraint Q235-A TP9KACX-035 TPF4-300-00 Lock Latch TP9KACX-036 GB95-1985 D20 Flat Washer D20 TP9KACX-037 GB818-2000 M6×30 Screw M6x30 TP9KACX-038 TPF4-300-09 Spring 65Mn TP9KACX-039 TPF4-100-12 Plastic Cover, Column PVC 0.007 TP9KACX / TP9KSCX 23 Jan 2017... - Page 24 MS, Short, Hyd. Hose 14.1” L=360 TP9KACX-071 TT-6934-500-04KY Pump Hyd. Fitting TP9KACX-072 O-RING O-Ring D14 TP9KACX-073 GB/6170-2000 M8 Nut M8 TP9KACX-074 GB_93-87 D8 Lock Washer D8 TP9KACX-075 GB95-1985 D8 Flat Washer D8 TP9KACX-076 GB_5781-2000 M8X25 Bolt M8x25 TP9KACX / TP9KSCX 24 Jan 2017...
- Page 25 COMBINED WASHER Combined Washer TP9KACX-083 JB/ZQ4770 Cap Nut M14 M14*1.5,45 TP9KACX-084 TPF4-CYLINDER-NEW Cylinder TP9KACX-085 TPF4-100-14-02 TP9KACX-086 TPF4-100-14-01 Chain Roller TP9KACX-087 DU-SF 2520 Bushing 2520 TP9KACX-088 GB894.1-86 D25 Spring Washer D25 TP9KACX-089 CHAIN LH1244 121NODE Chain TP9KACX / TP9KSCX 25 Jan 2017...
- Page 26 TP9KACX / TP9KSCX 26 Jan 2017...
Need help?
Do you have a question about the TP9KACX and is the answer not in the manual?
Questions and answers